Introduction
Wget is a networking command-line tool that lets you download files and interact with REST APIs. It supports the HTTP,HTTPS, FTP, and FTPS internet protocols. Wget can deal with unstable and slow network connections. In the event of a download failure, Wget keeps trying until the entire file has been retrieved. Wget also lets you resume a file download that was interrupted without starting from scratch.
You can also use Wget to interact with REST APIs without having to install any additional external programs. You can make GET, POST, PUT, and DELETE HTTP requests with single and multiple headers right in the terminal.
If you’re building up your shell skills, browse the Linux Commands hub for foundational tips you can reuse with Wget.
This tutorial is designed for developers, sysadmins, and beginners who need a reliable way to download files or interact with APIs from the Linux command line. Readers are typically searching for:
- Practical commands to quickly download single or multiple files.
- How to resume, throttle, or run downloads in the background without restarting.
- Simple REST API usage with Wget instead of installing extra tools like curl.
- Automation examples that integrate with cloud services such as the DigitalOcean API.
In this tutorial, you will use Wget to download files, interact with REST API endpoints, and create and manage a Droplet in your DigitalOcean account.
You can use your local system or a remote server to open a terminal and run the commands there. If you need a quick refresher on common shell utilities, review basic Linux commands and shell usage guides.
Key Takeaways
- Wget supports multiple protocols (HTTP, HTTPS, FTP) and handles unreliable networks.
- You can resume, throttle, and run downloads in the background with simple flags.
- Wget can make REST API calls (
GET, POST, PUT, DELETE) directly from the terminal.
- With headers and tokens, Wget can interact with cloud APIs like DigitalOcean’s.
- Beginners can use Wget immediately, while advanced users can script and automate it.
To complete this tutorial, you will need:
-
Wget installed. Most Linux distributions have Wget installed by default. To check, type wget in your terminal and press ENTER. If it is not installed, it will display: command not found. You can install it by running the following command: sudo apt-get install wget. New to the terminal? The Linux Commands hub covers the basics you’ll use throughout this guide.
-
A DigitalOcean account. If you do not have one, sign up for a new account.
-
A DigitalOcean Personal Access Token, which you can create via the DigitalOcean control panel. Instructions to do that can be found here: How to Generate a Personal Access Token.
Wget offers a wide range of command-line options to customize downloads and API interactions. Here’s a more in-depth look at the most commonly used flags, what they do, and how you might use them in real-world scenarios: For the complete set of options and behaviors, see the GNU Wget manual.
| Flag |
Purpose |
Example |
Details |
-P DIR |
Save files to a specific directory |
wget -P Downloads/ URL |
Downloads the file into the specified directory (Downloads/ in this example). If the directory does not exist, Wget will attempt to create it. Useful for organizing downloads. |
-q |
Quiet mode (no output) |
wget -q URL |
Suppresses all output except for errors. Ideal for scripts or cron jobs where you don’t want verbose output cluttering logs. |
--show-progress |
Show only progress bar |
wget -q --show-progress URL |
When combined with -q, this flag displays only the progress bar, hiding other output. This is helpful for monitoring download progress without extra information. |
-c |
Resume an interrupted download |
wget -c URL |
Continues downloading a partially downloaded file, picking up where it left off. Essential for large files or unreliable connections. |
--limit-rate=RATE |
Limit download speed |
wget --limit-rate=200k URL |
Restricts the download speed to the specified rate (e.g., 200k for 200 kilobytes per second). Useful for preventing Wget from saturating your bandwidth. Supports units like k (kilobytes), m (megabytes), etc. |
-O FILE |
Save as a specific filename |
wget -O file.txt URL |
Saves the downloaded content to a file with the specified name (file.txt), regardless of the original filename on the server. Useful for scripting or when the server’s filename is not descriptive. |
-i FILE |
Download URLs from a file |
wget -i list.txt |
Reads a list of URLs from the specified file (list.txt) and downloads each one. Great for batch downloads or automating the retrieval of multiple files. |
-b |
Run download in background |
wget -b URL |
Starts the download as a background process, allowing you to continue using the terminal. Output is written to a file named wget-log by default. |
--tries=N |
Retry download N times |
wget --tries=3 URL |
Sets the number of times Wget will retry a failed download before giving up. Useful for unstable connections or unreliable servers. |
-T SECONDS |
Set timeout for server response |
wget -T 5 URL |
Specifies the maximum time (in seconds) Wget will wait for a server response before timing out. Helps avoid hanging indefinitely on slow or unresponsive servers. |
--header=STRING |
Add HTTP request header |
wget --header="Authorization: Bearer TOKEN" URL |
Adds a custom HTTP header to the request. Essential for API authentication (such as bearer tokens) or for sending custom headers required by some web services. Can be used multiple times for multiple headers. |
--method=METHOD |
Specify HTTP method (POST, PUT, DELETE) |
wget --method=post URL |
Overrides the default GET method. Allows you to send POST, PUT, DELETE, or other HTTP methods, making Wget suitable for interacting with REST APIs. Often used with --body-data or --header. |
When working with Wget in real-world scenarios, you may encounter a variety of issues ranging from download failures to authentication errors. This expanded troubleshooting section will help you quickly identify, understand, and resolve the most frequent problems users face when using Wget.
- Scan the table below for your symptom or error message.
- Review the likely cause to understand why it happens.
- Apply the suggested fix or command to resolve the issue.
- For persistent or unusual problems, consult the GNU Wget manual or search for your error message online.
Below is a matrix of typical Wget issues, their probable causes, and actionable solutions. Use this as a quick reference when your downloads or API calls aren’t working as expected.
- File naming issues: Why does Wget save files as
name.ext.1, name.ext.2, etc.?
- Download interruptions: What to do if your download restarts from 0% or fails partway through?
- Slow or unstable transfers: How to improve reliability and speed?
- Authentication and permissions: How to resolve
401 Unauthorized or 403 Forbidden errors?
- SSL and certificate errors: What to do if you see SSL or certificate verification failures?
- Partial or unexpected content: Why did you get HTML instead of your file, or see API JSON mixed with logs?
- General connectivity issues: How to handle timeouts, stuck connections, or missing commands?
Each row in the table that follows addresses a specific symptom, explains the root cause, and provides a ready-to-use command or tactic to resolve it.
Tip: You can combine multiple Wget flags to address several issues at once. For example, to download a file in the background, save it to a specific directory, and limit the download speed, you might use:
wget -b -P Downloads/ --limit-rate=200k URL
If you continue to experience problems after trying these solutions, consider updating Wget to the latest version, checking your network connection, or consulting your system administrator for environment-specific issues.
| Symptom |
Likely Cause |
Fix (Exact Command / Tactic) |
File saved as name.ext.1, .2, … |
Same filename already exists in target directory |
Overwrite explicitly: wget -O name.ext URL or choose a directory: wget -P Downloads/ URL |
| Download restarts from 0% |
Missing resume flag or server doesn’t support ranges |
Resume with: wget -c URL. If server lacks range support, fallback to full re-download or use curl -C - -o name.ext URL. |
| Very slow / unstable transfer |
Bandwidth contention, server throttling, flaky link |
Throttle predictably: wget --limit-rate=200k URL; increase robustness: wget --tries=10 -T 10 -c URL. Consider scheduling off‑peak. |
| “command not found” |
wget not installed |
sudo apt-get install -y wget (Debian/Ubuntu) or sudo yum install -y wget (RHEL/CentOS). |
403/404 errors |
Auth header missing, expired URL, or path typo |
Add headers: wget --header="Authorization: Bearer $TOKEN" URL; validate URL; check API scope. |
401 Unauthorized on API |
Wrong token, missing scope, or wrong header key |
Ensure Authorization: Bearer $DO_TOKEN; re-issue token with required scopes; verify org/project in API path. |
SSL connect error or certificate verify failed |
Missing CA chain, system clock skew, proxy interception |
Sync time: sudo timedatectl set-ntp true; update CAs: sudo update-ca-certificates; if corporate proxy, import proxy CA and use --ca-certificate=/path/ca.crt. |
| Stuck waiting for response |
Server slow or hanging connection |
Set a timeout: wget -T 5 URL and retries: wget --tries=5 URL. |
| Partial HTML saved instead of file |
Redirect or auth wall |
Follow redirects automatically (default) or inspect with -S --spider URL; add required headers/cookies. |
| API JSON prints alongside progress logs |
Not using quiet output to stdout |
wget -qO- URL or wget -q -O - URL to print only the API payload. |
Performance Tips: Prefer -q --show-progress for clean logs, add --tries and -T for resilience, and use -c for large assets. For CI, pin versions and capture wget --version in logs.
Tip: You can combine multiple flags to tailor Wget’s behavior to your needs. For example, to download a file in the background, save it to a specific directory, and limit the download speed, you could use:
In this section, you will use Wget to customize your download experience. For example, you will learn to download a single file and multiple files, handle file downloads in unstable network conditions, and, in the case of a download interruption, resume a download. If you’re evaluating curl for similar tasks, see the companion guide, Workflow: Downloading Files with curl.
First, create a directory to save the files that you will download throughout this tutorial:
- mkdir -p DigitalOcean-Wget-Tutorial/Downloads
With the command above, you have created a directory named DigitalOcean-Wget-Tutorial, and inside of it, you created a subdirectory named Downloads. This directory and its subdirectory will be where you will store the files you download.
Navigate to the DigitalOcean-Wget-Tutorial directory:
- cd DigitalOcean-Wget-Tutorial
You have successfully created the directory where you will store the files you download.
In order to download a file using Wget, type wget followed by the URL of the file that you wish to download. Wget will download the file in the given URL and save it in the current directory.
Let’s download a minified version of jQuery using the following command:
wget https://code.jquery.com/jquery-3.6.0.min.js
Don’t worry if you don’t know what jQuery is – you could have downloaded any file available on the internet. All you need to know is that you successfully used Wget to download a file from the internet.
The output will look similar to this:
Output
--2021-07-21 16:25:11-- https://code.jquery.com/jquery-3.6.0.min.js
Resolving code.jquery.com (code.jquery.com)... 69.16.175.10, 69.16.175.42, 2001:4de0:ac18::1:a:1a, ...
Connecting to code.jquery.com (code.jquery.com)|69.16.175.10|:443... connected.
HTTP request sent, awaiting response... 200 OK
Length: 89501 (87K) [application/javascript]
Saving to: ‘jquery-3.6.0.min.js’
jquery-3.6.0.min.js 100%[===================>] 87.40K 114KB/s in 0.8s
2021-07-21 16:25:13 (114 KB/s) - ‘jquery-3.6.0.min.js’ saved [89501/89501]
According to the output above, you have successfully downloaded and saved a file named jquery-3.6.0.min.js to your current directory.
You can check the contents of the current directory using the following command:
- ls
The output will look similar to this:
Output
Downloads jquery-3.6.0.min.js jquery.min.js
So far, you have used wget to download files to the current directory. Next, you will download to a specific directory.
When downloading a file, Wget stores it in the current directory by default. You can change that by using the -P option to specify the name of the directory where you want to save the file.
Download the jQuery file you downloaded previously, but this time save it in the Downloads subdirectory.
wget -P Downloads/ https://code.jquery.com/jquery-3.6.0.min.js
The output will look similar to this:
Output
--2021-07-21 16:28:50-- https://code.jquery.com/jquery-3.6.0.min.js
Resolving code.jquery.com (code.jquery.com)... 69.16.175.42, 69.16.175.10, 2001:4de0:ac18::1:a:2b, ...
Connecting to code.jquery.com (code.jquery.com)|69.16.175.42|:443... connected.
HTTP request sent, awaiting response... 200 OK
Length: 89501 (87K) [application/javascript]
Saving to: ‘Downloads/jquery-3.6.0.min.js’
jquery-3.6.0.min.js 100%[==================================>] 87.40K 43.6KB/s in 2.0s
2021-07-21 16:28:53 (43.6 KB/s) - ‘Downloads/jquery-3.6.0.min.js’ saved [89501/89501]
Notice the last line where it says that the jquery-3.6.0.min.js file was saved in the Downloads directory.
If you use the ls Downloads command to list the contents of the Downloads directory, you will see the jQuery file there:
Run the ls command:
- ls Downloads
The output will look similar to this:
Output
jquery-3.6.0.min.js
By default, Wget outputs a lot of information to the terminal when you download a file. You can use the -q option to turn off all output.
Download the jQuery file, but this time without showing any output:
- wget -q https://code.jquery.com/jquery-3.6.0.min.js
You won’t see any output, but if you use the ls command to list the contents of the current directory you will find a file named jquery-3.6.0.min.js.1:
- ls
The output will look similar to this:
Output
Downloads jquery-3.6.0.min.js jquery-3.6.0.min.js.1 jquery.min.js
Before saving a file, Wget checks whether the file exists in the desired directory. If it does, Wget adds a number to the end of the file. If you ran the command above one more time, Wget would create a file named jquery-3.6.0.min.js.2. This number increases every time you download a file to a directory that already has a file with the same name.
You have successfully turned off Wget’s output, but now you can’t monitor the download progress. Let’s look at how to show the download progress bar.
Wget lets you show the download progress bar but hide any other output by using the -q option alongside the --show-progress option.
Download the jQuery file, but this time only show the download progress bar:
- wget -q --show-progress https://code.jquery.com/jquery-3.6.0.min.js
The output will look similar to this:
Output
jquery-3.6.0.min.js.2 100%[================================================>] 87.40K 207KB/s in 0.4s
Use the ls command to check the contents of the current directory and you will find the file you have just downloaded with the name jquery-3.6.0.min.js.2
From this point forward you will be using the -q and --show-progress options in most of the subsequent Wget commands.
So far you have only downloaded a single file. Next, you will download multiple files.
In order to download multiples files using Wget, you need to create a .txt file and insert the URLs of the files you wish to download. After inserting the URLs inside the file, use the wget command with the -i option followed by the name of the .txt file containing the URLs.
Create a file named images.txt:
- nano images.txt
In images.txt, add the following URLs:
images.txt
https://cdn.pixabay.com/photo/2016/12/13/05/15/puppy-1903313__340.jpg
https://cdn.pixabay.com/photo/2016/01/05/17/51/maltese-1123016__340.jpg
https://cdn.pixabay.com/photo/2020/06/30/22/34/dog-5357794__340.jpg
The URLs link to three random images of dogs found on Pixabay. After you have added the URLs, save and close the file.
Now you will use the -i option alongside the -P,-q and --show-progress options that you learned earlier to download all three images to the Downloads directory:
- wget -i images.txt -P Downloads/ -q --show-progress
The output will look similar to this:
Output
puppy-1903313__340.jp 100%[=========================>] 26.44K 93.0KB/s in 0.3s
maltese-1123016__340. 100%[=========================>] 50.81K --.-KB/s in 0.06s
dog-5357794__340.jpg 100%[=========================>] 30.59K --.-KB/s in 0.07s
If you use the ls Downloads command to list the contents of the Downloads directory, you will find the names of the three images you have just downloaded:
- ls Downloads
The output will look similar to this:
Output
dog-5357794__340.jpg jquery-3.6.0.min.js maltese-1123016__340.jpg puppy-1903313__340.jpg
So far, you have download files with the maximum available download speed. However, you might want to limit the download speed to preserve resources for other tasks. You can limit the download speed by using the --limit-rate option followed by the maximum speed allowed in kiloBits per second and the letter k.
Download the first image in the images.txt file with a speed of 15 kB/S to the Downloads directory:
- wget --limit-rate 15k -P Downloads/ -q --show-progress https://cdn.pixabay.com/photo/2016/12/13/05/15/puppy-1903313__340.jpg
The output will look similar to this:
Output
puppy-1903313__340.jpg.1 100%[====================================================>] 26.44K 16.1KB/s in 1.6s
If you use the ls Downloads command to check the contents of the Downloads directory, you will see the file you have just downloaded with the name puppy-1903313__340.jpg.1.
When downloading a file that already exists, Wget creates a new file instead of overwriting the existing file. Next, you will overwrite a downloaded file.
You can overwrite a file you have downloaded by using the -O option alongside the name of the file. In the code below, you will first download the second image listed in the images.txt file to the current directory and then you will overwrite it.
First, download the second image to the current directory and set the name to image2.jpg:
- wget -O image2.jpg -q --show-progress https://cdn.pixabay.com/photo/2016/12/13/05/15/puppy-1903313__340.jpg
The output will look similar to this::
Output
image2.jpg 100%[====================================================>] 26.44K --.-KB/s in 0.04s
If you use the ls command to check the contents of the current directory, you will see the file you have just downloaded with the name image2.jpg.
If you wish to overwrite this image2.jpg file, you can run the same command you ran earlier :
- wget -O image2.jpg -q --show-progress https://cdn.pixabay.com/photo/2016/12/13/05/15/puppy-1903313__340.jpg
You can run the command above as many times as you like and Wget will download the file and overwrite the existing one. If you run the command above without the -O option, Wget will create a new file each time you run it.
Thus far, you have successfully downloaded multiple files without interruption. However, if the download was interrupted, you can resume it by using the -c option.
Run the following command to download a random image of a dog found on Pixabay. Note that in the command, you have set the maximum speed to 1 KB/S. Before the image finishes downloading, press Ctrl+C to cancel the download:
- wget --limit-rate 1k -q --show-progress https://cdn.pixabay.com/photo/2018/03/07/19/51/grass-3206938__340.jpg
To resume the download, pass the -c option. Note that this will only work if you run this command in the same directory as the incomplete file:
- wget -c --limit-rate 1k -q --show-progress https://cdn.pixabay.com/photo/2018/03/07/19/51/grass-3206938__340.jpg
Up until now, you have only downloaded files in the foreground. Next, you will download files in the background.
You can download files in the background by using the -b option.
Run the command below to download a random image of a dog from Pixabay in the background:
- wget -b https://cdn.pixabay.com/photo/2018/03/07/19/51/grass-3206938__340.jpg
When you download files in the background, Wget creates a file named wget-log in the current directory and redirects all output to this file. If you wish to watch the status of the download, you can use the following command:
- tail -f wget-log
The output will look similar to this:
Output
Resolving cdn.pixabay.com (cdn.pixabay.com)... 104.18.20.183, 104.18.21.183, 2606:4700::6812:14b7, ...
Connecting to cdn.pixabay.com (cdn.pixabay.com)|104.18.20.183|:443... connected.
HTTP request sent, awaiting response... 200 OK
Length: 33520 (33K) [image/jpeg]
Saving to: ‘grass-3206938__340.jpg’
0K .......... .......... .......... .. 100% 338K=0.1s
2021-07-20 23:49:52 (338 KB/s) - ‘grass-3206938__340.jpg’ saved [33520/33520]
Until this point, we have assumed that the server that you are trying to download files from is working properly. However, let’s assume that the server is not working properly. You can use Wget to first limit the amount of time that you wait for the server to respond and then limit the number of times that Wget tries to reach the server.
If you wish to download a file but you are unsure if the server is working properly, you can set a timeout by using the -T option followed by the time in seconds.
In the following command, you are setting the timeout to 5 seconds:
- wget -T 5 -q --show-progress https://cdn.pixabay.com/photo/2016/12/13/05/15/puppy-1903313__340.jpg
You can also set how many times Wget attempts to download a file after being interrupted by passing the --tries option followed by the number of tries.
By running the command below, you are limiting the number of tries to 3:
- wget --tries=3 -q --show-progress https://cdn.pixabay.com/photo/2018/03/07/19/51/grass-3206938__340.jpg
If you would like to try indefinitely you can pass inf alongside the --tries option:
- wget --tries=inf -q --show-progress https://cdn.pixabay.com/photo/2018/03/07/19/51/grass-3206938__340.jpg
In this section, you used Wget to download a single file and multiple files, resume downloads, and handle network issues. In the next section, you will learn to interact with REST API endpoints.
Short answer: Use wget when your primary job is downloading or mirroring with resilient retries and simple headers. Use curl when you need fine‑grained HTTP features (multi‑part forms, advanced auth flows, HTTP/2 settings).
| Task |
Prefer wget |
Prefer curl |
| Large/batch downloads with resume/backgrounding |
wget -c -b URL |
|
| Simple JSON GET/POST with headers |
wget -qO- --header=… --method=post |
(either works) |
| Complex APIs (OAuth device flow, mTLS tweaks, HTTP/2, proxies) |
|
rich flags (--http2, --form, --cacert, --proxy-*) |
| Robust retry/backoff by default |
built‑in retry semantics |
Partial (script your own with --retry/--retry-max-time) |
| Website mirroring |
wget -r -np -k URL |
|
| Fine control over request/response formatting |
|
headers, bodies, upload forms are more ergonomic |
Rule of thumb: If your script reads like “download N files reliably” → use wget. If it reads like “call this API with complex auth and content negotiation” → reach for curl. You can mix both in the same pipeline.
For a curl‑centric walkthrough of download patterns and flags, read Workflow: Downloading Files with curl.
In this section, you will use Wget to interact with REST APIs without having to install an external program. You will learn the syntax to send the most commonly used HTTP methods: GET, POST, PUT, and DELETE. Advanced HTTP settings and headers are covered in the GNU Wget manual.
Export a token once per session (avoid leaking it in shell history):
export DO_TOKEN="paste-your-token-here"
wget -qO- \
--header="Accept: application/json" \
"https://jsonplaceholder.typicode.com/posts?_limit=2"
wget -qO- \
--method=post \
--header="Content-Type: application/json" \
--header="Accept: application/json" \
--body-data '{"title":"Wget POST","body":"Example body","userId":1}' \
https://jsonplaceholder.typicode.com/posts
wget -qO- \
--method=put \
--header="Content-Type: application/json" \
--header="Accept: application/json" \
--body-data '{"title":"Updated","body":"Updated body","userId":1,"id":1}' \
https://jsonplaceholder.typicode.com/posts/1
wget -qO- \
--method=delete \
--header="Accept: application/json" \
https://jsonplaceholder.typicode.com/posts/1
wget -qO- \
--header="Authorization: Bearer $DO_TOKEN" \
--header="Content-Type: application/json" \
URL_HERE
wget -qO- -c --tries=8 -T 10 \
--method=post \
--header="Authorization: Bearer $DO_TOKEN" \
--header="Content-Type: application/json" \
--body-data '{"ping":"pong"}' \
https://api.example.com/v1/endpoint
These blocks are formatted for copy‑paste and minimal noise in CI logs, prioritizing reliability (--tries, -T), clarity (-qO-), and safety (env var token).
-
Use -qO- in CI to print only the response body and keep logs clean. Pair with 2>>build.log if you still want errors persisted.
-
Always pair --tries with -T (timeout). Retries without timeouts can stall builds; timeouts without retries can flake under transient loss.
-
Prefer $DO_TOKEN (env var) over pasting tokens inline. This avoids leaking secrets in shell history and CI logs.
-
Resume large artifacts by default: add -c to keep partials moving across flaky networks.
-
Record tool versions for reproducibility:
wget --version
export http_proxy="http://proxy.corp:3128"
export https_proxy="http://proxy.corp:3128"
wget -qO- https://example.com/status
wget -qO- --user-agent="WgetTutorial/1.0 (+https://yourdomain.example)" https://api.example.com/status
wget --save-cookies cookies.txt --keep-session-cookies https://site.example.com/login
wget --load-cookies cookies.txt -O report.csv "https://site.example.com/reports?id=123"
Tip: For authenticated web apps, confirm whether the login endpoint requires POSTing a form. If so, use --method=post and --body-data or --post-data with the expected fields.
Install jq if missing:
sudo apt-get update && sudo apt-get install -y jq
Save the API response to a file and pretty‑print it:
wget -qO response.json --header="Accept: application/json" \
"https://jsonplaceholder.typicode.com/posts?_limit=2"
jq . response.json
Extract fields for scripts:
jq -r '.[0].id' response.json
We are going to use JSONPlaceholder as the mock REST API. JSONPlaceholder is a free online REST API that you can use for fake data. (The requests you send to it won’t affect any databases and the data won’t be saved.)
Wget lets you send GET requests by running a command that looks like the following:
- wget -O- [ URL ]
In the command above, the - after the -O option means standard output, so Wget will send the output of the URL to the terminal instead of sending it to a file as you did in the previous section. GET is the default HTTP method that Wget uses.
Run the following command in the terminal window:
- wget -O- https://jsonplaceholder.typicode.com/posts?_limit=2
In the command above, you used wget to send a GET request to JSON Placeholder in order to retrieve two posts from the REST API.
The output will look similar to this:
Output
--2021-07-21 16:52:51-- https://jsonplaceholder.typicode.com/posts?_limit=2
Resolving jsonplaceholder.typicode.com (jsonplaceholder.typicode.com)... 104.21.10.8, 172.67.189.217, 2606:4700:3032::6815:a08, ...
Connecting to jsonplaceholder.typicode.com (jsonplaceholder.typicode.com)|104.21.10.8|:443... connected.
HTTP request sent, awaiting response... 200 OK'
Length: 600 [application/json]
Saving to: ‘STDOUT’
- 0%[ ] 0 --.-KB/s [
{
"userId": 1,
"id": 1,
"title": "sunt aut facere repellat provident occaecati excepturi optio reprehenderit",
"body": "quia et suscipit\nsuscipit recusandae consequuntur expedita et cum\nreprehenderit molestiae ut ut quas totam\nnostrum rerum est autem sunt rem eveniet architecto"
},
{
"userId": 1,
"id": 2,
"title": "qui est esse",
"body": "est rerum tempore vitae\nsequi sint nihil reprehenderit dolor beatae ea dolores neque\nfugiat blanditiis voluptate porro vel nihil molestiae ut reiciendis\nqui aperiam non debitis possimus qui neque nisi nulla"
}
- 100%[==================================>] 600 --.-KB/s in 0s
2021-07-21 16:52:53 (4.12 MB/s) - written to stdout [600/600]
Notice the line where it says HTTP request sent, awaiting response... 200 OK, which means that you have successfully sent a GET request to JSONPlaceholder.
If that is too much output you can use the -q option that you learned in the previous section to restrict the output to the results of the GET request:
- wget -O- -q https://jsonplaceholder.typicode.com/posts?_limit=2
The output will look similar to this:
Output
[
{
"userId": 1,
"id": 1,
"title": "sunt aut facere repellat provident occaecati excepturi optio reprehenderit",
"body": "quia et suscipit\nsuscipit recusandae consequuntur expedita et cum\nreprehenderit molestiae ut ut quas totam\nnostrum rerum est autem sunt rem eveniet architecto"
},
{
"userId": 1,
"id": 2,
"title": "qui est esse",
"body": "est rerum tempore vitae\nsequi sint nihil reprehenderit dolor beatae ea dolores neque\nfugiat blanditiis voluptate porro vel nihil molestiae ut reiciendis\nqui aperiam non debitis possimus qui neque nisi nulla"
}
]
Wget lets you send POST requests by running a command that looks like the following:
- wget --method==[post] -O- --body-data=[ body in json format ] --header=[ String ] [ URL ]
Run the following command:
- wget --method=post -O- -q --body-data='{"title": "Wget POST","body": "Wget POST example body","userId":1}' --header=Content-Type:application/json https://jsonplaceholder.typicode.com/posts
In the command above, you used wget to send a POST request to JSON Placeholder to create a new post. You set the method to post, the Header to Content-Type:application/json and sent the following request body to it :{"title": "Wget POST","body": "Wget POST example body","userId":1}.
The output will look similar to this:
Output
{
"title": "Wget POST",
"body": "Wget POST example body",
"userId": 1,
"id": 101
}
Wget lets you send PUT requests by running a command that looks like the following:
- wget --method==[put] -O- --body-data=[ body in json format ] --header=[ String ] [ URL ]
Run the following command:
- wget --method=put -O- -q --body-data='{"title": "Wget PUT", "body": "Wget PUT example body", "userId": 1, "id":1}' --header=Content-Type:application/json https://jsonplaceholder.typicode.com/posts/1
In the command above you used wget to send a PUT request to JSON Placeholder to edit the first post in this REST API. You set the method to put, the Header to Content-Type:application/json and sent the following request body to it :{"title": "Wget PUT", "body": "Wget PUT example body", "userId": 1, "id":1} .
The output will look similar to this:
Output
{
"body": "Wget PUT example body",
"title": "Wget PUT",
"userId": 1,
"id": 1
}
Wget lets you send DELETE requests by running a command that looks like the following:
- wget --method==[delete] -O- [ URL ]
Run the following command:
- wget --method=delete -O- -q --header=Content-Type:application/json https://jsonplaceholder.typicode.com/posts/1
In the command above you used wget to send a DELETE request to JSON Placeholder to delete the first post in this REST API. You set the method to delete, and set the post you want to delete to 1 in the URL.
The output will look similar to this:
Output
{}
In this section, you learned how to use Wget to send GET, POST, PUT and DELETE requests with only one header field. In the next section, you will learn how to send multiple header fields in order to create and manage a Droplet in your DigitalOcean account.
In this section, you will apply what you learned in the previous section and use Wget to create and manage a Droplet in your DigitalOcean account. But before you do that, you will learn how to send multiple headers fields in a HTTP method.
The syntax for a command to send multiple headers looks like this:
- wget --header=[ first header ] --header=[ second header] --header=[ N header] [ URL ]
You can have as many headers fields as you like by repeating the --header option as many times as you need.
To create a Droplet or interact with any other resource in the DigitalOcean API, you will need to send two request headers:
export DO_TOKEN="paste-your-token-here"
You already saw the first header in the previous section. The second header is what lets you authenticate your account. It has the String named Bearer followed by your DigitalOcean account Personal Access Token.
Run the following command to create a droplet (uses $DO_TOKEN and ubuntu-24-04-x64):
- wget --method=post -qO- \
- --header="Content-Type: application/json" \
- --header="Authorization: Bearer $DO_TOKEN" \
- --body-data='{"name":"Wget-example","region":"nyc1","size":"s-1vcpu-1gb","image":"ubuntu-24-04-x64","tags":["Wget-tutorial"]}' \
- https://api.digitalocean.com/v2/droplets
With the command above, you have created an ubuntu-24-04-x64 Droplet in the nyc1 region named Wget-example with 1vcpu and 1gb of memory, and you have set the tag to Wget-tutorial. For more information about the attributes in the body-data field, see the DigitalOcean API documentation.
The output will look similar to this:
Output
{"droplet":{"id":237171073,"name":"Wget-example","memory":1024,"vcpus":1,"disk":25,"locked":false,"status":"new","kernel":null,"created_at":"2021-03-16T12:38:59Z","features":[],"backup_ids":[],"next_backup_window":null,"snapshot_ids":[],"image":{"id":72067660,"name":"20.04 (LTS) x64","distribution":"Ubuntu","slug":"ubuntu-20-04-x64","public":true,"regions":["nyc3","nyc1","sfo1","nyc2","ams2","sgp1","lon1","ams3","fra1","tor1","sfo2","blr1","sfo3"],"created_at":"2020-10-20T16:34:30Z","min_disk_size":15,"type":"base","size_gigabytes":0.52,"description":"Ubuntu 20.04 x86","tags":[],"status":"available"},"volume_ids":[],"size":{"slug":"s-1vcpu-1gb","memory":1024,"vcpus":1,"disk":25,"transfer":1.0,"price_monthly":5.0,"price_hourly":0.00744,"regions":["ams2","ams3","blr1","fra1","lon1","nyc1","nyc2","nyc3","sfo1","sfo3","sgp1","tor1"],"available":true,"description":"Basic"},"size_slug":"s-1vcpu-1gb","networks":{"v4":[],"v6":[]},"region":{"name":"New York 1","slug":"nyc1","features":["backups","ipv6","metadata","install_agent","storage","image_transfer"],"available":true,"sizes":["s-1vcpu-1gb","s-1vcpu-1gb-intel","s-1vcpu-2gb","s-1vcpu-2gb-intel","s-2vcpu-2gb","s-2vcpu-2gb-intel","s-2vcpu-4gb","s-2vcpu-4gb-intel","s-4vcpu-8gb","c-2","c2-2vcpu-4gb","s-4vcpu-8gb-intel","g-2vcpu-8gb","gd-2vcpu-8gb","s-8vcpu-16gb","m-2vcpu-16gb","c-4","c2-4vcpu-8gb","s-8vcpu-16gb-intel","m3-2vcpu-16gb","g-4vcpu-16gb","so-2vcpu-16gb","m6-2vcpu-16gb","gd-4vcpu-16gb","so1_5-2vcpu-16gb","m-4vcpu-32gb","c-8","c2-8vcpu-16gb","m3-4vcpu-32gb","g-8vcpu-32gb","so-4vcpu-32gb","m6-4vcpu-32gb","gd-8vcpu-32gb","so1_5-4vcpu-32gb","m-8vcpu-64gb","c-16","c2-16vcpu-32gb","m3-8vcpu-64gb","g-16vcpu-64gb","so-8vcpu-64gb","m6-8vcpu-64gb","gd-16vcpu-64gb","so1_5-8vcpu-64gb","m-16vcpu-128gb","c-32","c2-32vcpu-64gb","m3-16vcpu-128gb","m-24vcpu-192gb","g-32vcpu-128gb","so-16vcpu-128gb","m6-16vcpu-128gb","gd-32vcpu-128gb","m3-24vcpu-192gb","g-40vcpu-160gb","so1_5-16vcpu-128gb","m-32vcpu-256gb","gd-40vcpu-160gb","so-24vcpu-192gb","m6-24vcpu-192gb","m3-32vcpu-256gb","so1_5-24vcpu-192gb"]},"tags":["Wget-tutorial"]},"links":{"actions":[{"id":1164336542,"rel":"create","href":"https://api.digitalocean.com/v2/actions/1164336542"}]}}
If you see an output similar to the one above that means that you have successfully created a Droplet.
Now let’s get a list of all the Droplets in your account that have the tag Wget-tutorial. Run the following command:
- wget -qO- \
- --header="Content-Type: application/json" \
- --header="Authorization: Bearer $DO_TOKEN" \
- "https://api.digitalocean.com/v2/droplets?tag_name=Wget-tutorial"
You should see the name of the Droplet you have just created in the output:
Output
{"droplets":[{"id":237171073,"name":"Wget-example","memory":1024,"vcpus":1,"disk":25,"locked":false,"status":"active","kernel":null,"created_at":"2021-03-16T12:38:59Z","features":["private_networking"],"backup_ids":[],"next_backup_window":null,"snapshot_ids":[],"image":{"id":72067660,"name":"20.04 (LTS) x64","distribution":"Ubuntu","slug":"ubuntu-20-04-x64","public":true,"regions":["nyc3","nyc1","sfo1","nyc2","ams2","sgp1","lon1","ams3","fra1","tor1","sfo2","blr1","sfo3"],"created_at":"2020-10-20T16:34:30Z","min_disk_size":15,"type":"base","size_gigabytes":0.52,"description":"Ubuntu 20.04 x86","tags":[],"status":"available"},"volume_ids":[],"size":{"slug":"s-1vcpu-1gb","memory":1024,"vcpus":1,"disk":25,"transfer":1.0,"price_monthly":5.0,"price_hourly":0.00744,"regions":["ams2","ams3","blr1","fra1","lon1","nyc1","nyc2","nyc3","sfo1","sfo3","sgp1","tor1"],"available":true,"description":"Basic"},"size_slug":"s-1vcpu-1gb","networks":{"v4":[{"ip_address":"10.116.0.2","netmask":"255.255.240.0","gateway":"","type":"private"},{"ip_address":"204.48.20.197","netmask":"255.255.240.0","gateway":"204.48.16.1","type":"public"}],"v6":[]},"region":{"name":"New York 1","slug":"nyc1","features":["backups","ipv6","metadata","install_agent","storage","image_transfer"],"available":true,"sizes":["s-1vcpu-1gb","s-1vcpu-1gb-intel","s-1vcpu-2gb","s-1vcpu-2gb-intel","s-2vcpu-2gb","s-2vcpu-2gb-intel","s-2vcpu-4gb","s-2vcpu-4gb-intel","s-4vcpu-8gb","c-2","c2-2vcpu-4gb","s-4vcpu-8gb-intel","g-2vcpu-8gb","gd-2vcpu-8gb","s-8vcpu-16gb","m-2vcpu-16gb","c-4","c2-4vcpu-8gb","s-8vcpu-16gb-intel","m3-2vcpu-16gb","g-4vcpu-16gb","so-2vcpu-16gb","m6-2vcpu-16gb","gd-4vcpu-16gb","so1_5-2vcpu-16gb","m-4vcpu-32gb","c-8","c2-8vcpu-16gb","m3-4vcpu-32gb","g-8vcpu-32gb","so-4vcpu-32gb","m6-4vcpu-32gb","gd-8vcpu-32gb","so1_5-4vcpu-32gb","m-8vcpu-64gb","c-16","c2-16vcpu-32gb","m3-8vcpu-64gb","g-16vcpu-64gb","so-8vcpu-64gb","m6-8vcpu-64gb","gd-16vcpu-64gb","so1_5-8vcpu-64gb","m-16vcpu-128gb","c-32","c2-32vcpu-64gb","m3-16vcpu-128gb","m-24vcpu-192gb","g-32vcpu-128gb","so-16vcpu-128gb","m6-16vcpu-128gb","gd-32vcpu-128gb","m3-24vcpu-192gb","g-40vcpu-160gb","so1_5-16vcpu-128gb","m-32vcpu-256gb","gd-40vcpu-160gb","so-24vcpu-192gb","m6-24vcpu-192gb","m3-32vcpu-256gb","so1_5-24vcpu-192gb"]},"tags":["Wget-tutorial"],"vpc_uuid":"5ee0a168-39d1-4c60-a89c-0b47390f3f7e"}],"links":{},"meta":{"total":1}}
Now let’s take the id of the Droplet you have created and use it to delete the Droplet. Run the following command, replacing your_droplet_id with your Droplet id:
- wget --method=delete -qO- \
- --header="Content-Type: application/json" \
- --header="Authorization: Bearer $DO_TOKEN" \
- "https://api.digitalocean.com/v2/droplets/your_droplet_id"
In the command above, you added your Droplet id to the URL to delete it. If you are seeing a 204 No Content in the output, that means that you succeeded in deleting the Droplet.
In this section, you used Wget to send multiple headers. Then, you created and managed a Droplet in your DigitalOcean account.
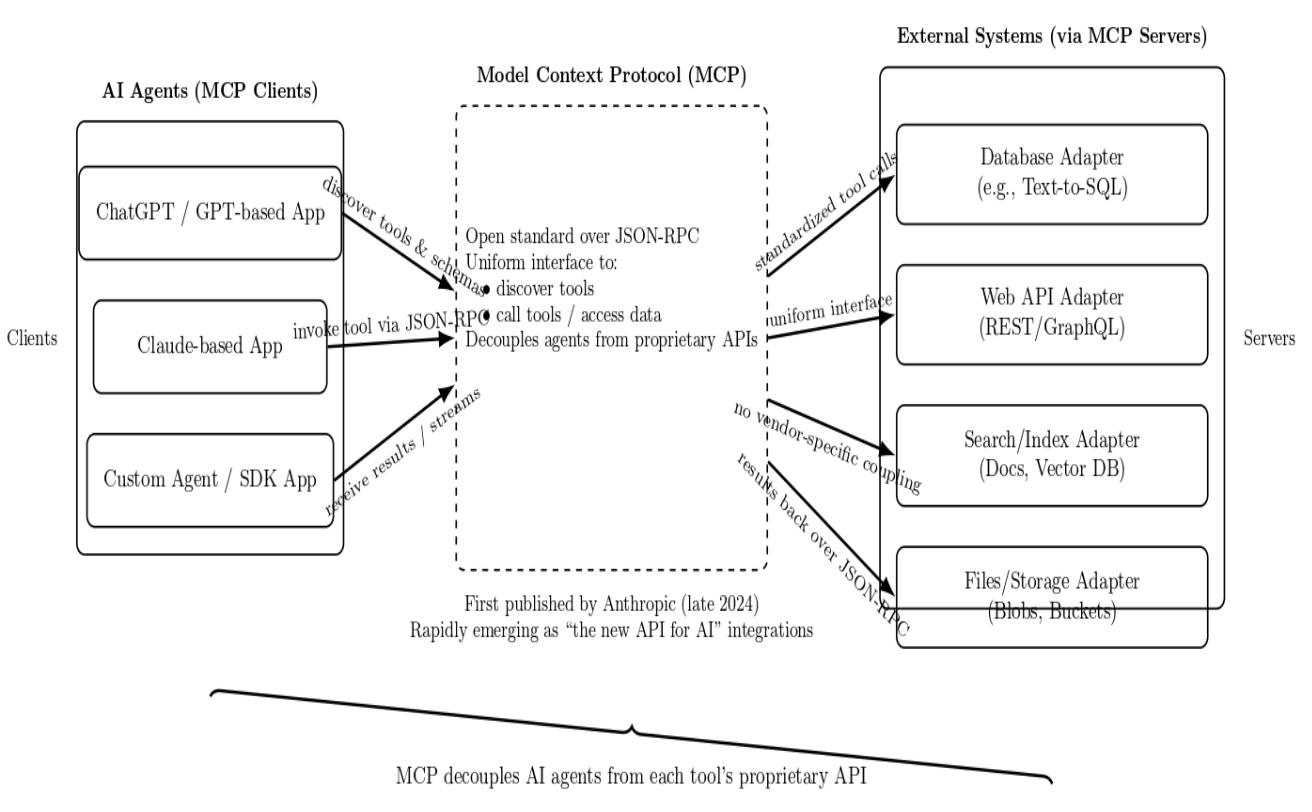
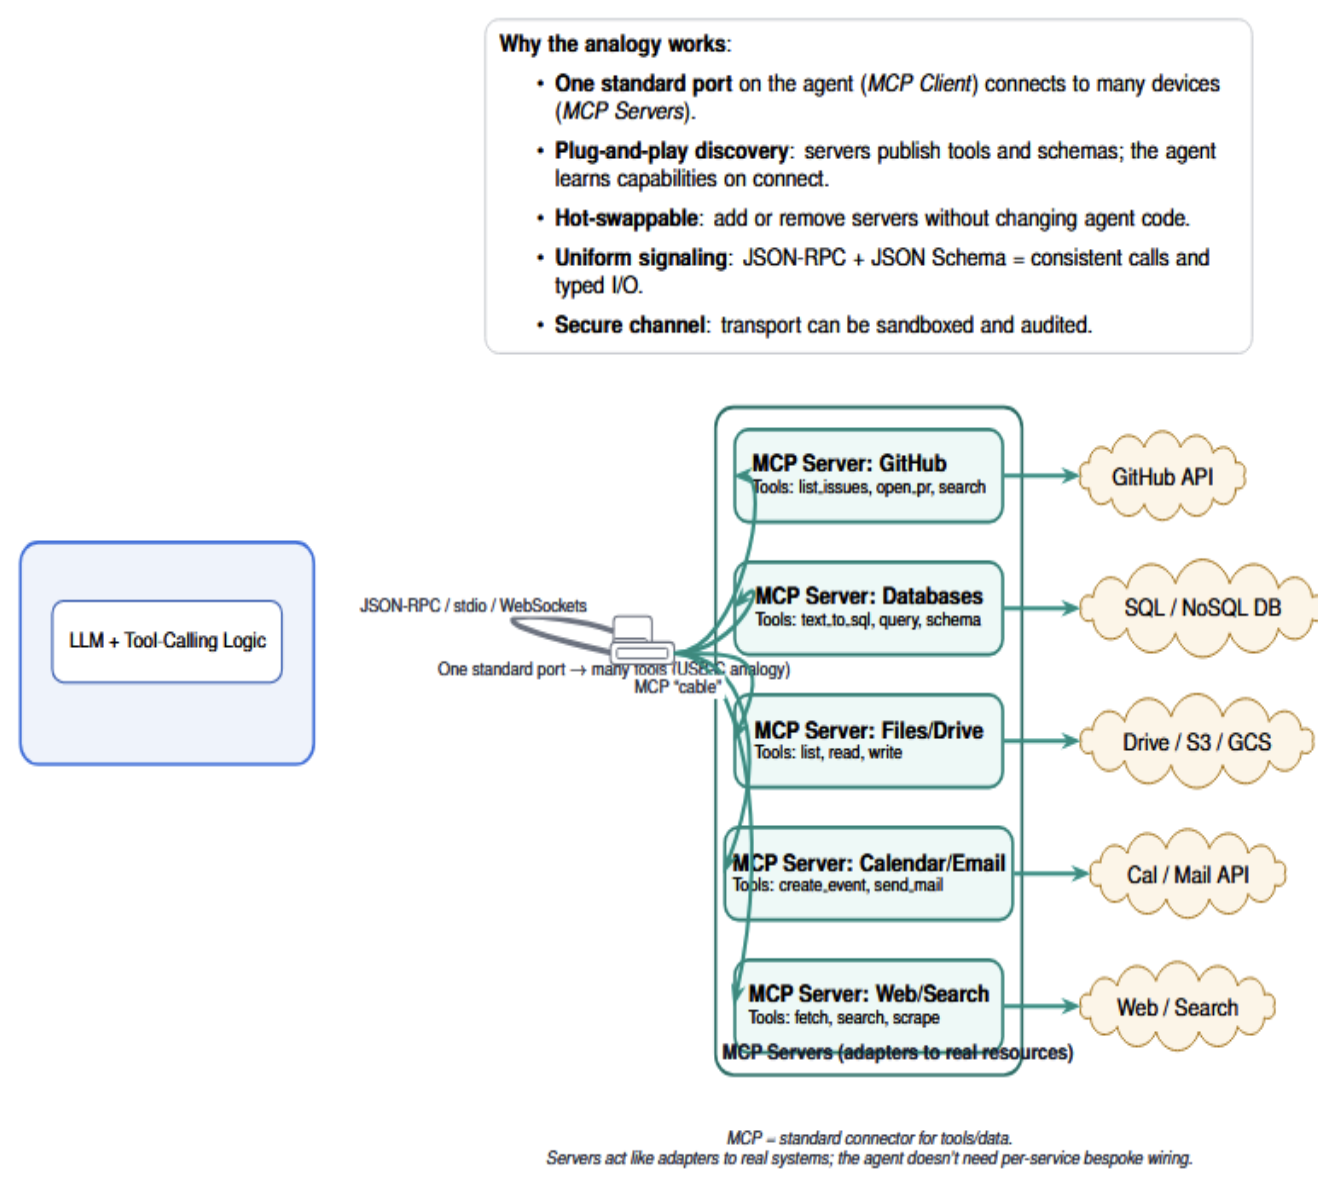
The Website Downloader MCP Server wraps wget to produce high‑fidelity offline mirrors of websites. It preserves structure, rewrites links for local navigation, and restricts scope to the domains you choose—ideal for offline docs, audits, education, or DR playbooks.
wget installed (see Prerequisites above).- Node.js (LTS recommended) and
npm to run the MCP server.
- Sufficient disk space for the target site (mirrors can grow quickly).
- macOS:
brew install wget
- Debian/Ubuntu:
sudo apt-get update && sudo apt-get install -y wget
- Fedora/RHEL:
sudo dnf install -y wget
- Windows:
choco install wget (or download the standalone binary and add to PATH)
git clone https://github.com/pskill9/website-downloader.git
cd website-downloader
npm install
npm run build
Add the server to your MCP client settings (example):
{
"mcpServers": {
"website-downloader": {
"command": "node",
"args": ["/absolute/path/to/website-downloader/build/index.js"]
}
}
}
-
url (string, required) — The root URL of the website you want to mirror. This should be the starting point for the download, such as https://example.com. Wget will begin crawling and downloading from this address, following links according to the specified depth and other options.
-
outputPath (string, optional) — The directory on your local system where the mirrored website will be saved. If you do not specify this parameter, the current working directory will be used by default. Providing a custom path (e.g., /path/to/output) helps keep your downloads organized and separate from other files.
-
depth (integer, optional) — The maximum recursion depth for following links from the root URL. This controls how many levels of links wget will follow:
0: Download only the specified page, without following any links.1: Download the page and all resources directly linked from it (such as images, CSS, and JavaScript files, as well as directly linked pages).2: Download the page, its direct links, and all links found on those direct links (i.e., two levels deep).- Higher values allow wget to follow links further into the site, potentially downloading large portions or the entirety of the website. Use higher depths with caution to avoid excessive downloads, especially on large or complex sites.
-
extraWgetArgs (array of strings, optional, advanced) — (If supported by your MCP client) An array of additional wget command-line arguments to further customize the mirroring process. This can include flags for rate limiting, user agent customization, excluding certain file types, or handling authentication. Only use this if you understand the implications of each flag, as improper use can result in incomplete or overly broad downloads.
Example Usage:
Some MCP clients may support an advanced payload with extraWgetArgs (array of strings) to pass additional wget flags (see Advanced Control below). Use this only if your client allows raw argument passthrough.
Request (JSON payload):
{
"url": "https://example.com",
"outputPath": "/path/to/output",
"depth": 1
}
Under the hood, the server composes a safe command similar to:
wget \
--recursive \
--level 1 \
--page-requisites \
--convert-links \
--adjust-extension \
--no-parent \
--domains example.com \
--directory-prefix "/path/to/output" \
https://example.com
-r / --recursive: Enables recursive downloading, allowing wget to follow links and download not just the specified page, but also linked pages and resources. This is essential for mirroring entire sites or sections.-l / --level <depth>: Sets the maximum recursion depth. For example, -l 1 downloads the main page and all directly linked resources, while higher values allow wget to follow links further. Use with care to avoid downloading too much content.--page-requisites: Ensures that all assets required to properly display each HTML page (such as images, CSS, and JavaScript files) are also downloaded. This makes offline viewing accurate and complete.--convert-links: After downloading, rewrites the links in downloaded HTML files so they point to the local copies instead of the original URLs. This is crucial for seamless offline browsing.--adjust-extension: Modifies the file extensions of downloaded files to match their content type (e.g., adding .html to HTML files). This helps browsers open files correctly from the local mirror.--no-parent: Prevents wget from ascending to parent directories above the starting URL. This confines the download to the specified directory tree, avoiding unwanted files from higher up the site structure.--domains <list>: Restricts downloads to the specified domain(s). This prevents wget from following links to external sites, keeping the mirror focused and manageable.
These flags work together to create a faithful, navigable offline copy of a website while giving you control over scope and resource usage.
Payload (if extraWgetArgs passthrough is supported):
{
"url": "https://docs.example.org",
"outputPath": "/srv/mirrors/docs-example",
"depth": 5,
"extraWgetArgs": ["--wait=1", "--random-wait", "--limit-rate=200k"]
}
This respects server load via --wait/--random-wait and caps bandwidth with --limit-rate.
If the site requires a session or header‑based access:
-
Cookies: first obtain cookies (via login) and point wget at them:
wget \
--recursive -l 2 --convert-links --page-requisites --adjust-extension --no-parent \
--load-cookies /path/to/cookies.txt \
--directory-prefix "/path/to/output" \
https://portal.example.com/docs
-
Headers: pass headers (e.g., tokens) with --header:
wget \
--recursive -l 2 --convert-links --page-requisites --adjust-extension --no-parent \
--header "Authorization: Bearer $TOKEN" \
--directory-prefix "/path/to/output" \
https://secure.example.com/knowledge-base
If your MCP client supports extraWgetArgs, you can supply these flags via the payload.
If images or CSS are hosted on a CDN, either:
-
Keep the mirror single‑domain (default) and allow broken external links to resolve online when connected; or
-
Extend scope across specific hosts using --domains and --span-hosts carefully:
wget -r -l 2 --convert-links --page-requisites --adjust-extension --no-parent \
--span-hosts --domains example.com,static.examplecdn.com \
--directory-prefix "/path/to/output" \
https://example.com
Use --reject to exclude large or irrelevant paths (e.g., /videos/, /search), and --accept to focus on specific types (.html,.css,.js,.png).
After the run, open the local index.html within the outputPath in a browser. Optionally serve it:
cd /path/to/output/example.com
python3 -m http.server 8080
Then browse to http://localhost:8080.
If enabled by your MCP client, you can pass vetted flags for nuanced control:
- Performance/Politeness:
--wait=SECONDS, --random-wait, --limit-rate=200k
- Scope:
--domains, --reject, --accept, --no-parent, --level N
- Robustness:
--tries=8, -T 10, -c (resume), --timeout=10, --retry-connrefused
- Naming/Compat:
--restrict-file-names=windows, --adjust-extension
- TLS/Proxy:
--ca-certificate=/path/ca.crt, env http_proxy/https_proxy
Only pass flags you understand. Over‑broad settings (e.g., --span-hosts without --domains) can explode scope and disk usage.
- Empty/partial pages: Often JS‑rendered content. Wget is not a headless browser; mirror server‑rendered routes or export static content from the site’s build pipeline.
- Missing CSS/Images: Check for cross‑domain assets; add
--span-hosts with a tight --domains list. Ensure --page-requisites is enabled.
- 403 / 401: Supply cookies/headers. Some sites block default user agents—try
--user-agent="WgetMirror/1.0".
- 429 / rate‑limit: Add
--wait/--random-wait and lower --limit-rate.
- Corporate TLS: Import proxy CA and use
--ca-certificate=… (see Advanced Edge‑Case Operations).
Respect robots.txt and Terms of Service. Obtain permission for private content. Use polite waits and rate limits. Keep mirrors internal if licensing restricts redistribution. Log actions for auditability.
In enterprise environments, TLS connections may fail because proxies intercept HTTPS traffic. To fix this, import the proxy’s root certificate and point Wget to it:
wget --ca-certificate=/etc/ssl/certs/corp-proxy-ca.crt https://secure.example.com/data.json
Keep CA bundles updated (update-ca-certificates on Debian/Ubuntu) and validate that your system clock is synchronized (timedatectl set-ntp true) to avoid handshake errors.
Wget sets exit codes you can check in scripts:
0 = success4 = network failure8 = server issued an error response (non‑2xx)
Use --server-response or --spider to test endpoints:
wget --spider --server-response https://api.example.com/v1/health || echo "API down"
In CI/CD, check $? to halt builds on persistent failures.
APIs that accept PUT or DELETE may behave differently across retries. Wget can send these methods using --method:
wget --method=PUT --body-data '{"name":"update"}' \
--header="Content-Type: application/json" \
--header="Authorization: Bearer $DO_TOKEN" \
https://api.example.com/v1/resource/42
Ensure the API endpoint is idempotent—meaning retries won’t create duplicate records or unintended deletions. For safety, confirm API docs or use PATCH when supported.
After downloading large images or backups, verify checksums to prevent corruption:
wget -O ubuntu.img https://releases.ubuntu.com/24.04/ubuntu-server.img
wget -O ubuntu.img.sha256 https://releases.ubuntu.com/24.04/ubuntu-server.img.sha256
sha256sum -c ubuntu.img.sha256
This ensures the file matches the publisher’s signature before production use. For automation, integrate checksum verification into your scripts so failed validations trigger alerts.
This section gives you a repeatable way to measure Wget performance and the impact of flags like --limit-rate, -c (resume), and retry/timeouts. We’ll collect wall‑clock time, CPU, and memory with /usr/bin/time, and keep the commands CI‑friendly.
- Baseline throughput for a fresh download
- Bandwidth‑capped download with
--limit-rate
- Resume performance with
-c after an interrupted transfer
- Retry/timeout bounds for unreliable endpoints
Replace the sample URL with any large, publicly accessible file your org approves for benchmarking.
TMPDIR="$(mktemp -d)"; cd "$TMPDIR"
TEST_URL="https://speed.hetzner.de/100MB.bin"
OUT="test.bin"
We’ll use GNU time for consistent metrics:
/usr/bin/time -f 'wall=%E user=%U sys=%S rss=%MKB exit=%x' <command>
- wall: elapsed (hh:mm:ss)
- user/sys: CPU time in user/kernel space
- rss: peak resident set (KB)
- exit: process exit code
/usr/bin/time -f 'wall=%E user=%U sys=%S rss=%MKB exit=%x' \
wget -q --show-progress -O "$OUT" "$TEST_URL"
ls -lh "$OUT"
Interpretation: This is your raw network + disk baseline under current conditions.
Cap at ~200 KB/s to preserve capacity for other workloads:
rm -f "$OUT"
/usr/bin/time -f 'wall=%E user=%U sys=%S rss=%MKB exit=%x' \
wget -q --show-progress --limit-rate=200k -O "$OUT" "$TEST_URL"
Interpretation: Expect much longer wall time with predictably low impact on other services.
Start download and interrupt mid‑way (Ctrl‑C), then resume:
rm -f "$OUT"
wget --limit-rate=1m -O "$OUT" "$TEST_URL" &
PID=$!; sleep 3; kill -INT "$PID" 2>/dev/null || true
/usr/bin/time -f 'wall=%E user=%U sys=%S rss=%MKB exit=%x' \
wget -q --show-progress -c -O "$OUT" "$TEST_URL"
Interpretation: The resume run should report shorter wall time than a full re‑download and skip already‑retrieved bytes.
Show how --tries + -T prevent hangs:
BAD_URL="https://example.invalid/bogus.bin"
/usr/bin/time -f 'wall=%E user=%U sys=%S rss=%MKB exit=%x' \
wget --spider --tries=3 -T 5 "$BAD_URL" || echo "bounded failure (as expected)"
Interpretation: Wall time should be ~tries × timeout (plus DNS/connect overhead). Exit code non‑zero is expected and should fail CI early.
Append key metrics to a lightweight CSV:
SCENARIO="baseline"; SIZE="$(stat -c%s "$OUT" 2>/dev/null || echo 0)"
/usr/bin/time -f "$SCENARIO,%E,%U,%S,%M,%x" -o results.csv -a true
echo "scenario,wall,user,sys,rss_kb,exit" | cat - results.csv | tee results.csv
Store results.csv as a CI artifact for trend analysis.
If you can use tc netem (Linux) on a lab host:
sudo tc qdisc add dev eth0 root netem delay 120ms loss 1%
sudo tc qdisc del dev eth0 root
Interpretation: Compare wall time and retry behavior under adverse conditions to validate your flags.
- Use
--limit-rate to preserve capacity, especially on shared build agents.
- Prefer
-c to resume large artifacts; verify server range support.
- Always pair
--tries with -T to bound failure time.
- Record tool versions and results.csv in CI for defensible SLOs.
This end‑to‑end example shows how to batch‑download assets reliably every day and notify an API when done. It applies the best practices from this guide: -qO- for clean logs, -c resume, --tries + -T for resilience, and $DO_TOKEN for auth.
- A script that reads URLs from
files.txt, resumes partial downloads, and writes to /var/backups/assets.
- Robust retry/timeout settings for flaky networks.
- An optional POST callback to your backend to signal completion.
Create a list of URLs (one per line):
sudo mkdir -p /var/backups/assets
sudo tee /var/backups/assets/files.txt >/dev/null <<'EOF'
https://example.com/static/manual.pdf
https://example.com/assets/logo.png
https://jsonplaceholder.typicode.com/posts?_limit=25
EOF
Export your token once per session (use a CI/secret store in production):
export DO_TOKEN="paste-your-token-here"
#!/usr/bin/env bash
set -euo pipefail
ASSET_DIR="/var/backups/assets"
URL_LIST="${ASSET_DIR}/files.txt"
LOG_FILE="/var/log/wget-sync.log"
mkdir -p "${ASSET_DIR}"
wget --continue \
--input-file="${URL_LIST}" \
--directory-prefix="${ASSET_DIR}" \
--tries=8 -T 10 \
-q --show-progress 2>>"${LOG_FILE}"
if [[ -n "${DO_TOKEN:-}" ]]; then
wget -qO- --method=post \
--header="Authorization: Bearer ${DO_TOKEN}" \
--header="Content-Type: application/json" \
--body-data "{\"synced\":\"$(date -Is)\",\"count\":$(wc -l < "${URL_LIST}")}" \
https://api.example.com/v1/sync >/dev/null
fi
Make it executable:
sudo install -m 0755 ./wget-daily-sync.sh /usr/local/bin/wget-daily-sync.sh
sudo crontab -e
Add:
15 2 * * * /usr/local/bin/wget-daily-sync.sh
- Check downloaded files:
ls -lah /var/backups/assets
- Inspect logs:
sudo tail -n 100 /var/log/wget-sync.log
- Verify callback (if enabled): backend should record the
synced timestamp and count.
Security: Avoid hard‑coding tokens in scripts. Use environment injection (systemd EnvironmentFile, CI secrets, or a vault). Keep /var/log/wget-sync.log readable only to admins if it may contain error details.
When using Wget in CI/CD, prefer -qO- for clean logs and always pair --tries with -T to prevent hanging builds. Store tokens in environment variables like $DO_TOKEN rather than inline in scripts. Capture wget --version to pin reproducibility across runs. This ensures secure, deterministic automation that auditors and teammates can trust.
Yes. Wget supports --header for tokens, cookies, and custom headers. Best practice is to export your token (export DO_TOKEN="...") and then pass it with --header="Authorization: Bearer $DO_TOKEN". This avoids leaking secrets in shell history and logs. For production systems, inject tokens using CI secrets or systemd EnvironmentFile.
Use Wget for reliable downloads, background transfers, and simple API calls with retries. Use curl when you need advanced HTTP/2 features, multipart forms, or complex authentication flows like OAuth. A good heuristic: “download N files → Wget; negotiate complex API calls → curl.” Many teams mix both tools depending on the job.
SSL errors often stem from outdated CA certificates, clock skew, or corporate proxies intercepting TLS. Run sudo update-ca-certificates and sudo timedatectl set-ntp true to refresh trust stores and time. In corporate environments, import your proxy’s CA and use --ca-certificate=/path/to/ca.crt. These steps align with enterprise security practices and compliance requirements.
By default, Wget only fetches data. To parse or pretty‑print JSON, combine it with tools like jq. For example:
wget -qO response.json --header="Accept: application/json" https://jsonplaceholder.typicode.com/posts?_limit=2
jq . response.json
This hybrid approach lets you format, filter, and validate API output directly in pipelines.
Set proxy variables before running Wget:
export http_proxy="http://proxy.corp:3128"
export https_proxy="http://proxy.corp:3128"
You can also define a custom user agent or persist cookies for sessions. This flexibility ensures Wget works even in tightly controlled enterprise networks.
Create a script that reads URLs from a file, uses --continue and retry flags, and logs to a file. Then schedule it with cron or systemd timers. Optionally, add a POST callback to your backend using $DO_TOKEN for authentication. This pattern—shown in the Implementation section—provides a production‑ready, auditable workflow that operations teams can rely on.
In this tutorial, you used Wget to download files in stable and unstable network conditions and interact with REST API endpoints. You then used this knowledge to create and manage a Droplet in your DigitalOcean account. For complete usage details and advanced options, see the official GNU Wget manual. Ready to put these commands into practice? Run your automations on a DigitalOcean Droplet and start building reliable, production-ready workflows today.
]]>


.png)


.png)
.png)
.png)
.png)
.png)
.png)
.png)
.png)


 Note that if there is any


