Tutorial
How To Deploy CockroachDB on a Three-Node Cluster on Ubuntu 16.04

An Article from CockroachDB
Introduction
CockroachDB is an open source, distributed SQL database which offers consistency, scalability, and survivability.
Setting up CockroachDB is straightforward: you install it on multiple servers, each known as a node, and join them together to act as if they were a single entity, known as a cluster. All of the nodes in your cluster then behave symmetrically and have access to the same data.
With this kind of design, as your data storage needs grow, you can easily increase your system’s capacity by creating new nodes and joining them to your existing cluster. For greater detail, you can read up on CockroachDB’s scalability model.
Note: At the time of writing, CockroachDB is currently in beta, so we recommend using this guide as a chance to familiarize yourself with the technology and not as a deployment guide for a piece of mission-critical software.
This guide does not secure access to the cluster’s Admin UI; anybody will be able to access it if they know the correct URL. If you plan to leave this in production, consider controlling access to port 8080 with firewall rules.
Goals
In this guide, you’ll create a distributed and fault-tolerant database by deploying CockroachDB across multiple servers, a distributed multi-node cluster. You’ll begin by installing CockroachDB on multiple servers, start them as nodes, and then have them work together as a cluster.
Additionally, we’ll demonstrate data distribution and how the cluster survives failure, and show you how to connect your application to CockroachDB.
This guide covers setting up an insecure deployment without SSL encryption, which we don’t recommend for production. However, CockroachDB also offers secure deployment instructions for DigitalOcean. (Despite what the first paragraph at the link says, the Secure version of the article is selected.)
Prerequisites
Before you begin, you’ll need the following:
- 3 Ubuntu 16.04 servers with at least 2GB of RAM with private networking enabled. They should all be in the same region. In this guide we will use the following hostnames:
- cockroach-01
- cockroach-02
- cockroach-03
- On each server, add a non-root user with sudo privileges
- Make sure that TCP traffic is allowed on the following ports. If you have set up UFW as your firewall you will need to allow these two ports on each server:
26257for inter-node and application communication:sudo ufw allow 26257/tcp8080for the Admin UI:sudo ufw allow 8080/tcp
- Optional: On each server, install and configure NTP. (For brief tests, this is not a firm requirement)
Make note of the public and private IP addresses of all of your servers. In this guide, we’ll use stand-in hostnames and IP addresses like cockroach-01, cockroach_01_public_ip, and cockroach_01_public_ip for each of the three servers. To find your private IP, click on the server from the DigitalOcean control panel. The Private IP is listed in the top row of information.
Step 1 — Installing CockroachDB
Each node in your cluster needs to have a copy of the cockroach binary (i.e., program). We’ll install CockroachDB on your first server, cockroach-01, and then do the same on the other servers.
To get started, log in to cockroach-01 with SSH.
- ssh sammy@cockroach_01_public_ip
Next, from your sudo user’s home directory, download and install the latest cockroach binary:
- wget https://binaries.cockroachdb.com/cockroach-latest.linux-amd64.tgz?s=do
Extract the binary:
- tar -xf cockroach-latest.linux-amd64.tgz?s=do --strip=1 cockroach-latest.linux-amd64/cockroach
Move the binary so it’s easily accessible from the command line:
- sudo mv cockroach /usr/local/bin
Make sure the binary is accessible by checking its version:
- cockroach version
If your system can’t find the cockroach command, please review this section again to make sure you’ve downloaded and extracted the program.
Finally, repeat these commands for the other two servers you plan to use as nodes. In our example, that’s cockroach-02 and cockroach-03.
Now that CockroachDB is available on all of your machines, you can set up your cluster.
Step 2 — Starting Your First Node
Your first CockroachDB node will start your cluster. There’s nothing special about this first node; it’s just that you have to start with one and then have others join it. We’ll use cockroach-01 for this section.
Make note of your private IP address for cockroach-01. From the DigitalOcean control panel, click this host. The Private IP is listed in the top row of information.
The following command to start the cluster should be executed on cockroach-01. This command starts a node without SSL encryption (--insecure), returns control of the command prompt (--background), and sets this node up to communicate with other nodes using its internal IP address (--advertise-host). Replace the highlighted variable below, cockroach_01_private_ip, with the actual private IP address:
- cockroach start --insecure --background --advertise-host=cockroach_01_private_ip
Note: When you start your node, you can use a number of flags to change its behavior, such as changing the directory data is stored in. Those flags are documented in cockroach start.
Now that your node (and cluster) is live, you can view its details by going to its Admin UI dashboard (a tool bundled with CockroachDB to show you information about your cluster). Go to http://cockroach_01_public_ip:8080. It’s the public IP address this time.
Here you’ll see that you have one node running.
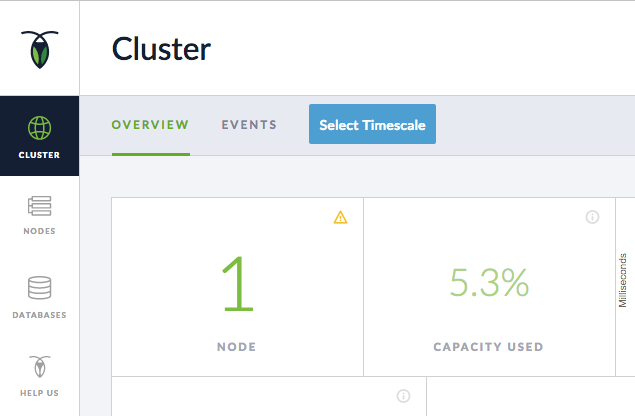
You’ll notice a warning exclamation point (!) in the NODE tile. If you mouse over the warning, it indicates that your cluster has Low Replication, which means you don’t have enough nodes. This is undertandable, since we have only one node right now. With one node, your data isn’t failure resistant because it’s not sufficiently replicated to other sources. If the node goes down, your data will be lost.
We’ll fix that in the next step by adding your other two servers as nodes to this cluster. By having three nodes, CockroachDB ensures there are at least three copies of your data, so it’s possible to lose a node without irreparably losing data.
Step 3 – Adding Nodes Two and Three to Your Cluster
On your cockroach-02 server, start the CockroachDB node with the cockroach start command like you did in Step 2. Here we update the command to specify that you want it to join the first server’s cluster through its private IP address. You will need the private IP address for both cockroach-02 and cockroach-01 to replace the highlighted variables below, cockroach_02_private_ip and cockroach_01_private_ip.
- cockroach start --insecure --background \
- --advertise-host=cockroach_02_private_ip \
- --join=cockroach_01_private_ip:26257
Repeat this command on your third machine, cockroach-03, with its private IP address. Have it join the first node as well.
- cockroach start --insecure --background \
- --advertise-host=cockroach_03_private_ip \
- --join=cockroach_01_private_ip:26257
Now, when you access the Admin UI from any node, you’ll see that the cluster has 3 nodes.
http://cockroach_03_public_ip:8080

Now that all of your nodes are connected through the cluster, they’ll all have access to the same data.
(Optional) Step 4 – Demonstrating Data Distrubtion
Whenever you write data to one node, all of the other nodes in the cluster have access to it. The easiest way to demonstrate this is to use CockroachDB’s example data, and then view it from the built-in SQL client.
From your first node, cockroach-01, generate the example data:
- cockroach gen example-data | cockroach sql
This creates a sample database called startrek.
You can now launch the SQL client and view which databases are in your cluster:
- cockroach sql
- SHOW DATABASES;
You’ll see the startrek database listed, which holds our example data.
+--------------------+
|      Database      |
+--------------------+
| information_schema |
| pg_catalog         |
| startrek           |
| system             |
+--------------------+
Note: CockroachDB supports its own SQL dialect that offers different extensions of the SQL standard than some other databases offer.
Now, move to your second node’s terminal, cockroach-02, and run the same commands:
- cockroach sql
- SHOW DATABASES;
You’ll see that even though you generated the example data on another node, it’s been distributed and the startrek database is accessible from all of your other servers.
You can also view that the database exists from the Admin UI’s DATABASES sidebar on any node; for example, at http://cockroach_01_public_ip:8080/#/databases/.
(Optional) Step 5 – Removing a Node from the Cluster
In addition to distributing data to all nodes in your cluster, CockroachDB also guarantees the availability and integrity of your data in case of server outages.
The formula for CockroachDB’s tolerance for node failure is (n - 1)/2, where n is the number of nodes in your cluster. So, in this example of three nodes, we can tolerate losing one node without losing any data.
To demonstrate this, we’ll remove a node from the cluster and show that all of the cluster’s data is still available. We’ll then rejoin the node to the cluster and see that it receives all updates that happened while it was offline.
From your second node, cockroach-02, launch the SQL client if you aren’t still in it:
- cockroach sql
Count the number of rows in the quotes table of the example database:
- SELECT COUNT(*) FROM startrek.quotes;
You’ll see that the table has 200 rows. Exit the SQL client by pressing CTRL+C.
Now, we’ll remove this node from the cluster and see that all of the data is still available from the other nodes.
From the same node you were using (cockroach-02), stop the cockroach process:
- cockroach quit
Now switch to the terminal of one of your other nodes (cockroach-03, for example) and launch the SQL client:
- cockroach sql
Run the same command as before to count the number of rows in the quotes table:
- SELECT COUNT(*) FROM startrek.quotes;
Despite losing one of the nodes in the cluster, you’ll see that you still have 200 rows of data! This means CockroachDB has successfully tolerated a system failure and maintained the integrity of your data.
(Optional) Step 6 — Rejoining a Node to the Cluster
We can also demonstrate that CockroachDB gracefully handles the server coming back online. First, we’ll delete some data, then have the node we removed rejoin the cluster. Once it rejoins, we’ll be able to see that CockroachDB automatically removes the same data from the resurrected node.
From one of your nodes that’s currently running, say cockroach-03, delete all of the quotes where the episode is greater than 50.
- DELETE FROM startrek.quotes WHERE episode > 50;
- SELECT COUNT(*) FROM startrek.quotes;
You’ll see there are now 133 rows of data.
Now, go back to the terminal of the node we removed from the cluster (cockroach-02), and have it rejoin the cluster:
- cockroach start --insecure --background \
- --advertise-host=cockroach_02_private_ip \
- --join=cockroach_01_private_ip:26257
Launch the built-in SQL client:
- cockroach sql
Now, count the number of rows the quotes table contains:
- SELECT COUNT(*) FROM startrek.quotes;
It should still be 133.
So, despite being offline when the update happened, the node is updated as soon as it rejoins the cluster.
If you’d like, you can now remove the example data (still using the cockroach sql CLI):
- DROP TABLE quotes;
- DROP TABLE episodes;
- DROP DATABASE startrek;
(Optional) Step 7 – Connecting an Application
With your cluster up and running, you can use it as the database for an application. This requires two parts:
- a driver to use with your application (CockroachDB works with PostgreSQL drivers)
- an appropriate connection string
This guide shows a general example; you’ll need to provide specifics for your own application.
Choose and install an appropriate driver from the list of compatible PostgreSQL client drivers for your application.
Note: Though CockroachDB supports the PostgreSQL wire protocol, its SQL syntax differs and is not a drop-in replacement for PostgreSQL.
Then, use an appropriate connection string at any point that you need your application to connect to the database.
Your connection string should connect to port 26257 and can use any node’s IP address. This means your firewall must also allow connections on port 26257 (as we set up in the prerequisites).
For example, here’s a PHP/PDO connection string that connects the user sammy to the database bank on localhost:
PDO('pgsql:host=localhost;port=26257;dbname=bank;sslmode=disable',
    'sammy', null, array(
      PDO::ATTR_ERRMODE          => PDO::ERRMODE_EXCEPTION,
      PDO::ATTR_EMULATE_PREPARES => true,
  ));
For more help using the PostgreSQL client drivers, CockroachDB has a number of code samples available.
Conclusion
At this point, you’ve created a three-node cluster, seen CockroachDB’s distributed and survivable features, and seen how to connect the cluster to an application.
Since CockroachDB is a fast-moving project, you will occasionally see the your dashboard display the message There is a newer version of CockroachDB available. Use the Update button to view a link to the updated binary, which at the time of writing you will have to download and install manually.
If you want to scale your deployment horizontally by adding more nodes, follow the steps for the second and third nodes above on a fourth node, etc. All you need to do is install the cockroach binary and have the new node(s) join your existing cluster.
If, after checking it out, you do want to run CockroachDB in production, please read their recommended production settings.
And finally, here is a general link to CockroachDB’s documentation.
Thanks for learning with the DigitalOcean Community. Check out our offerings for compute, storage, networking, and managed databases.
This textbox defaults to using Markdown to format your answer.
You can type !ref in this text area to quickly search our full set of tutorials, documentation & marketplace offerings and insert the link!


Get our biweekly newsletter
Sign up for Infrastructure as a Newsletter.

Hollie's Hub for Good
Working on improving health and education, reducing inequality, and spurring economic growth? We'd like to help.

Become a contributor
Get paid to write technical tutorials and select a tech-focused charity to receive a matching donation.
