Tutorial
How To Protect Your WordPress Account Login with Two-Factor Authentication on Ubuntu 14.04

Introduction
Security is one of the most important aspects of running a WordPress site. Many of us are tempted to think that hackers won’t bother with our websites, but in reality unauthorized login attempts are a common part of running a server on the public Internet.
In this tutorial, we will learn how to add an extra layer of security to the login process in WordPress: two-factor authentication. This is one of the most significant developments in the realm of cyber-security.
Two-factor authentication or “2FA” incorporates two steps when logging in to a site or system:
- Your username and password
- A randomly generated, time dependent code (that is, the code expires after a fixed duration) called the one-time password (OTP)
There are various ways that you can access the OTP:
- SMS
- Phone call
- Offline, through a mobile application
While high risk systems such as banks and trading accounts use SMS delivery for sensitive transactions, we will be using the offline mode of generating the OTP. Using a mobile application is free and strikes an optimal balance between high availability, implementation cost, and ease-of-use.
Goals
After two-factor authentication is installed and enabled, WordPress will have a more secure login procedure.
In addition to entering your username and password to log in, you will also need to enter a password generated by a mobile application. This means that even if your WordPress credentials are compromised, a hacker won’t be able to log in to WordPress without your phone.
At the end of the tutorial we’ll also go over a fail-proof recovery technique in case you lose your phone. Let’s begin!
Prerequisites
We require a functional installation of WordPress on a DigitalOcean Droplet. While you can adapt this tutorial for existing WordPess installations, it has specifically been tested with:
- An Ubuntu 14.04 Droplet
- A sudo user
- A fresh installation of WordPress with Nginx, which also requires the reader to install LEMP
DigitalOcean’s own WordPress 1-click image is another option as a place to start.
- You also need access to a mobile device running iOS or Android, where you can install the FreeOTP mobile application
Step 1 — Install the Google Authenticator Plugin
In this step, we will install the Google Authenticator plugin for our WordPress site.
The easiest way to install the plugin is via the WordPress dashboard. Log in to your WordPress dashboard now.
Follow the steps mentioned below for a smooth installation:
- From the dashboard, go to Plugins > Add New
- In the Search field, type
google authenticator - This will load a couple of plugins that match the query name
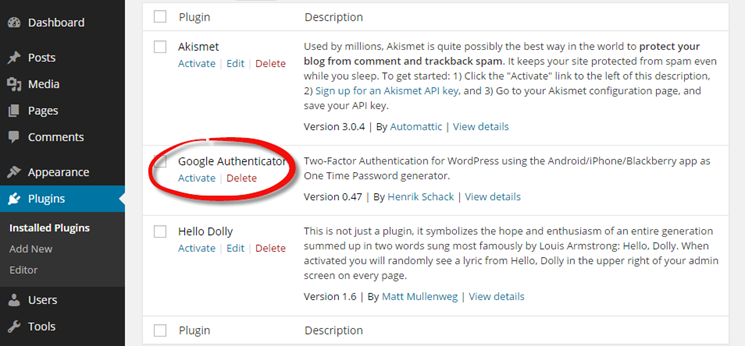
- Install the plugin called Google Authenticator by Henrik Schack
- Once the installation is complete, select the Activate Plugin link
Note: If this is your first time installing a plugin for this WordPress instance, you may have to enter your SSH credentials. Enter your Linux sudo user username and password (or for greater security, upload a public key), and select the SSH2 option.
(Optional) Install the Plugin Manually
Alternately, you could also download the plugin manually and activate it. We describe those steps below.
Log in to your DigitalOcean Droplet and navigate to your plugins directory:
cd /var/www/html/wp-content/plugins/
Note: In this tutorial, we’re following the setup from this tutorial which installs WordPress in the
/var/www/html/directory. If you’re using a different setup, please make sure to enter the correct directory where WordPress is installed.
Next, we download the plugin from the WordPress repository:
wget https://downloads.wordpress.org/plugin/google-authenticator.0.47.zip
Note: At the time of writing, the latest version of the Google Authenticator plugin is version 0.47. Please make sure that you install the latest version.
Step 2 — Download the FreeOTP Application
In this step, we will download and install the FreeOTP app on our mobile device.
FreeOTP is an open-source application that supports two-factor authentication for systems with one-time password protocols. In other words, it’s an alternative to Google Authenticator. We’ll be using this app to generate our one-time passwords to log in to our WordPress site.

FreeOTP is sponsored by RedHat and has apps for Android and iOS. Here are links to get the app and to its official project.
Step 3 — Activate the Authenticator Plugin for Your Profile
In this step we will activate the WordPress plugin for the admin WordPress profile and configure it to work with our FreeOTP app.
In the WordPress dashboard, go to your Profile page found under Users > Your Profile. Locate the sub-section called Google Authenticator Settings.

Let’s take a look at the various configuration options of the plugin:
- Active: Check this box to activate the plugin
- Relaxed: This increases the time limit from 10 seconds to 4 minutes for entering the OTP. Enable this if you’re having trouble copying the OTP in the allotted time
- Description: Enter a name (preferably your blog’s name). This value will be displayed in the FreeOTP app on your mobile device
- Show/Hide QR Code: Click on this button to show the QR code

Connecting the FreeOTP Application
Launch the FreeOTP app on your phone or tablet.
Click the small QR code icon in the app. Hold your phone to scan the QR code from WordPress that should now be showing on your computer screen.
You should immediately see an entry in FreeOTP designated as WordPress with the text you entered in the Description underneath it. This signifies that we have successfully linked our WordPress site to the FreeOTP app.
Save the Changes: Finally, we must save the changes we’ve made so far. In WordPress, scroll to the bottom of the page, and click the Update Profile button.
Step 4 - Test Login
In this step, we’ll verify that two-factor authentication is enabled.
Log out of your WordPress site and try logging in again. You should be greeted with the same login screen, plus a Google Authenticator code input box.
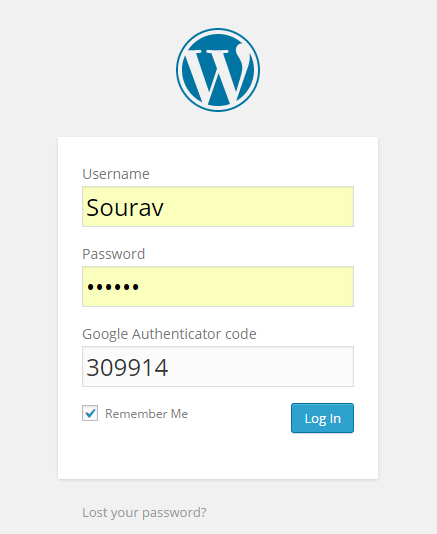
Launch the FreeOTP app on your mobile device. Click the WordPress button to generate a new one-time password.
Type that value in to the input box. You should be able to log in to WordPress.
Enable Two-Factor Authentication for Other Users
You can (and should) enable two-factor authentication for the other users who have access to your WordPress installation. Make sure they’re handy with FreeOTP installed on their own mobile devices when you set it up!
Account Recovery
If you were to lose your phone, then you would be locked out of your WordPress site. That’s a major drawback of implementing two-factor authentication. Thankfully, we have a very simple fix for such a situation.
All you have to do is disable the Google Authenticator plugin.
Launch your DigitalOcean Droplet’s shell and navigate to the plugins directory.
cd /var/www/html/wp-content/plugins/
Rename the google-authenticator folder to something else.
mv 'google-authenticator' 'deactivate-plug-google-authenticator'
This deactivates the plugin because WordPress won’t be able to find the working directory of the plugin.
Next, log in to your WordPress account as usual. This time, it won’t ask for the extra token, just your normal password.
Once you have access to the WordPress administrator dashboard, and have recovered your old device or obtained a new device with FreeOTP installed, you need to enable the plugin gain. From your Droplet’s shell, use the following command:
mv 'deactivate-plug-google-authenticator' 'google-authenticator'
If you’re using your old device, that should be all you need. You can follow Step 4 again to test the login process. Or you may need to go to WP Dashboard > Plugins > Installed Plugins and activate the Google Authenticator plugin once again.
Go to your user profile, under Users > Your Profile and find the Google Authenticator Settings sub-section.
If you’re using a new device this time, then click on Create new secret. A new QR code is generated and the old one is nullified. Scan the new QR code on your new device. This is the same thing we did when we activated two-factor authentication and connected the FreeOTP application as illustrated in Step 3.
Alternately, you could disable two-factor authentication until you find your device. After you’ve selected the appropriate option, make sure to save the changes by clicking on the Update Profile button.
Conclusion
Integrating two-factor authentication is an excellent step toward improving security for your WordPress site. Now, even if an attacker obtains your account credentials, they won’t be able to log in to your account without the OTP code! And the disaster recovery technique is helpful when you can’t find your phone.
What other security steps should WordPress admins take? Share your thoughts in the comments below!
Thanks for learning with the DigitalOcean Community. Check out our offerings for compute, storage, networking, and managed databases.
This textbox defaults to using Markdown to format your answer.
You can type !ref in this text area to quickly search our full set of tutorials, documentation & marketplace offerings and insert the link!


Get our biweekly newsletter
Sign up for Infrastructure as a Newsletter.

Hollie's Hub for Good
Working on improving health and education, reducing inequality, and spurring economic growth? We'd like to help.

Become a contributor
Get paid to write technical tutorials and select a tech-focused charity to receive a matching donation.

Why not using Google Authenticator as mobile app too?
Hello. Does this plugin & security only works with LEMP? not LAMP?
amazing…thanks !