Not using Ubuntu 16.04?
Choose a different version or distribution.
Introduction
Composer is a popular dependency management tool for PHP, created mainly to facilitate installation and updates for project dependencies. It will check which other packages a specific project depends on and install them for you, using the appropriate versions according to the project requirements.
This tutorial will explain how to install and get started with Composer on an Ubuntu 16.04 system.
Prerequisites
For this tutorial, you will need:
- A system running Ubuntu 16.04
- Access to the server as a regular user with sudo permission
Step 1 — Installing the Dependencies
Before we download and install Composer, we need to make sure our server has all dependencies installed.
First, update the package manager cache by running:
- sudo apt-get update
Now, let’s install the dependencies. We’ll need curl in order to download Composer and php-cli for installing and running it. The php-mbstring package is necessary to provide functions for a library we’ll be using. git is used by Composer for downloading project dependencies, and unzip for extracting zipped packages. Everything can be installed with the following command:
- sudo apt-get install curl php-cli php-mbstring git unzip
You can now proceed to the next step.
Step 2 — Downloading and Installing Composer
Composer provides an installer, written in PHP. Make sure you’re in your home directory, and retrieve the installer using curl:
- cd ~
- curl -sS https://getcomposer.org/installer -o composer-setup.php
Next, run a short PHP script to verify that the installer matches the SHA-384 hash for the latest installer found on the Composer Public Keys / Signatures page. You will need to make sure that you substitute the latest hash for the highlighted value below:
- php -r "if (hash_file('SHA384', 'composer-setup.php') === '669656bab3166a7aff8a7506b8cb2d1c292f042046c5a994c43155c0be6190fa0355160742ab2e1c88d40d5be660b410') { echo 'Installer verified'; } else { echo 'Installer corrupt'; unlink('composer-setup.php'); } echo PHP_EOL;"
Installer verified
To install composer globally, use the following:
sudo php composer-setup.php --install-dir=/usr/local/bin --filename=composer
This will download and install Composer as a system-wide command named composer, under /usr/local/bin. The output should look like this:
OutputAll settings correct for using Composer
Downloading 1.1.1...

Composer successfully installed to: /usr/local/bin/composer
Use it: php /usr/local/bin/composer
To test your installation, run:
- composer
And you should get output similar to this:
Output   ______
  / ____/___  ____ ___  ____  ____  ________  _____
 / /   / __ \/ __ `__ \/ __ \/ __ \/ ___/ _ \/ ___/
/ /___/ /_/ / / / / / / /_/ / /_/ (__  )  __/ /
\____/\____/_/ /_/ /_/ .___/\____/____/\___/_/
                    /_/
Composer version 1.1.1 2016-05-17 12:25:44

Usage:
  command [options] [arguments]

Options:
  -h, --help                     Display this help message
  -q, --quiet                    Do not output any message
  -V, --version                  Display this application version
      --ansi                     Force ANSI output
      --no-ansi                  Disable ANSI output
  -n, --no-interaction           Do not ask any interactive question
      --profile                  Display timing and memory usage information
      --no-plugins               Whether to disable plugins.
. . .
This means Composer was succesfully installed on your system.
If you prefer to have separate Composer executables for each project you host on this server, you can simply install it locally, on a per-project basis. Users of NPM will be familiar with this approach. This method is also useful when your system user doesn’t have permission to install software system-wide.
In this case, installation can be done, after downloading and verifying the installation script as above, like so:
- php composer-setup.php
This will generate a composer.phar file in your current directory, which can be executed with ./composer.phar command.
Step 3 — Generating the composer.json File
In order to use Composer in your project, you’ll need a composer.json file. The composer.json file basically tells Composer which dependencies it needs to download for your project, and which versions of each package are allowed to be installed. This is extremely important to keep your project consistent and avoid installing unstable versions that could potentially cause backwards compatibility issues.
You don’t need to create this file manually - it’s easy to run into syntax errors when you do so. Composer auto-generates the composer.json file when you add a dependency to your project using the require command. Additional dependencies can also be added in the same way, without the need to manually edit this file.
The process of using Composer to install a package as dependency in a project usually involves the following steps:
- Identify what kind of library the application needs
- Research a suitable open source library on Packagist.org, the official package repository for Composer
- Choose the package you want to depend on
- Run
composer requireto include the dependency in thecomposer.jsonfile and install the package
We’ll see how this works in practice with a simple demo application.
The goal of this application is to transform a given sentence into a URL-friendly string - a slug. This is commonly used to convert page titles to URL paths (like the final portion of the URL for this tutorial).
Let’s start by creating a directory for our project. We’ll call it slugify:
- cd ~
- mkdir slugify
- cd slugify
Searching for Packages on Packagist
Now it’s time to search Packagist.org for a package that can help us generating slugs. If you search for the term “slug” on Packagist, you’ll get a result similar to this:
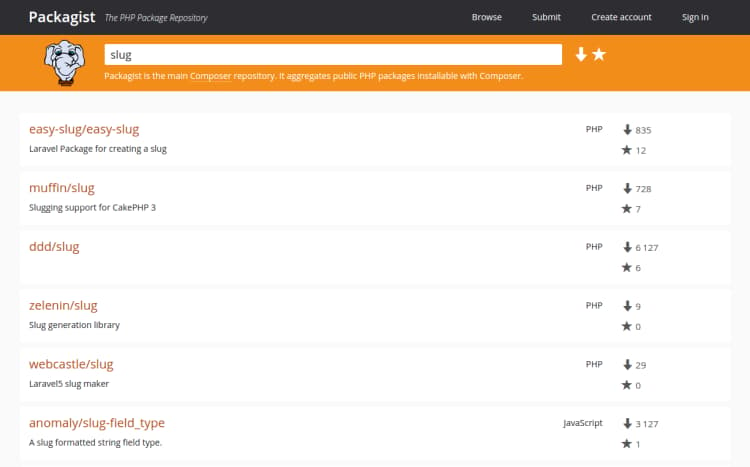
You’ll see two numbers on the right side of each package in the list. The number on the top represents how many times the package was installed, and the number on the bottom shows how many times a package was starred on GitHub. You can reorder the search results based on these numbers (look for the two icons on the right side of the search bar). Generally speaking, packages with more installations and more stars tend to be more stable, since so many people are using them. It’s also important to check the package description for relevance - is that really what you are looking for?
What we need is a simple string-to-slug converter. From the search results, the package cocur/slugify seems to be a good match, with a reasonable amount of installations and stars. (The package is a bit further down the page than the screenshot shows.)
You will notice that the packages on Packagist have a vendor name and a package name. Each package has a unique identifier (a namespace) in the same format GitHub uses for its repositories: vendor/package. The library we want to install uses the namespace cocur/slugify The namespace is what we need in order to require the package in our project.
Requiring a Package
Now that we know exactly which package we want to install, we can run composer require to include it as a dependency and also generate the composer.json file for the project:
- composer require cocur/slugify
OutputUsing version ^2.1 for cocur/slugify
./composer.json has been created
Loading composer repositories with package information
Updating dependencies (including require-dev)
  - Installing cocur/slugify (v2.1.1)
    Downloading: 100%

Writing lock file
Generating autoload files
As you can see from the output, Composer automatically decided which version of the package should be used. If you check your project’s directory now, it will contain two new files: composer.json and composer.lock, and a vendor directory:
- ls -l
Outputtotal 12
-rw-rw-r-- 1 sammy sammy   59 May 17 10:24 composer.json
-rw-rw-r-- 1 sammy sammy 2894 May 17 10:24 composer.lock
drwxrwxr-x 4 sammy sammy 4096 May 17 10:24 vendor
The composer.lock file is used to store information about which versions of each package are installed, and make sure the same versions are used if someone else clones your project and installs its dependencies. The vendor directory is where the project dependencies are located. The vendor folder should not be committed into version control - you only need to include the composer.json and composer.lock files.
When installing a project that already contains a composer.json file, you need to run composer install in order to download the project’s dependencies.
Understanding Version Constraints
If you check the contents of your composer.json file, you’ll see something like this:
- cat composer.json
- Output{
- "require": {
- "cocur/slugify": "^2.1"
- }
- }
You might notice the special character ^ before the version number in composer.json. Composer supports several different constraints and formats for defining the required package version, in order to provide flexibility while also keeping your project stable. The caret (^) operator used by the auto-generated composer.json file is the recommended operator for maximum interoperability, following semantic versioning. In this case, it defines 2.1 as the minimum compatible version, and allows updates to any future version below 3.0.
Generally speaking, you won’t need to tamper with version constraints in your composer.json file. However, some situations might require that you manually edit the constraints - for instance, when a major new version of your required library is released and you want to upgrade, or when the library you want to use doesn’t follow semantic versioning.
Here are some examples to give you a better understanding of how Composer version constraints work:
| Constraint | Meaning | Example Versions Allowed |
|---|---|---|
| ^1.0 | >= 1.0 < 2.0 | 1.0, 1.2.3, 1.9.9 |
| ^1.1.0 | >= 1.1.0 < 2.0 | 1.1.0, 1.5.6, 1.9.9 |
| ~1.0 | >= 1.0 < 2.0.0 | 1.0, 1.4.1, 1.9.9 |
| ~1.0.0 | >= 1.0.0 < 1.1 | 1.0.0, 1.0.4, 1.0.9 |
| 1.2.1 | 1.2.1 | 1.2.1 |
| 1.* | >= 1.0 < 2.0 | 1.0.0, 1.4.5, 1.9.9 |
| 1.2.* | >= 1.2 < 1.3 | 1.2.0, 1.2.3, 1.2.9 |
For a more in-depth view of Composer version constraints, read the official documentation.
Step 4 — Including the Autoload Script
Since PHP itself doesn’t automatically handle the loading of classes, Composer also provides an autoload script that you can include in your project to get autoloading for free. This makes it much easier to work with your dependencies and define your own namespaces.
The only thing you need to do is include the vendor/autoload.php file in your PHP scripts, before any class instantiation.
Let’s come back to the slugify example application. We’ll use nano to create a test.php script where we’ll use the cocur/slugify library:
- nano test.php
- <?php
- require __DIR__ . '/vendor/autoload.php';
-
- use Cocur\Slugify\Slugify;
-
- $slugify = new Slugify();
-
- echo $slugify->slugify('Hello World, this is a long sentence and I need to make a slug from it!');
You can run the script in the command line with:
- php test.php
This should produce the output hello-world-this-is-a-long-sentence-and-i-need-to-make-a-slug-from-it.
Step 5 — Updating the Project Dependencies
Whenever you want to update your project dependencies, you just need to run the update command:
- composer update
This will check for newer versions of the libraries you required in your project. If a newer version is found and it’s compatible with the version constraint defined in the composer.json file, it will replace the previous version installed. The composer.lock file will be updated to reflect these changes.
You can also update one or more specific libraries by running:
- composer update vendor/package vendor2/package2
Conclusion
This tutorial covered the essentials for getting started with Composer on Ubuntu 16.04. Composer is a powerful tool every PHP developer should have in their utility belt.
Beyond providing an easy and reliable way for managing project dependencies, it also establishes a new de facto standard for sharing and discovering PHP packages created by the community.
Thanks for learning with the DigitalOcean Community. Check out our offerings for compute, storage, networking, and managed databases.
About the author
Still looking for an answer?
This textbox defaults to using Markdown to format your answer.
You can type !ref in this text area to quickly search our full set of tutorials, documentation & marketplace offerings and insert the link!
Think you mean Ubuntu 16.04
Not: Prerequisites For this tutorial, you will need:
A system running Ubuntu 14.04
sudo apt-get install curl php-cli php-mbstring git unzip
that command fails on a fresh ubuntu 16.04 VM. There is no php-cli (there is php5-cli) and there is no php-mbstring (nor is there a php5-mbstring).
do this command after u install php 5 or 7
sudo apt-get install -y php libapache2-mod-php php-cli php-zip php-mbstring php-mcrypt php-mysql php-xml
work good
curl -sS https://getcomposer.org/installer | sudo php -- --install-dir=/usr/local/bin --filename=composer
The composer hash in this article is out of date so the line below will only return, “Installer corrupt”.
php -r "if (hash_file('SHA384', 'composer-setup.php') === '92102166af5abdb03f49ce52a40591073a7b859a86e8ff13338cf7db58a19f7844fbc0bb79b2773bf30791e935dbd938') { echo 'Installer verified'; } else { echo 'Installer corrupt'; unlink('composer-setup.php'); } echo PHP_EOL;"
To fix it, you’ll need the current hash from the original site, https://getcomposer.org/download/
root@ssss:~# composer Do not run Composer as root/super user! See https://getcomposer.org/root for details
php -r "if (hash_file('SHA384', 'composer-setup.php') === '92102166af5abdb03f49ce52a40591073a7b859a86e8ff13338cf7db58a19f7844fbc0bb79b2773bf30791e935dbd938') { echo 'Installer verified'; } else { echo 'Installer corrupt'; unlink('composer-setup.php'); } echo PHP_EOL;"
May be Hashing is out of date … always returns installer corrupt
sudo php composer-setup.php --install-dir=/usr/local/bin --filename=composer
this also seems to have some problem , below code worked for me
sudo php installer --install-dir=/usr/local/bin --filename=composer
When installing a project that already contains a composer.json file, you need to run composer install in order to download the project's dependencies.
You mean composer.lock here? As you need to run update for the json, install for the lock.
hello,
i runned
sudo apt-get install curl php-cli php-mbstring git unzip accidentally . how can i remove this files ?
thank you.
I created an account just for this <3 First I wanted to say thank you for providing all the install-by-composer instructions in an easier to read form! I also wanted to point out that the SHA hash verification has changed and the one provided on this page does not work. Information taken from “http://learn.elgg.org/en/stable/intro/install.html” may help:
cd /path/to/wwwroot/ composer self-update composer global require “fxp/composer-asset-plugin:~1.3” composer create-project elgg/starter-project:dev-master . composer install composer install # 2nd call is currently required
Do consider where to specify where to create the elgg project. For example I would change “composer create-project elgg/starter-project:dev-master .” to something like: composer create-project elgg/starter-project:dev-master /var/www/newelgginstall
Please note that if this doesn’t work: sudo php composer-setup.php --install-dir=/usr/local/bin --filename=composer Try also doing this: Please note that if this sudo php composer-setup.php --install-dir=/usr/bin --filename=composer (I changed the install directory from /usr/local/bin to /usr/bin [it will not hurt to have it installed in both places])
Now it would be wise to merge the mod directory from the install folder to the mod directory that was specified during creation above with this command: rsync -r /path/from/installer/mod/ /path/to/finalized/mod/ (both trailing “/” are required here)
I believe that is all I have to add. Sorry it’s kinda all over the place. Thanks again DigitalOcean! I love your tutorials!!!
 This work is licensed under a Creative Commons Attribution-NonCommercial- ShareAlike 4.0 International License.
Become a contributor for community
Get paid to write technical tutorials and select a tech-focused charity to receive a matching donation.

DigitalOcean Documentation
Full documentation for every DigitalOcean product.

Resources for startups and AI-native businesses
The Wave has everything you need to know about building a business, from raising funding to marketing your product.
The developer cloud
Scale up as you grow — whether you're running one virtual machine or ten thousand.

Start building today
From GPU-powered inference and Kubernetes to managed databases and storage, get everything you need to build, scale, and deploy intelligent applications.
