By Elliot Cooper and Kathryn Hancox
Not using Ubuntu 20.04?
Choose a different version or distribution.
The author selected the Open Internet/Free Speech Fund to receive a donation as part of the Write for DOnations program.
Introduction
Jitsi Meet is an open source video-conferencing application based on WebRTC. A Jitsi Meet server provides multi-person video conference rooms that you can access using nothing more than your browser and provides comparable functionality to a Zoom or Skype conference call. The benefit of a Jitsi conference is that all your data only passes through your server and the end-to-end TLS encryption ensures that no one can snoop on the call. With Jitsi you can be sure that your private information stays that way.
In this tutorial, you will install and configure a Jitsi Meet server on Ubuntu 20.04. The default configuration allows anyone to create a new conference room. This is not ideal for a server that is publicly available on the internet so you will also configure Jitsi Meet so that only registered users can create new conference rooms. After you have created the conference room any users can join as long as they have the unique address and the optional password.
Prerequisites
Before you begin this guide you’ll need the following:
- One Ubuntu 20.04 server set up by following the Initial Server Setup with Ubuntu 20.04 tutorial, including a non-root sudo-enabled user. The size of the server you will need mostly depends on the available bandwidth and the number of participants you expect to be using the server. The following table will give you some idea of what is needed.
- A domain name configured to point to your server. You can learn how to point domains to DigitalOcean Droplets by following the How To Set Up a Host Name with DigitalOcean tutorial. Throughout this guide, the example domain name
jitsi.your_domainis used.
When you are choosing a server to run your Jitsi Meet instance you will need to consider the system resources needed to host conference rooms. The following benchmark information was collected from a single-core virtual machine using high-quality video settings:
| CPU | Server Bandwidth | |
|---|---|---|
| Two Participants | 3% | 30Kbps Up, 100Kbps Down |
| Three Participants | 15% | 7Mbps Up, 6.5Mbps Down |
The jump in resource use between two and three participants is because Jitsi will route the call data directly between the clients when there are two of them. When more than two clients are present then call data is routed through the Jitsi Meet server.
Log in to your server as the non-root, sudo-enabled user before starting Step 1.
Step 1 — Setting the System Hostname
In this step, you will change the system’s hostname to match the domain name that you intend to use for your Jitsi Meet instance and resolve that hostname to the localhost IP, 127.0.0.1. Jitsi Meet uses both of these settings when it installs and generates its configuration files.
First, set the system’s hostname to the domain name that you will use for your Jitsi instance. The following command will set the current hostname and modify the /etc/hostname that holds the system’s hostname between reboots:
- sudo hostnamectl set-hostname jitsi.your_domain
The command that you ran breaks down as follows:
hostnamectl: A utility from the systemd tool suite to manage the system hostname.set-hostname: Sets the system hostname.
Check that this was successful by running the following:
- hostname
This will return the hostname you set with the hostnamectl command:
Outputjitsi.your-domain
Next, you will set a local mapping of the server’s hostname to the loopback IP address, 127.0.0.1. Do this by opening the /etc/hosts with a text editor:
- sudo nano /etc/hosts
Then, add the following line:
127.0.0.1 jitsi.your_domain
This local mapping of your Jitsi Meet server’s domain name to 127.0.0.1 is important because your Jitsi Meet server uses several networked processes on your server that accept local connections on the 127.0.0.1 IP address from each other. These connections are authenticated and encrypted with a TLS certificate, which is registered to your domain name. Locally mapping the domain name to 127.0.0.1 makes it possible to use the TLS certificate for these local network connections.
Your server now has the hostname that Jitsi requires when installed. In the next step, you will open the firewall ports that are needed by Jitsi and the TLS certificate installer.
Step 2 — Configuring the Firewall
When you followed the Initial Server Setup with Ubuntu 20.04 guide you enabled the UFW firewall and opened the SSH port. The Jitsi server needs some ports opened so that it can communicate with the call clients. Also, the TLS installation process needs to have a port open so that it can authenticate the certificate request.
The ports that you will open are the following:
80/tcp: Port used in the TLS certificate request.443/tcp: Port used for the conference room creation web page.4443/tcp10000/udp: Ports that will transmit and receive the encrypted call traffic.
Run the following ufw commands to open these ports:
- sudo ufw allow 80/tcp
- sudo ufw allow 443/tcp
- sudo ufw allow 4443/tcp
- sudo ufw allow 10000/udp
Check that they were all added with the ufw status command:
- sudo ufw status
You will receive the following output if these ports are open:
OutputStatus: active

To                         Action      From
--                         ------      ----
OpenSSH                    ALLOW       Anywhere
80/tcp                     ALLOW       Anywhere
443/tcp                    ALLOW       Anywhere
4443/tcp                   ALLOW       Anywhere
10000/udp                  ALLOW       Anywhere
OpenSSH (v6)               ALLOW       Anywhere (v6)
80/tcp (v6)                ALLOW       Anywhere (v6)
443/tcp (v6)               ALLOW       Anywhere (v6)
4443/tcp (v6)              ALLOW       Anywhere (v6)
10000/udp (v6)             ALLOW       Anywhere (v6)
The server is now ready for the Jitsi installation, which you will complete in the next step.
Step 3 — Installing Jitsi Meet
In this step, you will add the Jitsi stable repository to your server and then install the Jitsi Meet package from that repository. This will ensure that you are always running the latest stable Jitsi Meet package.
First, download the Jitsi GPG key with the wget downloading utility:
- wget https://download.jitsi.org/jitsi-key.gpg.key
The apt package manager will use this GPG key to validate the packages that you will download from the Jitsi repository.
Next, add the GPG key you downloaded to apt’s keyring using the apt-key utility:
- sudo apt-key add jitsi-key.gpg.key
You can now delete the GPG key file as it is no longer needed with this command:
- rm jitsi-key.gpg.key
Now, you will add the Jitsi repository to your server by creating a new sources file that contains the Jitsi repository. Open and create the new file:
- sudo nano /etc/apt/sources.list.d/jitsi-stable.list
Add this line to the file for the Jitsi repository:
deb https://download.jitsi.org stable/
Save and exit the editor.
Finally, perform a system update to collect the package list from the Jitsi repository and then install the jitsi-meet package:
- sudo apt update
- sudo apt install jitsi-meet
During the installation of jitsi-meet you will be prompted to enter the domain name (for example, jitsi.your-domain) that you want to use for your Jitsi Meet instance.
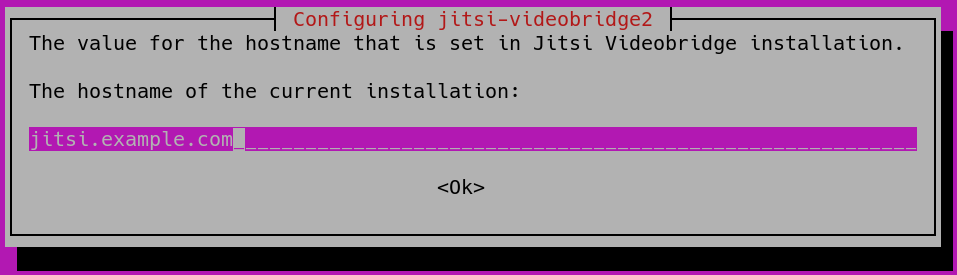
Note: You move the cursor from the hostname field to highlight the <OK> button with the TAB key. Press ENTER when <OK> is highlighted to submit the hostname.
You will then be shown a new dialog box that asks if you want Jitsi to create and use a self-signed TLS certificate or use an existing one if you have one:
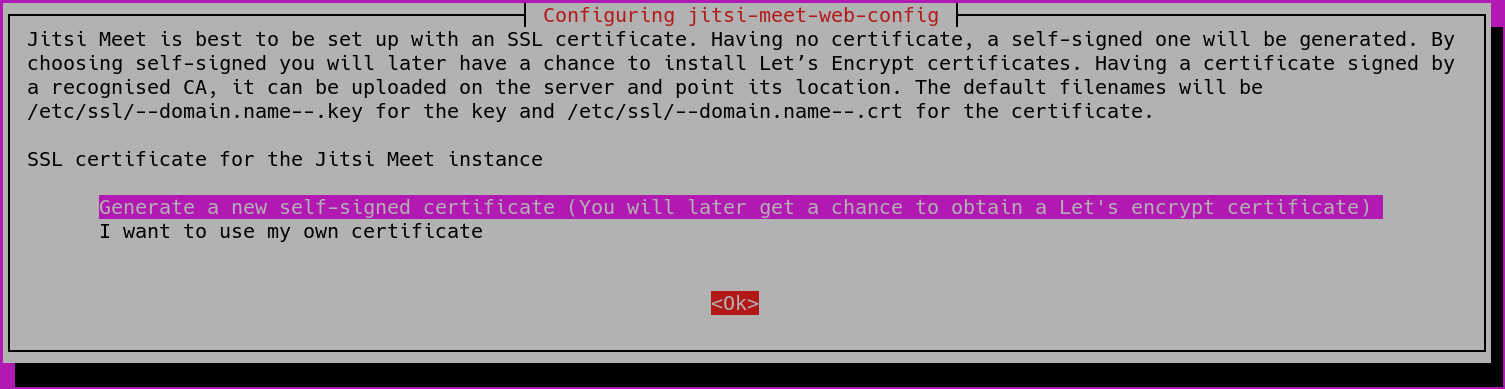
If you do not have a TLS certificate for your Jitsi domain select the first, Generate a new self-signed certificate, option.
Your Jitsi Meet instance is now installed using a self-signed TLS certificate. This will cause browser warnings so you will get a signed TLS certificate in the next step.
Step 4 — Obtaining a Signed TLS Certificate
Jitsi Meet uses TLS certificates to encrypt the call traffic so that no one can listen to your call as it travels over the internet. TLS certificates are the same certificates that are used by websites to enable HTTPS URLs.
Jitsi Meet supplies a script to automatically download a TLS certificate for your domain. Run this certificate installation script provided by Jitsi Meet at /usr/share/jitsi-meet/scripts/install-letsencrypt-cert.sh with the following command:
- sudo /usr/share/jitsi-meet/scripts/install-letsencrypt-cert.sh
The script prints the following information when you run it and asks you to supply an email address:
Output-------------------------------------------------------------------------
This script will:
- Need a working DNS record pointing to this machine(for domain jitsi.your_domain)
- Download certbot-auto from https://dl.eff.org to /usr/local/sbin
- Install additional dependencies in order to request Let’s Encrypt certificate
- If running with jetty serving web content, will stop Jitsi Videobridge
- Configure and reload nginx or apache2, whichever is used
- Configure the coturn server to use Let's Encrypt certificate and add required deploy hooks
- Add command in weekly cron job to renew certificates regularly
You need to agree to the ACME server's Subscriber Agreement
(https://letsencrypt.org/documents/LE-SA-v1.1.1-August-1-2016.pdf)
by providing an email address for important account notifications
Enter your email and press [ENTER]:
This email address will be submitted to the certificate issuer https://letsencrypt.org and will be used to notify you about security and other matters related to the certificate. You must enter an email address here to proceed with the installation.
The script will complete the installation and configuration of an SSL certificate for your Jitsi server without needing any more user input.
The default configuration for Jitsi Meet is that anyone visiting your Jitsi Meet server homepage can create a new conference room. This will use your server’s system resources to run the conference room and is not desirable for unauthorized users. In the next step, you will configure your Jitsi Meet instance to only allow registered users to create conference rooms.
Step 5 — Locking Conference Creation
In this step, you will configure your Jitsi Meet server to only allow registered users to create conference rooms. The files that you will edit were generated by the installer and are configured with your domain name.
The variable jitsi.your_domain will be used in place of a domain name in the following examples.
First, open /etc/prosody/conf.avail/jitsi.your_domain.cfg.lua with a text editor:
- sudo nano /etc/prosody/conf.avail/your_domain.cfg.lua
Edit this line:
authentication = "anonymous"
To
authentication = "internal_plain"
This configuration tells Jitsi Meet to force username and password authentication before allowing conference room creation by a new visitor.
Then, in the same file, add the following section to the end of the file:
VirtualHost "guest.jitsi.your_domain"
    authentication = "anonymous"
    c2s_require_encryption = false
This configuration allows anonymous users to join conference rooms that were created by an authenticated user. However, the guest must have a unique address and an optional password for the room to enter it.
Here, you added guest. to the front of your domain name. For example, the correct name to put here for jitsi.your_domain is guest.jitsi.your_domain. The guest. hostname is only used internally by Jitsi Meet, you will never enter it into a browser or need to create a DNS record for it.
Open another configuration file at /etc/jitsi/meet/jitsi.your_domain-config.js with a text editor:
- sudo nano /etc/jitsi/meet/jitsi.your_domain-config.js
Edit this line:
// anonymousdomain: 'guest.jitsi.your_domain',
To:
anonymousdomain: 'guest.jitsi.your_domain',
Again, using the guest.jitsi.your_domain hostname that you used previously. This configuration tells Jitsi Meet what internal hostname to use for the un-authenticated guests.
Next, open /etc/jitsi/jicofo/sip-communicator.properties:
- sudo nano /etc/jitsi/jicofo/sip-communicator.properties
And add the following line to complete the configuration changes:
org.jitsi.jicofo.auth.URL=XMPP:jitsi.your_domain
This configuration points one of the Jitsi Meet processes to the local server that performs the user authentication that is now required.
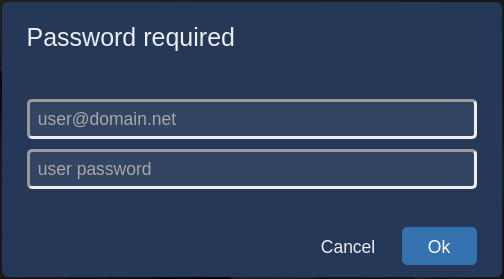
Your Jitsi Meet instance is now configured so that only registered users can create conference rooms. After a conference room is created, anyone can join it without needing to be a registered user. All they will need is the unique conference room address and an optional password set by the room’s creator.
Now that Jitsi Meet is configured to require authenticated users for room creation you need to register these users and their passwords. You will use the prosodyctl utility to do this.
Run the following command to add a user to your server:
- sudo prosodyctl register user your_domain password
The user that you add here is not a system user. They will only be able to create a conference room and are not able to log in to your server via SSH.
Finally, restart the Jitsi Meet processes to load the new configuration:
- sudo systemctl restart prosody.service
- sudo systemctl restart jicofo.service
- sudo systemctl restart jitsi-videobridge2.service
The Jitsi Meet instance will now request a username and password with a dialog box when a conference room is created.
Your Jitsi Meet server is now set up and securely configured.
Conclusion
In this article, you deployed a Jitsi Meet server that you can use to host secure and private video conference rooms. You can extend your Jitsi Meet instance with instructions from the Jitsi Handbook.
Thanks for learning with the DigitalOcean Community. Check out our offerings for compute, storage, networking, and managed databases.
About the author(s)
I have been a Linux Systems Administrator and technical content creator for more than 20 years. I am passionate about using and promoting OSS.
Former Senior Technical Editor at DigitalOcean, with a strong focus on DevOps and System Administration content. Areas of expertise include Terraform, PyTorch, Python, and Django.
Still looking for an answer?
This textbox defaults to using Markdown to format your answer.
You can type !ref in this text area to quickly search our full set of tutorials, documentation & marketplace offerings and insert the link!
Hello thanks for your tutorial i have a problem
sudo prosodyctl register user your_domain password The given hostname does not exist in the config
but sudo prosodyctl register user jitsi.your_domain password works ! but when i try to connect user@jitsi.your_domain is not accepted, while user@your_domain accepts the password but the display just freeze at connecting
so i cannot even open a conference right now
in your tutorial there is some parts not clear, example : sudo nano /etc/prosody/conf.avail/your_domain.cfg.lua Edit this line: /etc/prosody/conf.avail/jitsi.your_domain.cfg.lua
in the sudo command, it is your_domain.cfg.lua, but below, it is jitsi.your_domain.cfg.lua, it is confusing
i don’t know when to use only the domain name or when to use the FQDN
can you help me ?
Thanks
I follow the steps to install jitsi server , at vthe end , when I restart the server , nothing happen. I try type domain or IP, still timing out. Don’t know what is going on
Perfect Documentation.
do you have documentation for jigasi for jitsi recording or streaming
Thanks
Hello, Thanks for this comprehensive tutorial, is there a way to launch meeting from my machine? without install a browser or basically without installing a gui desktop environment?
I agree with user squirrel007; the part below needs clarification.
You wrote:
Then, in the same file, add the following section to the end of the file:
/etc/prosody/conf.avail/your_domain.cfg.lua
VirtualHost “guest.jitsi.your_domain” authentication = “anonymous” c2s_require_encryption = false
This configuration allows anonymous users to join conference rooms that were created by an authenticated user. However, the guest must have a unique address and an optional password for the room to enter it.
Here, you added guest. to the front of your domain name. For example, the correct name to put here for jitsi.your_domain is guest.jitsi.your_domain. The guest. hostname is only used internally by Jitsi Meet, you will never enter it into a browser or need to create a DNS record for it.
You stated add guest in front of your domain, but is it add jitsi.(your domain), or add jitsi.your_domain literally. There seems to be some contradiction in the instructions.
Thank you for the tutorial
when I try to access my domain, I get this message in the browser. how to set it up?
Welcome to nginx!
If you see this page, the nginx web server is successfully installed and working. Further configuration is required.

For online documentation and support please refer to nginx.org.
Commercial support is available at nginx.com.

Thank you for using nginx.
I am having the hardest time trying to understand why I don’t get that login screen at the end…
I have checked here and git hub and my settings seem proper but I don’t get asked for a username or password when I got to jitsi.mydomain.com it allows me to start a meeting. On mobile app it asks me for a password to create the room…
My install seems fine just no login… frustrating.
To add, other than not having the login popup I don’t have moderator settings on rooms I create so I seem to be close.
This comment has been deleted
 This work is licensed under a Creative Commons Attribution-NonCommercial- ShareAlike 4.0 International License.
Become a contributor for community
Get paid to write technical tutorials and select a tech-focused charity to receive a matching donation.

DigitalOcean Documentation
Full documentation for every DigitalOcean product.

Resources for startups and AI-native businesses
The Wave has everything you need to know about building a business, from raising funding to marketing your product.
The developer cloud
Scale up as you grow — whether you're running one virtual machine or ten thousand.

Start building today
From GPU-powered inference and Kubernetes to managed databases and storage, get everything you need to build, scale, and deploy intelligent applications.
