Not using Ubuntu 12.04?
Choose a different version or distribution.
Status: Deprecated
This article covers a version of Ubuntu that is no longer supported. If you are currently operate a server running Ubuntu 12.04, we highly recommend upgrading or migrating to a supported version of Ubuntu:
- Upgrade to Ubuntu 14.04.
- Upgrade from Ubuntu 14.04 to Ubuntu 16.04
- Migrate the server data to a supported version
Reason: Ubuntu 12.04 reached end of life (EOL) on April 28, 2017 and no longer receives security patches or updates. This guide is no longer maintained.
See Instead:
This guide might still be useful as a reference, but may not work on other Ubuntu releases. If available, we strongly recommend using a guide written for the version of Ubuntu you are using. You can use the search functionality at the top of the page to find a more recent version.
About Wordpress
Wordpress is a free and open source website and blogging tool that uses php and MySQL. It was created in 2003 and has since then expanded to manage 22% of all the new websites created and has over 20,000 plugins to customize its functionality.
Step One—Prerequisites!
This tutorial covers installing Wordpress. Before you go through it, make sure your server is ready for Wordpress. You need root privileges (check out steps 3 and 4 for details): Initial Server Setup
You need to have nginx, MySQL, and PHP-FPM installed on your server: LEMP tutorial
Only once you have the user and required software should you proceed to install wordpress!
Step Two—Download WordPress
We can download Wordpress straight from their website:
wget http://wordpress.org/latest.tar.gz
This command will download the zipped wordpress package straight to your user's home directory. You can unzip it the the next line:
tar -xzvf latest.tar.gz
Step Three—Create the WordPress Database and User
After we unzip the wordpress files, they will be in a directory called wordpress in the home directory on the virtual private server.
Now we need to switch gears for a moment and create a new MySQL directory for wordpress.
Go ahead and log into the MySQL Shell:
mysql -u root -p
Login using your MySQL root password, and then we need to create a wordpress database, a user in that database, and give that user a new password. Keep in mind that all MySQL commands must end with semi-colon.
First, let's make the database (I'm calling mine wordpress for simplicity's sake; feel free to give it whatever name you choose):
CREATE DATABASE wordpress;
Query OK, 1 row affected (0.00 sec)
Then we need to create the new user. You can replace the database, name, and password, with whatever you prefer:
CREATE USER wordpressuser@localhost;
Query OK, 0 rows affected (0.00 sec)
Set the password for your new user:
SET PASSWORD FOR wordpressuser@localhost= PASSWORD("password");
Query OK, 0 rows affected (0.00 sec)
Finish up by granting all privileges to the new user. Without this command, the wordpress installer will not be able to start up:
GRANT ALL PRIVILEGES ON wordpress.* TO wordpressuser@localhost IDENTIFIED BY 'password';
Query OK, 0 rows affected (0.00 sec)
Then refresh MySQL:
FLUSH PRIVILEGES;
Query OK, 0 rows affected (0.00 sec)
Exit out of the MySQL shell:
exit
Step Four—Setup the WordPress Configuration
The first step to is to copy the sample WordPress configuration file, located in the WordPress directory, into a new file which we will edit, creating a new usable WordPress config:
cp ~/wordpress/wp-config-sample.php ~/wordpress/wp-config.php
Then open the wordpress config:
sudo nano ~/wordpress/wp-config.php
Find the section that contains the field below and substitute in the correct name for your database, username, and password:
// ** MySQL settings - You can get this info from your web host ** //
/** The name of the database for WordPress */
define('DB_NAME', 'wordpress');

/** MySQL database username */
define('DB_USER', 'wordpressuser');

/** MySQL database password */
define('DB_PASSWORD', 'password');
Save and Exit.
Step Five—Copy the Files
We are almost done uploading Wordpress to the server. We need to create the directory where we will keep the wordpress files:
sudo mkdir -p /var/www
Transfer the unzipped WordPress files to the website's root directory.
sudo cp -r ~/wordpress/* /var/www
We can modify the permissions of /var/www to allow future automatic updating of Wordpress plugins and file editing with SFTP. If these steps aren't taken, you may get a "To perform the requested action, connection information is required" error message when attempting either task.
First, switch in to the web directory:
cd /var/www/
Give ownership of the directory to the nginx user, replacing the "username" with the name of your server user.
sudo chown www-data:www-data * -R
sudo usermod -a -G www-data username
Step Six—Set Up Nginx Server Blocks
Now we need to set up the WordPress virtual host.
Create a new file for the for WordPress host, copying the format from the default configuration:
sudo cp /etc/nginx/sites-available/default /etc/nginx/sites-available/wordpress
Open the WordPress virtual host:
sudo nano /etc/nginx/sites-available/wordpress
The configuration should include the changes below (the details of the changes are under the config information):
server {
        listen   80;


        root /var/www;
        index index.php index.html index.htm;

        server_name 192.34.59.214;

        location / {
                try_files $uri $uri/ /index.php?q=$uri&$args;
        }

        error_page 404 /404.html;

        error_page 500 502 503 504 /50x.html;
        location = /50x.html {
              root /usr/share/nginx/www;
        }

        # pass the PHP scripts to FastCGI server listening on 127.0.0.1:9000
        location ~ \.php$ {
                try_files $uri =404;
                #fastcgi_pass 127.0.0.1:9000;
                # With php5-fpm:
                fastcgi_pass unix:/var/run/php5-fpm.sock;
                fastcgi_index index.php;
                include fastcgi_params;
                 }


}
Here are the details of the changes:
- Change the root to /var/www/
- Add index.php to the index line.
- Change the server_name from local host to your domain name or IP address (replace the example.com in the configuration)
- Change the "try_files $uri $uri/ /index.html;" line to "try_files $uri $uri/ /index.php?q=$uri&$args;" to enable Wordpress Permalinks with nginx
- Uncomment the correct lines in “location ~ \.php$ {“ section
Save and Exit that file.
Step Seven—Activate the Server Block
Although all the configuration for worpress has been completed, we still need to activate the server block by creating a symbolic link:
sudo ln -s /etc/nginx/sites-available/wordpress /etc/nginx/sites-enabled/wordpress
Additionally, delete the default nginx server block.
sudo rm /etc/nginx/sites-enabled/default
Install php5-mysql:
sudo apt-get install php5-mysql
Then, as always, restart nginx and php-fpm:
sudo service nginx restart
sudo service php5-fpm restart
Step Eight—RESULTS: Access the WordPress Installation
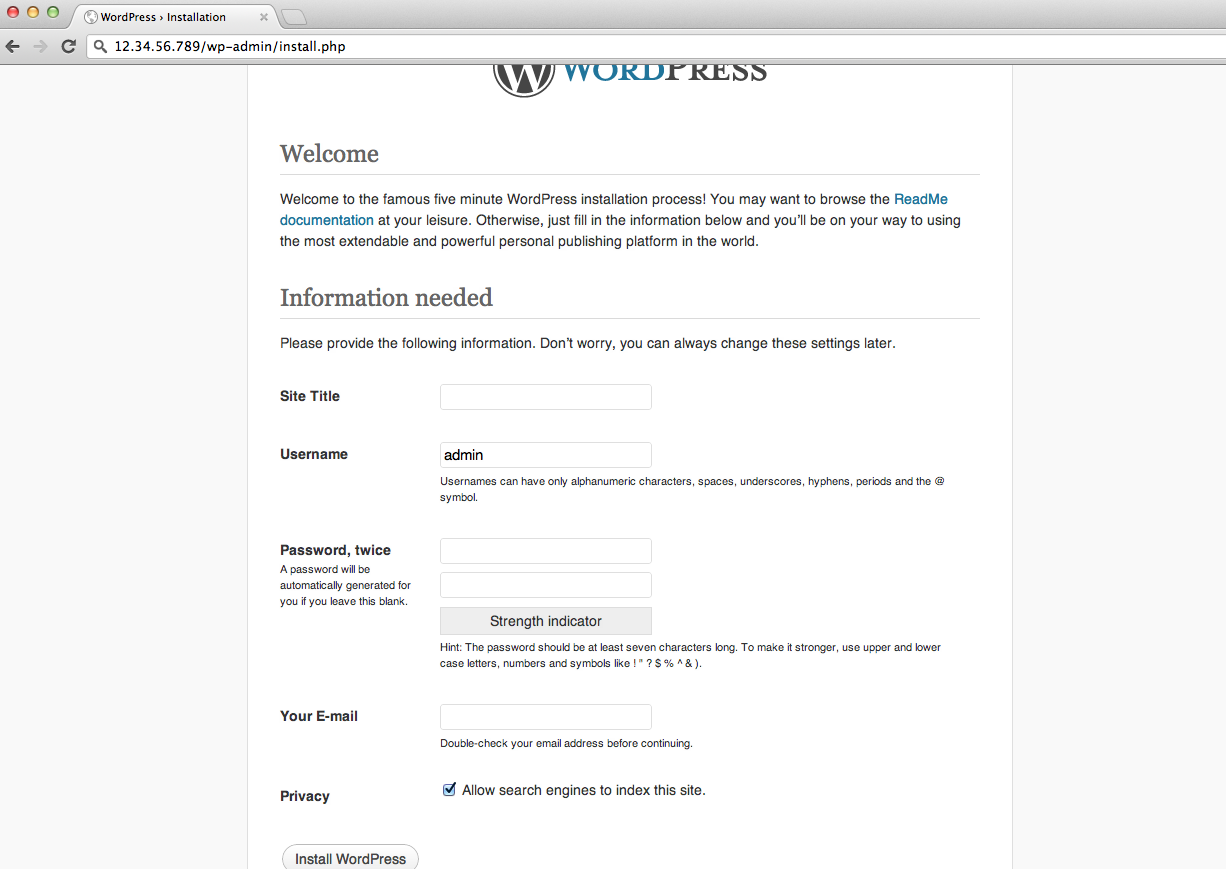
Once that is all done, the wordpress online installation page is up and waiting for you:
Access the page by visiting your site's domain or IP address (eg. example.com/wp-admin/install.php) and fill out the short online form (it should look like this).
See More
Once Wordpress is installed, you have a strong base for building your site.
If you want to encrypt the information on your site, you can Install an SSL Certificate
Thanks for learning with the DigitalOcean Community. Check out our offerings for compute, storage, networking, and managed databases.
About the author

Former Director of Community at DigitalOcean. Expert in cloud topics including LAMP Stack, CentOS, Ubuntu, MySQL, SSL certificates, and more.
Still looking for an answer?
 This work is licensed under a Creative Commons Attribution-NonCommercial- ShareAlike 4.0 International License.
Become a contributor for community
Get paid to write technical tutorials and select a tech-focused charity to receive a matching donation.

DigitalOcean Documentation
Full documentation for every DigitalOcean product.

Resources for startups and AI-native businesses
The Wave has everything you need to know about building a business, from raising funding to marketing your product.
The developer cloud
Scale up as you grow — whether you're running one virtual machine or ten thousand.

Start building today
From GPU-powered inference and Kubernetes to managed databases and storage, get everything you need to build, scale, and deploy intelligent applications.