By Josh Barnett
Not using Ubuntu 14.04?
Choose a different version or distribution.
Introduction
Ubuntu has two types of releases, standard and Long Term Support (or “LTS”). Standard updates are released every six months and receive security updates from Ubuntu for at least nine months, while LTS updates are released every two years and are supported for at least five years.
If you are currently using Ubuntu 12.04, you will have security updates until at least October 2017. If you want to extend that support time, and get access to new features and updates, you can upgrade your server to the newest LTS release. In this guide, we will go over how to safely upgrade an Ubuntu 12.04 server to 14.04, taking care to preserve our existing configurations.
Warning: As with almost any upgrade between major releases of an operating system, this process carries an inherent risk of failure, data loss, or broken software configuration. Comprehensive backups and extensive testing are strongly advised.
To avoid these problems, when possible, we recommend migrating to a fresh Ubuntu 14.04 server rather than upgrading in-place. You may still need to review differences in software configuration when upgrading, but the core system will likely have greater stability. You can follow our series on how to migrate to a new Linux server to learn how to migrate between servers.
Step One — Backing Up Existing Data
Since you are likely using your 12.04 server to handle sensitive tasks or data, it’s very important that you back up the current state of your server configuration and files. While the process that we will be going over is the recommended way to perform a release upgrade, there is no way to guarantee that a release upgrade won’t cause issues with software or configurations. Backing up your data beforehand will make it much easier to recover in case of a problem resulting from the upgrade.
In this step, we will cover multiple backup methods. If you are using DigitalOcean, it’s advised that you make a snapshot through the control panel in addition to syncing the files to your local computer. This way, you have the ability to either restore individual files or restore the entire snapshot, depending on the nature of the scenario that necessitates a restore.
Sync Files to Local Computer
There are several effective ways to back up files on an Ubuntu server. In this example, we are going to use rsync to copy our server’s files to a backup folder on our local computer. We won’t be able to back up every folder in the file system, since some of them are temporary storage for running processes. Fortunately, we can exclude these folders from our backup.
You can use the following command to copy the server’s file system, taking care to change the server credentials marked in red. If you use SSH key-based authentication on your server, your root user won’t have a password set by default, so you’ll need to point rsync to your private key file. This file is usually found at /home/username/.ssh/id_rsa. Since we are downloading server files locally, the command must be run from our local computer, not on the server that we are backing up.
sudo rsync -aAXv --exclude={"/dev/*","/proc/*","/sys/*","/tmp/*","/run/*","/mnt/*","/media/*","/lost+found"} -e 'ssh -i /path/to/private_key' root@SERVER_IP_ADDRESS:/* ~/backup/
The aAX flags tell rsync to preserve important file attributes like permissions, ownerships, and modification times. If you are using Docker or another virtualization tool, you should add the S flag so that rsync properly handles sparse files, like virtual storage.
Note: rsync is only available for Unix-based operating systems like Linux and OS X. If your local computer is running Windows, you can copy your server’s files using an SFTP client like Filezilla: How To Use Filezilla to Transfer and Manage Files Securely on your VPS
If you need to restore parts of your server files later on, you can use rsync again with the source and destination parameters reversed, like so: sudo rsync -aAXv -e 'ssh -i /path/to/private_key' ~/backup/ root@SERVER_IP_ADDRESS:/*
Make DigitalOcean Droplet Snapshot
If you are using DigitalOcean, you can create a snapshot of the Droplet that you can easily restore if anything goes wrong. Starting in October of 2016, snapshots cost $0.05 per gigabyte per month, based on the amount of utilized space within the filesystem. If this option is available to you, it’s a good idea to use both backup methods for the sake of redundancy, rather than choosing one method over the other. You can delete the snapshot once you’ve verified the upgrade has been completed without problems.
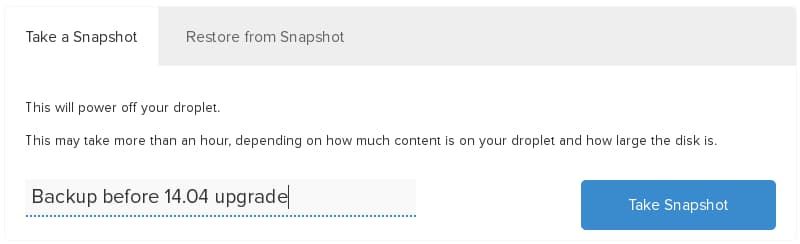
First, power off your server so that its current state is preserved for the snapshot. Although it is possible to snapshot a running system, to ensure that the data is consistent on disk, it is best to power off:
sudo poweroff
Next, log in to your DigitalOcean control panel and select the Droplet that you’re going to be upgrading. Go to the Snapshots panel, fill in a name for your new snapshot, and select Take Snapshot.
Once the snapshot process is finished, your server will automatically be rebooted, so you can reconnect to it via SSH to continue with the upgrade.
If you need to restore your server to this snapshot later on, you can rebuild from that image in the Destroy section of your Droplet’s control panel.
Step Two — Preparing for the Upgrade
Before we begin with the release upgrade, we need to make sure that the software already installed is up-to-date. Updating our installed software now makes the release upgrade less of a leap forward for many packages, which will reduce the likelihood of errors.
We’ll use apt to update our local package index, then upgrade the software that is currently installed:
sudo apt-get update
sudo apt-get upgrade
We’re going to use update-manager-core to manage the release upgrade. This package is installed by default in most Ubuntu 12.04 installations, but we can verify whether or not it is installed on the server by using apt-cache:
apt-cache policy update-manager-core
If the command does not return an installed version number (i.e. if it shows Installed: (none)), then use apt to download the update manager from Ubuntu’s software repositories:
sudo apt-get install update-manager-core
Once we have confirmed that the update manager is installed, we are ready to begin the upgrade process.
Step Three — Upgrading to 14.04
We can now run the do-release-upgrade command with root privileges. This is an automated script that will pull the newest release software from Ubuntu’s repositories and apply the various upgrades to your server. This upgrade can take several minutes and will be prompting you from time to time, so keep an eye on your SSH session while the upgrade is in progress.
sudo do-release-upgrade
While the update manager will handle most of the details involved in moving to the next LTS release, we will still need to make a few decisions as prompts come up. Most of these prompts will ask about overwriting existing configuration files. The default action is to keep the configuration that already exists, and that’s generally the best option to ensure stability. However, be sure to read each prompt carefully before choosing an option, and don’t be afraid to look up the package in question to be sure that you make the appropriate choice.
Near the end of the upgrade process, you will be prompted to reboot your server. Confirm with “y” to initiate the reboot.
Your SSH session will be disconnected, so you’ll need to reconnect to confirm that the upgrade went through as expected. Once you’ve reconnected, use lsb_release to verify your new Ubuntu version number:
lsb_release -a
You should see an output similar to the following:
No LSB modules are available.
Distributor ID:	Ubuntu
Description:	Ubuntu 14.04.1 LTS
Release:	14.04
Codename:	trusty
If the Release: shows 14.04, then you have successfully upgraded your Ubuntu LTS server!
Step Four — Upgrading the Kernel
Even though you’ve downloaded a new kernel to go with your updated release, the kernel might not be activated for use by the software used to host your server. If you are using DigitalOcean, the hosting software (called KVM) maintains the kernel outside of the server image, and will need to be updated separately.
You can see which kernel version your server is currently using with uname:
uname -ri
Your output will look something like this:
3.2.0-24-virtual i686
If the kernel version is lower than 3.13, that means that your server is not yet using Ubuntu 14.04’s kernel. While it’s unlikely that an older kernel will present issues with software, you might see improved performance or helpful new features with a newer kernel.
During the upgrade process, your server downloaded a new kernel to be loaded for use on Ubuntu 14.04. You can see which kernel version was downloaded by checking the contents of the /lib/modules directory:
ls /lib/modules
You will see a list that looks something like the following:
3.13.0-39-generic 3.2.0-24-virtual
In order to use a newly installed kernel, you must update the kernel selection in your droplet’s control panel, then power off and boot your droplet.
First, log in to your DigitalOcean control panel and select the server that you’re going to be upgrading. In the Settings panel, select the Kernel tab.
Here you will see a drop-down list of available kernels. Select the kernel that matches the distribution, release, and version number of the one that you downloaded (3.13.0-39-generic in the above example):
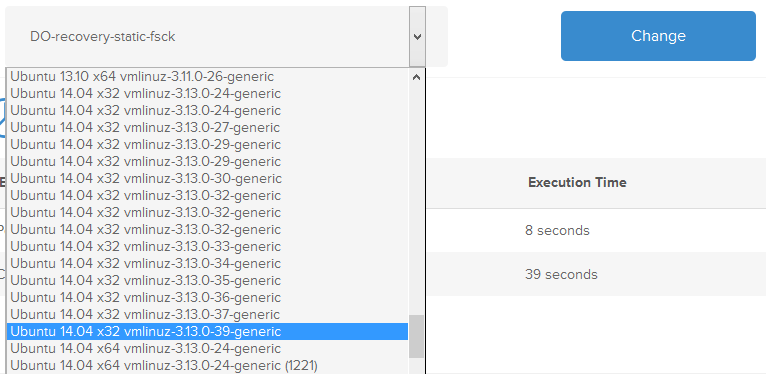
Once the kernel is selected, click Change to load that kernel onto your server. To begin using the new kernel, you’ll need to power down the server. While you can do this in the control panel, that is similar to unplugging the power from a computer, so it’s recommended that you power down through the terminal instead:
sudo poweroff
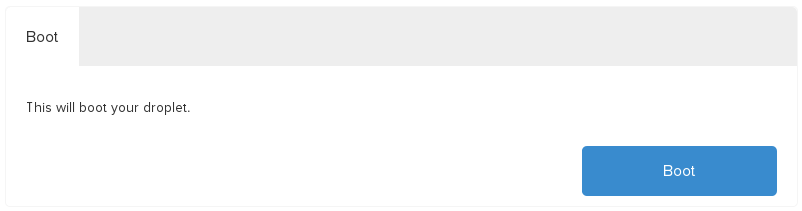
Once the server is completely shut down, you can boot it back up in the control panel. In the Power panel, select Boot.
Now you can reconnect to your server via SSH and use uname to confirm that the new kernel is in use:
uname -ri
You should see an output similar to the following:
3.13.0-39-generic i686
If the kernel version matches the kernel that you loaded on the control panel, then you have successfully updated your kernel.
Conclusion
You have now upgraded your Ubuntu server to the latest LTS release, giving you access to the latest software updates as well as security updates until at least 2019. If you run into compatibility issues with a program after the upgrade, check that program’s documentation to see if there were any significant changes that require changes to its configuration.
Thanks for learning with the DigitalOcean Community. Check out our offerings for compute, storage, networking, and managed databases.
About the author
Still looking for an answer?
This textbox defaults to using Markdown to format your answer.
You can type !ref in this text area to quickly search our full set of tutorials, documentation & marketplace offerings and insert the link!
I’m a little unsure, how much an issue not upgrading is?
Are there any security risks if you don’t upgrade?
Or are you literally extending the time that you will continue to get software update for?
I’m running Ubuntu 12.04 LTS
Thanks
i have ubuntu 12.10 vps. i followed your post and stuck at step tree due to this error:
apt-cache policy update-manager-core
update-manager-core: Installed: 1:0.156.14.18 Candidate: 1:0.156.14.18 Version table: *** 1:0.156.14.18 0 500 http://archive.ubuntu.com/ubuntu/ precise-updates/main amd64 Package s 100 /var/lib/dpkg/status 1:0.156.14.5 0 500 http://security.ubuntu.com/ubuntu/ precise-security/main amd64 Packa ges 1:0.156.14 0 500 http://archive.ubuntu.com/ubuntu/ precise/main amd64 Packages
sudo do-release-upgrade
Checking for a new Ubuntu release No new release found
is there any way to fix? thanks
Doing an rsync on root that includes all your lib files, etc. can be quite a risky procedure. I wouldn’t use that approach at all. Also be aware that if your Droplets are not on the exact same version of the O/S you’re setting yourself up for big trouble down the line.
Hi all, I upgraded the ubuntu to 14.04 and its shows the version number also. I came across the following problems- -Whenever i try to install soemthing it is asking me for root privelege and it is not accepting my password for my username to become root. -Even with “sudo su” i cannot become root. -I cannot go to the recovery mode, as I am working on a testbed so I log to the machine directly from the command prompt.
Any response would be much appreciated.
Thanxs
Great article, worked for me like a charm. Just had to update my nginx configurations after the fact to turn on php-fpm back to unix socket instead of IP:PORT.
Thank you for the great article!
Hi, nice articles. However, what’re difference between Ubuntu 12 and Ubuntu 14 For Server/Cloud Purpose ? is there any significant feature ?
Thanks
So, I was following alng with this and ran into some issues getting things going dues to some problems with the tex-common package… see https://bugs.launchpad.net/ubuntu/+source/tex-common/+bug/1236951
Vladimir Dobriakov (vladimir-geekq) wrote on 2014-06-04: #12 Same problem on upgrade from 12.04 LTS to 14.04 LTS.
As inspired by the comments #9 and #10 I worked around with
sudo apt-get remove --purge tex-common texlive-*
sudo rm /etc/texmf/
sudo apt-get install tex-common
sudo apt-get install texlive-base
sudo apt-get install texlive-latex-recommended
Run without any errors.
I have set sup rsa keys with Mac OS X Terminal app and was told the keys were saved in /Users/Philip/.ssh/id_rsa. It works, I can login to my VPS without writing my password.
I’m trying now to do the rsync command in Terminal (I’ve change server IP and the path to my private key according to the above), but I just get a warning: no such directory or file.
This seems rather strange given the fact that I’ve logged in using the keys in that directory.
Anybody knows what’s going on?
I went through the upgrade process from 12.04 to 14.04.5 today. I did do all updates available for 12.04 before I started the upgrade. I did not read this article until after I did the upgrade. I chose… to replace the customized configuration file… A few minutes later, it gave me the option to restart the system to complete the upgrade, and I selected restart.
I got the “ubuntu . . . . .” screen a coupe of times, but the screen is now just sitting there with the “ubuntu . . . .”
I thought “maybe it takes awhile to boot up.” But it’s been 30 minutes…
-
Normally, how long should it take to boot up, and come off of the “ubuntu . . . .” screen??
-
Or, what do you recommend my next step(s) should be ?
-
And, lastly, where or what do I pull up to enter a command line like
lsb_release
 This work is licensed under a Creative Commons Attribution-NonCommercial- ShareAlike 4.0 International License.
Become a contributor for community
Get paid to write technical tutorials and select a tech-focused charity to receive a matching donation.

DigitalOcean Documentation
Full documentation for every DigitalOcean product.

Resources for startups and AI-native businesses
The Wave has everything you need to know about building a business, from raising funding to marketing your product.
The developer cloud
Scale up as you grow — whether you're running one virtual machine or ten thousand.

Start building today
From GPU-powered inference and Kubernetes to managed databases and storage, get everything you need to build, scale, and deploy intelligent applications.
