Sr Technical Content Strategist and Team Lead

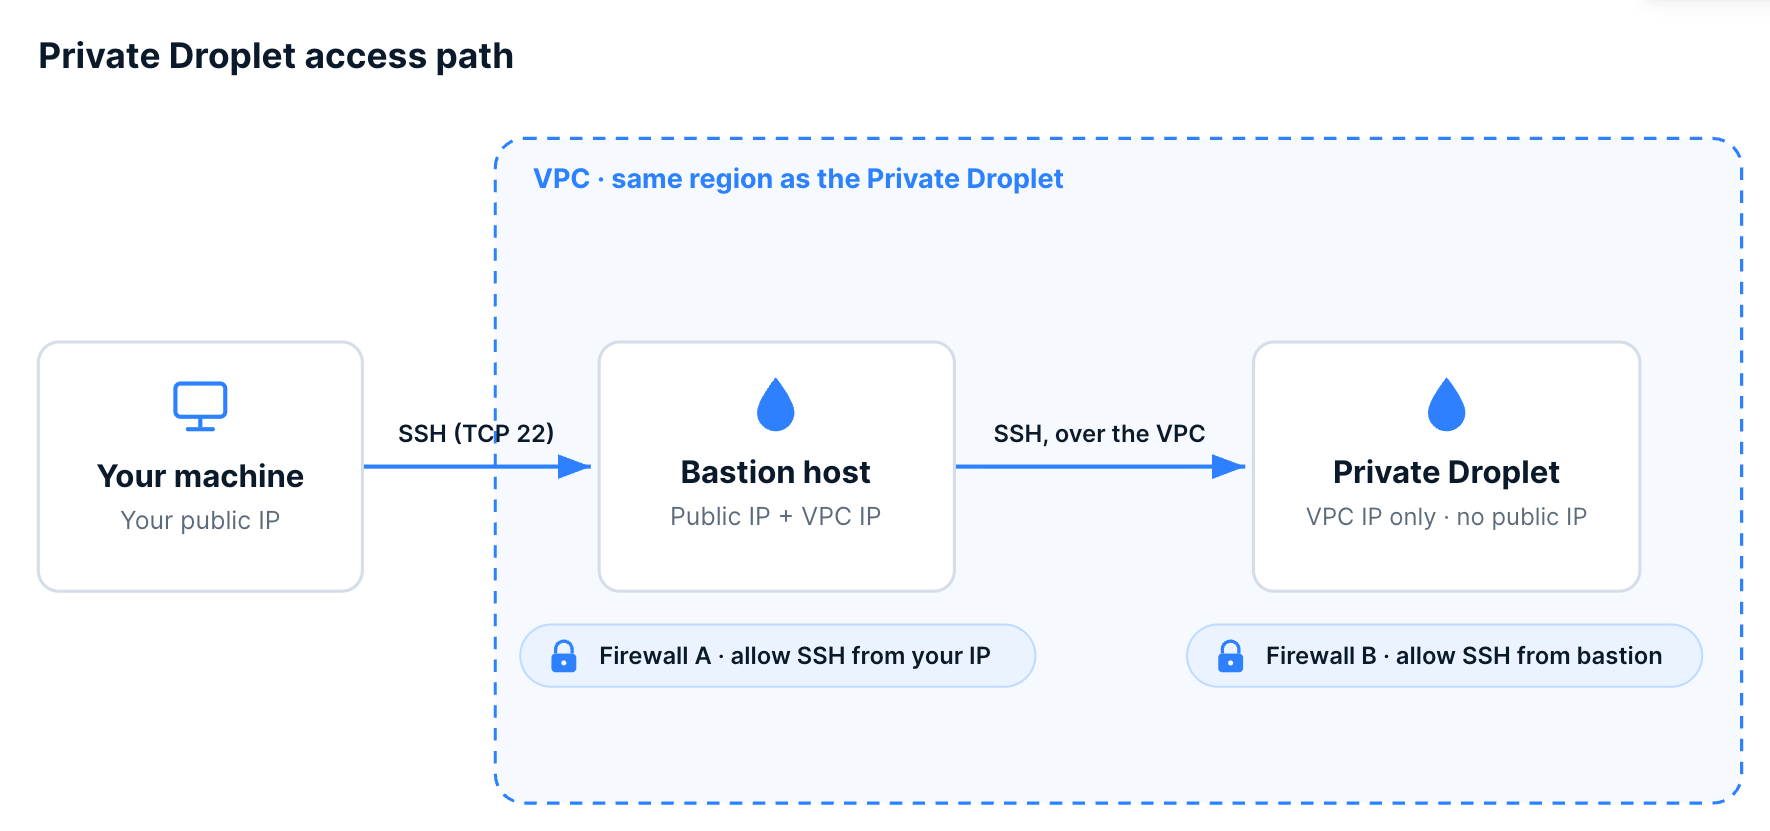
A Private Droplet has no public network interface, so you can’t SSH to it directly. The standard way in is a bastion host (jump host): a small Droplet with a public IP, in the same VPC, that you connect through. To keep that path tight, you put a Cloud Firewall on each Droplet, one that only lets you reach the bastion, and one that only lets the bastion reach the Private Droplet.
This tutorial walks through all four pieces from scratch:
- Create the Private Droplet.
- Create the bastion host in the same VPC.
- Configure a Cloud Firewall on the bastion (SSH from your IP only).
- Configure a Cloud Firewall on the Private Droplet (SSH from the bastion only).
Once that’s done, you connect using the steps in How to Connect to a Private Droplet.
What a Private Droplet actually is
A Private Droplet has a single private network interface (eth0) and no public IPv4. A traditional Droplet has two interfaces, public eth0 and private eth1. The difference is structural, not a setting you toggle after the fact:
- No public ingress except through a load balancer that fronts the VPC.
- No outbound internet access unless the VPC routes it through a NAT gateway.
- Uses the VPC local DNS resolver.
- Cannot be converted from or to a traditional Droplet, the private status is fixed at creation. To “convert,” you snapshot and recreate.
- No price premium: a Private Droplet costs the same as a standard Droplet of the same size.
The design principle to internalize is that private stays private. There is no supported path to attach a public IP, Reserved IP, or BYOIP address later. That permanence is the feature. It makes the isolation claim defensible to an auditor.
Here is a diagram of the Private Droplet access path for ease of understanding:
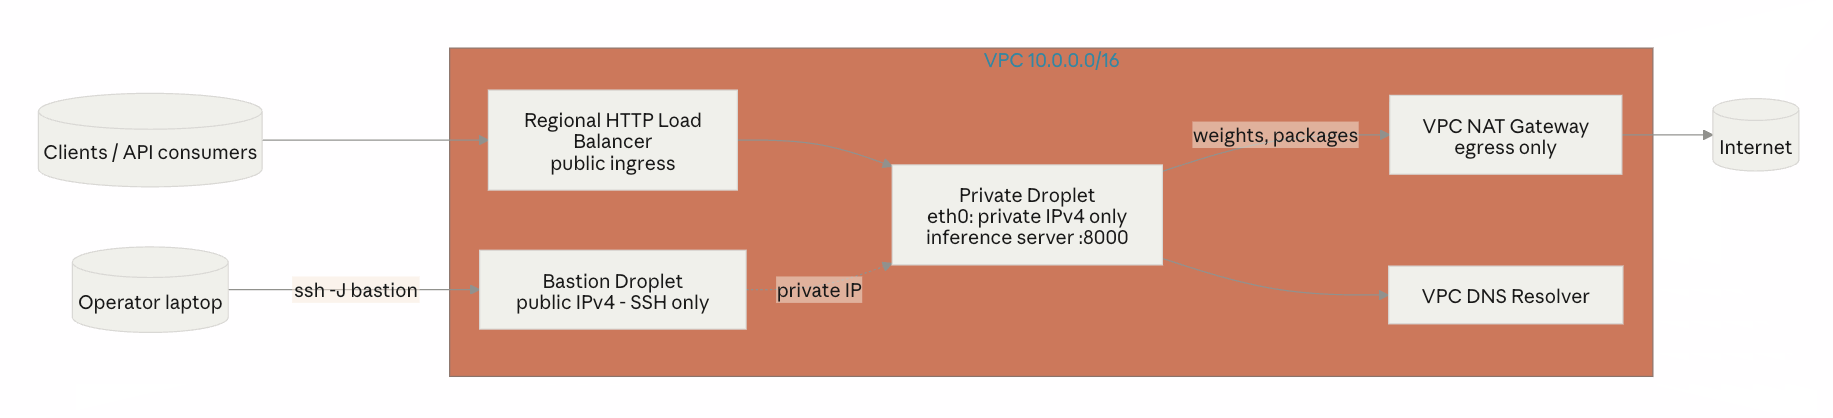
Private Droplet’s Architecture
The pattern is a private compute tier with three controlled edges: a bastion for human SSH access, a NAT gateway for outbound package/image pulls, and a load balancer for client ingress. The model server itself touches none of the public internet directly.
When to use a Private Droplet
A Private Droplet’s defining property is that it has no public network interface, it cannot be reached from the internet directly, and there is no supported way to add a public IP to it later. That isolation is the reason to choose one, and also the source of every tradeoff below.
Good fits:
- Back-end tiers that should never be public — databases, internal APIs, model servers, and other services that only need to be reached by other resources inside your VPC.
- Multi-tier architectures where only a front-end tier (behind a load balancer) is exposed, and everything behind it stays private.
- Workloads with strict network-isolation requirements — for example, teams working toward HIPAA, SOC 2, or PCI obligations, where the requirement is “this system has no public IP,” not “this system has a public IP that we firewall off.” A structural guarantee is easier to evidence in an audit than a rule that could be changed. (Confirm any specific compliance wording with your own compliance team — the absence of a public interface is a network fact, not a certification.)
When a Private Droplet is the wrong tool:
- A simple public-facing server. If a service needs to accept traffic from the internet directly, a standard Droplet with a Cloud Firewall is simpler and does the job.
- Workloads that need constant, unpredictable outbound access. Private Droplets reach the internet only through a NAT gateway, which adds cost and a moving part. If a box needs broad egress all the time, weigh whether the isolation is worth it.
- Quick experiments or demos, where the operational overhead of a bastion and NAT gateway isn’t justified.
Consequences to plan for:
- No direct SSH. You reach a Private Droplet only through a bastion host, which is exactly what this tutorial sets up. There is also no web-based Droplet console path that bypasses this; plan your access model before you need it.
- No outbound internet by default. Package updates, container pulls, and downloads require a VPC NAT gateway set as the VPC’s default route. (A NAT gateway provides outbound only — it does not accept inbound connections, so it cannot replace the bastion.)
- The networking type is permanent. A Private Droplet cannot be converted to a public Droplet, and an existing Droplet cannot be converted to private. To change the type, snapshot the workload and recreate it.
- No cost premium, but added operational pieces. A Private Droplet costs the same as a standard Droplet of the same size. The real cost is operational: you take on a bastion host and, if you need egress, a NAT gateway.
- Some integrations differ. As of the current docs, Private Droplets can’t be created from the Control Panel, custom images aren’t supported, and DOKS worker nodes aren’t Private Droplets. Check the Private Droplets documentation for the current list before you design around them.
Prerequisites
- A DigitalOcean account and a personal access token.
- An SSH key added to your account (you’ll reference it by fingerprint). The same key should be installed on both Droplets. See How to Add SSH Keys to Droplets.
- A VPC in your target region (the region’s default VPC is fine). Note its name and region.
doctlinstalled and authenticated (doctl auth init). Upgradedoctlif--enable-public-networkingis missing fromdoctl compute droplet create --help.- Your own current public IP address, for locking down SSH to the bastion. You can find it by visiting any “what is my IP” service.
Step 1 — Create the Private Droplet
A Private Droplet is created by turning public networking off at creation time. This is permanent, you can’t add public networking later, and you can’t convert an existing Droplet into a Private Droplet.
Create it with doctl, placing it in your chosen VPC:
doctl compute droplet create private-app-01 \
  --region sfo3 \
  --size s-1vcpu-1gb \
  --image ubuntu-24-04-x64 \
  --vpc-uuid <your-vpc-uuid> \
  --ssh-keys <your-ssh-key-fingerprint> \
  --enable-public-networking=false
The --enable-public-networking=false flag is what makes the Droplet private (equivalent to "public_networking": false in the API).
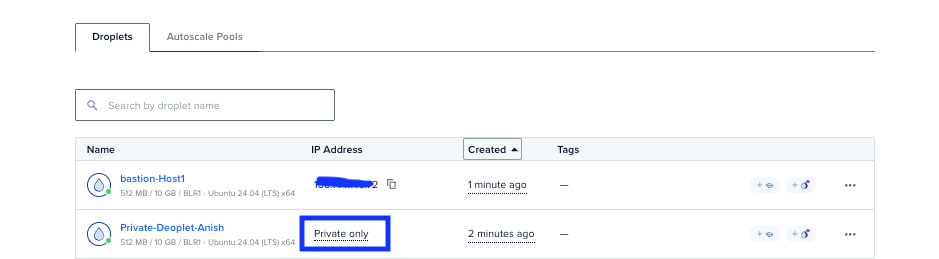
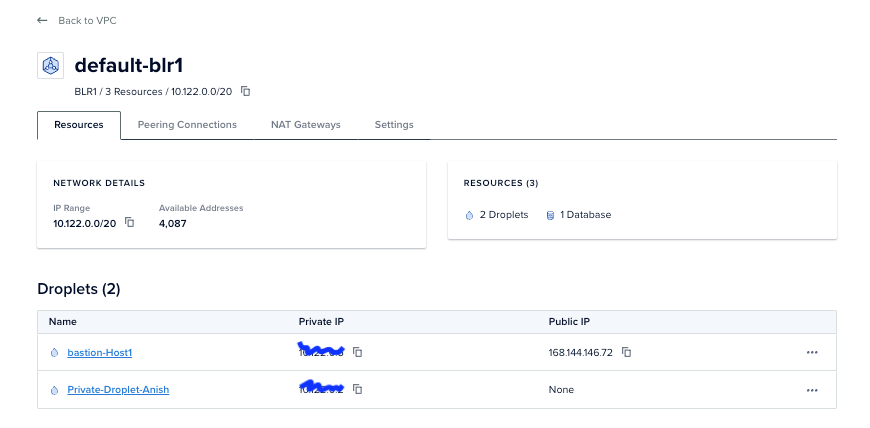
After it’s created, record two values you’ll need later:
- The Droplet ID — run
doctl compute droplet list --format ID,Name,PublicIPv4,PrivateIPv4. - The VPC IP address — shown in the Control Panel under Connection Details, or retrievable from the bastion later via the metadata path
interfaces/private/0/ipv4/address. (A Private Droplet has only a VPC IP, no public IP.)
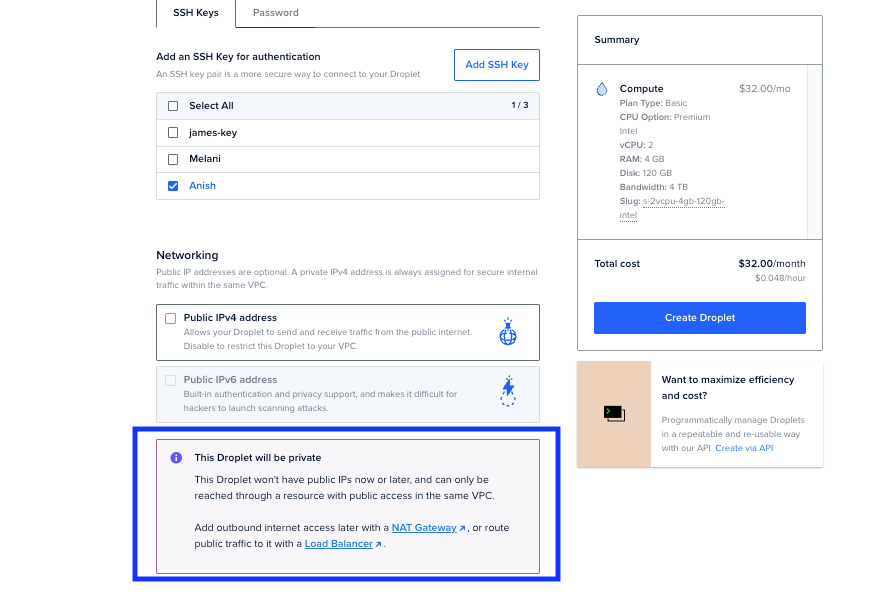
You can also create the Private Droplet using the Control Panel.
- Go to Droplets > Create Droplet.
- Choose the region you want to create the Private Droplet in.
- Pick the size you want to create the Private Droplet in.
- In the Networking section, simply uncheck the Public IPv4 address checkbox.
This will create a Private Droplet in the same VPC and region as the one you selected.
Next, you will create the bastion host.
Step 2 — Create the bastion host
The bastion is an ordinary Droplet with a public IP. The only hard requirement is that it sits in the same VPC and region as the Private Droplet, so it can reach it over the private network.
Using the Control Panel:
- Click Create > Droplets.
- Choose the same region as your Private Droplet.
- Pick a small size (for example, the smallest shared-CPU plan, a bastion does no real work).
- Under VPC Network, select the same VPC as your Private Droplet. This is the critical setting; if the bastion is in a different VPC, it won’t be able to reach the Private Droplet.
- Under Authentication, select the same SSH key you used for the Private Droplet (or another key you trust for bastion access).
- Name it something recognizable, such as
bastion-Host1, and click Create Droplet.
When it finishes, note the bastion’s public IP and its Droplet ID (visible in the Droplet list).
doctlequivalent:doctl compute droplet create bastion-01 --region sfo3 --size s-1vcpu-1gb --image ubuntu-24-04-x64 --vpc-uuid <same-vpc-uuid> --ssh-keys <your-ssh-key-fingerprint>— note there’s no--enable-public-networking=falsehere, because the bastion needs its public IP.
Step 3 — Add a Cloud Firewall to the bastion
DigitalOcean Cloud Firewalls deny everything that isn’t explicitly allowed: if there are no inbound rules, no inbound traffic is permitted. They are also stateful, so return traffic for an allowed connection is permitted automatically — you don’t need a matching outbound rule for SSH replies. (Cloud Firewalls are separate from any on-Droplet firewall like ufw.)
For the bastion, the only inbound you want is SSH from your own IP.
Using the Control Panel:
- Go to Networking > Firewalls > Create Firewall.
- Name it
bastion-ssh. - Under Inbound Rules, keep the SSH (TCP 22) rule but change its Sources from the default “All IPv4/All IPv6” to your public IP (for example
203.0.113.10/32). Remove the open defaults. - Leave the Outbound Rules at their defaults (all TCP, all UDP, ICMP), so the bastion can still reach updates and the VPC.
- Under Apply to Droplets, select your bastion (
bastion-Host1). - Click Create Firewall.
Note: On the bastion’s firewall (Firewall A): enter your own personal computer’s public IP. This is the only place your laptop’s IP goes. You’re the one connecting to the bastion from the outside, so the bastion should accept SSH only from you.
If you are using a mac you can use the below command to get your public/external IP address:
curl ifconfig.me

doctl equivalent:
doctl compute firewall create \
  --name "bastion-ssh" \
  --inbound-rules "protocol:tcp,ports:22,address:<your-ip>/32" \
  --outbound-rules "protocol:tcp,ports:all,address:0.0.0.0/0 protocol:udp,ports:all,address:0.0.0.0/0 protocol:icmp,address:0.0.0.0/0" \
  --droplet-ids <bastion-droplet-id>
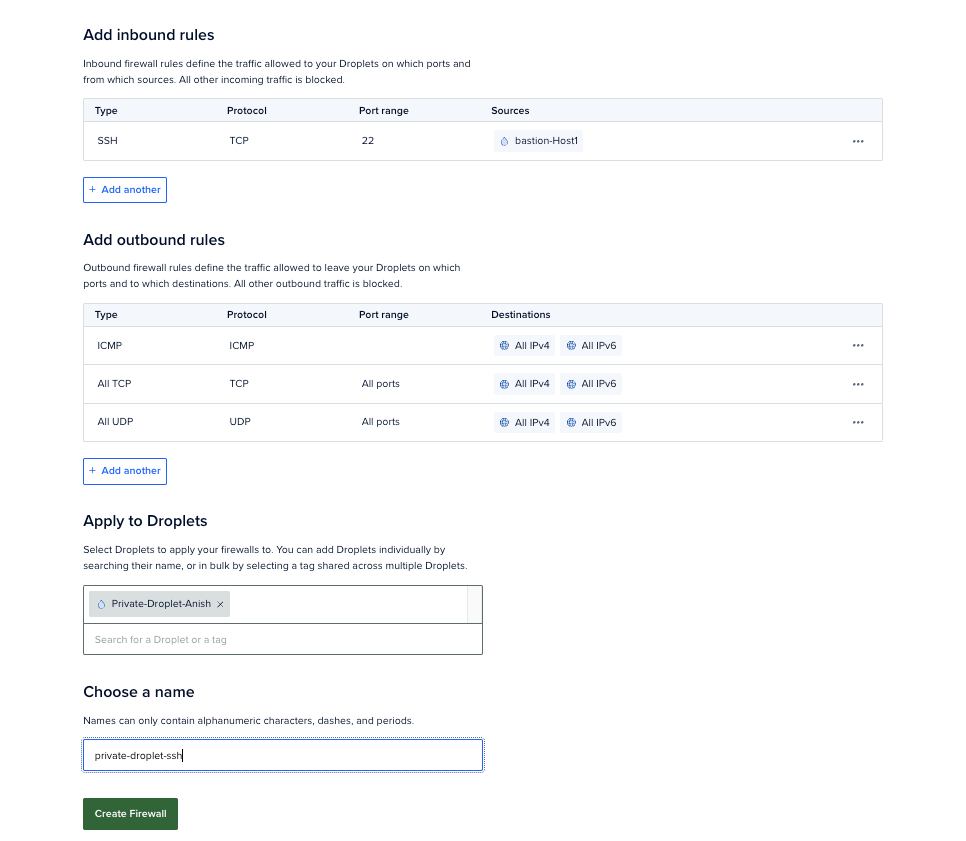
Step 4 — Add a Cloud Firewall to the Private Droplet
For the Private Droplet, the only inbound you want is SSH from the bastion.
Using the Control Panel:
- Go to Networking > Firewalls > Create Firewall.
- Name it
private-droplet-ssh. - Under Inbound Rules, keep SSH (TCP 22) and set its Sources to your bastion Droplet: start typing its name (
bastion-01) and select it. This restricts SSH to traffic coming from the bastion over the VPC. - Leave the Outbound Rules at their defaults.
- Under Apply to Droplets, select your Private Droplet (
private-app-01). - Click Create Firewall.
Step 5 — Connect
Both Droplets now exist, they share a VPC, and the firewalls allow exactly one path in: your machine to the bastion, and the bastion to the Private Droplet. From here, follow the SSH steps in the official guide:
You can follow the steps in How to Connect to a Private Droplet to connect to the Private Droplet.
In short, you’ll use ssh -J (ProxyJump) to hop through the bastion to the Private Droplet’s VPC IP. Remember the default login user on most DigitalOcean images is root.
ssh -J <bastion-user>@<bastion-public-ip> <private-user>@<private-vpc-ip>
For example:
ssh -J root@123.456.789.012 root@10.116.0.2
You can find the Private Droplet’s VPC IP in the Control Panel under Networking > VPC.
And thats it! You have successfully created a Private Droplet and a bastion host with Cloud Firewalls. You can now connect to the Private Droplet using the bastion host as a jump host.
Quick Verification Checklist
Make sure the following are true:
- Both Droplets show the same VPC under Networking > VPC.
- The bastion firewall allows TCP 22 from your IP only — not “All IPv4”.
- The Private Droplet firewall allows TCP 22 from the bastion (or the VPC CIDR) and nothing else inbound.
- Each firewall is actually applied to the right Droplet (check Apply to Droplets).
Notes and limitations
- A NAT gateway is only needed if the Private Droplet requires outbound internet (package updates, image pulls). It does not provide inbound access, so you can’t SSH through it — the bastion is required. See How to Create a NAT Gateway.
- Cloud Firewalls are stateful and are separate from any on-Droplet firewall (
ufw,firewalld); if you run both, make sure their rules don’t conflict. - For other Private Droplet behavior and current limitations, see the Private Droplets documentation.
Thanks for learning with the DigitalOcean Community. Check out our offerings for compute, storage, networking, and managed databases.
About the author
Anish is a Sr Technical Content Strategist and Team Lead at DigitalOcean with 7+ years of experience as an SRE at Nutanix and Cloud consultant at AMEX, and technical writing at DOCN, and shipping deep infra and AI inference tutorials that help developers deploy production‑ready applications on DigitalOcean.
Still looking for an answer?
This textbox defaults to using Markdown to format your answer.
You can type !ref in this text area to quickly search our full set of tutorials, documentation & marketplace offerings and insert the link!
 This work is licensed under a Creative Commons Attribution-NonCommercial- ShareAlike 4.0 International License.
Become a contributor for community
Get paid to write technical tutorials and select a tech-focused charity to receive a matching donation.

DigitalOcean Documentation
Full documentation for every DigitalOcean product.

Resources for startups and AI-native businesses
The Wave has everything you need to know about building a business, from raising funding to marketing your product.
The developer cloud
Scale up as you grow — whether you're running one virtual machine or ten thousand.

Start building today
From GPU-powered inference and Kubernetes to managed databases and storage, get everything you need to build, scale, and deploy intelligent applications.
