Technical Writer II

Introduction
SSH hardening means reducing the attack surface of your SSH service through configuration, rate limiting, and network controls so that brute-force and unauthorized access are mitigated. Fail2Ban alone is not enough: it reacts after failed logins and modifies the host firewall. It does not replace a firewall, restrict which IPs can reach SSH in the first place, or protect multiple servers through a single entry point. Defense in depth for SSH combines host-level hardening (SSH config, Fail2Ban, nftables) with network-edge controls (DigitalOcean Cloud Firewalls) and a bastion host so that SSH is exposed only where you choose. This tutorial builds on existing DigitalOcean content: for Fail2Ban-only SSH protection see How To Protect SSH with Fail2Ban on Ubuntu; here you get the full stack: hardened SSH, Fail2Ban, nftables, Cloud Firewall, and bastion on DigitalOcean.
Key takeaways
- Edge Cloud Firewall restricts who can reach SSH at the network edge; nftables rate-limits and filters traffic on the host; Fail2Ban bans IPs after repeated auth failures by adding firewall rules. Together they give you edge control, kernel-level limiting, and reactive intrusion prevention.
- Combining them gives you defense in depth: unknown IPs are blocked at the Cloud Firewall, abusive ones are rate-limited or dropped by nftables, and repeat offenders are banned by Fail2Ban, so no single layer carries the full load.
- Use sshd_config to disable root and password logins and enforce SSH key authentication; use nftables to limit new SSH connections per source and drop invalid packets; use Fail2Ban to watch auth logs and insert ban rules; use the Cloud Firewall to allow SSH only from trusted IPs or CIDRs.
- This pattern fits production servers, multi-host environments, and any system that exposes SSH to the internet and needs to resist brute-force and reduce attack surface.
- For production, use a bastion host with ProxyJump over a VPC so only one host has public SSH; pair with DigitalOcean Cloud Firewalls for edge allow-listing and keep the SSH port consistent in
sshd_config, Fail2Ban, nftables, and the firewall rules.
Prerequisites
Before you begin, you need:
- Two Ubuntu 22.04 Droplets with at least 1 GB of RAM each, created inside the same VPC. Create a VPC via the control panel (Networking → VPC → Create VPC Network) or follow How to Create a VPC. One Droplet will serve as the bastion host and the other as an application server. If you only want to harden a single server without the bastion setup in Step 5, one Droplet is enough.
- A non-root user with
sudoprivileges on each Droplet. Follow Initial Server Setup with Ubuntu 22.04 to create this user. - SSH key authentication configured for your non-root user on each Droplet. Follow How To Set Up SSH Keys on Ubuntu 22.04. You will disable password authentication in Step 1, so key-based login must be working before you start.
- A DigitalOcean account with access to DigitalOcean Cloud Firewall Documentation.
Defense in Depth for SSH Security
Defense in depth for SSH means layering controls so that a single failure does not grant access: hardened SSH daemon (keys only, no root), intrusion prevention (Fail2Ban), host firewall (nftables), and cloud firewall. Brute-force protection alone is insufficient: attackers can rotate IPs across hundreds of cloud providers and residential proxies, defeating single-IP bans. Layered SSH security combines authentication strength, rate limiting, reactive banning, and network segmentation.
How Fail2Ban Works
Fail2Ban parses service logs (e.g., auth.log for SSH), matches lines with a filter (regex in filter.d/sshd), and when failures exceed a threshold within a time window it runs an action. See our Fail2Ban SSH setup guide for details; for a step-by-step Fail2Ban-on-SSH setup, see Fail2Ban SSH setup guide on Ubuntu. The action is typically to add a rule to the host firewall (the backend for ban actions is iptables or nftables). So: log parsing → filter match → jail counter → action (e.g., ban IP in firewall). The port protected is the one you configure for the jail (e.g., 22 for SSH). Fail2Ban does not replace the firewall; it drives firewall rules based on log events.
nftables vs iptables
| Aspect | nftables | iptables |
|---|---|---|
| Status | Modern, maintained | Legacy, still in use |
| Ruleset | Single unified config | Multiple tools (iptables, ip6tables, etc.) |
| Syntax | Declarative, sets/maps | Imperative, chain-based |
| Rate limiting | Native (e.g., limit rate) |
Via module (e.g., hashlimit) |
Use nftables for new deployments on Ubuntu when you want a single ruleset and built-in rate limiting. For background on how host firewalls work (rules, chains, policies), see How the Iptables Firewall Works and Choosing an Effective Firewall Policy to Secure your Servers. For a UFW-based host firewall instead of nftables, see How To Set Up a Firewall with UFW on Ubuntu.
Cloud Firewall vs Host Firewall
A Cloud Firewall (e.g., DigitalOcean) is applied at the edge of the network before traffic reaches the Droplet. It can allow SSH only from trusted IPs and drop everything else. A host firewall (nftables/iptables) runs on the Droplet and can rate-limit and drop traffic per-connection. The Cloud Firewall blocks scans at the network edge before they consume Droplet resources; the host firewall enforces per-connection rate limits and reactive bans.
| Layer | Where it runs | What it controls |
|---|---|---|
| Cloud Firewall | Network edge (before Droplet) | Which IPs can reach port 22; blocks all other traffic |
| Host firewall (nftables) | On the Droplet | Connection rate per source, invalid packets; integrates with Fail2Ban bans |
Bastion Hosts for SSH Access
Use a bastion host (jump server) when you have multiple servers and want one hardened SSH entry point. The bastion has public SSH; internal servers are reached via ProxyJump. This reduces attack surface and simplifies Cloud Firewalls: only the bastion allows SSH from the internet.
Now that you understand each component and when to use a bastion architecture, let’s look at how these layers work together in a production deployment.
Architecture Overview
A production-ready layered model looks like this:
Internet
   ↓
DigitalOcean Cloud Firewall (SSH only from trusted IPs)
   ↓
Bastion Host (Public SSH)
   ↓
Private VPC Network
   ↓
Application Droplets (No public SSH; access via ProxyJump)
- VPC segmentation: Only the bastion has a public IP for SSH; app Droplets use private IPs.
- Bastion security: Harden SSH, Fail2Ban, and nftables on the bastion; restrict Cloud Firewall to trusted IPs.
- Private IP routing: SSH to the bastion, then ProxyJump to private IPs.
- Zero-trust access: Only clients with valid SSH keys that reach the bastion can reach internal hosts.
With the architecture in mind, let’s see how this defense-in-depth approach protects against real attacks.
Real-World Security Scenario
When a brute-force attack targets your server, the Cloud Firewall first blocks traffic from untrusted IP ranges at the network edge. If traffic reaches the bastion, nftables enforces connection rate limits at the kernel level. If repeated authentication failures occur, Fail2Ban dynamically inserts firewall rules to ban the source IP. Application servers remain unreachable from the public internet because SSH is exposed only on the bastion. Each layer controls a different boundary: the Cloud Firewall controls which IPs can reach port 22, nftables controls connection rate per source, Fail2Ban controls repeated authentication failures, and SSH config controls authentication method. A single misconfiguration in one layer does not expose the rest.
With the architecture in mind, let’s implement each layer step by step, starting with the foundation: hardening the SSH daemon itself.
Step 1 — Harden SSH Configuration
On the server (bastion or single host), edit /etc/ssh/sshd_config:
Add the following explicit configuration lines:
PermitRootLogin no
PasswordAuthentication no
ChallengeResponseAuthentication no
UsePAM yes
PubkeyAuthentication yes
Before restarting SSH, validate the configuration:
sudo sshd -t
This command should return no output. If it prints an error, fix the configuration before restarting the service.
- Set
PermitRootLogin noto disable root login. - Set
PasswordAuthentication noto enforce SSH key authentication only. - Optionally set
Portto a non-default port (e.g., 2222).
Using a non-default SSH port can reduce the number of scripted scans against your server. However, you will need to open the new port in both the Cloud Firewall and nftables. Many administrators choose to keep port 22 and rely on SSH keys and firewalls for security instead.
If you change the SSH port, update it in all four places:
/etc/ssh/sshd_config(Port 2222)- Fail2Ban jail (
port = 2222) - nftables rule (
tcp dport 2222 ...) - DigitalOcean Cloud Firewall inbound rule (TCP 2222 from trusted IPs)
Restart SSH and verify in a second session before closing the first:
sudo systemctl restart ssh # on some distros: sudo systemctl restart sshd
On success there is no output (or a brief “Job for ssh.service has finished”). If the command fails, fix sshd_config before disconnecting.
Verify that password authentication is disabled by attempting a password-based login from another machine. The connection should fail with a permission denied error. Keep your original session open until key-based login is confirmed.
If you use a non-default port, connect with ssh -p 2222 user@host. Ensure your sudo user can log in with keys before disabling passwords.
Step 2 — Install and Configure Fail2Ban
Install Fail2Ban:
sudo apt update && sudo apt install -y fail2ban
Example output (abbreviated):
Reading package lists... Done
Building dependency tree... Done
The following NEW packages will be installed:
  fail2ban python3-systemd
...
Setting up fail2ban ...
Create a local jail override file so updates can still improve the defaults:
sudo nano /etc/fail2ban/jail.local
Under [DEFAULT] set or adjust:
bantime: how long to ban (e.g.,1h).findtime: window in which failures are counted (e.g.,10m).maxretry: failures in that window that trigger a ban (e.g.,5).ignoreip: IPs/CIDRs never banned (e.g., your office IP).
Enable the SSH jail and set the port if you changed it:
[sshd]
enabled = true
port = ssh
filter = sshd
logpath = /var/log/auth.log
maxretry = 5
findtime = 10m
bantime = 1h
If SSH runs on a non-default port, set port = 2222 (or your port). Restart and check status:
sudo systemctl restart fail2ban
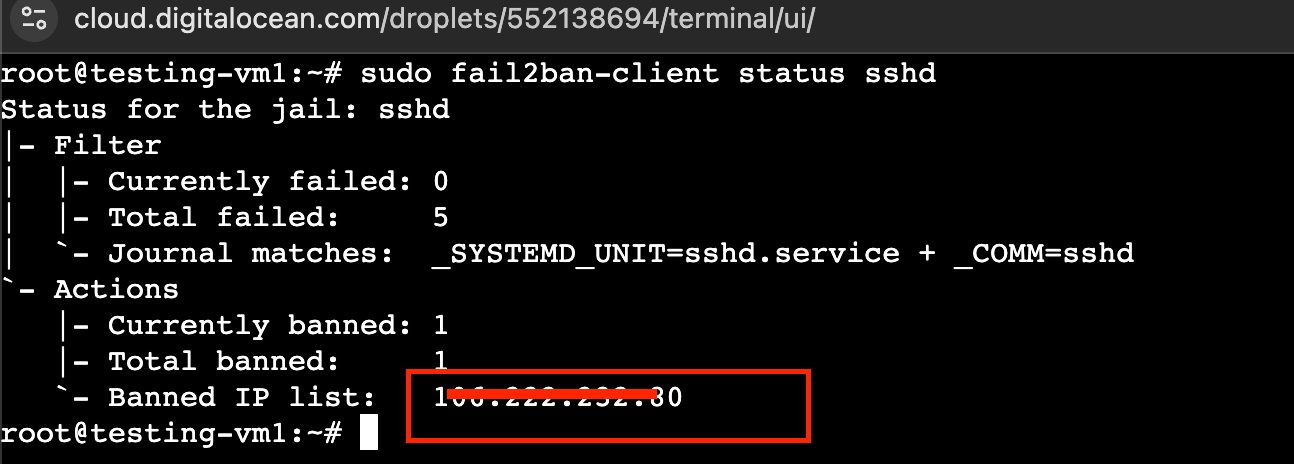
sudo fail2ban-client status sshd
Example output when the jail is active and no IPs are banned yet:
Status for the jail: sshd
|- Filter
|  |- Currently failed: 0
|  |- Total failed:     0
|  `- File list:        /var/log/auth.log
`- Actions
   |- Currently banned: 0
   |- Total banned:     0
   `- Banned IP list:
Trigger a ban from another host and confirm the IP in fail2ban-client status sshd. Fail2Ban is not a firewall: it uses a backend (iptables or nftables) to insert rules; the port protected is the jail’s port (e.g., ssh or 2222).
Verifying Fail2Ban Integration with nftables
Confirm which backend Fail2Ban is using:
sudo fail2ban-client get sshd banaction
If you are using nftables, ensure the banaction is compatible (for example, nftables-multiport). Then verify that banned IPs appear in the active ruleset:
sudo nft list ruleset
If bans are working, you should see a Fail2Ban chain referenced in the ruleset (often named like f2b-sshd) and the banned IP listed in that chain.
If you do not see any Fail2Ban chain in nft list ruleset, set a compatible banaction and restart Fail2Ban:
[sshd]
banaction = nftables-multiport
Then restart and re-check:
sudo systemctl restart fail2ban
sudo nft list ruleset
Step 3 — Configure nftables for Rate Limiting and Filtering
Install nftables and disable conflicting firewalls (e.g., ufw) if present:
sudo apt install -y nftables
sudo systemctl enable --now nftables
To enhance SSH security and protect your server against brute-force attacks and unwanted traffic, you can use nftables for kernel-level packet filtering and rate limiting. The example ruleset below, placed in /etc/nftables.conf, allows all established and local traffic, drops invalid packets, enforces a rate limit on new SSH connections, and can optionally permit ICMP (ping). Replace <SSH_PORT> with your SSH port if different from the default (22).
#!/usr/sbin/nft -f
flush ruleset

table inet filter {

  chain input {
    type filter hook input priority 0; policy drop;

    iif lo accept
    ct state established,related accept
    ct state invalid drop

    # Allow SSH with per-source rate limiting (IPv4)
    ip protocol tcp tcp dport <SSH_PORT> ct state new meter ssh4_per_src { ip saddr limit rate 5/minute burst 10 packets } accept

    # Allow SSH with per-source rate limiting (IPv6)
    ip6 nexthdr tcp tcp dport <SSH_PORT> ct state new meter ssh6_per_src { ip6 saddr limit rate 5/minute burst 10 packets } accept
    # Optional: allow ICMP (ping)
    ip protocol icmp accept
    ip6 nexthdr icmpv6 accept
  }

  chain forward {
    type filter hook forward priority 0; policy drop;
  }

  chain output {
    type filter hook output priority 0; policy accept;
  }
}
Load and persist:
sudo nft -f /etc/nftables.conf
No output on success. Then verify the active ruleset:
sudo nft list ruleset
Example output (abbreviated):
table inet filter {
  chain input {
    type filter hook input priority 0; policy drop
    iif "lo" accept
    ct state established,related accept
    ct state invalid drop
    tcp dport 22 ct state new limit rate 5/minute burst 10 packets accept
    ...
  }
  ...
}
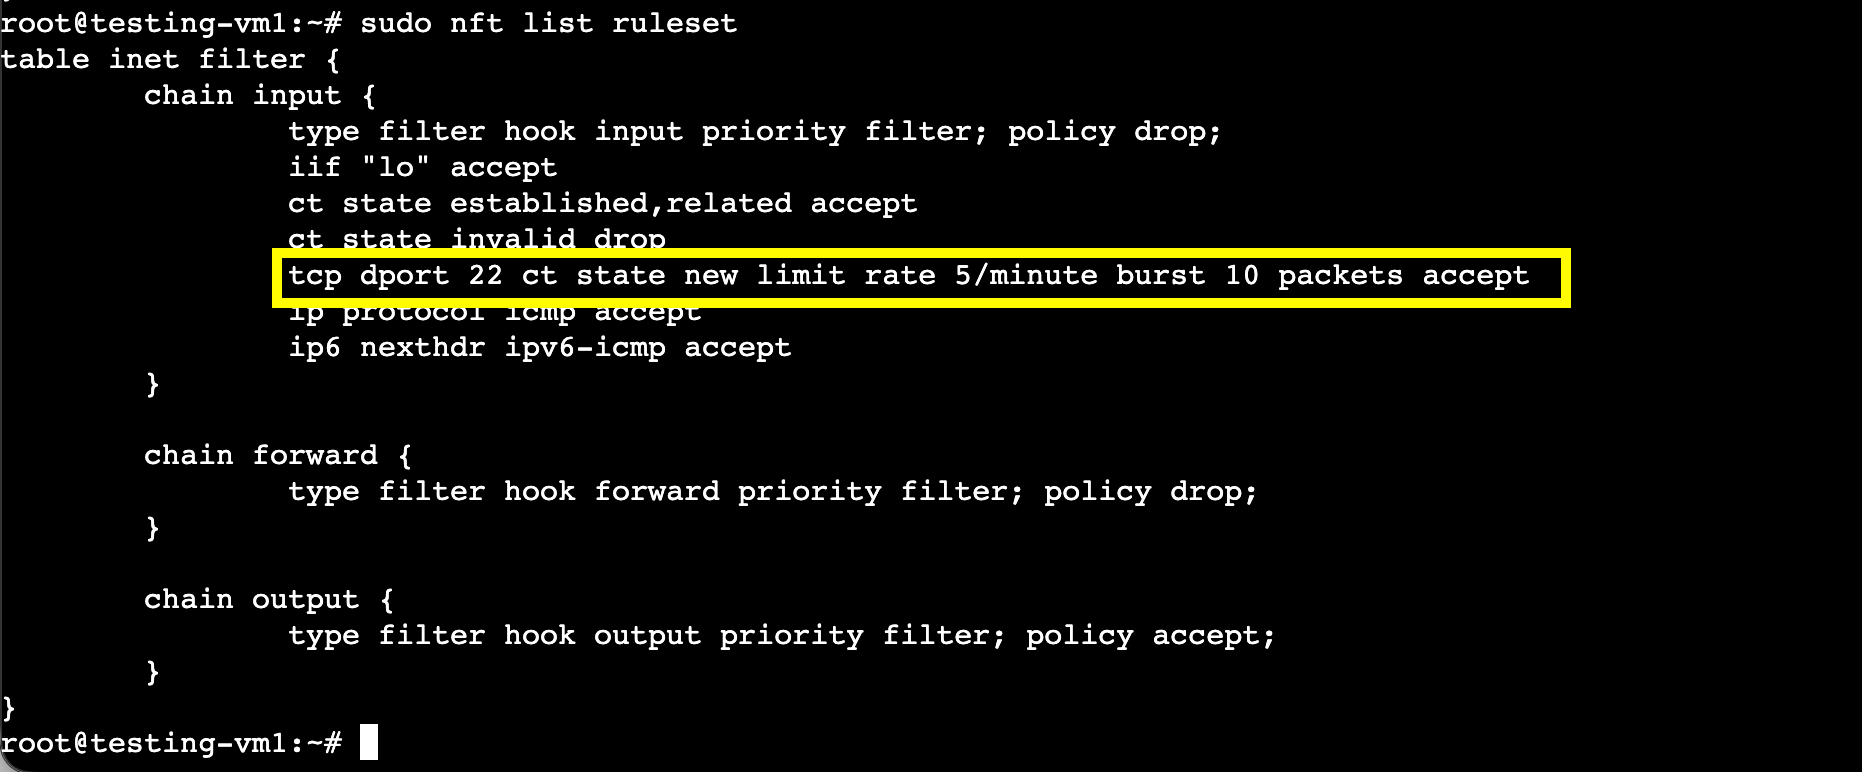
You should see policy drop on the input chain and an explicit tcp dport <SSH_PORT> accept rule. If you changed SSH to 2222, update <SSH_PORT> accordingly before loading the ruleset.
Test from another host to confirm SSH connections above the defined rate are dropped. If you lose access, use the provider console to temporarily flush rules:
sudo nft flush ruleset
On Ubuntu, nftables usually loads /etc/nftables.conf on boot. If Fail2Ban uses nftables, ensure its chains integrate with this table so bans and rate limiting work together.
Security Metrics (What to Expect)
In practice, each layer behaves roughly as follows so you can verify and tune:
- Fail2Ban: Typically adds a ban rule within 2–5 seconds after the configured number of failures within
findtime. The banned IP is dropped by the host firewall forbantime. - nftables rate limit: With a limit of 5/minute and burst 10, a single source can open at most about 10 new SSH connections in a short window before further new connections are dropped until the rate window resets. This reduces the number of login attempts one IP can make before Fail2Ban sees failures.
- Cloud Firewall: Traffic from non-allowed IPs is dropped at the edge; it never reaches the Droplet, so it does not consume CPU or appear in host logs. Only IPs in your allow list can attempt SSH.
These are typical behaviors; exact timing depends on your findtime, maxretry, and rate limit settings.
Step 4 — Configure DigitalOcean Cloud Firewall
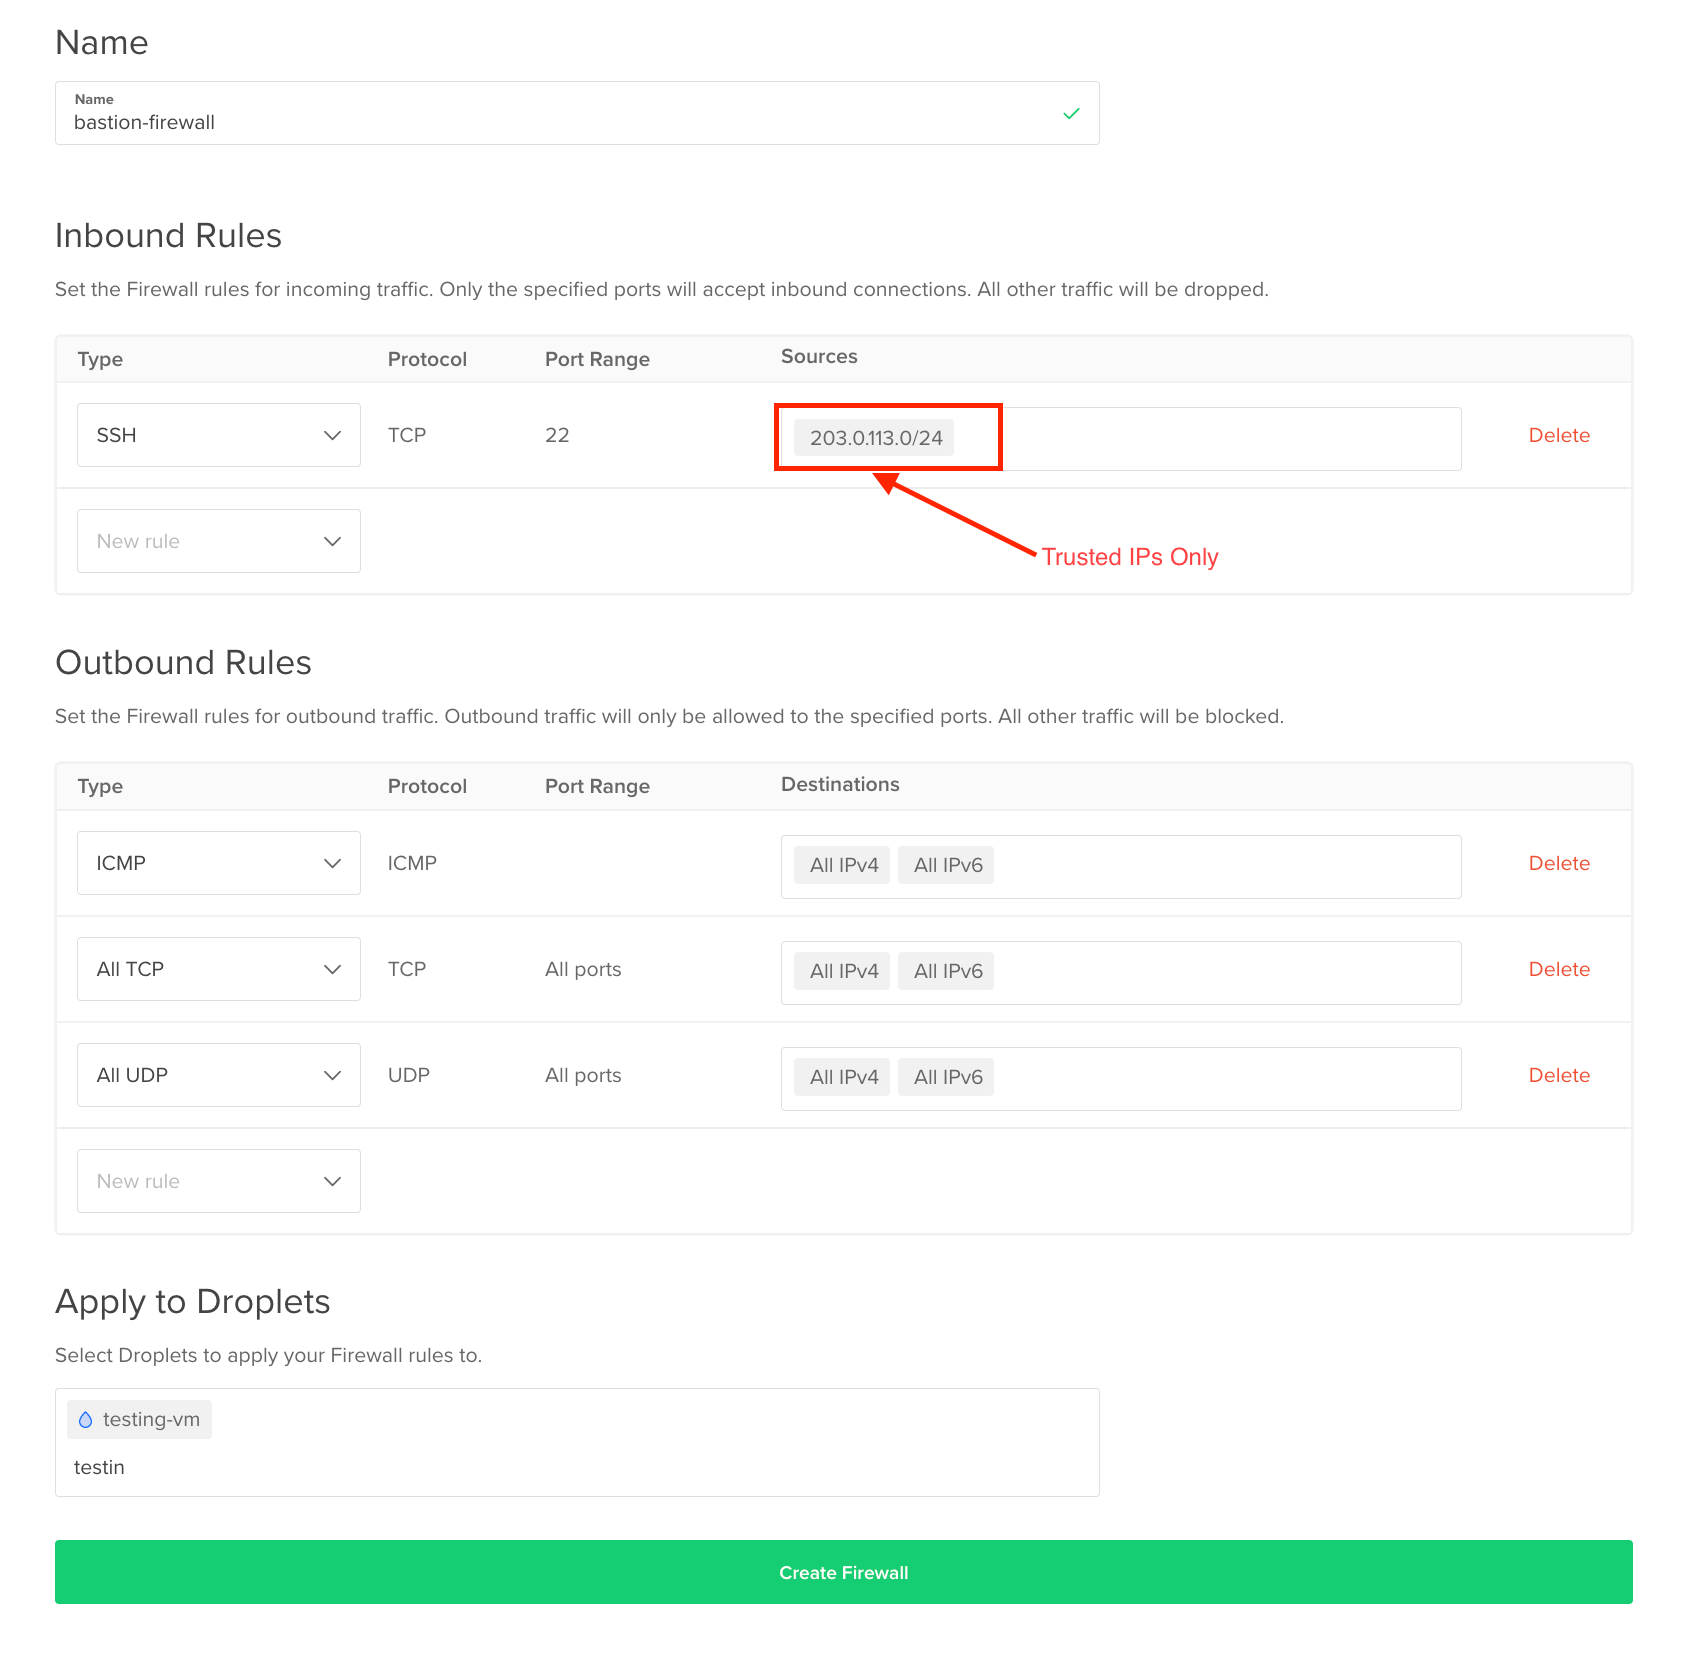
Create a Cloud Firewall via the control panel (Create → Cloud Firewalls), the API, or the CLI; see How to Create Firewalls for all options. For scripting or many Droplets, you can use doctl or the API to manage rules. Then attach the firewall to your bastion (or single Droplet):
- Inbound: Allow SSH (TCP 22, or your custom port) from trusted IPs or ranges only. Deny all other inbound.
- Outbound: Allow what the host needs (e.g., HTTP/HTTPS, VPC traffic).
Attach the firewall to the bastion only so SSH is exposed at one point. The Cloud Firewall is enforced at the network edge before traffic reaches the Droplet. Use it to allow SSH only from office/VPN so unknown IPs never reach port 22.
Recommended Rule Model
For the bastion host:
- Inbound SSH: Allow TCP 22 (or your custom port) only from your public IP address or VPN CIDR.
- Inbound other traffic: Deny.
- Outbound: Allow required internet access and VPC traffic.
For application Droplets:
- Inbound SSH: Allow only from the bastion’s private IP or the VPC CIDR range.
- No public SSH access from the internet.
- Outbound: Allow required service traffic (for example, database or API egress).
After applying the firewall, confirm connectivity:
- From an allowed IP, SSH should succeed.
- From a non-allowed IP, the TCP connection should time out (not prompt for credentials).
This confirms filtering is enforced at the network edge.
Step 5 — Test the Layered Defense
Run these checks in order to confirm each layer is enforcing controls:
- Cloud Firewall (edge filtering): From a non-allowed IP, attempt SSH to the bastion. The TCP connection should time out (no SSH banner).
- SSH hardening (keys-only): From an allowed IP, attempt a password login. It should fail with
Permission denied. - nftables (rate limiting): From an allowed IP, open many new SSH connections quickly. After the burst, new connections should be dropped or delayed.
- Fail2Ban (reactive bans): From an allowed IP, deliberately fail authentication until
maxretryis exceeded, then confirm the ban:sudo fail2ban-client status sshdshows the IP under banned addressessudo nft list rulesetshows the IP in the Fail2Ban chain (for nftables backends)
If any step doesn’t match the expected behavior, use the Troubleshooting section to isolate the layer that isn’t enforcing.
Step 6 — Implement Bastion (Jump Server) Model
For production, remove public IP exposure from application servers. Put them in a VPC with only private IPs (or with a Cloud Firewall that allows no inbound SSH from the internet). Use the bastion as a jump server.
On your local machine, add to ~/.ssh/config:
Host bastion
  HostName <BASTION_PUBLIC_IP>
  User your_bastion_user
  IdentityFile ~/.ssh/id_ed25519

Host app-server-1
  HostName 10.0.0.5
  User app_user
  ProxyJump bastion
  IdentityFile ~/.ssh/id_ed25519
Then ssh app-server-1 connects via the bastion to the app server’s private IP. Only the bastion has SSH open to the internet; the app server does not. This reduces attack surface and is standard in production and regulated environments.
Troubleshooting
- Fail2Ban not banning: Check
logpathandfilter = sshd; ensure jail is enabled andfail2ban-client status sshdshows the jail. Usebackend = systemdwithlogpathfromjournalctlif logs are in the journal. - Jail misconfiguration: Run
fail2ban-client -t; ensureportmatches SSH and the backend (iptables/nftables) is installed. - nftables not persisting: Put rules in
/etc/nftables.confand enable thenftablesservice. - SSH lockout: Keep a second session open until key login works. Use the provider’s recovery console to fix
sshd_configor firewall. - Cloud Firewall blocking you: Add your IP or VPN to the firewall’s allowed SSH sources.
- ProxyJump failure: Confirm bastion is reachable and can reach the target’s private IP (VPC routing and firewall allow it).
Frequently Asked Questions
What is defense in depth for SSH security?
Combining multiple controls: hardened SSH (keys only, no root), Fail2Ban, host firewall (nftables), and Cloud Firewall. No single layer is relied on alone.
Is Fail2Ban a firewall?
No. Fail2Ban monitors logs and tells the host firewall (iptables or nftables) to add or remove rules. It does not filter packets itself; the firewall does. So you need both a firewall and Fail2Ban (or similar) for reactive bans.
Is Fail2Ban enough to secure SSH?
No. Fail2Ban reacts to failed logins and adds firewall rules; it does not replace a firewall or restrict who can reach port 22. Use it with SSH hardening, host firewall, and (in production) Cloud Firewall and bastion.
Should I use a bastion host for SSH access?
Yes for production when you have multiple servers. A single jump server with public SSH reduces attack surface and lets you restrict Cloud Firewalls to one host; internal servers are reached via ProxyJump over the VPC.
What is the difference between nftables and iptables?
nftables is the modern packet filter with one ruleset and native rate limiting; iptables is legacy. Both work as Fail2Ban’s backend; nftables is preferred on Ubuntu and similar systems.
How do DigitalOcean Cloud Firewalls improve SSH security?
They allow SSH only from trusted IPs at the network edge; other traffic is dropped before reaching the Droplet, reducing brute-force and scans.
Can I disable SSH password authentication safely?
Yes, after you have SSH key authentication working and have verified login in a second session. Then set PasswordAuthentication no and restart SSH to prevent password brute force.
What ports should be open for secure SSH access?
TCP 22 (or your chosen port). Open it only to trusted IPs at the Cloud Firewall; on the host, nftables rate-limits and Fail2Ban bans abusive IPs.
How does a VPC improve server security?
Application servers sit on a private network with no public SSH; only the bastion has public SSH. Internal access is via the bastion over private IPs, reducing exposure and enabling zero-trust access.
Conclusion
Layered SSH security (hardened config, Fail2Ban, nftables, Cloud Firewall, and bastion) delivers production-ready defense in depth. Treat SSH as infrastructure-critical: use the bastion pattern with host and cloud firewalls, and keep key-based auth and no root login as the baseline.
Next Steps and Related Resources
DigitalOcean Community Tutorials:
- How To Protect SSH with Fail2Ban on Ubuntu 20.04: Fail2Ban-only SSH protection; this tutorial adds nftables, Cloud Firewall, and bastion.
- How Fail2Ban Works to Protect Services on a Linux Server: How Fail2Ban filters logs and triggers actions.
- How the Iptables Firewall Works: Firewall concepts (rules, chains, policies); applies to nftables.
- How To Choose an Effective Firewall Policy to Secure your Servers: Default drop vs accept, drop vs reject.
- How To Secure Web Server Infrastructure With DigitalOcean Cloud Firewalls Using Doctl: Creating and managing Cloud Firewalls from the CLI.
- How To Set Up a Firewall with UFW on Ubuntu: Host firewall with UFW (alternative to nftables).
DigitalOcean Documentation:
- How to Create Firewalls: Control panel, CLI, and API.
- How to Create a VPC: VPC creation for bastion and private app servers.
Server Setup and SSH Configuration:
Thanks for learning with the DigitalOcean Community. Check out our offerings for compute, storage, networking, and managed databases.
About the author
Building future-ready infrastructure with Linux, Cloud, and DevOps. Full Stack Developer & System Administrator. Technical Writer @ DigitalOcean | GitHub Contributor | Passionate about Docker, PostgreSQL, and Open Source | Exploring NLP & AI-TensorFlow | Nailed over 50+ deployments across production environments.
Still looking for an answer?
This textbox defaults to using Markdown to format your answer.
You can type !ref in this text area to quickly search our full set of tutorials, documentation & marketplace offerings and insert the link!
The command
sudo fail2ban-client get sshd banaction
was not valid in my version of fail2ban (1.1.0). Instead I had to use
sudo fail2ban-client -d | grep "addaction"
 This work is licensed under a Creative Commons Attribution-NonCommercial- ShareAlike 4.0 International License.
Become a contributor for community
Get paid to write technical tutorials and select a tech-focused charity to receive a matching donation.

DigitalOcean Documentation
Full documentation for every DigitalOcean product.

Resources for startups and AI-native businesses
The Wave has everything you need to know about building a business, from raising funding to marketing your product.
The developer cloud
Scale up as you grow — whether you're running one virtual machine or ten thousand.

Start building today
From GPU-powered inference and Kubernetes to managed databases and storage, get everything you need to build, scale, and deploy intelligent applications.
