By Erika Heidi and Anish Singh Walia
Not using Ubuntu 20.04?
Choose a different version or distribution.
Introduction
Composer is a popular dependency management tool for PHP, created mainly to facilitate installation and updates for project dependencies. It will check which other packages a specific project depends on and install them for you, using the appropriate versions according to the project requirements. Composer is also commonly used to bootstrap new projects based on popular PHP frameworks, such as Symfony and Laravel. If you’re planning to work with Laravel, you may also want to explore our guide on How To Install and Set Up Laravel with Docker Compose on Ubuntu 20.04.
Version Compatibility: This tutorial has been validated and tested on Ubuntu 20.04 LTS, 22.04 LTS, and 24.04 LTS. All commands and steps work consistently across these versions. While Ubuntu 20.04 ships with PHP 7.4 by default, Ubuntu 22.04 includes PHP 8.1, and Ubuntu 24.04 includes PHP 8.3. Composer is compatible with PHP 7.2.5 and higher, so it works seamlessly with all default PHP versions in these Ubuntu releases.
In this tutorial, you’ll install and get started with Composer on an Ubuntu system.
You could alternatively deploy up a Composer based project directly to DigitalOcean in 5 minutes. For details on how to deploy a PHP Project, see our DigitalOcean App Platform.
Key Takeaways
- Composer automates PHP dependency management by handling library installation, version control, and updates, eliminating manual package management tasks.
- Global installation provides system-wide access to Composer commands from any directory, while local installation offers project-specific control and version isolation.
- Hash verification is essential for security when downloading the Composer installer, protecting against tampered or corrupted installation scripts.
- The
composer.lockfile ensures consistency by locking exact dependency versions across development, staging, and production environments. - Composer is the standard for modern PHP development, with seamless integration into frameworks like Laravel and Symfony, and support from over 400,000 packages on Packagist.
Prerequisites
In order to follow this guide, you will need access to an Ubuntu server (20.04 LTS, 22.04 LTS, or 24.04 LTS) as a non-root sudo user, and a firewall enabled on your server. To set this up, you can follow our initial server setup guide for Ubuntu or the corresponding guide for your Ubuntu version.
If you’re looking for a quick reference, see our How To Install Composer on Ubuntu Quickstart guide. For additional Composer tutorials and resources, check out our Composer tutorial collection.
Step 1 — Installing PHP and Additional Dependencies
In addition to dependencies that should be already included within your Ubuntu system, such as git and curl, Composer requires php-cli in order to execute PHP scripts in the command line, and unzip to extract zipped archives. The php-cli package will install the default PHP version for your Ubuntu release (PHP 7.4 on Ubuntu 20.04, PHP 8.1 on Ubuntu 22.04, or PHP 8.3 on Ubuntu 24.04). If you need to set up your Ubuntu server first, see our initial server setup guide for Ubuntu. We’ll install these dependencies now.
First, update the package manager cache by running:
sudo apt update
Next, run the following command to install the required packages:
sudo apt install php-cli unzip
You will be prompted to confirm installation by typing Y and then ENTER.
Once the prerequisites are installed, you can proceed to installing Composer.
Step 2 — Downloading and Installing Composer
Composer provides an installer script written in PHP. We’ll download it, verify that it’s not corrupted, and then use it to install Composer.
Make sure you’re in your home directory, then retrieve the installer using curl:
cd
curl -sS https://getcomposer.org/installer -o /tmp/composer-setup.php
Next, we’ll verify that the downloaded installer matches the SHA-384 hash for the latest installer found on the Composer Public Keys / Signatures page. To facilitate the verification step, you can use the following command to programmatically obtain the latest hash from the Composer page and store it in a shell variable:
HASH=`curl -sS https://composer.github.io/installer.sig`
If you want to verify the obtained value, you can run:
echo $HASH
Outpute0012edf3e80b6978849f5eff0d4b4e4c79ff1609dd1e613307e16318854d24ae64f26d17af3ef0bf7cfb710ca74755a
Now execute the following PHP code, as provided in the Composer download page, to verify that the installation script is safe to run:
php -r "if (hash_file('SHA384', '/tmp/composer-setup.php') === '$HASH') { echo 'Installer verified'; } else { echo 'Installer corrupt'; unlink('composer-setup.php'); } echo PHP_EOL;"
You’ll see the following output:
Installer verified
If the output says Installer corrupt, you’ll need to download the installation script again and double check that you’re using the correct hash. Then, repeat the verification process. When you have a verified installer, you can continue.
To install composer globally, use the following command which will download and install Composer as a system-wide command named composer, under /usr/local/bin:
sudo php /tmp/composer-setup.php --install-dir=/usr/local/bin --filename=composer
You’ll see output similar to this:
OutputAll settings correct for using Composer
Downloading...

Composer (version 2.2.9) successfully installed to: /usr/local/bin/composer
Use it: php /usr/local/bin/composer
To test your installation, run:
composer
Output   ______
  / ____/___  ____ ___  ____  ____  ________  _____
 / /   / __ \/ __ `__ \/ __ \/ __ \/ ___/ _ \/ ___/
/ /___/ /_/ / / / / / / /_/ / /_/ (__  )  __/ /
\____/\____/_/ /_/ /_/ .___/\____/____/\___/_/
                    /_/
Composer version Composer version 2.2.9 2022-03-15 22:13:37
Usage:
  command [options] [arguments]

Options:
  -h, --help                     Display this help message
  -q, --quiet                    Do not output any message
  -V, --version                  Display this application version
      --ansi                     Force ANSI output
      --no-ansi                  Disable ANSI output
  -n, --no-interaction           Do not ask any interactive question
      --profile                  Display timing and memory usage information
      --no-plugins               Whether to disable plugins.
  -d, --working-dir=WORKING-DIR  If specified, use the given directory as working directory.
      --no-cache                 Prevent use of the cache
  -v|vv|vvv, --verbose           Increase the verbosity of messages: 1 for normal output, 2 for more verbose output and 3 for debug
...
This verifies that Composer was successfully installed on your system and is available system-wide.
Note: If you prefer to have separate Composer executables for each project you host on this server, you can install it locally, on a per-project basis. This method is also useful when your system user doesn’t have permission to install software system-wide.
To do this, use the command php /tmp/composer-setup.php. This will generate a composer.phar file in your current directory, which can be executed with php composer.phar. Local installations are particularly useful for maintaining different Composer versions across projects or when working in restricted environments.
Now let’s look at using Composer to manage dependencies.
Step 3 — Using Composer in a PHP Project
PHP projects often depend on external libraries, and managing those dependencies and their versions can be tricky. Composer solves that problem by keeping track of project versions and dependencies, while also facilitating the process of finding, installing, and updating packages that are required by a project.
In order to use Composer in your project, you’ll need a composer.json file. The composer.json file tells Composer which dependencies it needs to download for your project, and which versions of each package are allowed to be installed. This is extremely important to keep your project consistent and avoid installing unstable versions that could potentially cause backwards compatibility issues.
You don’t need to create this file manually - it’s common to run into syntax errors when you do so. Composer offers an interactive way to create a new composer.json file based on the user’s input, which is a good choice if you plan on sharing your project later as a public package on Packagist. Composer also auto-generates a barebones composer.json file when you run a composer require command to include a dependency in a newly created project.
The process of using Composer to install a package as dependency in a project involves the following steps:
- Identify what kind of library the application needs.
- Research a suitable open source library on Packagist.org, the official package repository for Composer.
- Choose the package you want to depend on.
- Run
composer requireto include the dependency in thecomposer.jsonfile and install the package.
Let’s try this out with a demo application.
The goal of this application is to transform a given sentence into a URL-friendly string - a slug. This is commonly used to convert page titles to URL paths (like the final portion of the URL for this tutorial).
Let’s start by creating a directory for our project. We’ll call it slugify:
cd ~
mkdir slugify
cd slugify
Although not required, you could now run a composer init command to create a detailed composer.json file for your project. Because our project’s only objective is to demonstrate how to install dependencies with Composer, we’ll use a simpler composer.json file that will be auto-generated when we require our first package.
Now it’s time to search Packagist.org for a package that can help us generate slugs. If you search for the term “slug” on Packagist, you’ll get a result similar to this:
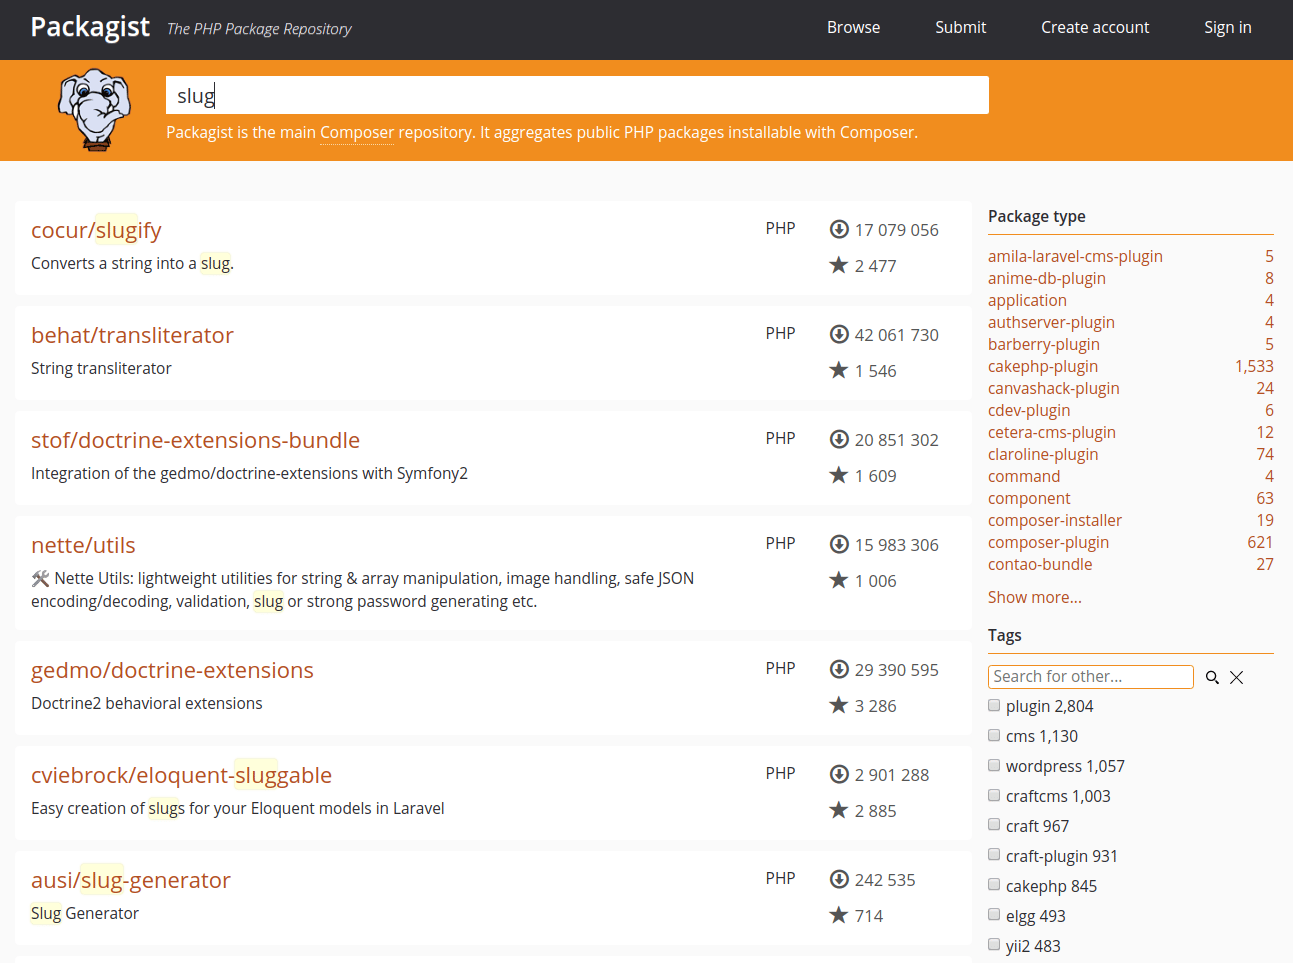
You’ll see two numbers on the right side of each package in the list. The number on the top represents how many times the package was installed via Composer, and the number on the bottom shows how many times a package was starred on GitHub. Generally speaking, packages with more installations and more stars tend to be more stable, since so many people are using them. It’s also important to check the package description for relevance to make sure it’s what you need.
We need a string-to-slug converter. From the search results, the package cocur/slugify, which appears as the first result in that page, seems to be a good match, with a reasonable amount of installations and stars.
Packages on Packagist have a vendor name and a package name. Each package has a unique identifier (a namespace) in the same format GitHub uses for its repositories: vendor/package. The library we want to install uses the namespace cocur/slugify. You need a package’s namespace in order to require it in your project.
Now that you know exactly which package you want to install, you can run composer require to include it as a dependency and also generate the composer.json file for your project. One thing that is important to notice when requiring packages is that Composer tracks both application-level dependencies as well as system-level dependencies. System-level dependencies are important to indicate which PHP modules a package relies on. In the case of the cocur/slugify package, it requires a PHP module that we haven’t installed yet.
When a required package relies on a system library that is currently not installed on your server, you will get an error telling which requirement is missing:
composer require cocur/slugify
OutputUsing version ^4.0 for cocur/slugify
./composer.json has been updated
Loading composer repositories with package information
Updating dependencies (including require-dev)
Your requirements could not be resolved to an installable set of packages.

  Problem 1
    - Installation request for cocur/slugify ^4.0 -> satisfiable by cocur/slugify[v4.0.0].
    - cocur/slugify v4.0.0 requires ext-mbstring * -> the requested PHP extension mbstring is missing from your system.
...
To solve the system dependency problem, we can search for the missing package using apt search:
apt search mbstring
OutputSorting... Done
Full Text Search... Done
php-mbstring/jammy 2:8.1+92ubuntu1 all
  MBSTRING module for PHP [default]

php-patchwork-utf8/jammy 1.3.1-1 all
  UTF-8 strings handling for PHP

php8.1-mbstring/jammy 8.1.2-1ubuntu2.14 amd64
  MBSTRING module for PHP
Note: The package names shown above are examples from Ubuntu 22.04. On Ubuntu 20.04, you’ll see php7.4-mbstring, and on Ubuntu 24.04, you’ll see php8.3-mbstring. The generic php-mbstring package will automatically install the correct version for your Ubuntu release.
After locating the correct package name, you can use apt once again to install the system dependency:
sudo apt install php-mbstring
Once the installation is finished, you can run the composer require command again:
composer require cocur/slugify
OutputUsing version ^4.0 for cocur/slugify
./composer.json has been created
Loading composer repositories with package information
Updating dependencies (including require-dev)
Package operations: 1 install, 0 updates, 0 removals
  - Installing cocur/slugify (v4.0.0): Downloading (100%)
Writing lock file
Generating autoload files
As you can see from the output, Composer automatically decided which version of the package to use. If you check your project’s directory now, it will contain two new files: composer.json and composer.lock, and a vendor directory:
ls -l
Outputtotal 12
-rw-rw-r-- 1 sammy sammy   59 May  4 13:56 composer.json
-rw-rw-r-- 1 sammy sammy 3229 May  4 13:56 composer.lock
drwxrwxr-x 4 sammy sammy 4096 May  4 13:56 vendor
The composer.lock file is used to store information about which versions of each package are installed, and ensure the same versions are used if someone else clones your project and installs its dependencies. This file locks the exact versions of all dependencies and their sub-dependencies, providing consistency across different environments and team members. The vendor directory is where the project dependencies are located. The vendor folder shouldn’t be committed into version control - you only need to include the composer.json and composer.lock files. When others clone your project, they can run composer install to recreate the exact dependency tree based on the lock file.
When installing a project that already contains a composer.json file, run composer install in order to download the project’s dependencies.
Let’s take a quick look at version constraints. If you check the contents of your composer.json file, you’ll see something like this:
- cat composer.json
Output{
    "require": {
        "cocur/slugify": "^4.0"
    }
}
You might notice the special character ^ before the version number in composer.json. Composer supports several different constraints and formats for defining the required package version, in order to provide flexibility while also keeping your project stable. The caret (^) operator used by the auto-generated composer.json file is the recommended operator for maximum interoperability, following semantic versioning. In this case, it defines 4.0 as the minimum compatible version, and allows updates to any future version below 5.0.
Generally speaking, you won’t need to tamper with version constraints in your composer.json file. However, some situations might require that you manually edit the constraints, for instance, when a major new version of your required library is released and you want to upgrade, or when the library you want to use doesn’t follow semantic versioning.
Here are some examples to give you a better understanding of how Composer version constraints work:
| Constraint | Meaning | Example Versions Allowed |
|---|---|---|
| ^1.0 | >= 1.0 < 2.0 | 1.0, 1.2.3, 1.9.9 |
| ^1.1.0 | >= 1.1.0 < 2.0 | 1.1.0, 1.5.6, 1.9.9 |
| ~1.0 | >= 1.0 < 2.0.0 | 1.0, 1.4.1, 1.9.9 |
| ~1.0.0 | >= 1.0.0 < 1.1 | 1.0.0, 1.0.4, 1.0.9 |
| 1.2.1 | 1.2.1 | 1.2.1 |
| 1.* | >= 1.0 < 2.0 | 1.0.0, 1.4.5, 1.9.9 |
| 1.2.* | >= 1.2 < 1.3 | 1.2.0, 1.2.3, 1.2.9 |
For a more in-depth view of Composer version constraints, see the official documentation.
Next, let’s look at how to load dependencies automatically with Composer.
Step 4 — Including the Autoload Script
Since PHP itself doesn’t automatically load classes, Composer provides an autoload script that you can include in your project to get autoloading working for your project. This file is automatically generated by Composer when you add your first dependency.
The only thing you need to do is include the vendor/autoload.php file in your PHP scripts before any class instantiation.
Let’s try it out in our demo application. Open a new file called test.php in your text editor:
nano test.php
Add the following code which brings in the vendor/autoload.php file, loads the cocur/slugify dependency, and uses it to create a slug:
<?php
require __DIR__ . '/vendor/autoload.php';

use Cocur\Slugify\Slugify;

$slugify = new Slugify();

echo $slugify->slugify('Hello World, this is a long sentence and I need to make a slug from it!');
Save the file and exit your editor.
Now run the script:
php test.php
This produces the output hello-world-this-is-a-long-sentence-and-i-need-to-make-a-slug-from-it.
Dependencies need updates when new versions come out, so let’s look at how to handle that.
Step 5 — Updating Project Dependencies
Whenever you want to update your project dependencies to more recent versions, run the update command:
composer update
This will check for newer versions of the libraries you required in your project. If a newer version is found and it’s compatible with the version constraint defined in the composer.json file, Composer will replace the previous version installed. The composer.lock file will be updated to reflect these changes.
You can also update one or more specific libraries by specifying them like this:
composer update vendor/package vendor2/package2
Be sure to check in your composer.json and composer.lock files within your version control system after you update your dependencies so that others can install these newer versions too.
Frequently Asked Questions
1. What is Composer used for in PHP?
Composer is a dependency manager for PHP that automates the process of finding, installing, and updating libraries and packages your PHP projects depend on. Instead of manually downloading and managing dependencies, Composer reads a composer.json file that lists your project’s requirements and handles everything automatically. This ensures you get the correct versions of packages and their dependencies, making PHP development more efficient and reliable.
2. How do I install Composer globally on Ubuntu?
To install Composer globally on Ubuntu, download the installer script, verify its integrity using the SHA-384 hash, and then run the installer with the --install-dir and --filename flags pointing to /usr/local/bin. This makes Composer available system-wide as the composer command. The installation process is identical across Ubuntu 20.04, 22.04, and 24.04. The detailed steps are covered in Step 2 of this tutorial.
3. How can I verify the Composer installer is safe?
You can verify the Composer installer’s safety by comparing its SHA-384 hash with the official hash published on the Composer Public Keys / Signatures page. Use the command php -r "if (hash_file('SHA384', '/tmp/composer-setup.php') === '$HASH') { echo 'Installer verified'; } else { echo 'Installer corrupt'; }" where $HASH contains the latest hash from Composer’s official page. This verification step is crucial for security and is demonstrated in Step 2.
4. What’s the difference between a global and local Composer install?
A global installation places Composer in a system directory like /usr/local/bin, making it accessible from any directory on your system. This is convenient for managing multiple projects. A local installation creates a composer.phar file in a specific project directory, which is useful when you don’t have system-wide installation permissions or want project-specific Composer versions. You can run a local installation with php /tmp/composer-setup.php in your project directory.
5. How do I update Composer to the latest version?
To update Composer to the latest version, run composer self-update. This command downloads and installs the newest version of Composer, replacing your current installation. For global installations, you may need to use sudo composer self-update depending on your permissions.
6. Why is Composer giving memory limit errors on Ubuntu?
Memory limit errors typically occur when Composer tries to process large dependency trees or when your PHP memory limit is too low. You can resolve this by increasing PHP’s memory limit temporarily for Composer commands using php -d memory_limit=512M /usr/local/bin/composer install or by editing your php.ini file to increase the memory_limit setting. For most projects, 512MB or 1GB should be sufficient.
7. How do I uninstall Composer on Ubuntu?
To uninstall a globally installed Composer, simply remove the executable file: sudo rm /usr/local/bin/composer. For local installations, delete the composer.phar file from your project directory. Note that this doesn’t remove the vendor directory or composer.json files in your projects, which you can delete separately if needed.
8. Do I need sudo to run Composer?
You don’t need sudo to run Composer commands for managing project dependencies. However, you may need sudo when installing or updating Composer itself globally, since that requires writing to system directories like /usr/local/bin. Once installed, regular Composer operations like composer install, composer require, and composer update work without elevated privileges.
Conclusion
Composer is a powerful tool that can greatly facilitate the work of managing dependencies in PHP projects. It provides a reliable way of discovering, installing, and updating PHP packages that a project depends on. In this guide, we saw how to install Composer, how to include new dependencies in a project, and how to update these dependencies once new versions are available.
Next Steps
Now that you have Composer installed and configured on your Ubuntu system, you can start building PHP applications with managed dependencies. Here are some recommended next steps:
-
Deploy PHP applications with Composer: Learn how to deploy Composer-based projects using DigitalOcean App Platform, which automatically detects and installs Composer dependencies during deployment.
-
Set up Laravel with Docker: If you’re working with Laravel, explore our guide on How To Install and Set Up Laravel with Docker Compose on Ubuntu to containerize your development environment.
-
Learn Docker Compose: For managing multi-container applications, check out our tutorial on How To Install and Use Docker Compose on Ubuntu.
-
Explore PHP development: Browse our collection of PHP tutorials to learn more about PHP development best practices, framework setup, and deployment strategies.
Ready to deploy your PHP application? Get started with DigitalOcean App Platform and deploy your Composer-based projects in minutes with automatic dependency management and scaling.
Additional Resources
- Quick Reference: For a condensed version of this guide, see our How To Install Composer on Ubuntu 20.04 Quickstart guide.
- Composer Tutorials: Explore our complete Composer tutorial collection for more advanced usage patterns and best practices.
- Docker Integration: Learn how to containerize your PHP applications with our guide on How To Install and Use Docker Compose on Ubuntu 20.04 or the corresponding guide for your Ubuntu version.
- PHP Development: Browse our comprehensive collection of PHP tutorials covering frameworks, deployment strategies, and performance optimization.
Want to host your PHP applications? Deploy with DigitalOcean App Platform for automatic scaling, managed databases, and seamless Composer integration, or create a Droplet for full server control.
Thanks for learning with the DigitalOcean Community. Check out our offerings for compute, storage, networking, and managed databases.
About the author(s)
Dev/Ops passionate about open source, PHP, and Linux. Former Senior Technical Writer at DigitalOcean. Areas of expertise include LAMP Stack, Ubuntu, Debian 11, Linux, Ansible, and more.
I help Businesses scale with AI x SEO x (authentic) Content that revives traffic and keeps leads flowing | 3,000,000+ Average monthly readers on Medium | Sr Technical Writer(Team Lead) @ DigitalOcean | Ex-Cloud Consultant @ AMEX | Ex-Site Reliability Engineer(DevOps)@Nutanix
Still looking for an answer?
This textbox defaults to using Markdown to format your answer.
You can type !ref in this text area to quickly search our full set of tutorials, documentation & marketplace offerings and insert the link!
Followed the steps in this article to install composer Ubuntu 20.04 and got the following output as mentioned:
Composer (version 2.0.13) successfully installed to: /usr/local/bin/composerphp
Use it: php /usr/local/bin/composerphp
But, when I next run the composer command as the root user, I get the following output:
root@host:~# composer

Command 'composer' not found, but can be installed with:

apt install composer`
I have never had this issue installing Composer before, so I am not sure what’s wrong here. Would be thankful for any clues.
Used to use containers and tools like Lando or DDEV, I had to upgrade my main system and did not remember some steps. This tutorial has been very useful for me to reinstall Composer! Thank you so much.
I’m having trouble getting Composer installed with a USER_DATA script through the API. I have run many scripts with no issues. As far as I can tell, a permissions issue is preventing this line from running the Composer Installer script:
php /var/www/myapp/app/composer-setup.php --install-dir=/usr/local/bin --filename=composer
USER_DATA Script below.
USER_DATA="#!/bin/sh
#UPDATE UBUNTU apt -y install php-cli unzip
curl -sS https://getcomposer.org/installer -o /var/www/myapp/app/composer-setup.php chmod 755 /var/www/myapp/app/composer-setup.php php /var/www/myapp/app/composer-setup.php --install-dir=/usr/local/bin --filename=composer
mkdir /var/www/${domain} mkdir /var/www/${domain}/app mkdir /var/www/${domain}/html
mkdir /var/www/${fulldomain} mkdir /var/www/${fulldomain}/app mkdir /var/www/${fulldomain}/html
/root/composer.ph /root/composer.phar install --working-dir=/var/www/myapp/app -n "
 This work is licensed under a Creative Commons Attribution-NonCommercial- ShareAlike 4.0 International License.
Become a contributor for community
Get paid to write technical tutorials and select a tech-focused charity to receive a matching donation.

DigitalOcean Documentation
Full documentation for every DigitalOcean product.

Resources for startups and AI-native businesses
The Wave has everything you need to know about building a business, from raising funding to marketing your product.
The developer cloud
Scale up as you grow — whether you're running one virtual machine or ten thousand.

Start building today
From GPU-powered inference and Kubernetes to managed databases and storage, get everything you need to build, scale, and deploy intelligent applications.
