
Introduction
Django is a powerful web framework that can help you get your Python application or website off the ground. Django includes a simplified development server for testing your code locally, but for anything even slightly production related, a more secure and powerful web server is required.
In this guide, we will demonstrate how to install and configure some components on CentOS 7 to support and serve Django applications. We will configure the uWSGI application container server to interface with our applications. We will then set up Nginx to reverse proxy to uWSGI, giving us access to its security and performance features to serve our apps.
Prerequisites and Goals
In order to complete this guide, you should have a fresh CentOS 7 server instance with a non-root user with sudo privileges configured. You can learn how to set this up by running through our initial server setup guide.
We will be installing Django within two different virtual environments. This will allow your projects and their requirements to be handled separately. We will be creating two sample projects so that we can run through the steps in a multi-project environment.
Once we have our applications, we will install and configure the uWSGI application server. This will serve as an interface to our applications which will translate client requests using HTTP to Python calls that our application can process. We will then set up Nginx in front of uWSGI to take advantage of its high performance connection handling mechanisms and its easy-to-implement security features.
Let’s get started.
Install and Configure VirtualEnv and VirtualEnvWrapper
We will be installing our Django projects in their own virtual environments to isolate the requirements for each. To do this, we will be installing virtualenv, which can create Python virtual environments, and virtualenvwrapper, which adds some usability improvements to the virtualenv work flow.
We will be installing both of these components using pip, the Python package manager. To get pip, we first need to enable the EPEL repository. We can do this easily by typing:
sudo yum install epel-release
Once EPEL is enabled, we can install pip by typing:
sudo yum install python-pip
Now that you have pip installed, we can install virtualenv and virtualenvwrapper globally by typing:
sudo pip install virtualenv virtualenvwrapper
With these components installed, we can now configure our shell with the information it needs to work with the virtualenvwrapper script. Our virtual environments will all be placed within a directory in our home folder called Env for easy access. This is configured through an environmental variable called WORKON_HOME. We can add this to our shell initialization script and can source the virtual environment wrapper script.
To add the appropriate lines to your shell initialization script, you need to run the following commands:
echo "export WORKON_HOME=~/Env" >> ~/.bashrc
echo "source /usr/bin/virtualenvwrapper.sh" >> ~/.bashrc
Now, source your shell initialization script so that you can use this functionality in your current session:
source ~/.bashrc
You should now have directory called Env in your home folder which will hold virtual environment information.
Create Django Projects
Now that we have our virtual environment tools, we will create two virtual environments, install Django in each, and start two projects.
Create the First Project
We can create a virtual environment easily by using some commands that the virtualenvwrapper script makes available to us.
Create your first virtual environment with the name of your first site or project by typing:
mkvirtualenv firstsite
This will create a virtual environment, install Python and pip within it, and activate the environment. Your prompt will change to indicate that you are now operating within your new virtual environment. It will look something like this: (firstsite)user@hostname:~$. The value in the parentheses is the name of your virtual environment. Any software installed through pip will now be installed into the virtual environment instead of on the global system. This allows us to isolate our packages on a per-project basis.
Our first step will be to install Django itself. We can use pip for this without sudo since we are installing this locally in our virtual environment:
pip install django
With Django installed, we can create our first sample project by typing:
cd ~
django-admin.py startproject firstsite
This will create a directory called firstsite within your home directory. Within this is a management script used to handle various aspects of the project and another directory of the same name used to house the actual project code.
Move into the first level directory so that we can begin setting up the minimum requirements for our sample project.
cd ~/firstsite
Begin by migrating the database to initialize the SQLite database that our project will use. You can set up an alternative database for your application if you wish, but this is outside of the scope of this guide:
./manage.py migrate
You should now have a database file called db.sqlite3 in your project directory. Now, we can create an administrative user by typing:
./manage.py createsuperuser
You will have to select a username, give a contact email address, and then select and confirm a password.
Next, open the settings file for the project with your text editor:
nano firstsite/settings.py
Since we will be setting up Nginx to serve our site, we need to configure a directory which will hold our site’s static assets. This will allow Nginx to serve these directly, which will have a positive impact on performance. We will tell Django to place these into a directory called static in our project’s base directory. Add this line to the bottom of the file to configure this behavior:
STATIC_ROOT = os.path.join(BASE_DIR, "static/")
Save and close the file when you are finished. Now, collect our site’s static elements and place them within that directory by typing:
./manage.py collectstatic
You can type “yes” to confirm the action and collect the static content. There will be a new directory called static in your project directory.
With all of that out of the way, we can test our project by temporarily starting the development server. Type:
./manage.py runserver 0.0.0.0:8080
This will start up the development server on port 8080. Visit your server’s domain name or IP address followed by 8080 in your browser:
http://server_domain_or_IP:8080
You should see a page that looks like this:
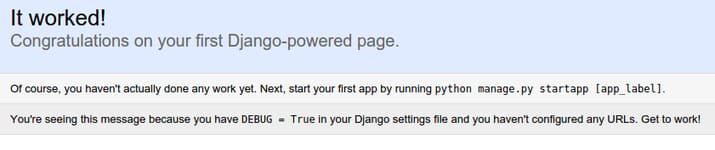
Add /admin to the end of the URL in your browser’s address bar and you will be taken to the admin login page:
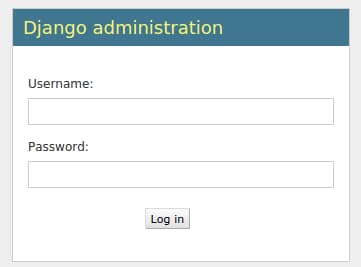
Using the administrative login credentials you selected with the createsuperuser command, log into the server. You will then have access to the administration interface:

After testing this functionality out, stop the development server by typing CTRL-C in your terminal. We can now move on to our second project.
Create the Second Project
The second project will be created in exactly the same way as the first. We will abridge the explanation in this section, seeing as how you have already completed this once.
Move back to your home directory and create a second virtual environment for your new project. Install Django inside of this new environment once it is activated:
cd ~
mkvirtualenv secondsite
pip install django
The new environment will be created and changed to, leaving your previous virtual environment. This Django instance is entirely separate from the other one you configured. This allows you to manage them independently and customize as necessary.
Create the second project and move into the project directory:
django-admin.py startproject secondsite
cd ~/secondsite
Initialize the database and create an administrative user:
./manage.py migrate
./manage.py createsuperuser
Open the settings file:
nano secondsite/settings.py
Add the location for the static files, just as you did in the previous project:
STATIC_ROOT = os.path.join(BASE_DIR, "static/")
Save and close the file. Now, collect the static elements into that directory by typing:
./manage.py collectstatic
Finally, fire up the development server to test out the site:
./manage.py runserver 0.0.0.0:8080
You should check the regular site at:
http://server_domain_or_IP:8080
Also log into the admin site:
http://server_domain_or_IP:8080/admin
When you’ve confirmed that everything is working as expected, type CTRL-C in your terminal to stop the development server.
Backing Out of the Virtual Environment
Since we are now done with the Django portion of the guide, we can deactivate our second virtual environment:
deactivate
If you need to work on either of your Django sites again, you should reactivate their respective environments. You can do that by using the workon command:
workon firstsite
Or:
workon secondsite
Again, deactivate when you are finished working on your sites:
deactivate
Setting up the uWSGI Application Server
Now that we have two Django projects set up and ready to go, we can configure uWSGI. uWSGI is an application server that can communicate with applications over a standard interface called WSGI. To learn more about this, read this section of our guide on setting up uWSGI and Nginx on Ubuntu 14.04.
Installing uWSGI
Unlike the guide linked above, in this tutorial, we’ll be installing uWSGI globally. This will create less friction in handling multiple Django projects. Before we can install uWSGI, we need the Python development files that the software relies on. We also need a compiler. We can get both of these using yum:
sudo yum install python-devel gcc
Now that the development files are available, we can install uWSGI globally through pip by typing:
sudo pip install uwsgi
We can quickly test this application server by passing it the information for one of our sites. For instance, we can tell it to serve our first project by typing:
uwsgi --http :8080 --home /home/user/Env/firstsite --chdir /home/user/firstsite -w firstsite.wsgi
Here, we’ve told uWSGI to use our virtual environment located in our ~/Env directory, to change to our project’s directory, and to use the wsgi.py file stored within our inner firstsite directory to serve the file. For our demonstration, we told it to serve HTTP on port 8080. If you go to server’s domain name or IP address in your browser, followed by :8080, you will see your site again (the static elements in the /admin interface won’t work yet). When you are finished testing out this functionality, type CTRL-C in the terminal.
Creating Configuration Files
Running uWSGI from the command line is useful for testing, but isn’t particularly helpful for an actual deployment. Instead, we will run uWSGI in “Emperor mode”, which allows a master process to manage separate applications automatically given a set of configuration files.
Create a directory that will hold your configuration files. Since this is a global process, we will create a directory called /etc/uwsgi/sites to store our configuration files. Move into the directory after you create it:
sudo mkdir -p /etc/uwsgi/sites
cd /etc/uwsgi/sites
In this directory, we will place our configuration files. We need a configuration file for each of the projects we are serving. The uWSGI process can take configuration files in a variety of formats, but we will use .ini files due to their simplicity.
Create a file for your first project and open it in your text editor:
sudo nano firstsite.ini
Inside, we must begin with the [uwsgi] section header. All of our information will go beneath this header. We are also going to use variables to make our configuration file more reusable. After the header, set a variable called project with the name of your first project. Set another variable with your normal username that owns the project files. Add a variable called base that uses your username to establish the path to your user’s home directory:
[uwsgi]
project = firstsite
username = user
base = /home/%(username)
Next, we need to configure uWSGI so that it handles our project correctly. We need to change into the root project directory by setting the chdir option. We can combine the home directory and project name setting that we set earlier by using the %(variable_name) syntax. This will be replaced by the value of the variable when the config is read.
In a similar way, we will indicate the virtual environment for our project. By setting the module, we can indicate exactly how to interface with our project (by importing the “application” callable from the wsgi.py file within our project directory). The configuration of these items will look like this:
[uwsgi]
project = firstsite
username = user
base = /home/%(username)

chdir = %(base)/%(project)
home = %(base)/Env/%(project)
module = %(project).wsgi:application
We want to create a master process with 5 workers. We can do this by adding this:
[uwsgi]
project = firstsite
username = user
base = /home/%(username)

chdir = %(base)/%(project)
home = %(base)/Env/%(project)
module = %(project).wsgi:application

master = true
processes = 5
Next we need to specify how uWSGI should listen for connections. In our test of uWSGI, we used HTTP and a network port. However, since we are going to be using Nginx as a reverse proxy, we have better options.
Instead of using a network port, since all of the components are operating on a single server, we can use a Unix socket. This is more secure and offers better performance. This socket will not use HTTP, but instead will implement uWSGI’s uwsgi protocol, which is a fast binary protocol designed for communicating with other servers. Nginx can natively proxy using the uwsgi protocol, so this is our best choice.
We need to set the user who will run the process. We will also modify the permissions and ownership of the socket because we will be giving the web server write access. The socket itself will be placed within the /run/uwsgi directory (we’ll create this directory in a bit) where both uWSGI and Nginx can reach it. We’ll set the vacuum option so that the socket file will be automatically cleaned up when the service is stopped:
[uwsgi]
project = firstsite
username = user
base = /home/%(username)

chdir = %(base)/%(project)
home = %(base)/Env/%(project)
module = %(project).wsgi:application

master = true
processes = 5

uid = %(username)
socket = /run/uwsgi/%(project).sock
chown-socket = %(username):nginx
chmod-socket = 660
vacuum = true
With this, our first project’s uWSGI configuration is complete. Save and close the file.
The advantage of setting up the file using variables is that it makes it incredibly simple to reuse. Copy your first project’s configuration file to use as a base for your second configuration file:
sudo cp /etc/uwsgi/sites/firstsite.ini /etc/uwsgi/sites/secondsite.ini
Open the second configuration file with your text editor:
sudo nano /etc/uwsgi/sites/secondsite.ini
We only need to change a single value in this file in order to make it work for our second project. Modify the project variable with the name you’ve used for your second project:
[uwsgi]
project = firstsite
username = user
base = /home/%(username)

chdir = %(base)/%(project)
home = %(base)/Env/%(project)
module = %(project).wsgi:application

master = true
processes = 5

uid = %(username)
socket = /run/uwsgi/%(project).sock
chown-socket = %(username):nginx
chmod-socket = 660
vacuum = true
Save and close the file when you are finished. Your second project should be ready to go now.
Create a Systemd Unit File for uWSGI
We now have the configuration files we need to serve our Django projects, but we still haven’t automated the process. Next, we’ll create a Systemd unit file to automatically start uWSGI at boot.
We will create the unit file in the /etc/systemd/system directory where user-created unit files are kept. We will call our file uwsgi.service:
sudo nano /etc/systemd/system/uwsgi.service
Start with the [Unit] section, which is used to specify metadata. We’ll simply put a description of our service here:
[Unit]
Description=uWSGI Emperor service
Next, we’ll open up the [Service] section. We’ll use the ExecStartPre directive to set up the pieces we need to run our server. This will make sure the /run/uwsgi directory is created and that our normal user owns it with the Nginx group as the group owner. Both mkdir with the -p flag and the chown command return successfully even if they already exist. This is what we want.
For the actual start command, specified by the ExecStart directive, we will point to the uwsgi executable. We will tell it to run in “Emperor mode”, allowing it to manage multiple applications using the files it finds in /etc/uwsgi/sites. We will also add the pieces needed for Systemd to correctly manage the process. These are taken from the uWSGI documentation here:
[Unit]
Description=uWSGI Emperor service

[Service]
ExecStartPre=/usr/bin/bash -c 'mkdir -p /run/uwsgi; chown user:nginx /run/uwsgi'
ExecStart=/usr/bin/uwsgi --emperor /etc/uwsgi/sites
Restart=always
KillSignal=SIGQUIT
Type=notify
NotifyAccess=all
Now, all we need to do is add the [Install] section. This allows us to specify when the service should be automatically started. We will tie our service to the multi-user system state. Whenever the system is set up for multiple users (the normal operating condition), our service will be activated:
[Unit]
Description=uWSGI Emperor service

[Service]
ExecStartPre=/usr/bin/bash -c 'mkdir -p /run/uwsgi; chown user:nginx /run/uwsgi'
ExecStart=/usr/bin/uwsgi --emperor /etc/uwsgi/sites
Restart=always
KillSignal=SIGQUIT
Type=notify
NotifyAccess=all

[Install]
WantedBy=multi-user.target
When you are finished with this, save and close the file.
We will be unable to start the service successfully at this point because it relies on the nginx user being available. We will have to wait to start the uWSGI service until after Nginx is installed.
Install and Configure Nginx as a Reverse Proxy
With uWSGI configured and ready to go, we can now install and configure Nginx as our reverse proxy. This can be downloaded and installed using yum:
sudo yum install nginx
Once Nginx is installed, we can go ahead and edit the main configuration file:
sudo nano /etc/nginx/nginx.conf
Within this file, next to the existing server block, we will create an additional server block for each of our sites:
http {

    . . .

    include /etc/nginx/conf.d/*.conf;

    server {
    }

    server {
    }

    server {
        listen 80 default_server;
        server_name localhost;

        . . .
The blocks we created will hold the configuration for our uWSGI sites. We’ll cover the directives that we need in the first server block now.
First, we need to tell the server block which port number and domain name that it should respond to. We’ll assume that you have a domain name for each of your sites:
server {
    listen 80;
    server_name firstsite.com www.firstsite.com;
}
Next, we’ll tell Nginx that we don’t need to worry about a missing favicon. We will then specify the directory where our first site’s static assets were collected for when these files are requested. Nginx can hand them straight to the client from that directory:
server {
    listen 80;
    server_name firstsite.com www.firstsite.com;

    location = favicon.ico { access_log off; log_not_found off; }
    location /static/ {
        root /home/user/firstsite;
    }
}
Next, we create a catch-all location block that will pass all additional queries straight to uWSGI. We will include the uwsgi parameters found in the /etc/nginx/uwsgi_params file and pass the traffic to the socket that the uWSGI server sets up:
server {
    listen 80;
    server_name firstsite.com www.firstsite.com;

    location = favicon.ico { access_log off; log_not_found off; }
    location /static/ {
        root /home/user/firstsite;
    }

    location / {
        include uwsgi_params;
        uwsgi_pass unix:/run/uwsgi/firstsite.sock;
    }
}
With that, our first server block is complete.
The second server block for our other site will be almost the same. You can copy and paste the server block we just created to get started. You will need to modify the domain name that the site should respond to, the location of the site’s static files, and the site’s socket file:
server {
    listen 80;
    server_name secondsite.com www.secondsite.com;

    location = favicon.ico { access_log off; log_not_found off; }
    location /static/ {
        root /home/user/secondsite;
    }

    location / {
        include uwsgi_params;
        uwsgi_pass unix:/run/uwsgi/secondsite.sock;
    }
}
When you are finished with this step, save and close the file.
Check the syntax of the Nginx file to make sure you don’t have any mistakes:
sudo nginx -t
If no errors are reported, our file is in good condition.
We have one additional task we have to complete to make our sites work correctly. Since Nginx is handling the static files directly, it needs access to the appropriate directories. We need to give it executable permissions for our home directory, which is the only permission bit it is lacking.
The safest way to do this is to add the Nginx user to our own user group. We can then add the executable permission to the group owners of our home directory, giving just enough access for Nginx to serve the files:
sudo usermod -a -G user nginx
chmod 710 /home/user
Now, we can start the Nginx server and the uWSGI process:
sudo systemctl start nginx
sudo systemctl start uwsgi
You should now be able to reach your two projects by going to their respective domain names. Both the public and administrative interfaces should work as expected.
If this goes well, you can enable both of the services to start automatically at boot by typing:
sudo systemctl enable nginx
sudo systemctl enable uwsgi
Conclusion
In this guide, we’ve set up two Django projects, each in their own virtual environments. We’ve configured uWSGI to serve each project independently using the virtual environment configured for each. Afterwards, we set up Nginx to act as a reverse proxy to handle client connections and serve the correct project depending on the client request.
Django makes creating projects and applications simple by providing many of the common pieces, allowing you to focus on the unique elements. By leveraging the general tool chain described in this article, you can easily serve the applications you create from a single server.
Thanks for learning with the DigitalOcean Community. Check out our offerings for compute, storage, networking, and managed databases.
About the author

Former Senior Technical Writer at DigitalOcean, specializing in DevOps topics across multiple Linux distributions, including Ubuntu 18.04, 20.04, 22.04, as well as Debian 10 and 11.
Still looking for an answer?
This textbox defaults to using Markdown to format your answer.
You can type !ref in this text area to quickly search our full set of tutorials, documentation & marketplace offerings and insert the link!

Thanks for your complete and step by step tutorial :) If it is possible write a tutorial about what uWSGi or Enginx is and how they work?
Thanks :)

I understand if I have firstsite running on python2 and secondsite on python3 hence I need a different virtualenv for each site.
If I have two django apps using python2, do I still need to have ONE virtualenv per app?
Do you have an example for ubuntu 14.04 where instead of systemd, you have a script for upstart?
And only the firstsite works for me.
In my case firstsite is djangoonpy2 and secondsite is djangoonpy3

Hi. I’ve got a problem with this manual:
uwsgi.log:
Set PythonHome to /hedgehog/.virtualenv/hedgehog ImportError: No module named site
My settings:
/etc/uwsgi/sites/hedgehog.ini
[uwsgi]
project = hedgehog
username = hedgehog
base = /var/www/%(username)/code

chdir = /var/www/hedgehog/code
home = /%(username)/.virtualenv/%(username)
module = %(username).wsgi:application

master = true
processes = 5

uid = %(username)
socket = /run/uwsgi/%(project).sock
chown-socket = %(username):nginx
chmod-socket = 660
vacuum = true
logto = /var/www/%(username)/log/uwsgi.log
/etc/systemd/system/uwsgi.service
[Unit]
Description=uWSGI Emperor service

[Service]
ExecStartPre=/usr/bin/bash -c 'mkdir -p /run/uwsgi; chown hedgehog:nginx /run/uwsgi'
ExecStart=/usr/bin/uwsgi --emperor /etc/uwsgi/sites
Restart=always
KillSignal=SIGQUIT
Type=notify
NotifyAccess=all

[Install]
WantedBy=multi-user.target
The app is in /var/www/hedgehog/code.
Seems that uwsgi somehow doesn’t use the virtualenv. I’ve tried adding this to the ini file:
plugins = python
virtualenv = %(home)
It didn’t help.
An something more:
[rreimche@rreimche-web sites]$ sudo -u hedgehog -H bash -l
[sudo] password for rreimche:
[hedgehog@rreimche-web sites]$ python
Python 2.7.5 (default, Jun 24 2015, 00:41:19)
[GCC 4.8.3 20140911 (Red Hat 4.8.3-9)] on linux2
Type "help", "copyright", "credits" or "license" for more information.
>>> import site
>>> exit()
Could you please help me?

It’s really annoying that we get this 502 bad gateway issue because uwsgi is not created the socket file.
@jellingwood Please clarify what the correct permissions should be for this not to occur…

I followed this tutorial and getting error like :
502 Bad Gateway
nginx/1.6.3
Operating Environment and tools: Rhel 7.2 Django uwsgi nginx
my firstsite.ini
[uwsgi]
project = firstsite
username = ec2-user
base = /home/%(username)

chdir = %(base)/%(project)
home = %(base)/Env/%(project)
module = %(project).wsgi:application

master = true
processes = 5

uid = %(username)
socket = /run/uwsgi/%(project).sock
chown-socket = %(username):nginx
chmod-socket = 660
vacuum = true
uwsgi.service:
[Unit]
Description=uWSGI Emperor service

[Service]
ExecStartPre=/usr/bin/bash -c 'mkdir -p /run/uwsgi; chown ec2-user:nginx /run/uwsgi'
ExecStart=/usr/bin/uwsgi --emperor /etc/uwsgi/sites
Restart=always
KillSignal=SIGQUIT
Type=notify
NotifyAccess=all

[Install]
WantedBy=multi-user.target
nginx.conf :
#inside http block after existing server block
server {
    listen 80;
    server_name 52.32.66.190;

    location = favicon.ico { access_log off; log_not_found off; }
    location /static/ {
        root /home/ec2-user/firstsite;
    }

    location / {
        include uwsgi_params;
        uwsgi_pass unix:/run/uwsgi/firstsite.sock;
    }
}


Good Article. How do we enable WebSocket(ws:// or wss://) communication with the same configuration?

This comment is probably as long as the tutorial itself. But if you’ve been struggling to get yours working, you may find some relief here. That is my hope anyway.
I am migrating my website Phrancko.com from AWS to DO. I was using Apache and mod_wsgi at AWS but thought it would be nice to used Nginx and uwsgi instead at DO. I chose the Centos operating system because that’s the one I was most familiar with.
So I found this page and thought, “Oh boy, this is going to lead me right through setting it all up.” Unfortunately it turns out this document written in 2015 has not kept up with more recent developments. It took me 14 days of beating my head against the wall but I finally found all the answers I needed, including many that some of the commenters to this article have also needed. (Yes, literally 14 long and very frustrating days to get here!) Along the way I read many forums, including the comments right here, where people asked how to solve the same problems I was hitting, but then got no answers. If they did get answers, they were often incomplete, or just plain wrong.
Going into this, I knew I wanted a couple of differences in my environment that are not described in this article:
- I wanted to use pipenv to control my virtual environment, instead of virtualenv and virtualenvwrapper.
- All sites should now be secure so I wanted to incorporate LetsEncrypt / certbot into the mechanisms.
That didn’t seem like too much to ask for enhancing the environment. But I never had heard of this little thing to tighten permissions called selinux and its companion setsebool that the article never mentions. They turned out to be the keys to the most difficult issues that this article does not address. I didn’t even know to search for selinux so it took a long time to find it and even longer to realize that was the problem.
So as a public service I am documenting all that I found that finally produced a working Django, nginx, uwsgi, letsencrypt enviroment and will answer the following questions, and perhaps a few more that the article leaves out:
- How do you use pipenv with uwsgi, instead of virtualenv?
- How do you get uwsgi to produce a log so you can see what its problems are?
- How do you incorporate LetEncrypt SSL protection for your website?
- Why doesn’t the simple access to the static directory just work as described in this article? How do you fix it?
- Why does uwsgi report that your virtual environment does not exist when you can ‘ls -ld’ that exact path and prove that it does? How do you fix that?
- What do you do when you get the dreaded “502 Bad Gateway” error? Is it a problem with uwsgi or with nginx? (It could be either or, as in my case, both.)
- Why do you keep getting “connect() to unix:/run/uwsgi/example.sock failed (13: Permission denied)” even though you have set the user and group and permissions all correctly?
- Oh, and another little thing: what is the uid that nginx runs under. (Hint: It isn’t www-data which many forums say it is.)
Using pipenv
This article tells you to is set up a virtual environment with virtualenv and virtualenvwrapper. Ignore all that and the additions to .bashrc and instead set up your virtual environment with pipenv, which is more advanced and easier to use than any alternatives to date. There are many good intro articles and YouTube videos showing how to get started with pipenv so I won’t give a tutorial here. However, what you do need to know is that once you have done that you should cd to your pipenv intialized project and execute:
pipenv --venv
The output shows the path to your virtual environment. Copy that path and use that path as your home value, both when executing uwsgi from the command line and for the home setting in your /etc/uwsgi/sites/example.ini file.
Setting up the Django project
Simply follow the instructions here. If you run across advice that you can rename your top-level project directory so you don’t have the structure /home/user/example_project/example_project/… DON’T DO IT. This article’s uwsgi.ini file depends on that duplicate name. (I bet you can guess how I found that out.) You’ll probably want to change the SQLite database to a more substantial production one later. That is beyond the scope of this article and my comments.
Initializing uwsgi
Believe it or not, the ini files for uwsgi.service and for uwsgi/sites/example.ini work as presented, except for replacing the value for ‘home’ with you pipenv virtual environment path. I say believe it or not, because in my frustration I tried all kinds of changes to both of these files, but once I solved the mysterious problems, I took out my changes one by one until I got all the way back to what is described in the this article.
You may have to change the location of the uwsgi executable also. I discovered mine was in /usr/local/bin so I also changed this line in the uwsgi.service file:
ExecStart=/usr/local/bin/uwsgi --emperor /etc/uwsgi/sites
The only other change you should make is to add the following line to the end of the example.ini file:
daemonize = /var/log/uwsgi/uwsgi.log
That provides a log to look at when things don’t work out as planned. (One of the frustrations I had with this article was that it gave no guidance about what to do when things didn’t just work as described. And especially it didn’t tell how to log what uwsgi was doing so you could find out if it was working or why it was failing.)
This may be the point where I discovered the error in that log that told me my virtual environment directory did not exist. It turns out that if permissions are not right for some of these things, instead of giving a permissions error, it says the directory or file does not exist. Nevertheless, here’s the magic incantation that solves that problem and the later nginx problem accessing static and media files. I’m not quite sure when I discovered it but you should do it now rather than wait for some strange error. After much searching and much advice about changing the ownership and rwx permissions on my directory structure, all of which was necessary, but did not fix the problem, I found this advice buried in a forum somewhere. Just execute:
setsebool -P httpd_read_user_content 1
You don’t have to understand it, just do it and it solves a lot of issues. It allows processes to access files and directories in your user directories, which are prevented by a system “policy” if you haven’t done it.
Also, make sure you don’t miss these two commands in the article:
sudo usermod -a -G user nginx
chmod 710 /home/user
Install nginx
I installed letsencrypt (aka certbot) right after I installed nginx. I think I did things in the wrong order and I had to doctor the resulting nginx.conf file to move the certbot installed lines into the right place. I think if you set up nginx exactly as the article describes to run your website as a non-secured site on port 80, and THEN install letsencrypt that may not be necessary. But I’ll describe what I think did in case the same thing happens to you.
Install letsencrypt / certbot
Here’s the easy, peasy way. Just go here, click “Get certbot instructions,” and specify your server as nginx and your operating system (mine is Centos 8) and follow the instructions from there:
After you do that, check your nginx.conf and see if the certbot installed lines are working for your website or not. If they are in the wrong place in the file, you may have to move them to the right place to go with your host names. And you may have to remove ‘listen 80’ from that area as well. Anyway, mine now has the following structure which works:
server {

    listen [::]:443 ssl ipv6only=on; # managed by Certbot
    listen 443 ssl; # managed by Certbot
    ssl_certificate /etc/letsencrypt/live/example.com/fullchain.pem; # managed by Certbot
    ssl_certificate_key /etc/letsencrypt/live/example.com/privkey.pem; # managed by Certbot
    include /etc/letsencrypt/options-ssl-nginx.conf; # managed by Certbot
    ssl_dhparam /etc/letsencrypt/ssl-dhparams.pem; # managed by Certbot

    server_name  example.com www.example.com;
	. . .
And don’t forget to do the final step to keep the certificate updated:
echo "0 0,12 * * * root python -c 'import random; import time; time.sleep(random.random() * 3600)' && certbot renew -q" | sudo tee -a /etc/crontab > /dev/null
This will call python from the root user. If root doesn’t know where python is, you may have to put a directory in front of python command. Mine looks like this:
0 0,12 * * * root /home/my-user/.local/bin/python -c 'import random; . . .
Finish installing nginx
Complete the rest of the instructions up to, but not including the systemctl enable commands. If you have executed the setsebool command above, then you should not have any trouble browsing to a static file in your project. If you didn’t do it before then do it now.
If it doesn’t work to browse to static files, you may have hit a problem I did not get. You can look for nginx errors here:
/var/log/nginx/error.log
And look for uwsgi errors here (assuming you added the daemonize statement to your wsgi project ini file.
/var/log/uwsgi/uwsgi.log
By the way, if you look at the top of your nginx.conf file you’ll see ‘user nginx;’ which tells you nginx runs as the user nginx, not www-data. Apparently nginx used to run as www-data or in other environments it still does. So if you spend any time searching forums for nginx help, you’ll see lots of people saying the nginx user is www-data. It isn’t. And you don’t need to create a www-data user and change it to that. (I know! I did that too during my head-to-wall banging period.)
If you browse to your website now, you will most likely get the dreaded ‘502 Bad Gateway’ error.
Check the logs. Fix whatever is required, if anything, to get uwsgi running without errors first. Make sure it produces the socket file and sets its ownership and permissions correctly.
Then see what errors occur in the nginx error.log file. If you’re lucky, it’s just the old socket permission denied error. Now we will fix that and you are done.
The solution I finally found was described as succinctly as possible here: https://axilleas.me/en/blog/2013/selinux-policy-for-nginx-and-gitlab-unix-socket-in-fedora-19/
You can read it all for a better understanding, or you can just ‘sudo su’ to become the root user and execute these commands:
yum install -y policycoreutils-{python,devel}
grep nginx /var/log/audit/audit.log | audit2allow -M nginx
semodule -i nginx.pp
usermod -a -G git nginx
chmod g+rx /home/git/
If you browse to your website now, you should be delighted to see the rocket ship default page of Django. I’m breaking out a bottle of champagne tonight to celebrate the success at the end of 14 long, frustrating days.
By the way, DO documentation has a lot about selinux, including a two part tutorial. But since I had never heard of it before, I did not find those until after all of this and then I specifically searched for selinux. There is no mention in those articles of the “502 Bad Gateway” error, or the socket permissions error, so searching DO documents for those things did not lead me to them.
I hope this helps it go better for you all.
Frank Jernigan

I made in a local VM to test. I do everything. The last step that I did is:
sudo systemctl start nginx
sudo systemctl start uwsgi
In the browser I try to access the URL: http://localhost/ or http://localhost/fistsite
I try too this link under, but result in a external site: www.firstsite.com
But everything that I try (localhost/anything) result in this:
502 Bad Gateway nginx/1.20.1
What is the link to test at localhost? Or, how I do a local test at localhost?
 This work is licensed under a Creative Commons Attribution-NonCommercial- ShareAlike 4.0 International License.
Become a contributor for community
Get paid to write technical tutorials and select a tech-focused charity to receive a matching donation.

DigitalOcean Documentation
Full documentation for every DigitalOcean product.

Resources for startups and AI-native businesses
The Wave has everything you need to know about building a business, from raising funding to marketing your product.
The developer cloud
Scale up as you grow — whether you're running one virtual machine or ten thousand.

Start building today
From GPU-powered inference and Kubernetes to managed databases and storage, get everything you need to build, scale, and deploy intelligent applications.
