By Erika Heidi
Developer Advocate

So far, you’ve seen how to set up the application’s MySQL database tables using migrations, how to create an Eloquent model to interact with the links table, and how to create Artisan commands to manage links in the database. You’ll now see how to create a custom Blade template to show your links in the application’s front-end. To facilitate styling this page while keeping it minimal, for this series we are going to use Bulma, a single-file CSS framework.
The default route set up within the Laravel web routes file points to an example template that you can find at resources/views/welcome.blade.php. You’ll create a new index.blade.php file within that same directory, and edit the main routes file so that the / route points to this template instead. In the route definition, you’ll also need to obtain a list of all links that you want to show in the new index template.
Start by updating the routes file of your Laravel application. Open the routes/web.php file using your text or code editor of choice:
- nano routes/web.php
Your current / route points to the example page that comes with Laravel by default:
Route::get('/', function () {
    return view('welcome');
});
To make the proposed changes, first you’ll use the Link Eloquent model to fetch all links from the database, and sort them in decreasing order to make sure any new links you create are listed first, and thus will be shown at the top of the page.
$links = Link::all()->sortDesc();
The view helper function will look for a template file named welcome.blade.php, in the root of the resources/views directory, and return the rendered result to the browser. You’ll change this to point to a new index.blade.php template. Additionally, you’ll pass the $links variable along as template data.
    return view('index', [
        'links' => $links
    ]);
The following code implements the discussed changes for the / route. Replace the contents in your routes/web.php file with:
<?php

use Illuminate\Support\Facades\Route;
use App\Models\Link;

/*
|--------------------------------------------------------------------------
| Web Routes
|--------------------------------------------------------------------------
|
| Here is where you can register web routes for your application. These
| routes are loaded by the RouteServiceProvider within a group which
| contains the "web" middleware group. Now create something great!
|
*/

Route::get('/', function () {
    return view('index', [
        'links' => Link::all()->sortDesc()
    ]);
});
Save and close the file when you’re done.
The routes file is all set, but if you try to access your main application’s page right now you will get an error message because the index.blade.php template doesn’t exist yet. You’ll create it now.
You can base your template on the Bulma starter template, which provides a minimal HTML page structure with a title, a subtitle, and a main content area. Later on, you’ll include some CSS styling to customize the appearance of this page.
To get started, create a new index.blade.php template using your text or code editor of choice:
- nano resources/views/index.blade.php
Apart from the HTML boilerplate code, which creates the page structure and the static elements that you may want to use (such as headers and other information), you’ll need to show the list of links that was passed along as template data —a collection of Link objects.
You can use Blade’s foreach loop to loop through the links in the collection, and output them to the page:
            @foreach ($links as $link)
                <li>
                    <a href="{{ $link->url }}" target="_blank" title="Visit Link: {{ $link->url }}">{{ $link->description }}</a>
                </li>
            @endforeach
Include the following content in your index.blade.php file. Feel free to customize the title and other information in the page as you wish:
<!DOCTYPE html>
<html>
<head>
    <meta charset="utf-8">
    <meta name="viewport" content="width=device-width, initial-scale=1">
    <title>Sammy's Awesome Links</title>
    <link rel="stylesheet" href="https://cdn.jsdelivr.net/npm/bulma@0.9.1/css/bulma.min.css">
</head>
<body>
<section class="section">
    <div class="container">
        <h1 class="title">
            Check out my awesome links
        </h1>
        <p class="subtitle">
            You can include a little description here.
        </p>

        <ul>
            @foreach ($links as $link)
                <li>
                    <a href="{{ $link->url }}" target="_blank" title="Visit Link: {{ $link->url }}">{{ $link->description }}</a>
                </li>
            @endforeach
        </ul>
    </div>
</section>
</body>
</html>
Save the file when you’re done.
Now go to your browser to check the results. You should be able to access your application at port 8000 of either localhost or your remote server’s IP address, in case you are using a remote server as a development platform.
http://localhost:8000
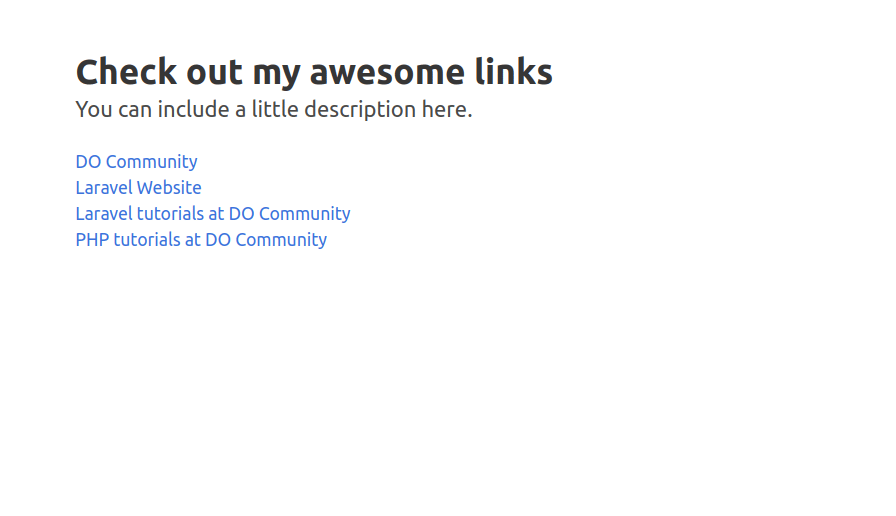
You’ll see a page like this, showing all links present in your database from latest to first:
Your application is now fully-functional, but you can still improve the appearance of this starter page to make it more appealing to your audience.
Styling and Customizing the Template (Optional)
Now that the base template is ready, you can include a few optional CSS customizations to style the page using some of the features available in Bulma, in addition to custom styles.
To give this page a new look, you can start by setting up a full page background. In this guide, we’ll use a DigitalOcean Wallpaper, but as an alternative you can also use a personal image or an image from a free stock photo website such as unsplash. You’ll need to obtain the image URL and use it to set up the background CSS property for the html element. A few other properties can be adjusted to make sure the image is centralized.
html {
            background: url("https://i.imgur.com/BWIdYTM.jpeg") no-repeat center center fixed;
            -webkit-background-size: cover;
            -moz-background-size: cover;
            -o-background-size: cover;
            background-size: cover;
        }
To style the list of links, you might want to replace the <li> elements for each link with box components, and include the link URL as a paragraph under the link description.
            @foreach ($links as $link)
                <div class="box link">
                    <h3><a href="{{ $link->url }}" target="_blank" title="Visit Link: {{ $link->url }}">{{ $link->description }}</a></h3>
                    <p>{{$link->url}}</p>
                </div>
            @endforeach
Finally, you can create a couple additional CSS styles to customize the appearance of the link text.
        div.link h3 {
            font-size: large;
        }

        div.link p {
            font-size: small;
            color: #718096;
        }
The following Blade template contains all suggested implementations. Replace your current index.blade.php file contents with:
<!DOCTYPE html>
<html>
<head>
    <meta charset="utf-8">
    <meta name="viewport" content="width=device-width, initial-scale=1">
    <title>Sammy's Awesome Links</title>
    <link rel="stylesheet" href="https://cdn.jsdelivr.net/npm/bulma@0.9.1/css/bulma.min.css">

    <style>
        html {
            background: url("https://i.imgur.com/BWIdYTM.jpeg") no-repeat center center fixed;
            -webkit-background-size: cover;
            -moz-background-size: cover;
            -o-background-size: cover;
            background-size: cover;
        }

        div.link h3 {
            font-size: large;
        }

        div.link p {
            font-size: small;
            color: #718096;
        }
    </style>
</head>
<body>
<section class="section">
    <div class="container">
        <h1 class="title">
            Check out my awesome links
        </h1>
        <p class="subtitle">
            You can include a little description here.
        </p>

        <section class="links">
            @foreach ($links as $link)
                <div class="box link">
                    <h3><a href="{{ $link->url }}" target="_blank" title="Visit Link: {{ $link->url }}">{{ $link->description }}</a></h3>
                    <p>{{$link->url}}</p>
                </div>
            @endforeach
        </section>
    </div>
</section>
</body>
</html>
Save the file when you’re done.
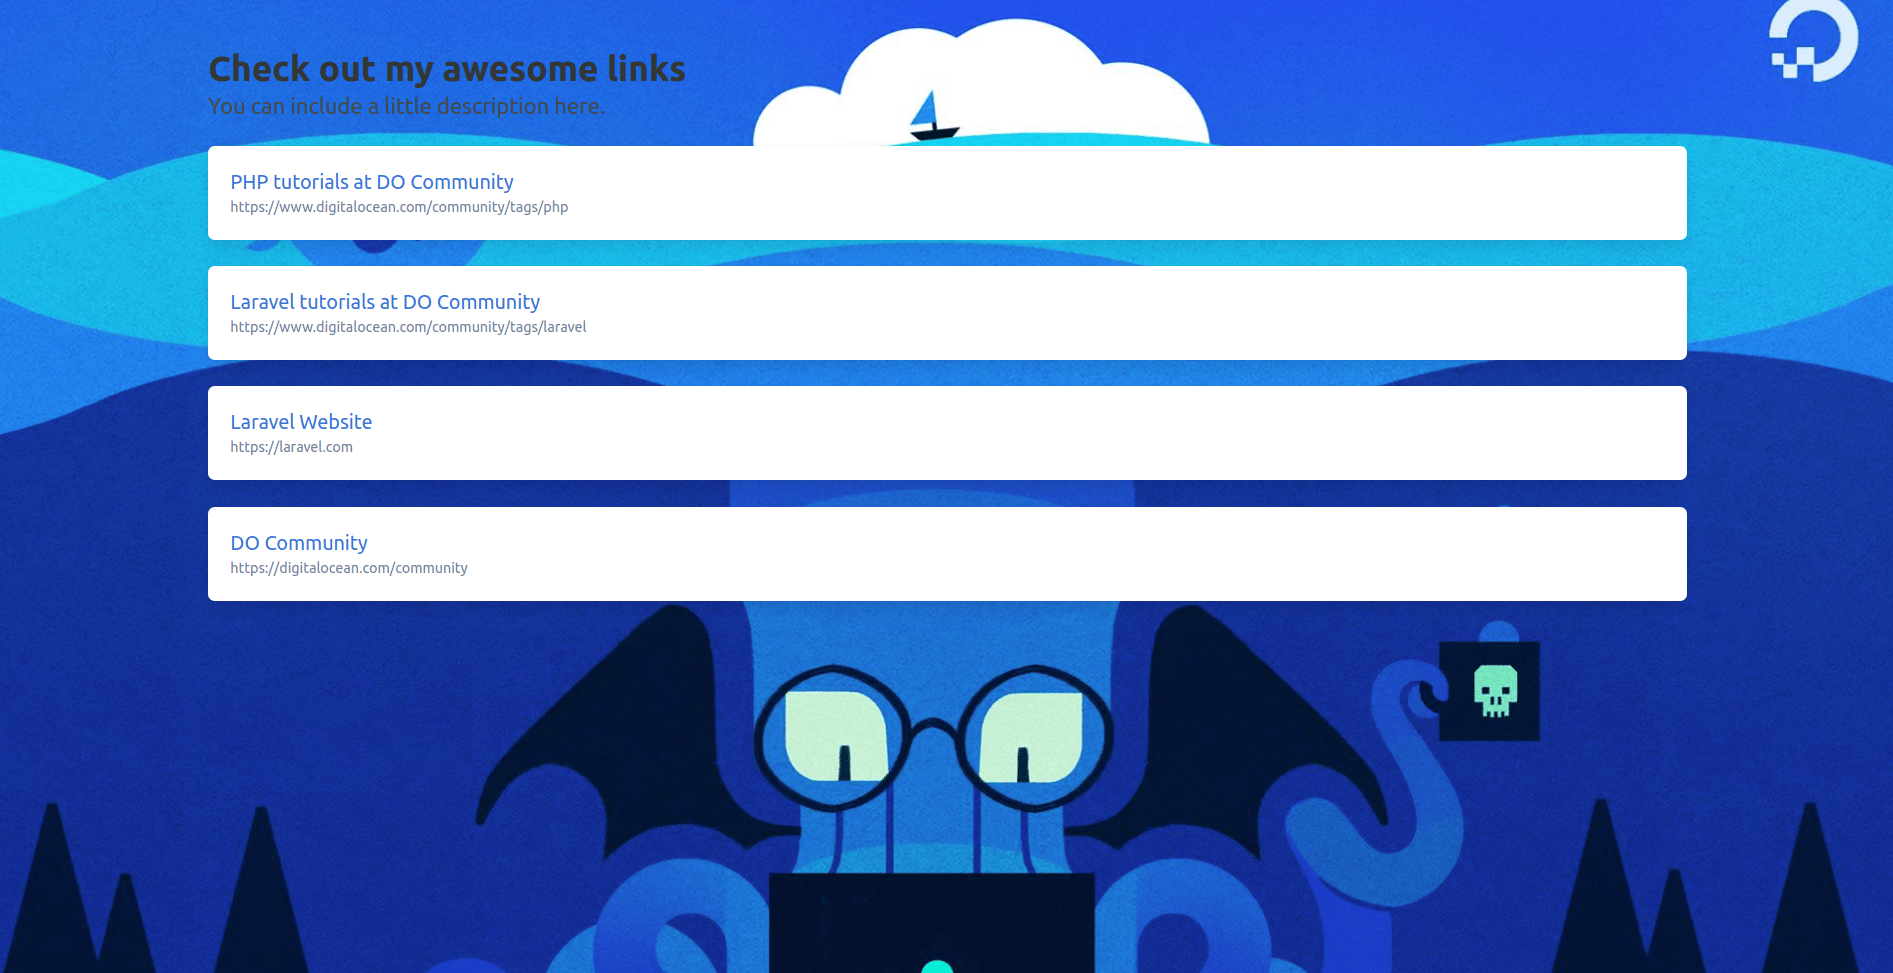
Now reload your browser and you’ll see the updated page:
Thanks for learning with the DigitalOcean Community. Check out our offerings for compute, storage, networking, and managed databases.
Tutorial Series: How To Build a Links Landing Page in PHP with Laravel and Docker Compose
Laravel is an open-source PHP framework that provides a set of tools and resources to build modern PHP applications. In this project-based tutorial series, you’ll build a Links Landing Page application with the Laravel framework, using a containerized PHP development environment managed by Docker Compose.
At the end, you’ll have a one-page website built with Laravel and managed via Artisan commands where you can share relevant links to an audience on social channels and presentations.
About the author
Dev/Ops passionate about open source, PHP, and Linux. Former Senior Technical Writer at DigitalOcean. Areas of expertise include LAMP Stack, Ubuntu, Debian 11, Linux, Ansible, and more.
Still looking for an answer?
 This work is licensed under a Creative Commons Attribution-NonCommercial- ShareAlike 4.0 International License.
Become a contributor for community
Get paid to write technical tutorials and select a tech-focused charity to receive a matching donation.

DigitalOcean Documentation
Full documentation for every DigitalOcean product.

Resources for startups and AI-native businesses
The Wave has everything you need to know about building a business, from raising funding to marketing your product.
The developer cloud
Scale up as you grow — whether you're running one virtual machine or ten thousand.

Start building today
From GPU-powered inference and Kubernetes to managed databases and storage, get everything you need to build, scale, and deploy intelligent applications.
