
Introduction
Google Maps presents a robust set of APIs for building and interacting with maps, visualizing location data, and searching via autocomplete, to name but a few.
vue-google-maps, which has been updated for Vue.js 2, provides Vue.js applications with tools to utilize these APIs. It comes with a well-rounded set of components for interacting with Google Maps as well as two-way data binding.
In this tutorial, you will use the vue2-google-maps library and create a map that uses autocomplete to display a location.
Prerequisites
To complete this tutorial, you will need:
- Node.js installed locally, which you can do by following How to Install Node.js and Create a Local Development Environment.
- Some familiarity with setting up a Vue.js project and using Vue.js components may be beneficial.
- A Google Maps JavasScript API Key.
- This will require a Google account.
- Signing in to the Google Cloud Platform Console.
- Creating a new project.
- Enabling the Google Maps JavaScript API and Places API for the project.
- And creating credentials for an API Key.
Warning: To avoid the “For development purposes only” messages when using the Google Maps API, you will need to provide a valid credit card and associate with a Billing account for the Google Cloud Project. Please be aware of the fees that are associated with using these APIs.
This tutorial was verified with Node v14.13.1, npm v6.14.8, vue v2.6.11, and vue2-google-maps v0.10.7.
Step 1 — Setting Up the Project
You can use @vue/cli to create a new Vue.js project.
In your terminal window, use the following command:
- npx @vue/cli create --default vue-google-maps-example
This will use the default configurations for creating a Vue.js Project.
Navigate to the newly created project directory:
- cd vue-google-maps-example
Start the project to verify that there are no errors.
- npm run serve
If you visit the local app (typically at localhost:8080) in your web browser, you will see a "Welcome to Your Vue.js App" message.
With this scaffolding set in place, you can install the vue2-google-maps package.
Step 2 — Implementing vue2-google-maps
vue2-google-mapsNext, you will install the vue2-google-maps package and add it to your Vue.js project.
First, you will need to install vue2-google-maps:
- npm install vue2-google-maps@0.10.7
Open src/main.js in your code editor.
Import vue2-google-maps and instantiate the plugin using your API key:
import Vue from 'vue'
import * as VueGoogleMaps from 'vue2-google-maps'
import App from './App.vue'

Vue.config.productionTip = false

Vue.use(VueGoogleMaps, {
  load: {
    key: 'YOUR_GOOGLE_MAPS_API_KEY_GOES_HERE',
    libraries: 'places',
  }
});

new Vue({
  render: h => h(App),
}).$mount('#app')
Be sure to replace 'YOUR_GOOGLE_MAPS_API_KEY_GOES_HERE' with your actual API key. Also, specify the places library which will be required for using the autocomplete feature.
Warning: Be sure to avoid saving your API key in any files you commit to public repositories (like GitHub) as it can then be used by others for purposes you did not intend.
With the application ready to use vue2-google-maps, you can create a custom component to use it.
Step 3 — Building the Map Search Component
Next, you will create a new component that uses GmapMap, GmapAutocomplete, and GmapMarker.
In your code editor, create a new component called GoogleMap.vue:
<template>
  <div>
    <div>
      <h2>Search and add a pin</h2>
    </div>
    <br>
  </div>
</template>

<script>
export default {
  name: 'GoogleMap'
}
</script>
Then, in your code editor, modify App.vue to use this new component:
<template>
  <div id="app">
    <GoogleMap />
  </div>
</template>

<script>
import GoogleMap from './components/GoogleMap.vue'

export default {
  name: 'App',
  components: {
    GoogleMap
  }
}
</script>
When you visit your application in a web browser, you should observe a "Search and add a pin" message. This checkpoint helps verify that everything up to this point is working properly. Next, you will start adding all the pieces for the map.
For tutorial purposes, you can define a default center location with latitude and longitude coordinates that line up with Montreal, Canada (45.508, -73.587). This will be the initial focus point for your map. Feel free to change these values.
Add the GmapMap component. And define the center, zoom, and style:
<template>
  <div>
    <div>
      <h2>Search and add a pin</h2>
    </div>
    <br>
    <GmapMap
      :center='center'
      :zoom='12'
      style='width:100%;  height: 400px;'
    />
  </div>
</template>

<script>
export default {
  name: 'GoogleMap',
  data() {
    return {
      center: { lat: 45.508, lng: -73.587 },
    }
  },
};
</script>
At this point, if you visit your application in a browser, you should see a Google Map centered at Montreal.
Next, you will add some geolocation to get the user’s current location and update the map accordingly:
<template>
  <div>
    <div>
      <h2>Search and add a pin</h2>
    </div>
    <br>
    <GmapMap
      :center='center'
      :zoom='12'
      style='width:100%;  height: 400px;'
    />
  </div>
</template>

<script>
export default {
  name: 'GoogleMap',
  data() {
    return {
      center: { lat: 45.508, lng: -73.587 },
    }
  },
  mounted() {
    this.geolocate();
  },
  methods: {
    geolocate: function() {
      navigator.geolocation.getCurrentPosition(position => {
        this.center = {
          lat: position.coords.latitude,
          lng: position.coords.longitude,
        };
      });
    },
  },
};
</script>
At this point, if you visit your application in a browser, you should see a Google Map centered at your location.
Note: You may need to accept a prompt to allow your browser to use your geolocation information.
Next, you will add autocomplete to let users change the location on the map:
<template>
  <div>
    <div>
      <h2>Search and add a pin</h2>
      <GmapAutocomplete
        @place_changed='setPlace'
      />
    </div>
    <br>
    <GmapMap
      :center='center'
      :zoom='12'
      style='width:100%;  height: 400px;'
    />
  </div>
</template>

<script>
export default {
  name: 'GoogleMap',
  data() {
    return {
      center: { lat: 45.508, lng: -73.587 },
      currentPlace: null,
    }
  },
  mounted() {
    this.geolocate();
  },
  methods: {
    setPlace(place) {
      this.currentPlace = place;
    },
    geolocate: function() {
      navigator.geolocation.getCurrentPosition(position => {
        this.center = {
          lat: position.coords.latitude,
          lng: position.coords.longitude,
        };
      });
    },
  },
};
</script>
This code will add the GmapAutocomplete component. When it updates the place, setPlace is called and the currentPlace value is updated.
At this point, if you visit your application in a browser, you will see an autocomplete field that will provide suggestions for locations based on what is typed in the field. If you are feeling curious, you can add a console.log to setPlace to inspect the value of the place variable.
Next, you will add markers to indicate locations on the map:
<template>
  <div>
    <div>
      <h2>Search and add a pin</h2>
      <GmapAutocomplete
        @place_changed='setPlace'
      />
      <button
        @click='addMarker'
      >
        Add
      </button>
    </div>
    <br>
    <GmapMap
      :center='center'
      :zoom='12'
      style='width:100%;  height: 400px;'
    >
      <GmapMarker
        :key="index"
        v-for="(m, index) in markers"
        :position="m.position"
        @click="center=m.position"
      />
    </GmapMap>
  </div>
</template>

<script>
export default {
  name: 'GoogleMap',
  data() {
    return {
      center: { lat: 45.508, lng: -73.587 },
      currentPlace: null,
      markers: [],
      places: [],
    }
  },
  mounted() {
    this.geolocate();
  },
  methods: {
    setPlace(place) {
      this.currentPlace = place;
    },
    addMarker() {
      if (this.currentPlace) {
        const marker = {
          lat: this.currentPlace.geometry.location.lat(),
          lng: this.currentPlace.geometry.location.lng(),
        };
        this.markers.push({ position: marker });
        this.places.push(this.currentPlace);
        this.center = marker;
        this.currentPlace = null;
      }
    },
    geolocate: function() {
      navigator.geolocation.getCurrentPosition(position => {
        this.center = {
          lat: position.coords.latitude,
          lng: position.coords.longitude,
        };
      });
    },
  },
};
</script>
Let’s review what you accomplished here.
You created a GmapAutocomplete and a GmapMap (with children GmapMarkers). Initially, the map is created centered on Montreal. After the instance is mounted(), you call geolocate and re-center.
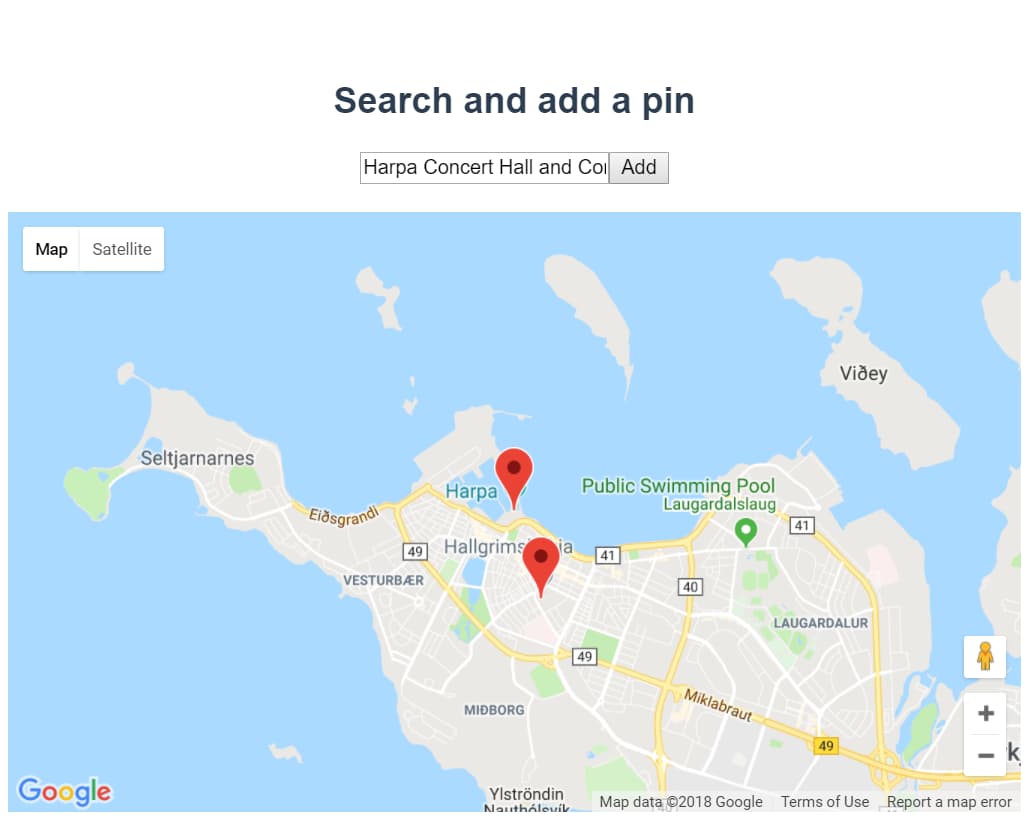
Once a user enters a search term and makes a selection from the autocomplete dropdown, the GmapAutocomplete calls setPlace. This selection is then stored in currentPlace. When the add button is clicked, it calls addPlace which stores the marker location in markers, triggering the GmapMap (and subsequently GmapMarkers) to update. You are also updating center to the position of the last marker.
Additionally, you are storing each place’s full place object in the places property. This will allow any additional data returned from the autocomplete query to be used in this component or any child components, as needed.
And the “app” should look like this (if you were in Iceland):
Warning: Once you have concluded your experimentation, it is advised that you log in to your Google Cloud Console and remove the API Key and remove the associated billing account to avoid potential misuse.
You now have a Google Map with autocomplete and marker functionality.
Conclusion
In this tutorial, you learned how to use vue2-google-maps and Google Maps API features in your Vue.js application.
This has great potential to show visitors locations for businesses, travel destinations, and points of interest.
If you’d like to learn more about Vue.js, check out our Vue.js topic page for exercises and programming projects.
Thanks for learning with the DigitalOcean Community. Check out our offerings for compute, storage, networking, and managed databases.
About the author
Still looking for an answer?
This textbox defaults to using Markdown to format your answer.
You can type !ref in this text area to quickly search our full set of tutorials, documentation & marketplace offerings and insert the link!
do you know how to fix it in this TUTORIAL?
You should mention that search input needs to have Places API and Geolocation API enabled for the project in Google console
 This work is licensed under a Creative Commons Attribution-NonCommercial- ShareAlike 4.0 International License.
Become a contributor for community
Get paid to write technical tutorials and select a tech-focused charity to receive a matching donation.

DigitalOcean Documentation
Full documentation for every DigitalOcean product.

Resources for startups and AI-native businesses
The Wave has everything you need to know about building a business, from raising funding to marketing your product.
The developer cloud
Scale up as you grow — whether you're running one virtual machine or ten thousand.

Start building today
From GPU-powered inference and Kubernetes to managed databases and storage, get everything you need to build, scale, and deploy intelligent applications.
