How DigitalOcean's new Droplet Console works
By House Li
- Published:
- 5 min read
We recently released our brand new web based terminal, which makes it much easier for connecting to Droplets. The new Droplet Console provides one-click SSH access to Droplets through a native SSH/Terminal-like experience. Today, I want to share how some of the security features of the new console work.
Customers’ security is always our top priority and was something we kept in mind when designing and building every piece of this project. To guarantee the security of the sessions, we integrated the SSH protocol, which can provide a secure channel over an unsecured network such as the internet).
How SSH works in DigitalOcean’s new Droplet Console
There are a few challenges for us to overcome with the security of each session, including:
- How to securely support the SSH keys-based authentication
- How to apply end-to-end encryption on the connection
Supporting SSH keys authentication
When building the Droplet Console, we had a few options to support SSH keys-based authentication. The most straightforward way would be to directly allow the customer to specify a private key that is already set up for accessing the Droplet. However, there are some problems with this solution:
- The private key is not always available. For example, the private key may be stored at a customer’s desktop, and if they are away from their office and have the private key on their laptop, they will not be able to access the Droplet.
- Using this solution, customers would need to submit their private keys to DigitalOcean through the internet, which can be risky.
Another way to dynamically generate temporary SSH key pairs and distribute the private key to the Console UI (namely the customer’s browser), so that it does not require the presence of the customer’s preset private keys. However, this solution is not ideal because the private key is still being transmitted over the internet, which is not recommended. Most importantly, letting a DigitalOcean owned service generate the key pairs makes it a single point of failure because if that service is compromised, the security of all Droplets may be threatened.
Instead, we ended up having the Console UI generate a unique SSH key pair for every session. The private key is kept within the customer’s browser throughout its lifecycle and is never exposed to the network, and the public key is securely distributed to the Droplet before the Console UI attempts any SSH connection, which we will cover later.
End-to-End encryption
Since the Console UI is a web-based app running on the customer’s browser, there are a few challenges we had to overcome due to the limitation set by the browser environment. Typically, the SSH protocol runs over a TCP connection. However, a raw TCP connection isn’t allowed by most browsers. Moreover, even if we had a way to support a direct TCP connection from within the browser, the Console UI still would not be able to connect to the target Droplet due to CORS limitation unless we assigned every Droplet a sub domain that complies with the CORS requirements, which is impractical.
Therefore, we had to place a proxy in the middle between the Console UI and the target Droplet. The Console UI communicates with the proxy over a websocket connection, and the proxy talks to the target Droplet over a TCP connection. To build the proxy, we decided to build a heavier Console UI by embedding a fully functional SSH client and making the proxy work at the network layer for translating & repeating the binary messages between the websocket and TCP connections. Although the connection is still being bridged by the proxy, the SSH communication has been end-to-end encrypted between the Console UI (i.e. the browser) and the target Droplet.
How a new Console session is created
Now let’s talk about the whole process of what happens after you open the Console UI to access a Droplet.
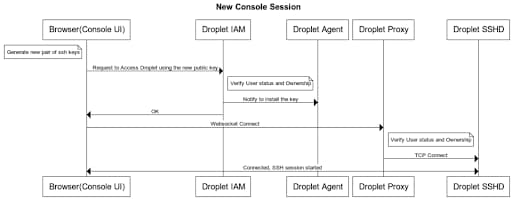
The above diagram depicts the details of a session creation.
- When you open a new console window for accessing a Droplet, the Console UI will first generate a new pair of SSH keys, and then send the public one to a service that registers the key for accessing the target Droplet.
- Upon receiving the request, we will first verify the requestor’s identity and status, as well as the ownership of the target Droplet to make sure the requestor has access to the Droplet, if yes, then
- We will then push the key to the Droplet-agent running on the target Droplet to install it for the designated os user (see below for details on how the key is pushed).
- Once the new public key is installed on the Droplet, the Console UI will then attempt to establish a connection between itself and the Droplet by calling the Droplet Proxy service, which is a websocket endpoint.
- The Droplet Proxy service will then verify the requestor’s status and ownership of the droplet again to make sure the request is valid, and if everything looks good, the Proxy will create a direct TCP connection to the sshd running on the target droplet and make a channel between the TCP connection and the corresponding websocket connection.
- The Console UI can now kick off the SSH session with the sshd on the target Droplet using the newly generated keys.
Dynamic SSH Keys Management on Droplets
Another question you may have is “how are the keys installed on the target Droplet?” This is done by a program running on the Doplet called droplet-agent. It is open sourced and you can find it at https://github.com/digitalocean/droplet-agent
The droplet-agent is designed to manage the dynamic SSH keys used for the console access. It will watch for any new key and install it onto the Droplet under the specified OS user, as well as remove expired keys from the Droplet.
How a key is pushed to the Droplet
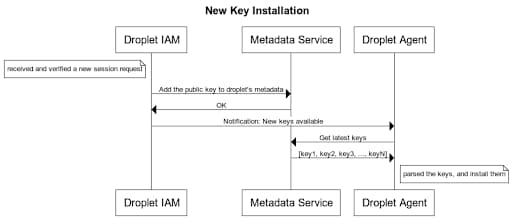
For security reasons, we didn’t want to let the public key be transmitted over the public internet because that gives the risk of malicious impersonation. Therefore, the key is being transferred on DigitalOcean’s internal network via the metadata service. Here are the detailed steps:
- Once we have successfully identified the user and ownership, we will push the key to the target Droplet’s metadata by calling an internal-only metadata service endpoint.
- We will then notify the droplet-agent that there is a new key available to be added to the Droplet; NOTE, at this point, it’s just a notification. No actual key is being sent yet.
- The droplet-agent will then call the metadata service to pull the latest active keys and install those keys that are not yet presented in the system.
Happy coding!
House Li, Senior Engineer
About the author
Related Articles

Under the Hood: Serving Kimi K3
Jonathan Dieu
- July 30, 2026
- 12 min read

The Inference Alpha: Maximizing Frontier Models on AMD
Balaji Varadarajan
- June 10, 2026
- 12 min read

The Inference Tax: How Prefix-Aware Routing Eliminates the Hidden Cost of LLMs at Scale
- June 1, 2026
- 13 min read