Using Packer to Create a 1-Click NKN Image on DigitalOcean
By Yilun Zhang, NKN
- Published:
- 8 min read
NKN is the new kind of P2P network connectivity protocol and ecosystem powered by a novel public blockchain. Our open source node software allows internet users to share network connections and unused bandwidth for rewards. By running an NKN node, you become part of the NKN network community helping to build the decentralized internet so everyone can enjoy secure, low cost, and universally accessible connectivity.
Recently NKN’s Testnet has grown to over 6,000 community full nodes and many of these nodes are running on DigitalOcean. In fact, one of the most frequently asked questions from our community is how to set up a NKN full node on DigitalOcean? We have a few tutorials on how to do that; however, having to properly and safely set up the Droplet environment creates significant friction for those who have just heard of the project and want to try it for themselves, preferably in just a few minutes.
Luckily for all, DigitalOcean now provides a Marketplace where we can release a 1-Click App for NKN, a very convenient and user-friendly way to deploy preconfigured droplets in 60 seconds. You can quickly start a NKN 1-Click App from the “Marketplace” in your DigitalOcean cloud control panel, or by visiting DigitalOcean Marketplace directly.
Using Packer to Create a 1-Click Image
To make the NKN 1-Click App in DigitalOcean’s new Marketplace, we recognized that creating a preconfigured production-ready image takes effort: not just to create the initial image, but every time that image needs to be updated. A few repetitive but necessary steps need to be done every time a snapshot is created, e.g. starting and stopping Droplets, removing user history and trace, creating a snapshot from Droplets. Doing these steps manually for each image update is not only time consuming, but can open the opportunity for mistakes.
Another headache comes when we want to create the same image for multiple cloud providers. Typically each cloud providers has their own steps and requirements when creating an image. For example, DigitalOcean requires an image to have `cloud-init` set up, while Google Cloud requires an image to be licensed. These differences need to be taken into account every time an image is updated.
Since creating and maintaining an app image is repetitive and has a lot of detailed steps that easily break when doing them manually, we chose to handle the process using Packer, which can automate all these processes across many different cloud providers.
With Packer, you provide the configuration scripts and your API key for your cloud provider, and Packer will do the rest. The result is a ready-to-use image for each cloud provider. Most importantly, everything is automatic, which means it’s reproducible and can be part of continuous integration. Let’s dig a little bit deeper to see how to do it in detail.
There are quite a few ways to install Packer as you can see in the official documentation. The simplest way is to use the precompiled binary.
Obtaining a DigitalOcean API Token
To use Packer with DigitalOcean, we first need to obtain (or generate) a DigitalOcean API Token. This can be done on the DigitalOcean website:
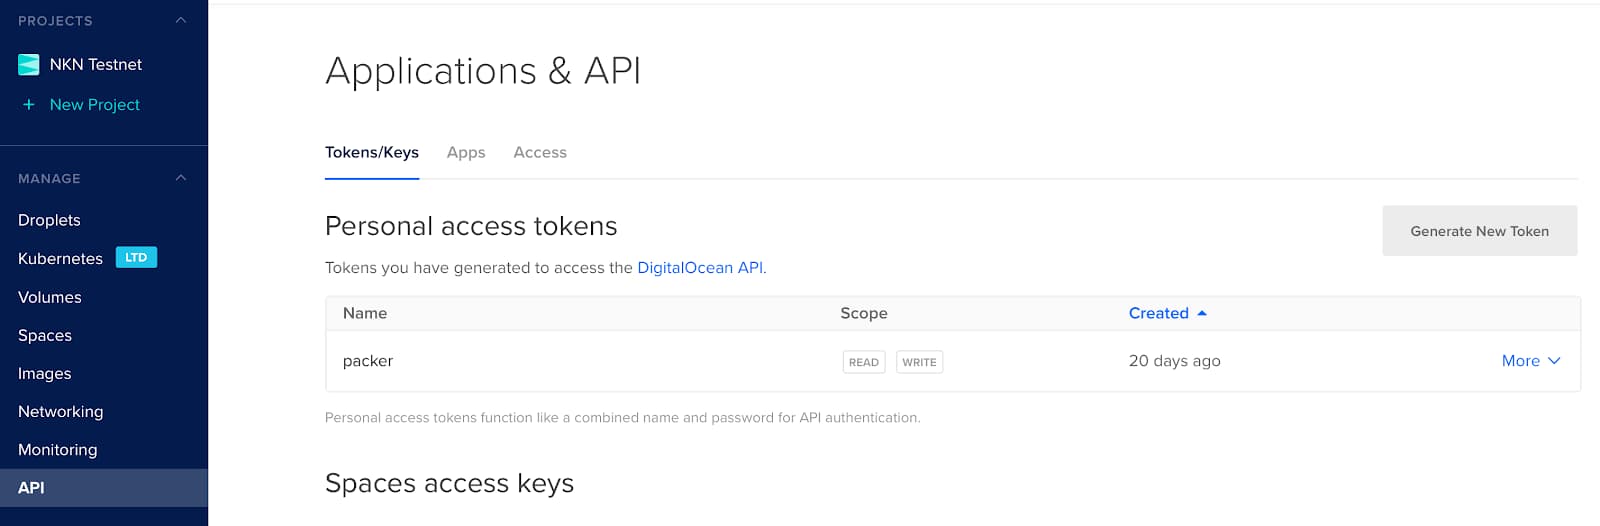
Note that both read and write scope are needed for the API token.
DigitalOcean Packer Builder
A builder in Packer will create an image on a certain platform from some configuration, and DigitalOcean is one of the supported builders. A basic Packer example which creates a plain Ubuntu image on DigitalOcean is as simple as the following Packer template:
{ “builders”: [ { “type”: “digitalocean”, “api_token”: “Your DigitalOcean API Token”, “image”: “ubuntu-18-04-x64”, “region”: “nyc3”, “size”: “s-1vcpu-1gb”, “ssh_username”: “root” } ] }
If you save the above Packer template as packer.json, include your DigitalOcean API token and run packer build packer.json, you will get a working Ubuntu image in your DigitalOcean account in a couple minutes!
If we look at the template above, the image key specifies the basic OS image to use; the region and size are used for the temporary droplet packer creates (and will destroy automatically); and, the ssh_username key specifies which user Packer will use to ssh into the machine.
You probably noticed that builders in the Packer template are an array, so if we want to build the same image on multiple cloud providers, we just need to add builders into the array, and all of them will be built in parallel.
Packer supports quite a lot of builders. More information about Packer builder can be found here.
Provisioning the Image
The above basic example only gives you a standard Ubuntu image, which is probably not what you want. To build a custom image, we need provisioners that customize an image by installing and configuring software before taking the Snapshot and turning it into an image. Let’s add provisioners to the Packer template in the previous step:
{ “builders”: [ { “type”: “digitalocean”, “api_token”: “Your DigitalOcean API Token”, “image”: “ubuntu-18-04-x64”, “region”: “nyc3”, “size”: “s-1vcpu-1gb”, “ssh_username”: “root” } ], “provisioners”: [ { “type”: “shell”, “inline”: [ “sleep 30”, “sudo apt-get update”, “sudo apt-get install -y supervisor” ] }, { “type”: “shell”, “script”: “./scripts.sh” }, { “type”: “file”, “source”: “./nkn.conf”, “destination”: “/tmp/” }, { “type”: “shell”, “inline”: [ “sudo mv /tmp/nkn.conf /etc/supervisor/conf.d/” ] } ] }
We added quite a few provisioners to the Packer template, and they will be executed sequentially. Let’s look at them one by one.
The first provisioner is an inline shell type, which contains a few commands to run on the droplet before creating the image. Note that the first command sleep 30 makes sure the system is properly initialized before executing the rest of the command.
The second provisioner is a shell script type. It’s very similar to the first one but specifies a shell script file to run on the droplet.
The third provisioner uploads a local file to the droplet, and the fourth provisioner copies the uploaded file into the designated location. One can also upload it directly to the target location which works properly on DigitalOcean but not necessarily on other cloud platforms if ssh_username does not have the required permissions.
You can find more information about supported provisioners in the official documentation.
Passing Variables to the Packer Template
Currently, the Packer template contains your DigitalOcean API token in plain text, which is a very dangerous thing to do if you share it with other people. A much better way is to pass the API token as a variable to the template. Do this by modifying the Packer template (“provisioners” section does not need to be changed):
{ “variables”: { “do_api_token”: “” }, “builders”: [ { “type”: “digitalocean”, “api_token”: “{{user `do_api_token`}}”, “image”: “ubuntu-18-04-x64”, “region”: “nyc3”, “size”: “s-1vcpu-1gb”, “ssh_username”: “root” } ], “provisioners”: […] }
To build the image, use the command packer build -var ‘do_api_token=XXX’ packer.json where XXX should be replaced by your DigitalOcean API token. Using the variable is not only safer, but also makes it possible to create the same image in different DigitalOcean accounts with the same template.
A Few Final Tips
Here are some tips based on our experience in creating a multi-platform images using Packer:
- Updating an image is typically more complicated than updating the code, so it’s better to create your image such that it will fetch the latest version of your software when the Droplet is initiated such that the image itself does not need to be updated every time your software updates.
- For the same reason as above, it’s useful to have some sort of auto-update mechanism so that existing one-click users will not need to update or even re-create the Droplet manually.
- All Droplets created from the same image are nearly identical on DigitalOcean, so if you have any sort of “account” in your software, the credentials may need to be generated randomly and saved to disk so users can access it. In our case we also set the credential file permission so that only a certain user (plus superusers) can view the content of the file.
Do not assume ssh_username is a superuser like root. Although we use root user on DigitalOcean, other platforms may have different user settings, and provisioners may not work properly due to lack of permissions.
Complete Code
The complete config we used to create 1-click image on DigitalOcean and other platforms can be found at GitHub.
Yilun Zhang is co-founder and CTO of NKN.org.
About the author
Related Articles
Upcoming GPU Pricing Updates
- July 21, 2026
- 2 min read
Scale Faster with Managed Weaviate: Now in Public Preview on DigitalOcean
- July 9, 2026
- 4 min read
DigitalOcean Evaluations: Production Model and Router Testing for the Inference Stack
- July 1, 2026
- 3 min read