By Etel Sverdlov and Milecia McGregor

Introduction
In this article, you’ll learn three tricks you can do with DNS. If you’ve ever done any work with DNS configuration, these little tricks may help you get through your workflow a little faster. You’ll learn some commands and ways to work with DNS data in your terminal, like how to check the current name servers. When you’re finished, you’ll even know how to set up DNS load balancing.
How to Confirm Your DNS Records are Working Using WHOIS and Dig
DigitalOcean is one of the many options you have for managing your domain name servers. In this example, you’ll see what DNS records look like when using DigitalOcean. You can point your domain to the DigitalOcean name servers , and you might see that pinging it still displays the old information.
This may occur because the old DNS information has not had a chance to propagate. For example, your home internet provider will cache the DNS information for a designated amount of time known as TTL (Time To Live) and will provide only that information until it expires. The time to live is commonly set to half an hour.
You can verify that you are using the DigitalOcean name servers by running WHOIS; the output should include the most current name server information:
- whois yourdomainname.com
OutputDomain Name: YOURDOMAINNAME.COM
   Registrar: ENOM, INC.
   Whois Server: whois.enom.com
   Referral URL: http://www.enom.com
   Name Server: NS1.DIGITALOCEAN.COM
   Name Server: NS2.DIGITALOCEAN.COM
   Name Server: NS3.DIGITALOCEAN.COM
   Status: ok
After checking that the WHOIS information has been correctly updated, you can use dig to verify that the DigitalOcean name servers are serving DNS records for your domain name.
- dig -t NS yourdomainname.com @ns1.digitalocean.com
Output; <<>> DiG 9.10.6 <<>> -t NS yourdomainname.com
@ns1.digitalocean.com
;; global options: +cmd
;; Got answer:
;; ->>HEADER<<- opcode: QUERY, status: NOERROR, id: 44786
;; flags: qr aa rd; QUERY: 1, ANSWER: 4, AUTHORITY: 0, ADDITIONAL: 1
;; WARNING: recursion requested but not available

;; OPT PSEUDOSECTION:
; EDNS: version: 0, flags:; udp: 512
;; QUESTION SECTION:
;yourdomainname.com.			IN	NS

;; ANSWER SECTION:
yourdomainname.com.	7200	IN	NS	ns3.digitalocean.com.
yourdomainname.com.	7200	IN	NS	ns2.digitalocean.com.
yourdomainname.com.	7200	IN	NS	ns1.digitalocean.com.

;; Query time: 30 msec
;; SERVER: 2001:4860:4802:32::6e#53(2001:4860:4802:32::6e)
;; WHEN: Thu Dec 22 12:11:26 CST 2022
;; MSG SIZE  rcvd: 161
All of this information is useful as it provides the fastest way to confirm that your site is connected to the correct name servers and that the information is propagating while your site is updating.
How to Set Up DNS Load Balancing
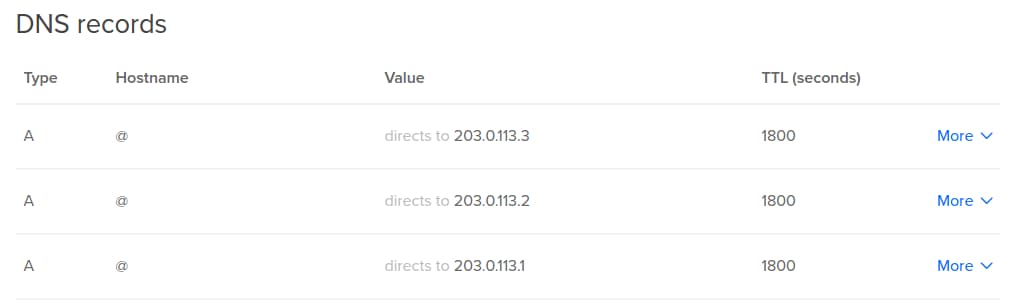
DNS records can provide a way of building a simple load balancer to distribute site visitors across several IP addresses, each one serving identical content. If more than one IP address is connected to a site, visitors will be sent to one of the connected IP addresses in order. Although this is a helpful way to serve more visitors and prevent the site from going down if one server fails, DNS load balancing does not account for geography, network congestion, or user IP address (among others). You can learn how to address these issues by checking out our What is a CDN article.
To set up DNS Load balancing, fill out the site’s A records with @ in the hostname, directing users to the main domain, and with the correct IP in the IP Address field. Your setup should look something like this:
How To Change Name Servers Without Site Downtime
When changing your site’s name servers from your current host to DigitalOcean, you can do so without any site downtime.
Start by setting up all of your DNS settings in the DigitalOcean interface. Doing this will have no effect on your current website because the site has been configured on the original host.
Once you put in your A, CNAME, and MX server records, access your domain registrar. If you do not remember where you registered your name, you can look it up using “WHOIS”, a protocol that displays a site’s identifying information, such as the IP address and registration details.
Open up the command line and type:
- whois example.com
The command will display all of the details associated with the site, including the Technical Contact which contains your domain registrar.
Once you have the information, you can change the name servers to point to DigitalOcean (ns1.digitalocean.com, ns2.digitalocean.com, ns3.digitalocean.com), and the website will be transferred over with no downtime.
Conclusion
In this tutorial, you learned three tricks you can use to work with the DNS records of your site. From here, you can learn more about the details of DNS in our Intro to Managing DNS tutorial series.
Thanks for learning with the DigitalOcean Community. Check out our offerings for compute, storage, networking, and managed databases.
About the author(s)
Former Director of Community at DigitalOcean. Expert in cloud topics including LAMP Stack, CentOS, Ubuntu, MySQL, SSL certificates, and more.
Still looking for an answer?
This textbox defaults to using Markdown to format your answer.
You can type !ref in this text area to quickly search our full set of tutorials, documentation & marketplace offerings and insert the link!
Is there a recommended way to set up DNS without switching to Digital Ocean nameservers? I’m not able to switch over, unfortunately, as the website will be running from a subdomain and I don’t have control over DNS settings.
I guess what would be cool is if Digital Ocean were to create an A record for each droplet based on the droplet name. e.g. testsite.droplets.digitalocean.com
It then ought to be possible to use a CNAME for the external DNS entry and that way, if the IP address were to change possibly by destroying the existing droplet and creating a new one with the same name, it wouldn’t be necessary to change external DNS settings.
Hope that makes some sense… :/
It looks like you can simply use your own name servers without using digital ocean’s by following the “How To Change Name Servers Without Site Downtime” section above, but simply omitting the last step of changing the domain name servers to Digital Oceans.
Then look up your droplet’s IP address within Digital Ocean’s network and add that with the new hostname a-record to your existing DNS settings, effectively duplicating the setup for each droplet. I’m not sure how stable the IP address is, so that might need to be updated if you move between hosting locations or if you delete your droplet from what I understand.
Not sure if there are any other gotchas by not moving over your domain to Digital Ocean’s nameservers, but for testing a new host this should help. With a larger number of subdomains, mx record, spf record I don’t want to have to change over just to test out the service.
Hello DO,
Is it possible to configure “my own” NS (name server), like NS1.MYDOMAIN.COM. using CNAME with NS1.DIGITALOCEAN.COM.?
Thank you very much in advance.
I’m joining to the question about “my own” NS like NS1.MYDOMAIN.COM. using CNAME with NS1.DIGITALOCEAN.COM.?
Hi, I am just writting an article about own DNS servers. Will post it here as soon as it is approved. It just need some more correction.
 This work is licensed under a Creative Commons Attribution-NonCommercial- ShareAlike 4.0 International License.
Become a contributor for community
Get paid to write technical tutorials and select a tech-focused charity to receive a matching donation.

DigitalOcean Documentation
Full documentation for every DigitalOcean product.

Resources for startups and AI-native businesses
The Wave has everything you need to know about building a business, from raising funding to marketing your product.
The developer cloud
Scale up as you grow — whether you're running one virtual machine or ten thousand.

Start building today
From GPU-powered inference and Kubernetes to managed databases and storage, get everything you need to build, scale, and deploy intelligent applications.
