By Cristian Marius Tiutiu, Bikram Gupta and Anish Singh Walia

Introduction
This blueprint will show you how to implement a CI/CD solution using free and popular open-source implementations that run on Kubernetes clusters natively.
DigitalOcean Marketplace provides pre-configured 1-Click apps to deploy to your DigitalOcean Kubernetes (DOKS) cluster quickly. You will use 1-Click apps to provision each software component for your cluster.
You will learn to use Tekton to build a CI/CD pipeline that continuously fetches code changes from a Git repository and builds a Docker image for your custom application. Then, Tekton will push the Docker image to a remote registry and notify Argo CD to deploy it to your Kubernetes cluster. This guide will also teach you how to use Knative Eventing to trigger the CI/CD pipeline each time code is automatically pushed to your application’s GitHub repository. All these steps run automatically.
This tutorial uses the following tools:
- Kaniko for building container images directly in a Kubernetes cluster.
- Tekton pipelines and Argo CD for implementing the CI process.
- Knative for running and exposing applications functionality on Kubernetes.
- Cert-Manager for managing TLS termination of Knative Services.
After completing this blueprint, you will have a fully functional CI/CD pipeline that continuously builds and deploys code changes for your custom applications using Kubernetes.
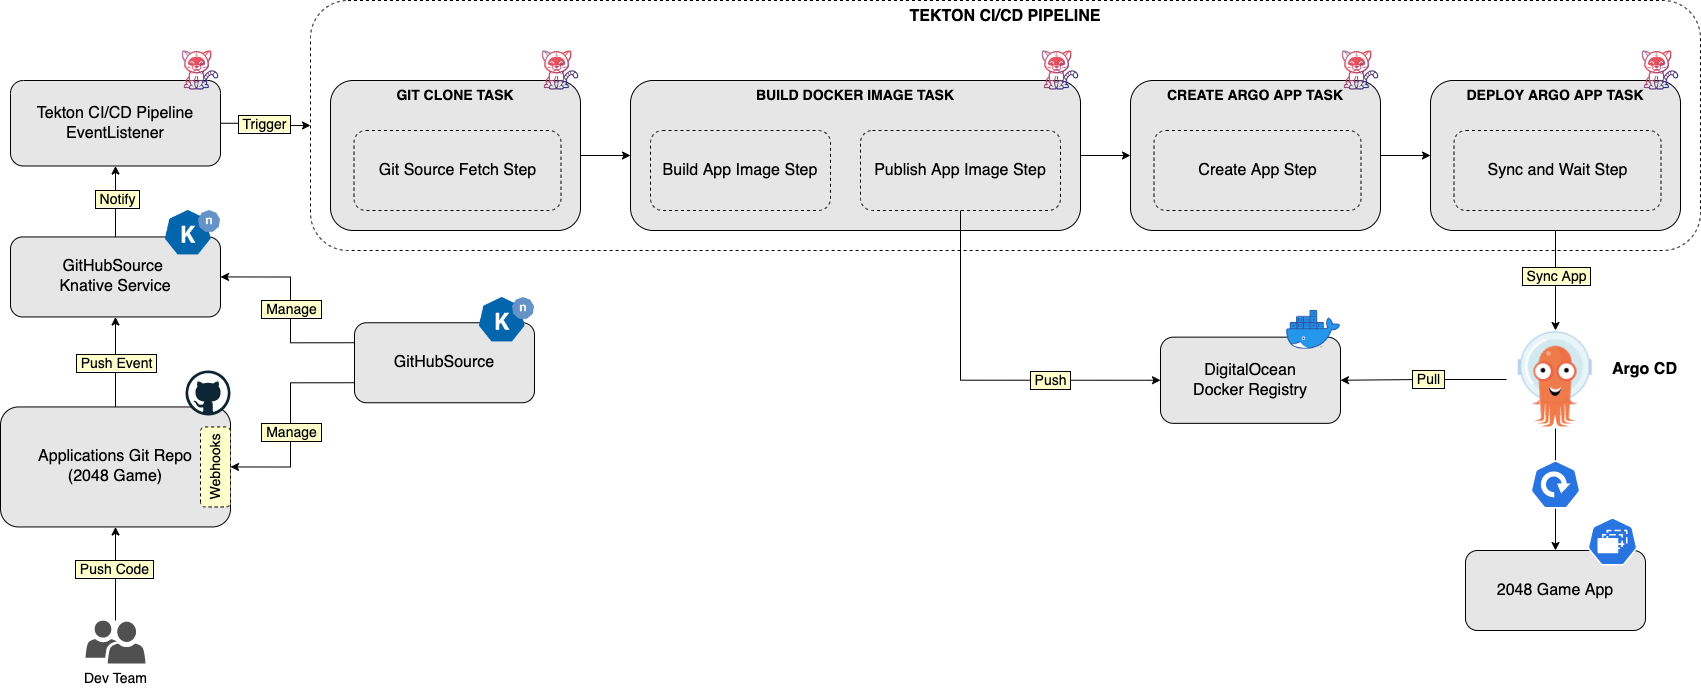
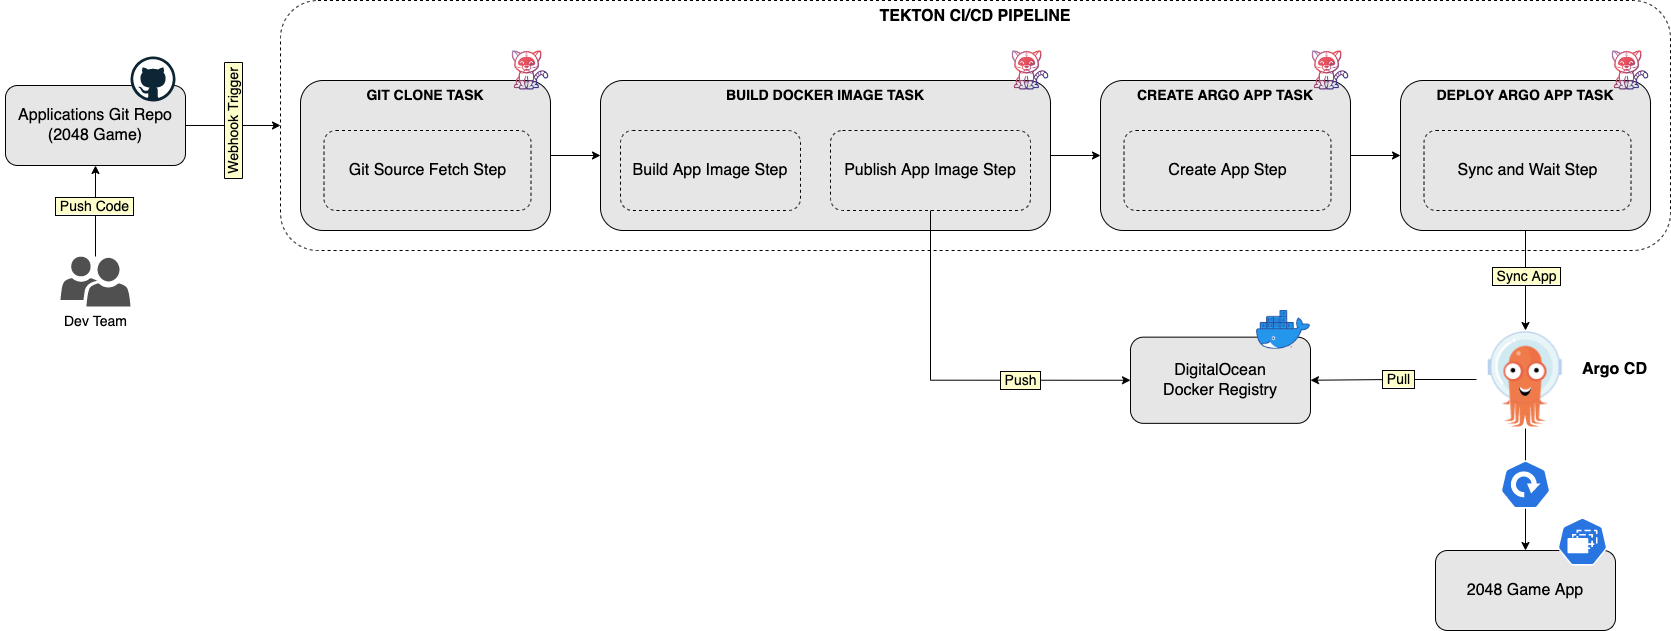
Following diagram shows the complete setup:
In the tutorial, you will learn:
- About components such as Kaniko, Tekton, Argo CD, and Knative.
- How to install each component using the DigitalOcean 1-Click apps.
- How to configure the required components, such as Knative Serving, Eventing, etc. to react on GitHub events and trigger the CI/CD pipeline.
- How to implement and test the CI/CD flow, and deploy a sample Knative application (2048 game).
Table of Contents
- Introduction
- Prerequisites
- About the Blueprint Software Components
- Step 1: Prepare the Sample Application Requirements
- Step 2: Install Cert-Manager
- Step 3: Install Tekton
- Step 4: Install Argo CD
- Step 5: Install Knative
- Step 6: Configure Knative Serving
- Step 7: Configure Knative Eventing
- Step 8: Set Up Your First CI/CD Pipeline Using Tekton and Argo CD
- Step 9: Test the CI/CD Setup
- Conclusion
- Next Steps
- Learn More
Prerequisites
To complete this tutorial, you will need:
- A working domain that you own. This is required for exposing public services, such as GitHub webhooks, used in this guide. Make sure to also read the DigitalOcean DNS Quickstart Guide.
- A working DOKS cluster running Kubernetes version greater than 1.21. The DOKS cluster must have at least 2 nodes, each with 2 CPUs, 4 GB of memory, and 20 GB of disk storage. For additional instructions on configuring a DOKS cluster, see How to Set Up a DigitalOcean Managed Kubernetes Cluster (DOKS).
- A git client to interact with GitHub repositories.
- doctl for interacting with DigitalOcean API.
- kubectl for interacting with Kubernetes. Follow these instructions to connect to your cluster with
kubectlanddoctl. - Helm for interacting with Helm releases created by the DigitalOcean 1-Click apps used in this tutorial.
- Argo CLI to interact with Argo CD using the command line interface.
- Tekton CLI to interact with Tekton Pipelines using the command line interface.
- Knative CLI for interacting with Knative using the command line interface.
- Kustomize is extensively used in this guide, and some basic knowledge is required. You can follow our community tutorial as a starting point.
Next, this tutorial provides a quick introduction to each software component. The main purpose is to give you a basic understanding of each component and how it’s being used.
About the Blueprint Software Components
Getting to Know Kaniko
Kaniko is a tool to build container images directly from a Dockerfile inside a container or Kubernetes cluster. It means you can build and push docker images to a remote registry directly from your Kubernetes cluster. What is nice about this setup is you can have a full CI system running completely in your Kubernetes cluster.
Under the hood, Kaniko doesn’t depend on a Docker daemon and executes each command within a Dockerfile completely in userspace. This enables building container images in environments that can’t easily or securely run a Docker daemon, such as a standard Kubernetes cluster. Kaniko is meant to be run as an image: gcr.io/kaniko-project/executor.
Please visit the official project page for more information and details about Kaniko.
In this blueprint, you will use Kaniko to build Docker images for your custom applications from the Kubernetes cluster itself.
Getting to Know Tekton
Continuous integration (or CI) is the process of automating the integration of small code changes from multiple contributors into a single software project. To achieve CI a central repository is used (e.g. Git), where each developer (or contributor) pushes code changes. Then, a CI tool (e.g., Tekton) detects changes and starts the CI automation.
In general, each CI automation consists of several steps:
- Fetching application code from a remote SCM (Source Control Management) repository like Git.
- Building application code via specific compilers, depending on the used programming language.
- Testing application code changes (via unit testing, integration testing, etc).
- Creating the final artifact (binary file, zip file, Docker image, etc) for application delivery.
- Pushing the application artifact to a remote repository for later use by a continuous delivery system.
Tekton is a cloud-native solution for building CI/CD systems on top of Kubernetes clusters. It is specifically engineered to run on Kubernetes and empowers developers to create CI pipelines using reusable blocks called Tasks. Other important components are Tekton CLI and Catalog (collection of reusable Tasks), which make Tekton a complete ecosystem.
In this guide, Tekton implements the CI part via the Pipeline resource (and associated components, such as: Tasks, Triggers, etc).
Tekton is modular and very well organized. This tutorial relies on the following Tekton components to implement the CI part:
- Tasks - used to organize the steps performing each action, such as build and test your application code.
- Pipelines - used to organize tasks and define your custom CI/CD flow.
- Triggers and EventListeners - used to capture and trigger Git events (e.g., git push events).
Tasks
A Tekton Task is a collection of Steps that you define and arrange in a specific execution order as part of your continuous integration flow. Steps are the basic unit of execution in Tekton, which performs real actions such as building code, creating a Docker image, pushing to the Docker registry, etc. To add steps to a Task, you define a steps field containing a list of desired Steps. The order in which the Steps appear in this list is the order in which they will be executed.
Tekton creates a Kubernetes Pod in your cluster for each task to run the steps. Then, each step runs in a docker container thus it must reference a docker image. The container you choose depends on what your step does. For example:
- Execute shell scripts: use an
Alpine Linuximage. - Build a Dockerfile: use
Google’s Kanikoimage. - Run kubectl: use the
bitnami/kubectlimage. - An image of your own to perform custom actions.
Task definitions are composed of (most important are highlighted):
- Parameters - used to specify input parameters for a task such as compilation flags, artifacts name, etc.
- Workspaces - used to share data (artifacts) between steps defined in a task.
- Results - represent a string value emitted by a Task. Results can be passed between Tasks inside a pipeline. Results are also visible to users, and represent important information such as SHA id for a cloned repository (emitted by the git-clone Task).
A typical Tekton Task definition looks like below:
apiVersion: tekton.dev/v1beta1
kind: Task
metadata:
  name: kaniko-example
spec:
  params:
    - name: IMAGE
      description: Name (reference) of the image to build.
    - name: DOCKERFILE
      description: Path to the Dockerfile to build.
      default: ./Dockerfile
  results:
    - name: IMAGE_DIGEST
      description: Digest of the image just built.
    - name: IMAGE_URL
      description: URL of the image just built.
  steps:
    - name: build-and-push
      workingDir: $(workspaces.source.path)
      image: $(params.BUILDER_IMAGE)
...
Explanation for the above configuration:
spec.params: defines the list of input parameters for a Task.spec.results: defines a list of string values that this Task emits. Emitting results allows passing values between tasks. In other words, a result is an output value created by one Task, and can be used as an input value for the second Tasks (and so on).spec.steps: defines the list of steps to execute. Steps represent the basic unit of execution, and define the logic of Tasks.
Important Note:
Task resources are deprecated starting with v1beta1 version of Tekton APIs. Users are encouraged to use the new features as the deprecation note explains.
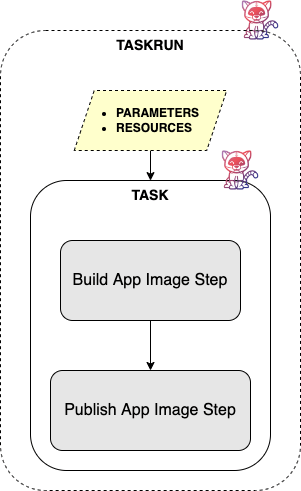
By design, Tekton will not run your Tasks when created. To launch a Task into execution, you need to create a separate TaskRun resource. A TaskRun is what instantiates your Task and begins the execution of steps. A TaskRun executes the Steps in the Task in the specified order until all Steps have been executed successfully or a failure occurs. Also, a TaskRun allows passing input parameters and specifying resources and workspaces for your custom Task.
What’s important to remember is that tasks are reusable building blocks that can be shared and referenced across pipelines. This design aspect makes Tekton unique. To help users even more, the Tekton project offers a collection of reusable tasks via the Tekton Catalog project.
The below picture illustrates the Task and TaskRun concepts:
Please visit the official documentation page for more information and details about Tekton Tasks.
Pipelines
A Tekton Pipeline organizes your Tekton tasks and orchestrates the CI flow. A Pipeline specifies one or more Tasks in the desired order of execution. You can embed tasks in a pipeline directly or reference them from external manifest files. Using references, you create task definitions in separate manifest files and reuse them across pipelines. This method is encouraged because it avoids code or configuration duplication and promotes code reuse (or configuration reuse). Thus, tasks act as objects (with inputs and outputs) that can be reused (and instantiated) across your pipelines. You can create dedicated pipelines to test, build, and deploy your application code.
Pipeline definitions are composed of (most important are highlighted):
- Parameters - used to specify input parameters (at a global level) for all tasks within a Pipeline.
- Workspaces - used to specify a workspace for shared artifacts between Tasks within a Pipeline.
- Tasks - used to specify the list of Tasks to execute as part of the Pipeline.
Typical Tekton Pipeline definition looks like below:
apiVersion: tekton.dev/v1beta1
kind: Pipeline
metadata:
  name: kaniko-pipeline
spec:
  params:
    - name: git-url
    - name: git-revision
    - name: image-name
    - name: path-to-image-context
    - name: path-to-dockerfile
  workspaces:
    - name: git-source
  tasks:
    - name: fetch-from-git
      taskRef:
        name: git-clone
      params:
        - name: url
          value: $(params.git-url)
        - name: revision
          value: $(params.git-revision)
      workspaces:
        - name: output
          workspace: git-source
    - name: build-image
      taskRef:
        name: kaniko
      params:
        - name: IMAGE
          value: $(params.image-name)
        - name: CONTEXT
          value: $(params.path-to-image-context)
        - name: DOCKERFILE
          value: $(params.path-to-dockerfile)
      workspaces:
        - name: source
          workspace: git-source
Explanation for the above configuration:
spec.params: defines the list of input parameters for the Pipeline.spec.workspaces: defines a list of workspaces to be used by each Task inside the Pipeline. Workspaces are used to share data (or artifacts) between tasks.spec.tasks: defines the list of tasks to be executed in order as part of the Pipeline. Tasks can be embedded in the Pipeline YAML definition, or referenced using thetaskReffield.
Tip:
The Tekton Catalog (or Hub) provides a ready-to-use collection of task definitions for common-use scenarios, such as cloning a git repository, building a docker image via kaniko, etc. You can install them in your Kubernetes cluster via tkn CLI or kubectl. Then, you can reference each task in your custom pipeline using the taskRef field (you can see such an example in the example pipeline definition to follow).
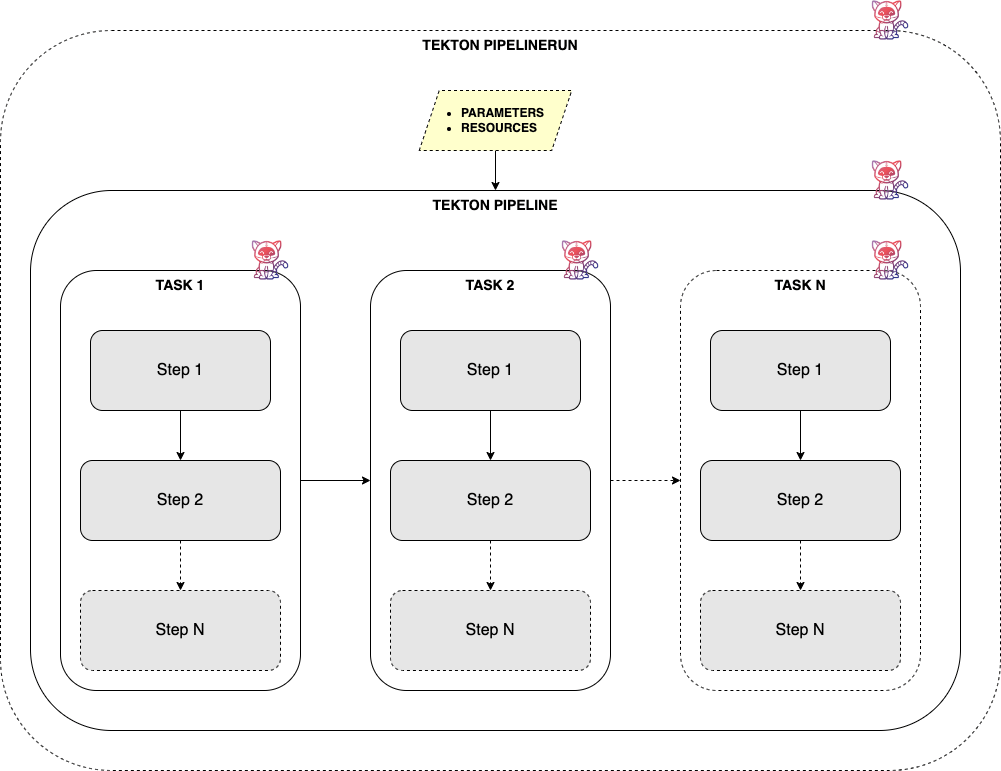
By design, Tekton will not run your Pipelines when created. To launch a Pipeline into execution, you must create a PipelineRun resource. A PipelineRun lets you instantiate and execute a Tekton Pipeline in your Kubernetes cluster. A PipelineRun executes the Tasks in the Pipeline in the specified order until all Tasks have been executed successfully or a failure occurs.
Important Notes:
- Pipeline resources are deprecated starting with
v1beta1version of Tekton APIs (hence, not used in this tutorial as well). As the deprecation note explains, users are encouraged to use the new features. - Tasks referenced within a Pipeline will get the corresponding TaskRun objects created automatically (no need to create them separately).
The picture below illustrates the Pipelines and Tasks composition:
Please visit the official documentation page for more information and details about Tekton Pipelines.
Event Listeners and Triggers
You need a mechanism to tell Tekton how to react and trigger your CI pipeline in response to external events emitted by various sources, such as GitHub. This is accomplished via another Tekton component called Triggers (needs to be installed separately). Tekton triggers allow you to detect and extract information from events from various sources and execute TaskRuns and PipelineRuns based on that information. It can also pass information extracted from events directly to TaskRuns and PipelineRuns.
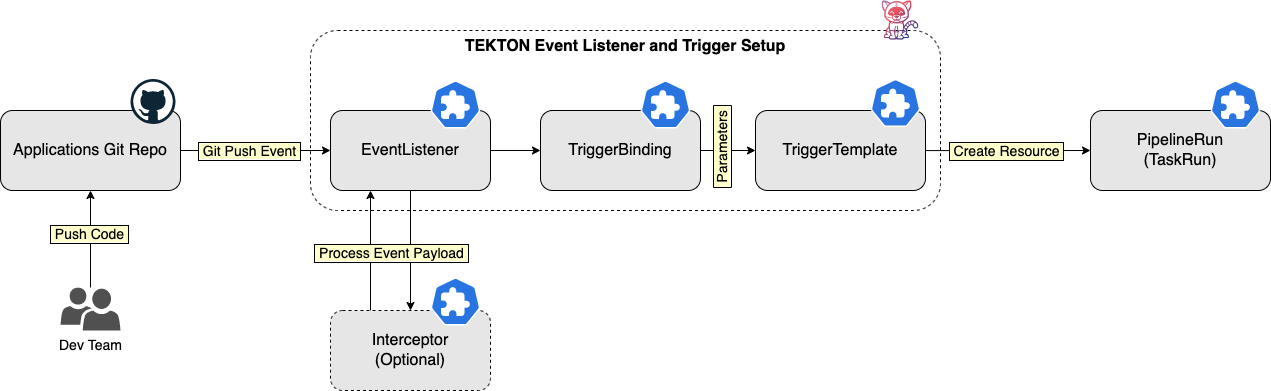
The following resources are required to trigger a Tekton pipeline using GitHub webhooks automatically:
- An EventListener - listens for events, and specifies one or more
Triggers. - A Trigger - specifies what happens when the
EventListenerdetects an event. ATriggerspecifies aTriggerTemplateand aTriggerBinding. - A TriggerTemplate - specifies what
TaskRunorPipelineRunto execute when yourEventListenerdetects an event. - A TriggerBinding - specifies what data to extract from the event payload, and how to pass that data to the
TriggerTemplate.
Optionally, you can also create an Interceptor to filter events, perform webhook verification (using secrets), or other processing before the Trigger actions are executed.
The following diagram illustrates how Tekton EventListeners and Triggers work:
In this blueprint, you will use Tekton EventListeners and Triggers to respond to GitHub push events and trigger the CI/CD pipeline to build and deploy your custom application.
Please visit the official project page for more information and details about Tekton EventListener and Triggers.
Tekton Catalog
Tekton Catalog is a collection of reusable tasks you can use in your pipelines. The main idea is to promote the modular design of Tekton and abstract implementation details for common situations. For example, in most of the pipelines you will want to use git clone tasks, application image build tasks, push to remote registry tasks, etc.
The following listing contains a few interesting tasks to start with:
- Git Clone Task - clone a Git repository URL to a workspace.
- Kaniko Task - builds a simple Dockerfile with Kaniko and pushes it to a registry.
- ArgoCD Sync and Wait Task - deploys an Argo CD application and waits for it to be healthy.
In this blueprint you will use Tekton catalog to install commonly used tasks, such as git-clone, kaniko and argocd-sync-and-wait.
Please visit the Tekton Catalog GitHub project page to learn more.
Tekton Dashboard
Tekton Dashboard is a web-based interface for Tekton Pipelines and Tekton triggers resources. It allows you to manage and view Tekton resource creation, execution, and completion.
Tekton Dashboard supports:
- Filtering resources by label.
- Real-time view of PipelineRun and TaskRun logs.
- View resource details and YAML.
- Show resources for the whole cluster or limit visibility to a particular namespace.
- Import resources directly from a git repository.
- Adding functionality through extensions.
In this blueprint, you will use the Tekton dashboard to interact with pipeline runs and visualize results (such as logs) for each task from the CI/CD flow.
Please visit the Tekton Dashboard GitHub project page to learn more.
Getting to Know Argo CD
Argo CD is a popular open-source implementation for doing GitOps continuous delivery (CD) on top of Kubernetes. Your applications, definitions, configurations, and environments should be declarative and version-controlled. Also, application deployment and lifecycle management should be automated, auditable, and easily understood. All this can be done using Argo.
Argo CD adheres to the same GitOps patterns and principles, thus maintaining your cluster state using a declarative approach. Synchronization happens via a Git repository, where your Kubernetes manifests are stored. Kubernetes manifests can be specified in several ways:
- Kustomize applications.
- Helm charts.
- Ksonnet applications.
- Jsonnet files.
- Plain directory of YAML/JSON manifests.
- Any custom config management tool configured as a config management plugin.
Why Argo and not Tekton for the CD part?
While you can also accomplish the CD part using Tekton, Argo is more specialized for this task. Every CI system can indeed be used to perform deployments as well, but it implies more steps and logic to accomplish the same thing. Traditionally, you would use all kinds of scripts and glue logic to create the CD part inside a CI system (take Jenkins as an example). Soon, you will notice that it’s unnatural, hence a dedicated CD solution is more appropriate.
Other important aspects to consider:
- How do I implement GitOps?
- How easy can I deploy to multiple environments and Kubernetes clusters?
- What happens if my CI/CD system goes down?
Argo CD helps you implement GitOps and keep your Kubernetes manifests (even those used in this guide) synced with a Git repository—no need to go back and apply everything by hand on every change. GitOps also allows you to keep track of changes easily and, most important, forbids manual intervention in your cluster (via other members in the team using kubectl, for example).
Next, the most important aspect is a setup where a specialized system takes care of the CD part and doesn’t interfere, or it’s not dependent on the CI part. If the CI system goes down for some reason, it shouldn’t affect the CD part and vice-versa. On the other hand, a system or a component that does multiple things at once can be prone to failure in accomplishing both. So, it’s best to follow the single responsibility principle in general and let Tekton take care of the CI part and Argo handle CD (as well as GitOps).
Applications
Argo CD is using the Application core concept to manage applications deployment and lifecycle. Inside an Argo CD application manifest, you define the Git repository hosting your application definitions and the corresponding Kubernetes cluster used to deploy your applications. In other words, an Argo CD application defines the relationship between a source repository and a Kubernetes cluster. It’s a concise and scalable design where you can associate multiple sources (Git repositories) and corresponding Kubernetes clusters.
A major benefit of using applications is that you don’t need to deploy Argo to each cluster individually. You can use a dedicated cluster for Argo and simultaneously deploy applications to all clusters from a single place. This way, you avoid Argo CD downtime or loss in case other environments have issues or get decommissioned.
Projects
You can group similar applications into a Project. Projects permit logical grouping of applications and associated roles/permissions when working with multiple teams. Each new application belongs to the default project when not specified. The default project is created automatically, and it doesn’t have any restrictions. The default project can be modified but not deleted.
Note:
All examples used in this tutorial use the default Argo CD project.
Please visit the official documentation website to read more about Argo CD core concepts.
In this blueprint, you will learn how to continuously use Argo CD to deploy code changes for your custom applications.
Getting to Know Knative
Knative is an open-source solution for deploying serverless applications using Kubernetes as the underlying platform. In addition to application development, developers may also have infrastructure tasks such as maintaining Kubernetes manifests for application deployment, rolling back to a previous revision, traffic routing, scaling up or down workloads to meet load demand, etc.
Knative reduces the boilerplate needed for spinning up workloads in Kubernetes, such as creating deployments, services, ingress objects, etc. Knative also helps you implement best practices in production systems (e.g., blue-green, canary deployments), application observability (logs and metrics), and support for event-driven applications.
Knative has two main components:
- Serving - abstracts all required parts for your application to run and be accessible to the outside world.
- Eventing - adds support for event-driven programming, thus making it easy to create event-driven architectures.
Serving Component
In this blueprint you will learn how to use the Knative Serving component to deploy and publicly expose serverless web application - the 2048 game, via Services (not to be confused with Kubernetes Services).
For each application you want to run and expose publicly via Knative, you need to create a Knative Service CRD. A Knative Service represents the basic execution unit for the Knative Serving component. Going further, a Knative Service resource abstracts all the details needed to run and expose your application, such as creating Kubernetes deployments (including autoscaling), services, ingress configurations, etc.
Knative can automatically scale down your applications to zero when not in use or idle (for example, when no HTTP traffic is present), which makes your applications serverless.
Knative Serving features include:
- Deploy serverless applications quickly.
- Autoscaling for application pods (downscaling to zero is supported).
- Point-in-time snapshots for application code and configurations (via revisions).
- Routing and network programming. Supports multiple networking layers, like: Kourier, Contour, and Istio.
Other important Knative Serving resources worth mentioning are:
- Revisions - represent a point-in-time snapshot of the code and configuration for each modification made to the workload.
- Routes - maps a network endpoint to one or more revisions.
You can read more about the available Knative Serving resources on the official documentation page.
Eventing Component
The Knative Eventing component is used in this blueprint to connect GitHub events with Tekton Pipelines to automatically trigger the CI flow. The Tekton CI pipeline rebuilds the application image whenever a git push event is triggered by the GitHub repository hosting the application source code.
Knative Eventing helps address common tasks for cloud-native development, such as:
- Enabling late-binding for event sources and consumers.
- Loose coupling between services, thus making it easy to deploy individual application components.
- Various services can be connected without modifying consumers or producers, thus facilitating the building of new applications.
Event-driven architectures allow loose coupling between components in the system. This has a tremendous advantage, meaning that new functionality can be added easily without interfering or breaking other components. Event-based architectures use a message broker such as Apache Kafka or RabbitMQ (or an in-memory one - not recommended for production systems). Using brokers abstracts the details of event routing from the event producer and consumer. In other words, applications need not to worry how a message (or event) travels from point A to B. The broker takes care of all the details and correctly routes each message (or event) from the source to the destination (or multiple destinations). Brokers also offer support for complex deliveries, such as responding to events, message filtering, delivery guarantees, etc.
Knative eventing provides support for the following delivery mechanisms:
- Simple Delivery - used in
1:1scenarios, where an event source sends messages to a single subscriber (such as a Knative Service or a Kubernetes Service). - Complex Delivery via Channels and Subscriptions - used in
1:nfanout scenarios, where an event source can send messages to 1 or more subscribers via channels. Channels can be in-memory (volatile), or persistent if using Kafka. - Complex Delivery with Reply - same as above, but supports replying to events. Harder to maintain when working with multiple channels, and multiple subscribers replying to events.
- Complex Delivery via Brokers and Triggers - a Broker combines Channel, reply, and filter functionality into a single resource. Trigger provides declarative filtering of all events. This is the preferred method when developing applications using Knative Eventing.
In this blueprint, you will learn how to use Knative Eventing to listen for GitHub events and trigger the Tekton CI/CD pipeline that builds and deploys your custom application.
For more information about Knative and other features, please visit the official documentation website. Knative Tips is also a very good documentation source and practical examples for Knative in general.
Getting to Know Cert-Manager
Cert-Manager is an open-source certificate management tool that works with Kubernetes. It supports all the required operations for obtaining, renewing, and using SSL/TLS certificates. Cert-Manager can talk with various certificate authorities (CAs), like Let’s Encrypt, HashiCorp Vault, and Venafi. It can also automatically issue valid certificates for you and renew them before they expire.
SSL/TLS certificates secure your connections and data by verifying the identity of hosts/sites and encrypting your data. Cert-Manager manages them by integrating with your Kubernetes cluster’s Ingress Controller, the main entry point for your backend services. Then, you can provide identity information to users by presenting them with a valid SSL/TLS certificate whenever they visit your website(s).
This blueprint configures Knative Serving to work with Cert-Manager and enables the automatic creation and renewal of TLS certificates for each Knative Service. The Knative component providing the auto TLS integration is called net-certmanager, and it’s a separate project developed by Knative.
Cert-Manager relies on several CRDs to fetch TLS certificates for your domain, such as:
- Issuer: Defines a
namespacedcertificate issuer, allowing you to usedifferent CAsin eachnamespace. - ClusterIssuer: Similar to
Issuer, but it doesn’t belong to a namespace, hence can be used toissuecertificates inany namespace. - Certificate: Defines a
namespacedresource that references anIssuerorClusterIssuerfor issuing certificates.
In this blueprint, you will a cluster based issuer (ClusterIssuer) resource to enable TLS termination for your Knative services. Next, net-certmanager manages TLS certificates automatically for you via the ClusterIssuer resource.
For more information about Cert-Manager and its features, please visit the official documentation website.
Next, you will prepare the sample application repository used in this tutorial, as well as the DigitalOcean Docker Registry used for storing application images. You will also create a dedicated Kubernetes namespace to keep everything clean and well-organized.
Step 1: Prepare the Sample Application Requirements
Before continuing with the tutorial, perform the following steps:
- Fork the sample application repository used in this guide.
- Provision a DigitalOcean Container Registry to store the sample application images.
- Create a dedicated Kubernetes namespace to store all custom resources used in this tutorial.
Fork the Sample Application Repo
To test the Tekton CI/CD flow presented in this blueprint, you need to fork the kubernetes-sample-apps repository first. Also, create a GitHub Personal Access Token (PAT) with the appropriate permissions, as explained here. The PAT is needed to allow the GitHubSource CRD to manage webhooks for you automatically. Store the PAT credentials somewhere safe because you will need them later.
Create a DigitalOcean Container Registry
You need a DigitalOcean Container Registry to store the sample application images. For detailed steps to create one, follow the quickstart guide. A free plan is adequate to complete this guide.
Alternatively, you can run the following command to provision a new registry:
doctl registry create <YOUR_DOCKER_REGISTRY_NAME_HERE> \
  --region <YOUR_DOCKER_REGISTRY_REGION_HERE> \
  --subscription-tier starter
The command includes the following flags:
--region: Specifies the region name to provide the registry. You can list all the available regions via thedoctl registry options available-regionscommand.--subscription-tier: Specifies the subscription tier to use. You can list all the available tiers via thedoctl registry options subscription-tierscommand. The example above uses thestartertier, which is free.
Then, run the following command to verify that the registry was created successfully. Make sure to replace the <> placeholders accordingly in the following command:
doctl registry get <YOUR_DOCKER_REGISTRY_NAME_HERE>
The output looks similar to the following:
OutputName         Endpoint                               Region slug
tekton-ci    registry.digitalocean.com/tekton-ci    nyc3
In this guide, the registry is named tekton-ci and provisioned in the nyc3 region.
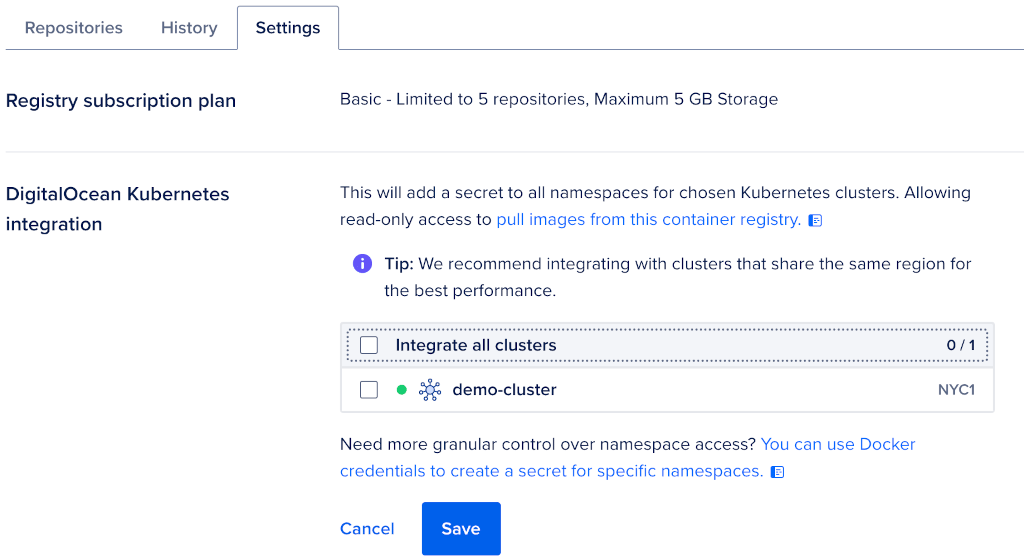
Finally, you must configure your DOKS cluster to pull images from your private registry. DigitalOcean provides an easy way of accomplishing this task using the control panel. First, navigate to the Settings tab of your container registry. Then, click the Edit button from the DigitalOcean Kubernetes Integration section. Finally, select the appropriate checkbox and press the Save button.
Create a Dedicated Namespace for Kubernetes Resources
It’s generally a best practice to have a dedicated namespace when provisioning new resources in your Kubernetes cluster to keep everything organized. A dedicated namespace also lets you easily clean up everything later on.
This tutorial uses the doks-ci-cd namespace. Run the following command to create it:
kubectl create ns doks-ci-cd
Then, check if the namespace is successfully created:
kubectl get ns doks-ci-cd
The output looks similar to:
NAME         STATUS   AGE
doks-ci-cd   Active   13m
Clone the Sample Repository
Clone the container-blueprints repo using the following command:
git clone https://github.com/digitalocean/container-blueprints.git
Then, change the directory to your local copy using the following command:
cd container-blueprints
Next, you will install each software component required by this guide using the DigitalOcean Marketplace collection of 1-click apps for Kubernetes.
Step 2: Install Cert-Manager
Cert-Manager is available as a 1-Click Kubernetes application from the DigitalOcean Marketplace. To install Cert-Manager, navigate to your cluster’s Marketplace tab and search for the app. Then, click the Install App button and follow the instructions.

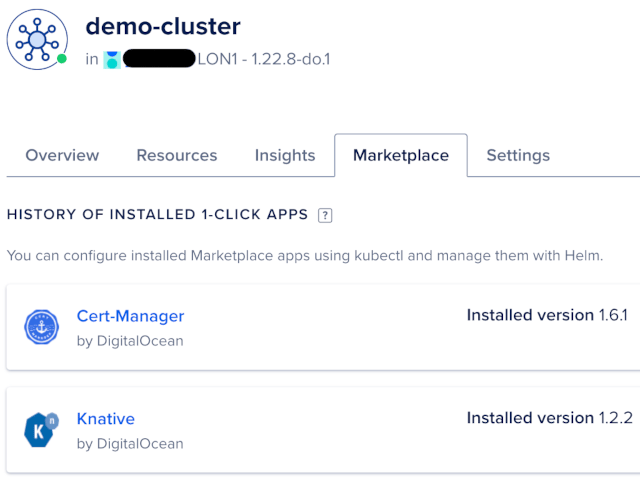
After the installation finishes, you should see the new application listed in the Marketplace tab of your Kubernetes cluster. The output looks similar to:
Finally, check if the installation was successful by following the Getting started after deploying Cert-Manager section from the Cert-Manager 1-Click app documentation page.
Next, you will provision Tekton Pipelines on your Kubernetes cluster from DigitalOcean Marketplace.
Step 3: Install Tekton
Tekton installation is divided into two parts:
- Tekton Pipelines represents the main component of Tekton and provides pipeline support (as well as other core components, such as Tasks).
- Tekton Triggers provides an additional component to support triggering pipelines whenever events emitted by various sources (such as GitHub) are detected.
Tekton Pipelines is available as a 1-Click Kubernetes application from the DigitalOcean Marketplace. On the other hand, you will install Tekton Triggers using kubectl.
Provision Tekton Pipelines
To install Tekton Pipelines, navigate to the Marketplace tab of your cluster and search for the app. Then, click on the Install App button from the right side and follow the instructions:

After the installation, you should see the new application listed in your Kubernetes cluster’s Marketplace tab. The output looks similar to:

Finally, check if the installation was successful by following the Getting started after deploying Tekton Pipelines section from the Tekton Pipelines 1-Click app documentation page.
Next, you will provision Tekton Triggers on your Kubernetes cluster.
Provision Tekton Triggers
Tekton Triggers is not available as a 1-Click application, so you will install it using kubectl as recommended in the official installation page. Run the following commands to install Tekton Triggers and dependencies. The latest stable version available at this time of writing is v0.20.1:
kubectl apply -f https://storage.googleapis.com/tekton-releases/triggers/previous/v0.20.1/release.yaml
kubectl apply -f https://storage.googleapis.com/tekton-releases/triggers/previous/v0.20.1/interceptors.yaml
Note:
Tekton Triggers require Tekton Pipelines to be installed first as a dependency, as described in the Provision Tekton Pipelines section. By default, it uses the tekton-pipelines namespace to create the required resources.
Next, check if Tekton Triggers was installed successfully:
kubectl get pods --namespace tekton-pipelines -l app.kubernetes.io/part-of=tekton-triggers
The output looks similar to:
OutputNAME                                                 READY   STATUS    RESTARTS   AGE
tekton-triggers-controller-75b9b7b77d-5nk76          1/1     Running   0          2m
tekton-triggers-core-interceptors-7769dc7cbc-8hjkn   1/1     Running   0          2m
tekton-triggers-webhook-79c866dc85-xz64m             1/1     Running   0          2m
All tekton-triggers pods should be running and healthy. You can also list the installed Tekton components and corresponding version using the Tekton CLI:
tkn version
The output looks similar to:
OutputClient version: 0.24.0
Pipeline version: v0.29.0
Triggers version: v0.19.1
Next, you will provision the Tekton Dashboard on your Kubernetes cluster using kubectl.
Provision Tekton Dashboard
Tekton Dashboard is not available as a 1-Click application yet, so you will install it using kubectl as recommended in the official installation page. Run the following commands to install Tekton Dahsboard and dependencies. The latest stable version available at this time of writing is v0.28.0:
kubectl apply -f https://storage.googleapis.com/tekton-releases/dashboard/previous/v0.28.0/tekton-dashboard-release.yaml
Note: Tekton Dashboard requires Tekton Pipelines to be installed first as a dependency, as described in the Provision Tekton Pipelines section. By default, it uses the tekton-pipelines namespace to create required resources.
Next, check if the Tekton Dashboard installation was successful:
kubectl get pods --namespace tekton-pipelines -l app.kubernetes.io/part-of=tekton-dashboard
The output looks similar to:
OutputNAME                                READY   STATUS    RESTARTS   AGE
tekton-dashboard-56fcdc6756-p848r   1/1     Running   0          5m
All tekton-dashboard pods should be running and healthy. You can also list installed Tekton components and corresponding version using Tekton CLI:
tkn version
The output looks similar to:
OutputClient version: 0.24.0
Pipeline version: v0.29.0
Triggers version: v0.20.1
Dashboard version: v0.28.0
The Tekton Dashboard can be accessed by port-forwarding the associated Kubernetes service. First, check the associated service:
kubectl get svc --namespace tekton-pipelines -l app.kubernetes.io/part-of=tekton-dashboard
The output looks similar to the following:
OutputNAME               TYPE        CLUSTER-IP       EXTERNAL-IP   PORT(S)    AGE
tekton-dashboard   ClusterIP   10.245.127.170   <none>        9097/TCP   23s
Notice that the Kubernetes service is named tekton-dashboard and listening on port 9097.
Now, port-forward the tekton-dashboard service:
kubectl port-forward svc/tekton-dashboard -n tekton-pipelines 9097:9097
Finally, open a web browser and navigate to localhost:9097. You should see the welcome page:
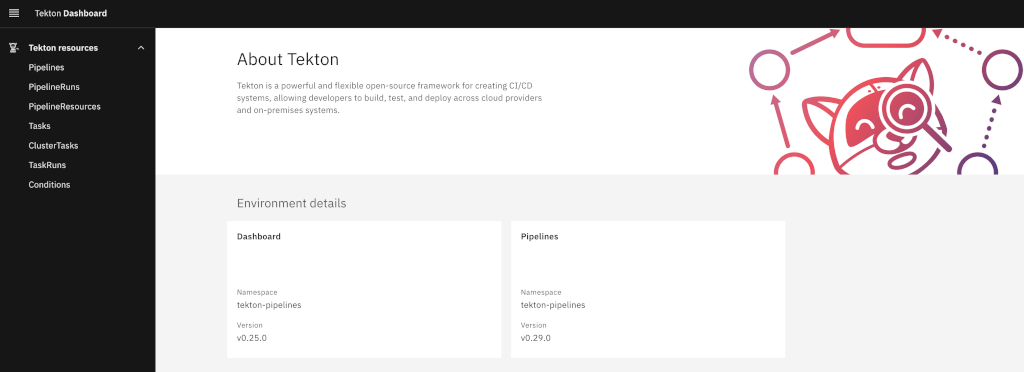
You can explore each section from the left menu, and see what options are available. Next, you will install the Argo CD 1-Click app from DigitalOcean marketplace.
Step 4: Install Argo CD
Argo CD is available as a 1-Click Kubernetes application from the DigitalOcean Marketplace. To install Argo CD, navigate to the Marketplace tab of your cluster and search for the app. Then, click on the Install App button, and follow the instructions:

After the installation finishes, you should see the new application listed in the Marketplace tab of your Kubernetes cluster. The output looks similar to:

Finally, check if the installation was successful by following the Getting started after deploying Argo CD section from the Argo CD 1-click app documentation page.
Next, you will install the Knative 1-Click app from the DigitalOcean Marketplace.
Step 5: Install Knative
Knative is available to install as a 1-Click Kubernetes application from the DigitalOcean Marketplace. To install Knative, navigate to the Marketplace tab of your cluster and search for the app. Then, click on the Install App button and follow the instructions:

After the installation finishes, you should see the new application listed in the Marketplace tab of your Kubernetes cluster. The output looks similar to:
Finally, check if the installation was successful by following the Getting started after deploying Knative section from the Knative 1-click app documentation page.
Note: The Knative 1-Click app installs both the Knative Serving and Eventing components in your DOKS cluster, via the Knative Operator.
Next, you will configure each component of Knative to work in conjunction with Tekton Pipelines and trigger the CI automation on GitHub events such as push. You will also publicly expose and enable TLS termination for your Knative services.
Step 6: Configure Knative Serving
In this step, you will learn how to prepare a domain you own to work with Knative Services. Then, you will learn how to configure Knative Serving to use your custom domain and enable automatic TLS termination for all Knative services. It’s generally a best practice to enable TLS termination for all application endpoints exposed publicly.
Configure DigitalOcean Domain Records for Knative Services
In this section, you will configure DNS within your DigitalOcean account using a domain that you own. Then, you will create a wildcard record to match a specific subdomain under your root domain and map it to your Knative load balancer. DigitalOcean is not a domain name registrar. You need to buy a domain name first from providers such as Google or GoDaddy.
First, run the following command to register your domain with DigitalOcean, replacing the <> placeholders:
doctl compute domain create "<YOUR_DOMAIN_NAME_HERE>"
The output looks similar to the following:
OutputDomain                TTL
starter-kit.online    0
In this example, we use the domain starter-kit.online.
Note: Ensure that your domain registrar is configured to point to DigitalOcean name servers. For more information, see here.
Next, you will add a wildcard record of type A for the Kubernetes namespace doks-ci-cd. First, you need to identify the load balancer external IP created by Knative:
kubectl get svc -n knative-serving
The output looks similar to the following:
OutputNAME                         TYPE           CLUSTER-IP       EXTERNAL-IP     PORT(S)                           AGE
activator-service            ClusterIP      10.245.219.95    <none>          9090/TCP,8008/TCP,80/TCP,81/TCP   4h30m
autoscaler                   ClusterIP      10.245.42.109    <none>          9090/TCP,8008/TCP,8080/TCP        4h30m
autoscaler-bucket-00-of-01   ClusterIP      10.245.236.8     <none>          8080/TCP                          4h30m
autoscaler-hpa               ClusterIP      10.245.230.149   <none>          9090/TCP,8008/TCP                 4h30m
controller                   ClusterIP      10.245.13.134    <none>          9090/TCP,8008/TCP                 4h30m
domainmapping-webhook        ClusterIP      10.245.113.122   <none>          9090/TCP,8008/TCP,443/TCP         4h30m
kourier                      LoadBalancer   10.245.23.78     159.65.208.64   80:31060/TCP,443:31014/TCP        4h30m
Then, add the wildcard record, which maps your subdomain to the Knative load balancer. Knative Services are namespace scoped and use the following pattern: *.<k8s_namespace>.<your_root_domain>. The doks-ci-cd Kubernetes namespace and the EXTERNAL-IP column value for the kourier service are used for this blueprint. You can also change the TTL value as per your requirement, making sure to replace the <> placeholders accordingly:
doctl compute domain records create "<YOUR_DOMAIN_NAME_HERE>" \
  --record-name "*.doks-ci-cd" \
  --record-data "<YOUR_KOURIER_LOAD_BALANCER_EXTERNAL_IP_ADDRESS_HERE>" \
  --record-type "A" \
  --record-ttl "30"
Note: The DNS record must not contain the root domain value - it will be appended automatically by DigitalOcean. For example, if the root domain name is starter-kit.online, and the Kourier LoadBalancer has an external IP value of 143.198.242.190, then the above command becomes:
doctl compute domain records create "starter-kit.online" \
  --record-name "*.doks-ci-cd" \
  --record-data "143.198.242.190" \
  --record-type "A" \
  --record-ttl "30"
Finally, you can check the records created for the starter-kit.online domain:
doctl compute domain records list starter-kit.online
The output looks similar to:
OutputID           Type    Name           Data                    Priority    Port    TTL     Weight
274640149    SOA     @              1800                    0           0       1800    0
274640150    NS      @              ns1.digitalocean.com    0           0       1800    0
274640151    NS      @              ns2.digitalocean.com    0           0       1800    0
274640152    NS      @              ns3.digitalocean.com    0           0       1800    0
309782452    A       *.doks-ci-cd   143.198.242.190         0           0       3600    0
Configure a Custom Domain and Auto TLS Feature for Knative Services
Knative enables TLS termination automatically for your existing or new services and automatically fetches or renewes TLS certificates from Let’s Encrypt. This feature is provided via Cert-Manager and a special component (or adapter) named net-certmanager. You can also configure Knative to use a custom domain you own and let users access your services via your domain.
The following steps configure Knative Serving with your domain and enable the auto-TLS feature:
- Create a
ClusterIssuerresource to issue certificates from Let’s Encrypt. - Install the
net-cert-managercontroller to act as a bridge (or adapter) between Cert-Manager and Knative Serving to issue certificates automatically. - Configure Knative Serving component via the
Knative Operatorto:- Use a dedicated domain that is registered with DigitalOcean, as explained in Configure DigitalOcean Domain Records for Knative Services section.
- Use the
ClusterIssuerresource to issue/renew certificates for each service automatically. - Enable the
auto TLSfeature via a special flag calledauto-ts.
First, you need to create a ClusterIssuer CRD for Cert-Manager. This blueprint provides a ready-to-use manifest, which you can install using kubectl:
apiVersion: cert-manager.io/v1
kind: ClusterIssuer
metadata:
  name: kn-letsencrypt-http01-issuer
spec:
  acme:
    privateKeySecretRef:
      name: kn-letsencrypt
    server: https://acme-v02.api.letsencrypt.org/directory
    solvers:
      - http01:
          ingress:
            class: kourier
The manifest has the following keys:
spec.acme.privateKeySecretRef.name- Specifies the unique name given to the private key of the TLS certificate.spec.acme.server- Specifies the Let’s Encrypt server endpoint used to issue certificates.spec.acme.solvers- Specifies the ACME client challenge type and what ingress class to use. The above configuration uses the HTTP-01 challenge and Knative Kourier ingress controller.
Apply the Knative ClusterIssuer manifest using kubectl:
kubectl apply -f https://github.com/digitalocean/container-blueprints/blob/main/DOKS-CI-CD/assets/manifests/knative-serving/resources/kn-cluster-issuer.yaml
Check the ClusterIssuer state:
kubectl get clusterissuer kn-letsencrypt-http01-issuer
The output looks similar to:
OutputNAME                           READY   AGE
kn-letsencrypt-http01-issuer   True    22h
The READY column should show True. Now, that the ClusterIssuer resource is functional, you need to tell Knative Serving how to use it and issue certificates automatically for your Knative Services. This feature is called auto TLS. To use this feature, you need to install an additional component called net-certmanager.
You can install net-certmanager using kubectl:
kubectl apply -f https://github.com/knative/net-certmanager/releases/download/knative-v1.4.0/release.yaml
Alternatively, you can use the Knative Operator. The Knative Operator is already installed in your DOKS cluster via the DigitalOcean Knative 1-Click app, which you deployed previously. The following YAML manifest shows you how to instruct Knative Operator to install the additional net-certmanager component, as part of the KnativeServing component configuration:
apiVersion: operator.knative.dev/v1alpha1
kind: KnativeServing
metadata:
  name: knative-serving
  namespace: knative-serving
spec:
  additionalManifests:
    - URL: https://github.com/knative/net-certmanager/releases/download/knative-v1.4.0/release.yaml
You don’t have to apply the above manifest by hand, because everything is handled via Kustomize in this repository, including enabling the auto TLS feature for Knative Services.
Kustomize uses the kustomization manifest to take the original KnativeServing configuration from the DigitalOcean Marketplace GitHub repository and apply a set of patches for each needed feature. This way, you don’t have to modify the original file or keep a modified copy of it somewhere. Kustomize lets you use the original file as a base, and apply a set of patches on the fly.
The patch files are listed below:
- net-certmanager-install: Installs
net-certmanangercomponent via Knative Operator. - certmanager-config: Configures Knative Serving to use the
ClusterIssuerresource created earlier to automatically issue TLS certificates from Let’s Encrypt. - domain-config: Configures Knative Serving to use your custom domain when exposing services.
- network-config: Configures Knative Serving to enable the
auto TLSfeature for Knative Services, via theauto-tlsflag.
Follow the steps to apply all required changes for the Knative Serving component via Kustomize:
-
Edit domain-config to point to your own domain name (replace the
starter-kit.onlinekey with your domain), using a text editor of your choice (preferably withYAMLlinting support). For example, you can use Visual Studio Code:code https://github.com/digitalocean/container-blueprints/blob/main/DOKS-CI-CD/assets/manifests/knative-serving/patches/domain-config.yaml -
Apply
kustomizationsusingkubectl:kubectl apply -k DOKS-CI-CD/assets/manifests/knative-serving
Finally, you can test your whole setup by deploying the sample hello-world Knative Service provided in the DigitalOcean Marketplace repo to test the whole setup:
kubectl apply \
  -n doks-ci-cd \
  -f https://raw.githubusercontent.com/digitalocean/marketplace-kubernetes/master/stacks/knative/assets/manifests/serving-example.yaml
After a few moments, a new service should show up. List all Knative Services using the Knative CLI (kn):
kn service list -n doks-ci-cd
The output looks similar to:
NAME     URL                                          LATEST          AGE   CONDITIONS   READY
hello    https://hello.doks-ci-cd.starter-kit.online  hello-world     31m   3 OK / 3     True
The hello-world service endpoint should be in a healthy state with the READY column set to True. Also, the service endpoint should be HTTPS enabled as shown in the URL column value, and use your custom domain name. You can also open a web browser and navigate to the service endpoint - a Hello World! message should be displayed.
Note:
- It may take up to 1 minute or so until HTTPS is enabled for your service(s) endpoint. This is because it takes a while until the ACME client used by the ClusterIssuer finishes the HTTP-01 challenge, and obtains the final TLS certificate(s).
- For testing purposes, it’s recommended to set the
spec.acme.serverfield to point to Let’s Encrypt staging server by editing the kn-cluster-issuer file and then runkubectl apply -f. This is because the Let’s Encrypt production server has a quota limit set which can be very easily reached, and you will not be able to issue certificates for the whole day. - GitHub webhooks require production-ready TLS certificates, so switch to the Let’s Encrypt production server afterward.
Knative Private Services
By default, Knative will configure all services with a public endpoint, if a valid domain is configured. If you do not want to expose a Knative service because of some security implications publicly, or if it’s not ready yet to be consumed by users, you can use the Knative Private Services feature.
To make a Knative service private, you need to add a special label named networking.knative.dev/visibility: cluster-local to any Knative service manifest. For example:
apiVersion: serving.knative.dev/v1
kind: Service
metadata:
  name: hello
  labels:
    networking.knative.dev/visibility: cluster-local
spec:
  template:
    metadata:
      # Revision name
      # Must follow the convention {service-name}-{revision-name}
      name: hello-world
    spec:
      containers:
        - image: gcr.io/knative-samples/helloworld-go
          ports:
            - containerPort: 8080
          env:
            - name: TARGET
              value: "World"
After applying the above manifest in the doks-ci-cd namespace, Knative will create a private service:
kn service list -n doks-ci-cd
The output looks similar to:
OutputNAME                    URL                                           LATEST           AGE   CONDITIONS   READY
hello                   http://hello.doks-ci-cd.svc.cluster.local     hello-world      17m   3 OK / 3     True
In the output above, you will notice that the hello-world service endpoint is using the internal domain of the cluster - svc.cluster.local. Also, only HTTP is enabled for the service in question.
Next, you will configure Knative Eventing to listen for GitHub events and trigger the sample Tekton CI/CD pipeline used in this tutorial.
Step 7: Configure Knative Eventing
Knative has a very powerful eventing system built in. Tekton also has some primitives built in to react on external events, such as the EventListener. Tekton EventListeners know how to filter events as well, via Interceptors. This tutorial shows you another way of processing events and triggering Tekton pipelines by using Knative Eventing.
Before continuing, it’s important to understand some Knative Eventing concepts used in this guide:
- Sources: The main purpose is to define or create event producers. In this tutorial, the GitHubSource type is used as a producer of GitHub events. When working with
GitHubSources, you can also filter and react on specific events such aspushevents. It can also manage webhooks for you automatically via the GitHub API using the PAT you created previously. - Event delivery mechanisms, such as Simple Delivery and Complex Delivery.
This guide uses a simple delivery mechanism, where GitHubSource filters and fires the Tekton CI/CD pipeline EventListener on push events. The GitHubSource component is available via the eventing-github Knative project. The official version doesn’t support Kubernetes v1.22 and up at this time of writing (there is a open PR to address this issue). This repository provides a functional github-eventing-v1.4.0 manifest that you can use.
Install github-eventing in your cluster by apply the github-eventing-v1.4.0 manifest using kubectl:
kubectl apply -f https://github.com/digitalocean/container-blueprints/blob/main/DOKS-CI-CD/assets/manifests/knative-eventing/github-eventing-v1.4.0.yaml
The command also creates a dedicated knative-sources namespaces for github-eventing.
Now, check if all github-eventing pods are up and running:
kubectl get pods -n knative-sources
The output looks similar to:
OutputNAME                              READY   STATUS    RESTARTS   AGE
github-controller-manager-0       1/1     Running   0          21h
github-webhook-6cdcfc69ff-2q4sn   1/1     Running   0          21h
The github-controller and github-webhook pods should be in a Running state. The github-controller pod is responsible with reconciling your GitHubSource CRDs. The github-webhook pod manages webhooks for your GitHub repository, as defined by the GitHubSource CRD.
Each time you create a GitHubSource resource, a corresponding Knative Service is also created. The Knative Service exposes a public endpoint and gets registered as a webhook in your GitHub repository by the github-eventing component. Then, each time a GitHub event is fired, the Knative Service created by your GitHubSource resource is triggered and notifies the Tekton EventListener. This approach has other benefits, such as letting Knative Serving to take care of creating endpoints for your webhooks and automatically provide TLS support.
The following diagram illustrates the setup used in this guide and all involved components.
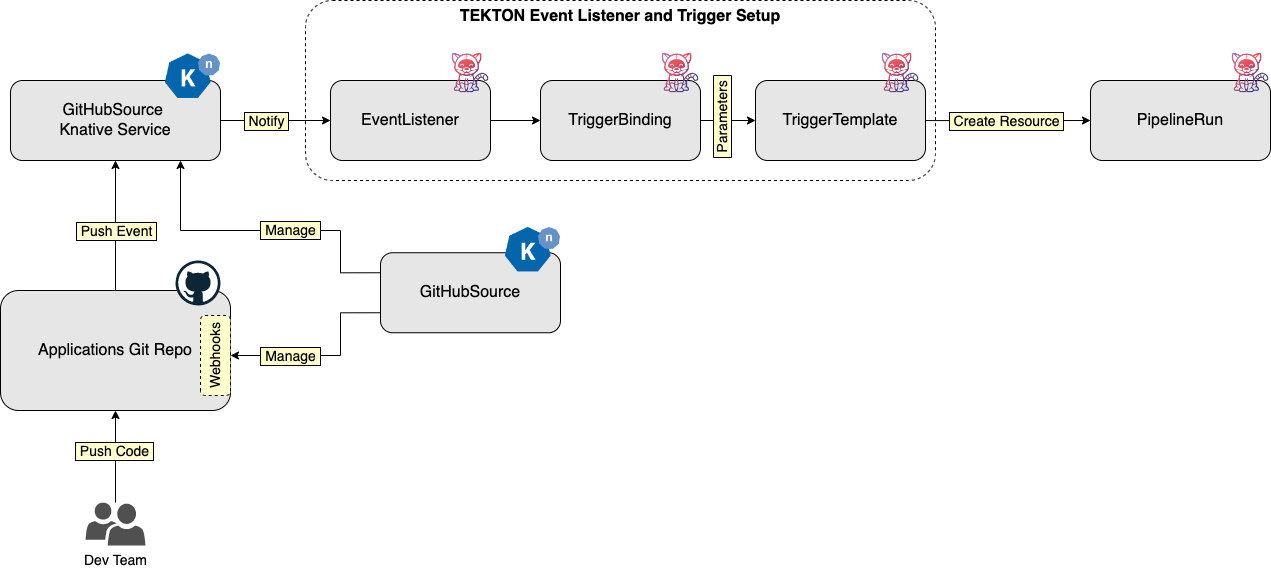
You can also replace the simple delivery mechanism with a complex delivery that uses channels or brokers. Then, you can have multiple subscribers responding to all kinds of events. For example, you can have a dedicated setup where, based on the type of event that gets fired, a different Tekton Pipeline is triggered. For example:
- When a PR is opened, a specific subscriber gets notified and triggers a dedicated pipeline that runs only application tests, thus validating PRs.
- When code is merged in the
main(ordevelopment) branch, another subscriber gets notified and triggers a dedicated CI/CD pipeline.
A typical GitHubSource CRD definition looks like the following:
apiVersion: sources.knative.dev/v1alpha1
kind: GitHubSource
metadata:
  name: sample-app-github-source
spec:
  eventTypes:
    - push
  ownerAndRepository: github-repo-owner/sample-app-repo
  accessToken:
    secretKeyRef:
      name: github-pat
      key: accessToken
  secretToken:
    secretKeyRef:
      name: github-pat
      key: secretToken
  sink:
    uri: http://el-tekton-event-listener.doks-ci-cd.svc.cluster.local:8080
The manifest has the following keys:
spec.eventTypes: Specifies what type of events you’re interested in, for examplepush.spec.ownerAndRepository: Specifies the GitHub repository (and owner) for the application source code.spec.accessToken(spec.secretToken): Specifies the GitHub personal access token name and value.spec.sink: Specifies a destination for events, such as a Kubernetes service URI, or a Knative Service.
Next, you will configure and test the Tekton CI/CD pipeline for the sample application (2048 game). You will also learn how to automatically trigger the pipeline on GitHub events when pushing commits, using Knative GitHubSource and Tekton EventListeners.
Step 8: Set Up Your First CI/CD Pipeline Using Tekton and Argo CD
In this part of the tutorial, you will set up a Tekton CI/CD Pipeline that builds a Docker image for your custom application using Kaniko and publishes it to a remote Docker registry. Then, the Tekton pipeline will trigger Argo CD to create and deploy the application to your Kubernetes cluster.
At a high-level overview, you use the following steps:
- Implement the CI/CD Pipeline workflow using Tekton and Argo CD.
- Configure Tekton EventListeners and Triggers to automatically trigger the CI/CD Pipeline using Git events such as pushing commits.
- Configure the Knative Eventing GitHubSource to trigger your Tekton CI/CD pipeline.
Next, to set up the CI/CD Pipeline workflow:
- Fetch sample application source code from Git.
- Build and push the application image to the DigitalOcean Container Registry.
- Trigger Argo CD to deploy (sync) the sample application to your Kubernetes cluster.
Finally, to configure the CI/CD pipeline to trigger Git events:
- Set up the
GitHubSourceresource that triggers your Tekton pipeline by registering the required webhook with your GitHub application repository. - Set up an
EventListenerthat triggers and processes incoming events from theGitHubSource. - Set up a
TriggerTemplatethat instantiates aPipelineresource (and associatedTasks) each time theEventListeneris triggered. - Set up a
TriggerBindingresource to populate theTriggerTemplateinput parameters with data extracted from the GitHub event.
The following diagram below illustrates the CI/CD process implemented using Tekton and Argo:
This blueprint provides all the necessary manifests to create resources, such as Tekton CRDs and Knative CRDs, in your Kubernetes cluster via Kustomize. You will find everything inside the tekton folder, including the kustomization manifest. You can look at each and see how it’s being used.
The following shows how the tekton kustomization folder is structured:
OutputDOKS-CI-CD/assets/manifests/tekton/
├── configs
│   ├── argocd
│   │   ├── auth.env
│   │   └── server.env
│   ├── docker
│   │   ├── config.json
│   │   └── registry.yaml
│   └── github
│       ├── githubsource.yaml
│       └── pat.env
├── eventing
│   ├── tekton-ci-cd-channel-subscribers.yaml
│   ├── tekton-ci-cd-channel.yaml
│   └── tekton-ci-cd-github-source.yaml
├── pipelines
│   └── tekton-argocd-build-deploy.yaml
├── tasks
│   └── argocd-task-create-app.yaml
├── triggers
│   ├── rbac.yaml
│   ├── tekton-argocd-build-deploy-event-listener.yaml
│   ├── tekton-argocd-build-deploy-trigger-binding.yaml
│   └── tekton-argocd-build-deploy-trigger-template.yaml
└── kustomization.yaml
The DOKS-CI-CD/assets/manifests/tekton/ folder structure is explained below:
configs: Contains configuration files for the secret and configmap generators used in the kustomization file. This folder is further broken into:argocd: Contains ArgoCD configurations and secrets.docker- contains the registry configuration file used to push images to the DigitalOcean Docker registry.github: Contains your PAT (Personal Access Token) credentials.
eventing: Contains all manifest files required to configure Knative Eventing to trigger the Tekton CI/CD pipeline. The following manifests are present here:tekton-ci-cd-github-source.yaml: Configures theGitHubSourceCRD used in this tutorial (in-depth explanations can be found inside).tekton-ci-cd-channel-subscribers.yaml: This is optional and not being used by the kustomization from this tutorial. Provided as an example for how to use Knative Eventing subscriptions feature.tekton-ci-cd-channel.yaml- This is optional and not being used by the kustomization from this tutorial. Provided as an example for how to use Knative Eventing channels feature.
pipelines: Contains configuration files for the Tekton CI/CD Pipeline used in this tutorial. Following manifests are present here:tekton-argocd-build-deploy.yaml: Contains the definition for the CI/CD pipeline (in-depth explanations can be found inside).
tasks: Contains configuration files for custom Tekton Tasks used in this tutorial. Following manifests are present here:argocd-task-create-app.yaml: Defines the Argo CD task for creating new applications.
triggers: Contains configuration files for the Tekton Triggers used in this tutorial. The following manifests are present here:rbac.yaml- defines the service account and required role bindings used by the Tekton EventListener from this tutorial. This is required by the EventListener to instantiate resources, such as the Tekton CI/CD pipeline.tekton-argocd-build-deploy-event-listener.yaml- contains the definition for the Tekton EventListener used in this tutorial (in-depth explanations can be found inside).tekton-argocd-build-deploy-trigger-binding.yaml: Contains the definition for the Tekton TriggerBinding used this tutorial (in-depth explanations can be found inside).tekton-argocd-build-deploy-trigger-template.yaml: Contains the definition for the Tekton TriggerTemplate used in this tutorial (in-depth explanations can be found inside).
kustomization.yaml: This is the main kustomization file (in-depth explanations can be found inside).
Note: The configs folder used by Kustomize contains sensitive data. Use a .gitignore file to exclude committing those files in your Git repository.
Steps to follow to create all required resources in your Kubernetes cluster, via Kustomize:
- Edit and save each property file from the
DOKS-CI-CD/assets/manifests/tekton/configssubfolder, making sure to replace the<>placeholders accordingly. For example, you can use VS Code:
code DOKS-CI-CD/assets/manifests/tekton/configs/argocd/auth.env
code DOKS-CI-CD/assets/manifests/tekton/configs/docker/config.json
code DOKS-CI-CD/assets/manifests/tekton/configs/github/pat.env
Tips: To obtain the Argo CD admin password, use the following command:
kubectl -n argocd get secret argocd-initial-admin-secret -o jsonpath="{.data.password}" | base64 -d; echo
- To obtain your DigitalOcean Container Registry
read/writecredentials, you can use the following command and write results directly in theconfig.jsonfile:
doctl registry docker-config --read-write <YOUR_DOCKER_REGISTRY_NAME_HERE> > DOKS-CI-CD/assets/manifests/tekton/configs/docker/config.json
- Edit the
configs/GitHub/GitHub source.yamlfile and replace the<>placeholders accordingly, then save the changes. For example, you can use VS Code:
code DOKS-CI-CD/assets/manifests/tekton/configs/github/githubsource.yaml
- Edit the
configs/docker/registry.yamlfile and replace the<>placeholders accordingly, then save changes. For example, you can use VS Code:
code DOKS-CI-CD/assets/manifests/tekton/configs/docker/registry.yaml
- Finally, apply all changes via Kustomize (
-kflag):
kubectl apply -k DOKS-CI-CD/assets/manifests/tekton
After Kustomize finishes, you should have all required resources created in your cluster in the doks-ci-cd namespace.
First, check the eventing resources state (the GitHubSource):
kubectl get githubsources -n doks-ci-cd
The output looks similar to (READY column should display True, and SINK should point to the EventListener service URI):
OutputNAME                         READY   REASON   SINK                                                                                    AGE
tekton-ci-cd-github-source   True             http://el-tekton-argocd-build-deploy-event-listener.doks-ci-cd.svc.cluster.local:8080   36s
The above output shows you that the EventListener of your Tekton CI/CD pipeline is connected (via the SINK column value) to the GitHubSource CRD to receive GitHub events.
Next, check associated Knative Services:
kn services list -n doks-ci-cd
The output looks similar to:
OutputNAME                               URL                                                                      LATEST                                  READY
hello                              https://hello.doks-ci-cd.starter-kit.online                              hello-world                             True
tekton-ci-cd-github-source-7cgcw   https://tekton-ci-cd-github-source-7cgcw.doks-ci-cd.starter-kit.online   tekton-ci-cd-github-source-7cgcw-00001  True
You should see a tekton-ci-cd-github-source-xxxx service running, and in the READY state. This service is responsible for receiving events from GitHub. The tekton-ci-cd-github-source-xxxx service URL should be also registered as a webhook in your forked repo. Navigate to the Settings of your forked GitHub repository and check the Webhooks section. A new webhook should be listed with a green check mark:
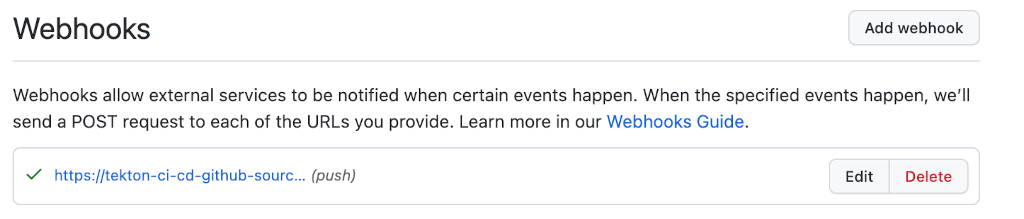
It points to the same URL as displayed in the Knative services listing. On the other hand, you can also inspect the events being sent by GitHub (including response status).
Finally, check important Tekton resources status, such as pipelines, triggers, and event listeners:
tkn pipeline list -n doks-ci-cd
tkn pipelinerun list -n doks-ci-cd
tkn triggertemplate list -n doks-ci-cd
tkn eventlistener list -n doks-ci-cd
Tip: For troubleshooting, you can inspect each resource events and logs, via the corresponding subcommand as shown below:
- Describing Tekton pipeline resources using the
describesubcommand:
tkn pipeline describe tekton-argocd-build-deploy-pipeline -n doks-ci-cd
tkn pipelinerun describe <tekton-argocd-build-deploy-pipeline-run-zt6pt-r-r7wgw> -n doks-ci-cd
- Inspecting Tekton pipeline resources logs using the
logssubcommand:
tkn pipeline logs tekton-argocd-build-deploy-pipeline -n doks-ci-cd
tkn pipelinerun logs tekton-argocd-build-deploy-pipeline-run-zt6pt-r-r7wgw  -n doks-ci-cd
Next, you will test the CI/CD pipeline flow by pushing some changes to the tekton-sample-app repository prepared in the Forking the Sample Application Repo step. Then, you will access the Tekton dashboard and watch a live demonstration of how the pipeline triggers automatically and execution of steps.
Step 9: Test the CI/CD Setup
You will begin testing the CI/CD flow by changing the knative-service resource from the application repo to point to your container registry.
First, clone the git repository prepared in the Fork the Sample Application Repo step (make sure to replace the <> placeholders accordingly):
git clone git@github.com:<YOUR_GITHUB_USER_NAME_HERE>/kubernetes-sample-apps.git
Then, change the directory to your local clone:
cd kubernetes-sample-apps
Next, edit the game-2048-example/knative-service.yaml manifest file to point to your Docker registry. For example you can use VS Code (make sure to replace the <> placeholders accordingly):
code game-2048-example/knative-service.yaml
Save and commit knative-service.yaml file changes to your GitHub repository. Next, port-forward the tekton dashboard service:
kubectl port-forward svc/tekton-dashboard -n tekton-pipelines 9097:9097
Now, launch your Web browser and access localhost:9097. Then, navigate to PipelineRuns - you should see your Tekton CI/CD pipeline running:
.png)
If you click on it, you should see each Task execution status and logs:
.png)
Note: Initially, you may get a failed pipeline run as well. When the webhook is created for the first time, GitHub sends a specific payload to test your GitHubSource endpoint to check if it’s alive. The payload content is invalid for the Tekton pipeline and causes the pipeline to fail.
You can access your application endpoint and play the game. First, list all Knative routes from the doks-ci-cd namespace:
kn route list -n doks-ci-cd
The output looks similar to:
OutputNAME                               URL                                                                      READY
game-2048                          https://game-2048.doks-ci-cd.starter-kit.online                          True
hello                              https://hello.doks-ci-cd.starter-kit.online                              True
tekton-ci-cd-github-source-7cgcw   https://tekton-ci-cd-github-source-7cgcw.doks-ci-cd.starter-kit.online   True
A new entry should be present named game-2048, and in a READY state with HTTPS enabled in the URI field. Open a Web browser and paste the link shown in the URL column. The 2048 game should start successfully:
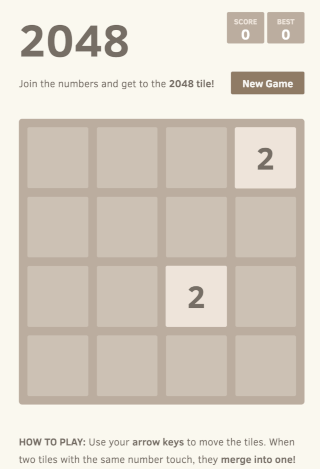
If everything looks like the above, then you created and tested your first Tekton CI/CD pipeline successfully.
Conclusion
In this guide, you learned how to combine software components (such as Knative, Tekton and Argo) to create a simple CI/CD pipeline running entirely on Kubernetes. You also learned how to configure and use Knative Serving and Eventing to do useful work for you and ease application development on Kubernetes. Then, by using Knative Eventing and Tekton EventListeners, you enabled automatic CI/CD flow triggering each time a change is pushed to the application GitHub repository. Finally, Argo CD closes the loop and deploys your custom application on Kubernetes as a Knative service.
Next Steps
Argo CD is a GitOps tool that can keep both application and Kubernetes-specific configuration in sync with dedicated GitHub repositories. You can use a dedicated repository for automatically configuring your DOKS cluster with all the steps used in this guide. From a practical point of view, you can fork the container-blueprints repository and tell Argo CD to sync all Kubernetes configuration manifests with your cluster. This way, you don’t need to redo all steps by hand again and let Argo handle it automatically, as well as future upgrades for all software components used in this guide.
You can also let Argo CD manage Helm releases as well majority of DigitalOcean Marketplace 1-Click apps use Helm to deploy software components.
Thanks for learning with the DigitalOcean Community. Check out our offerings for compute, storage, networking, and managed databases.
About the author(s)
I help Businesses scale with AI x SEO x (authentic) Content that revives traffic and keeps leads flowing | 3,000,000+ Average monthly readers on Medium | Sr Technical Writer(Team Lead) @ DigitalOcean | Ex-Cloud Consultant @ AMEX | Ex-Site Reliability Engineer(DevOps)@Nutanix
Still looking for an answer?
This textbox defaults to using Markdown to format your answer.
You can type !ref in this text area to quickly search our full set of tutorials, documentation & marketplace offerings and insert the link!
hi, im getting this error when running your knative event sourcing
error: error parsing https://github.com/digitalocean/container-blueprints/blob/main/DOKS-CI-CD/assets/manifests/knative-eventing/github-eventing-v1.4.0.yaml: error converting YAML to JSON: yaml: line 229: mapping values are not allowed in this context
 This work is licensed under a Creative Commons Attribution-NonCommercial- ShareAlike 4.0 International License.
Become a contributor for community
Get paid to write technical tutorials and select a tech-focused charity to receive a matching donation.

DigitalOcean Documentation
Full documentation for every DigitalOcean product.

Resources for startups and AI-native businesses
The Wave has everything you need to know about building a business, from raising funding to marketing your product.
The developer cloud
Scale up as you grow — whether you're running one virtual machine or ten thousand.

Start building today
From GPU-powered inference and Kubernetes to managed databases and storage, get everything you need to build, scale, and deploy intelligent applications.
