By Cristian Marius Tiutiu, Bikram Gupta and Anish Singh Walia

Introduction
In this tutorial, you will learn to:
- Use
fluxCLI to provisionFlux CDto yourDOKScluster. - Keep your
Kubernetescluster applications state synchronized with aGitrepository (useGitOpsprinciples). - Install and manage applications via
Flux CD HelmReleases. - Install and manage
Sealed Secretscontroller viaFlux CDto encrypt sensitive data.
After finishing all the steps from this tutorial, you should have a DOKS cluster with Flux CD deployed, that will:
- Handle cluster reconciliation via GitRepository CRD.
- Handle Helm releases, via HelmRelease CRDs
Flux CD helps you synchronize the state of your infrastructure using Git as the source of truth, thus following GitOps principles. Flux also helps you implement continuous delivery for your applications. It knows how to handle Helm releases as well, thus you can control application deployment and lifecycle via the standard package manager for Kubernetes.
The process of synchronizing your DOKS cluster state with a Git repository, is called reconciliation. Reconciliation makes sure that your applications state match a desired state declaratively defined somewhere (can be a Git repository, Helm repository or a S3 bucket).
Flux CD provides several ways to achieve reconciliation:
- HelmRelease: matches state using Helm releases (also performs a release if not present).
- Bucket: matches state using contents of objects coming from S3 compatible storage.
- Kustomization: matches state using
kustomizationmanifests defined in a Git repository or S3 bucket.
For each of the enumerated resources, there is an associated controller containing necessary logic to fetch artifacts containing declarative state manifests, and apply required changes to your cluster (maintain desired state):
- Source Controller: manages Git repositories, Helm repositories, Bucket storage, etc.
- Helm Controller: manages Helm releases.
- Kustomize Controller: manages Kustomizations.
A special component used by Flux is the Source CRD (Custom Resource Definition). Flux CD treats sources as a way of fetching artifacts containing state configuration (e.g. Git repositories, Helm repositories, S3 buckets, etc).
Starter Kit is using the Git repository source type and HelmReleases for maintaining application state. Every chapter of the Starter Kit is using Helm to perform application deployment, so it’s a natural choice to rely on HelmReleases to do the job.
In terms of system observability, Flux CD provides support for various alerting/notification solutions via the Notification Controller, such as:
System monitoring and logging:
- Prometheus (official guide).
- Loki.
DOKS and Flux CD Automation Overview
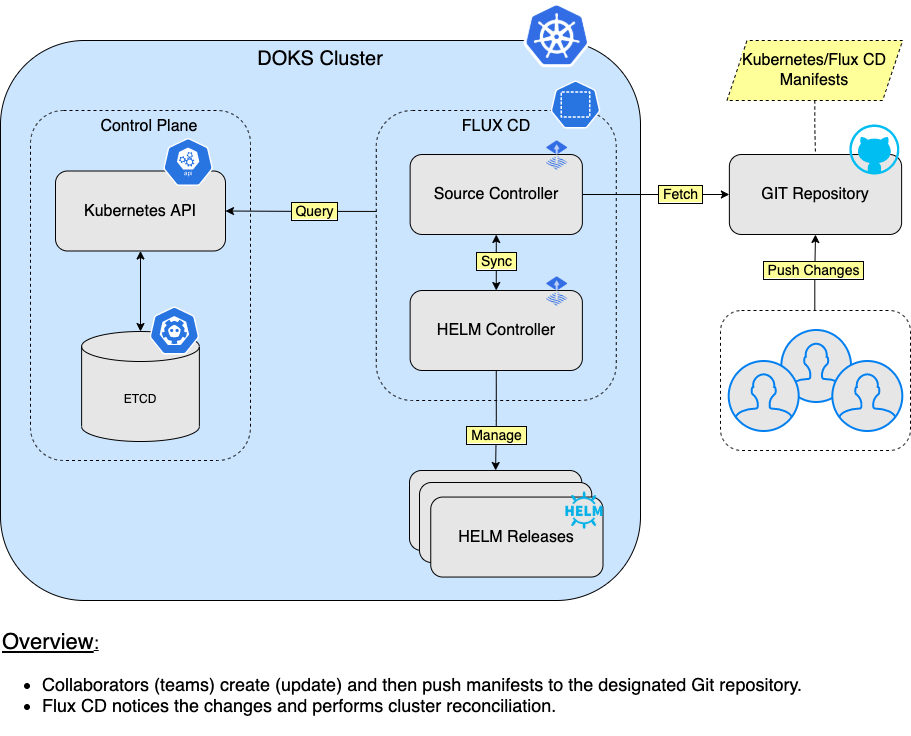
Table of Contents
- Introduction
- Prerequisites
- Understanding Flux CD Concepts for Automated Helm Releases
- Step 1 - Bootstrapping Flux CD
- Step 4 - Cloning the Flux CD Git Repository and Preparing the Layout
- Step 5 - Creating the Sealed Secrets Helm Release
- Step 6 [OPTIONAL] - Creating the Cert-Manager Helm Release
- Step 7 - Creating the Ingress Controller Helm Release
- Step 8 - Creating the Prometheus Stack Helm Release
- Step 9 - Creating the Loki Stack Helm Release
- Step 10 - Creating the Velero Helm Release
- Conclusion
Prerequisites
To complete this tutorial, you will need:
- A working
DOKScluster that you have access to. Please follow the Starter Kit DOKS Setup Guide to find out more. - A GitHub repository and branch, to store Flux CD and your applications manifests.
- A Git client, for cloning the
Starter Kitrepository. - Kubectl CLI, for
Kubernetesinteraction. Follow these instructions to connect to your cluster withkubectlanddoctl. - Flux CLI, to deploy and interact with
Flux CD. - Kubeseal, for encrypting secrets and Sealed Secrets Controller interaction.
Understanding Flux CD Concepts for Automated Helm Releases
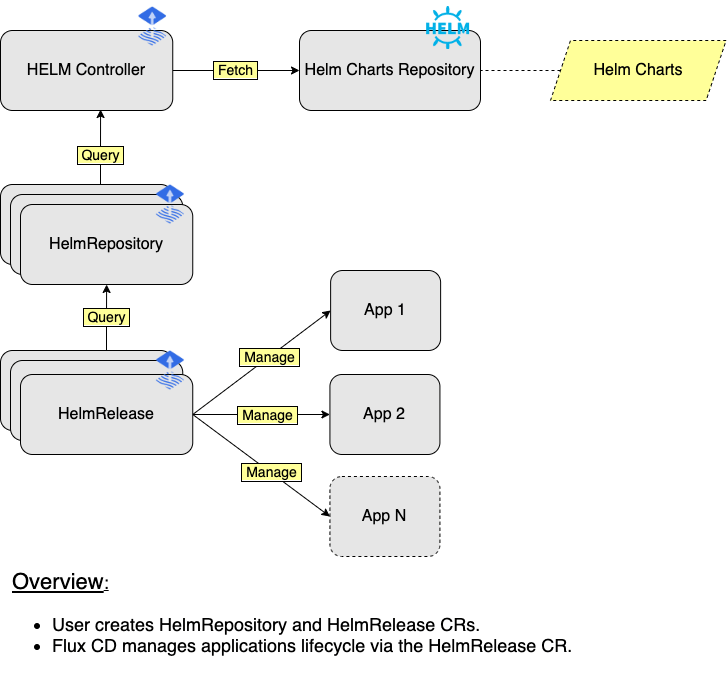
The way Flux CD knows how to handle Helm releases is via a dedicated custom resource definition named HelmRelease. Next, each HelmRelease makes use of a HelmRepository CRD, to fetch the required chart to install. So, a HelmRepository is the source of Helm charts for the HelmRelease to consume.
You have some familiarity now with Helm installations performed via CLI (each section of the Starter Kit makes use of it). Flux CD is achieving the same thing via the Helm Controller. You define manifests that make use of specific CRDs (HelmRepository, HelmRelease), which in turn instruct the Helm Controller to perform the same steps as the helm CLI counterpart (helm install/upgrade).
Below picture shows FluxCD Helm CRs relationship:
Using HelmRepository CRD to Define Helm Repositories
The HelmRepository CRD is used by Flux CD to handle Helm repositories and fetch the charts from remote (the CLI equivalent of helm repo add <name> <url> and helm repo update).
Typical structure of a HelmRepository manifest looks like below:
apiVersion: source.toolkit.fluxcd.io/v1beta1
kind: HelmRepository
metadata:
  name: ambassador
  namespace: flux-system
spec:
  interval: 10m0s
  url: https://app.getambassador.io
Explanations for the above configuration:
<kind>: Tells Flux CD what type ofCRDthe manifest is using (HelmRepository, in above example).<metadata.name>: Name of theHelmRepositoryCRD (ambassador, in above example).<metadata.namespace>: Namespace to use for theHelmRepositoryresource (flux-system, in above example).<spec.interval>: Time interval to use for synchronizing with the remote Helm repository (to fetch new chart releases metadata - CLI equivalent of:helm repo update).<spec.url>: Helm chart repository URL.
Using HelmRelease CRD to Install Helm Charts
The HelmRelease CRD is used by Flux CD to handle Helm releases in your DOKS cluster (the CLI equivalent of helm install <name> <chart> -f <values.yaml>). It can also take care of upgrades, as well as how to recover in case of a failure, like: how many retries to perform for a failed install operation, rollbacks, etc.
Each HelmRelease makes use of a source type, so that it knows where to pull the Helm chart from:
- HelmRepository, for use with
Helmchart repositories. - GitRepository, for use with
Gitrepositories. - S3 Bucket, for use with
S3compatible buckets.
Typical structure of a HelmRelease manifest, looks like below:
apiVersion: helm.toolkit.fluxcd.io/v2beta1
kind: HelmRelease
metadata:
  name: ambassador-stack
  namespace: flux-system
spec:
  chart:
    spec:
      chart: edge-stack
      sourceRef:
        kind: HelmRepository
        name: ambassador
      version: 7.3.2
  install:
    createNamespace: true
  interval: 1m0s
  targetNamespace: ambassador
Explanations for the above configuration:
<kind>: Tells Flux CD what type ofCRDthe manifest is using (HelmRelease, in above example).<metadata.name>: Name of theHelmReleaseCRD (ambassador-stack, in above example).<metadata.namespace>: Namespace to use for theHelmReleaseresource (flux-system, in above example).<chart.spec.chart>: Specifies thechart nameto fetch and install from theHelmRepository(ambassador, in above example).<chart.spec.sourceRef.kind>: Tells Flux CD to use aHelmRepositoryresource for fetching Helm charts (this is a good example that illustrates CRDs dependency).<chart.spec.sourceRef.name>: HelmRepository CRD name to reference.<chart.spec.version>: version of the Helm chart to install.<spec.install.createNamespace>: Tells Flux CD if a namespace needs to be created before installing the chart (Helm CLI equivalent of:helm install --create-namespace).<spec.interval>: Time interval at which to reconcile the Helm release.<spec.targetNamespace>: Namespace to place the Helm release (Helm CLI equivalent of:helm install --namespace <name>).
Using HelmRelease CRD to Override Helm Values
Each Flux CD HelmRelease can override values via a values file - the equivalent of helm install <name> <chart> -f values.yaml, or by setting each value individually - the equivalent of helm instal <name> <chart> --set <key> <value>.
Flux CD lets you override Helm values via two spec types:
<spec.values>: Allows you to override valuesinlineas seen in a standardvalues.yamlfile). This is the equivalent of:helm install -f <values_file>.<spec.valuesFrom>: Allows you to override valuesindividually, by using each keyfully qualified pathfrom the values file (e.g.:aws.access_key_id). This is the equivalent ofhelm install --set <key> <value>.
Typical usage of spec.values:
...
spec:
  values:
    loki:
      enabled: true
      config:
        schema_config:
          configs:
            - from: "2020-10-24"
              store: boltdb-shipper
              object_store: aws
              schema: v11
              index:
                prefix: index_
                period: 24h
...
Explanations for the above configuration:
<spec.values>: Holds application specific key-value pairs, just as a Helm values file does.
As mentioned earlier, the <spec.values> field stores key-value pairs exactly as seen in the YAML file. It means that sensitive data, like DO Spaces credentials or API tokens will be exposed, and that is not a good thing. Flux CD has a solution for this situation, meaning you can override values from other data sources like Kubernetes Secrets or ConfigMaps (can be secured by using protected namespaces).
Typical usage of spec.valuesFrom in combination with a Kubernetes Secret (the below example expects that the do-credentials Kubernetes secret to be created beforehand):
spec:
  valuesFrom:
    - kind: Secret
      name: do-credentials
      valuesKey: spaces_access_key
      targetPath: aws.access_key_id
Explanations for the above configuration:
<spec.valuesFrom.kind>: Kind of the values referent (Kubernetes Secret, in this example - can be aConfigMapas well).<spec.valuesFrom.name>: Name of the values referent (e.g. KubernetesSecret), in thesame namespaceas theHelmRelease.<spec.valuesFrom.valuesKey>: The data key where a specific value can be found (defaults tovalues.yamlwhen omitted).<spec.valuesFrom.targetPath>: TheYAMLdot notationpathat which the value should be merged. When set, thevaluesKeyis expected to be a single flat value (defaults toNonewhen omitted, which results in thevaluesgettingmergedat theroot).
You can have a combination of spec.values for storing non-sensitive data, and spec.valuesFrom that reference Kubernetes secrets for sensitive data. In the end, each Flux CD HelmRelease will merge all the values together, so you can benefit from both worlds. In fact, this is how Helm works, so the same principles apply.
In a GitOps flow, it’s not wise to store Kubernetes Secrets directly in a Git repository, so you’re going to use Sealed Secrets to encrypt sensitive data.
Using Sealed Secrets Controller to Encrypt Kubernetes Secrets
Sealed Secrets allows you to encrypt generic Kubernetes secrets and store them safely in Git (even in public repositories). Then, Flux CD will create a corresponding Sealed Secret Object in your cluster when syncing the Git repository. Sealed Secrets Controller notices the sealed objects, and decrypts each to a classic Kubernetes secret. Applications can consume the secrets as usual.
Flux CD Sealed Secrets GitOps Flow:
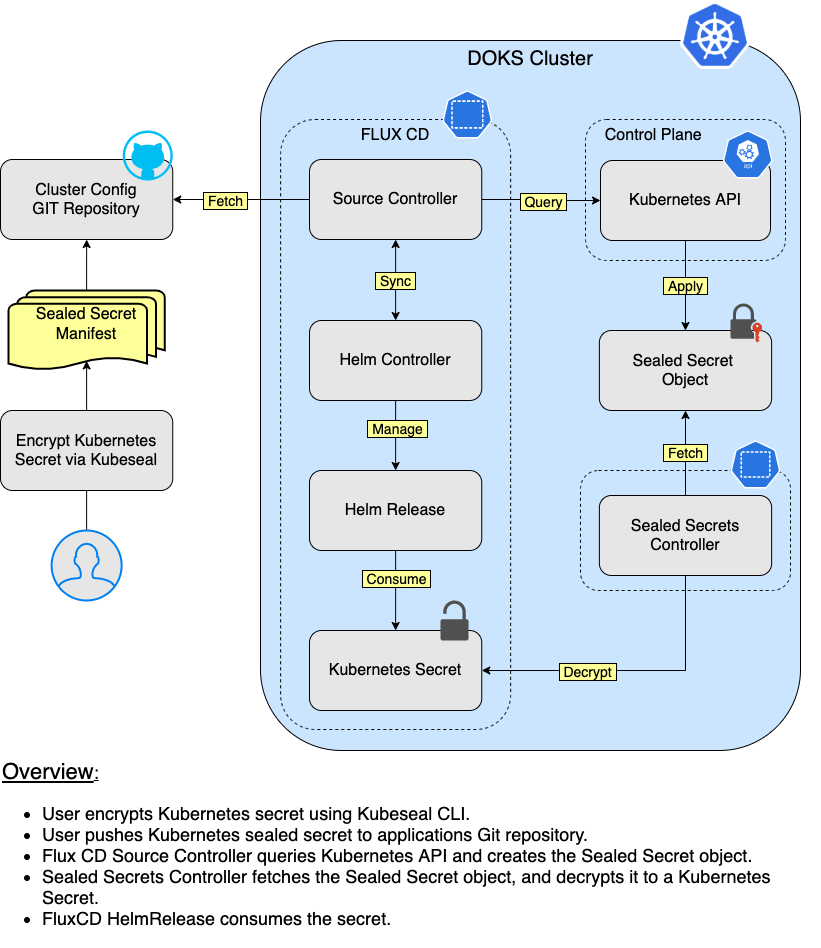
For more details, please refer to Section 06 - Encrypt Kubernetes Secrets.
Next, you will learn how to deploy Flux CD to your DOKS cluster.
Step 1 - Bootstrapping Flux CD
Flux CD provides a CLI binary which you can use for provisioning Flux CD itself, as well as for main system interaction. Using the flux bootstrap subcommand, you can install Flux on a Kubernetes cluster and configure it to manage itself from a Git repository.
If the Flux components are present on the cluster, the bootstrap command will perform an upgrade if needed. The bootstrap is idempotent, it’s safe to run the command as many times as you want.
Bootstrapping Flux CD on an existing DOKS cluster:
- Generate a personal access token (PAT) that can create repositories by checking all permissions under
repo. - Export your GitHub personal access token as an environment variable (make sure to replace the
<>placeholders accordingly):
export GITHUB_TOKEN=<YOUR_PERSONAL_ACCESS_TOKEN_HERE>
- Run the bootstrap for a repository on your personal GitHub account (make sure to replace the
<>placeholders accordingly):
flux bootstrap github \
  --owner=<YOUR_GITHUB_USER> \
  --repository=<YOUR_GITHUB_REPOSITORY_NAME> \
  --path=clusters/dev \
  --personal
Explanations for the above command:
--owner: Holds your GitHub user name.--repository: Git repository to use by Flux CD (the repository will be created if it doesn’t exist).--path: Directory path to use inside the repository to store all manifests (the directory path will be created if it doesn’t exist). This argument is important, because Flux CD will monitor all changes happening under the directory path you define here.
The flux bootstrap command will create the specified GitHub repository if it doesn’t exist, and will start the provisioning process for Flux CD. In the end, you should have a bunch of YAML manifests created in your Git repository, as well as all Kubernetes resources required by Flux CD to work.
Next, you can perform some sanity checks via:
flux check
The output looks similar to the following:
Output► checking prerequisites
✔ Kubernetes 1.21.9 >=1.20.6-0
► checking controllers
✔ helm-controller: deployment ready
► ghcr.io/fluxcd/helm-controller:v0.17.2
✔ kustomize-controller: deployment ready
► ghcr.io/fluxcd/kustomize-controller:v0.21.1
✔ notification-controller: deployment ready
► ghcr.io/fluxcd/notification-controller:v0.22.3
✔ source-controller: deployment ready
► ghcr.io/fluxcd/source-controller:v0.21.2
✔ all checks passed
Then, inspect all Flux CD resources via:
flux get all
The output looks similar to the following (you can notice the gitrepository/flux-system component fetching the latest revision from your main branch, as well as the kustomization/flux-system component):
OutputNAME                            READY   MESSAGE                         REVISION        SUSPENDED
gitrepository/flux-system       True    Fetched revision: main/6e9b41b  main/6e9b41b    False

NAME                            READY   MESSAGE                         REVISION        SUSPENDED
kustomization/flux-system       True    Applied revision: main/6e9b41b  main/6e9b41b    False
In case you need to perform some troubleshooting, and see what Flux CD is doing, you can access the logs via:
flux logs
The output looks similar to the following:
Output...
2022-03-17T10:47:21.976Z info Kustomization/flux-system.flux-system - server-side apply completed
2022-03-17T10:47:22.662Z info Kustomization/flux-system.flux-system - server-side apply completed
2022-03-17T10:47:22.702Z info Kustomization/flux-system.flux-system - Reconciliation finished in 9.631064885s, next run in 10m0s
2022-03-17T10:47:19.167Z info GitRepository/flux-system.flux-system - Discarding event, no alerts found for the involved object
2022-03-17T10:47:22.691Z info Kustomization/flux-system.flux-system - Discarding event, no alerts found for the involved object
2022-03-17T10:47:22.709Z info Kustomization/flux-system.flux-system - Discarding event, no alerts found for the involved object
2022-03-17T10:47:19.168Z info GitRepository/flux-system.flux-system - Reconciliation finished in 7.79283477s, next run in 1m0s
2022-03-17T10:48:20.594Z info GitRepository/flux-system.flux-system - Reconciliation finished in 1.424279853s, next run in 1m0s
...
Finally, check that Flux CD points to your Git repository:
kubectl get gitrepositories.source.toolkit.fluxcd.io -n flux-system
The output looks similar to (notice the URL column value - should point to your Git repository, and the READY state set to True):
OutputNAME         URL                                                       READY  STATUS                             AGE
flux-system  ssh://git@github.com/test-starterkit/starterkit_fra1.git  True   Fetched revision: main/6e9b41b...  9m59s
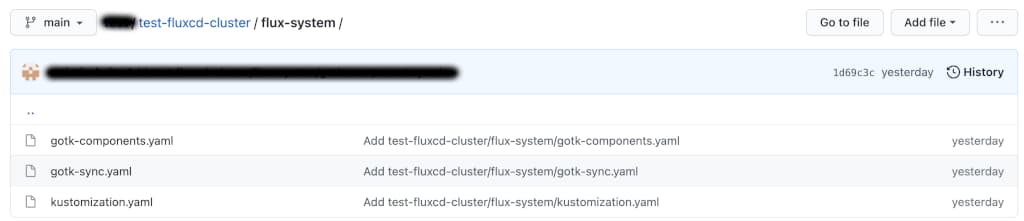
You should also see a bunch of Flux CD system manifests present in your Git repository as well:
In the next step, you will prepare the Git repository layout for use in this tutorial. Flux CD is watching for changes present in the --path argument that you passed to the flux bootstrap command. Starter Kit is using the clusters/dev directory path. You can create any directory structure under the clusters/dev path to keep things organized. Flux CD will perform a recursive search for all manifests under the clusters/dev path.
You can throw all the manifests under the Flux CD sync path (e.g. clusters/dev), but it’s best practice to keep things organized and follow naming conventions as much as possible to avoid frustration in the future.
Step 4 - Cloning the Flux CD Git Repository and Preparing the Layout
In this step, you will learn how to organize your Git repository used by Flux CD to sync your DOKS cluster state. For simplicity, this tutorial is based on a mono repo structure and uses a single environment to hold all your manifests (e.g., clusters/dev). You can check the official Flux CD documentation for some guidance on how to set up your Git repository structure.
Please make sure that the following steps are performed in order:
- First, clone your Flux CD Git repository. This is the
main repositoryused for yourDOKSclusterreconciliation(please replace the<>placeholders accordingly):
git clone https://github.com/<YOUR_GITHUB_USER>/<YOUR_GITHUB_REPOSITORY_NAME>.git
Explanations for the above command:
<YOUR_GITHUB_USER>- your GitHubusernameas defined by the--ownerargument of the flux bootstrap command.<YOUR_GITHUB_REPOSITORY_NAME>- GitHub repository name used for yourDOKSclusterreconciliationas defined by the--repositoryargument of the flux bootstrap command.
- Next, change the directory where your Flux CD
Gitrepository was cloned, and check out the correct branch (usuallymain). - Now, create the
directory structureto store Flux CDHelmRepository,HelmReleaseandSealedSecretmanifests for each component of theStarter Kit. Please replace theFLUXCD_SYNC_PATHvariable value with yourFlux CDcluster sync directory path, as defined by the--pathargument of the flux bootstrap command (Starter Kit is using theclusters/devpath):
FLUXCD_SYNC_PATH="clusters/dev"
FLUXCD_HELM_MANIFESTS_PATH="${FLUXCD_SYNC_PATH}/helm"
mkdir -p "${FLUXCD_HELM_MANIFESTS_PATH}/repositories"
mkdir -p "${FLUXCD_HELM_MANIFESTS_PATH}/releases"
mkdir -p "${FLUXCD_HELM_MANIFESTS_PATH}/secrets"
- Finally, add the
.gitignorefile toavoidcommittingunencryptedHelm value files in your repository that may contain sensitive data. Using your favoritetext editor, paste the following (the below example is using theStarter Kitnaming convention):
Output# Ignore all YAML files containing the `-values-` string.
*-values-*.yaml

# Do not ignore sealed YAML files.
!*-sealed.yaml
After finishing all the steps from this tutorial, you should have a Git repository structure similar to:
├── README.md
├── clusters
│   └── dev
│       ├── flux-system
│       │   ├── gotk-components.yaml
│       │   ├── gotk-sync.yaml
│       │   └── kustomization.yaml
│       └── helm
│           ├── releases
│           │   ├── ambassador-stack-v7.3.2.yaml
│           │   ├── loki-stack-v2.6.4.yaml
│           │   ├── prometheus-stack-v35.5.1.yaml
│           │   ├── sealed-secrets-v2.4.0.yaml
│           │   └── velero-v2.29.7.yaml
│           ├── repositories
│           │   ├── ambassador.yaml
│           │   ├── grafana.yaml
│           │   ├── prometheus-community.yaml
│           │   ├── sealed-secrets.yaml
│           │   └── vmware-tanzu.yaml
│           └── secrets
│               ├── do-api-credentials-sealed.yaml
│               ├── do-spaces-credentials-sealed.yaml
│               └── prometheus-stack-credentials-sealed.yaml
└── pub-sealed-secrets-dev-cluster.pem
Next, you’re going to provision the required Flux CD manifests for each component of the Starter Kit. Then, you will inspect and commit each manifest to your Git repository used by Flux CD to reconcile your DOKS cluster. For sensitive data, a Kubernetes Secrets will be created and encrypted using Sealed Secrets, and then stored in your Git repository as well.
The first example will make use of the Flux CLI for you to accommodate and get familiarized with creating manifests via the CLI. Then, you will use the already prepared manifests provided by the Starter Kit repository to speed up the steps from this tutorial.
You’re going to start with the Sealed Secrets Helm release first because it’s a prerequisite for the rest of the Starter Kit components.
Step 5 - Creating the Sealed Secrets Helm Release
In this step, you will learn how to create manifests using the Flux CLI, to define the Sealed Secrets Helm release. Then, Flux will trigger the Sealed Secrets Controller installation process for your DOKS cluster.
Please use the following steps to create the required manifests for the Sealed Secrets Helm release:
- First, change the directory where your
Flux CDGit repository was cloned. Also, please check that the required directory structure for this tutorial is created and that theFLUXCD_HELM_MANIFESTS_PATHenvironment variable is set (please refer to Step 4 - Cloning the Flux CD Git Repository and Preparing the Layout, for details). - Then, create the
Sealed SecretsHelmRepository manifest forFlux:
flux create source helm sealed-secrets \
--url="https://bitnami-labs.github.io/sealed-secrets" \
--interval="10m" \
--export > "${FLUXCD_HELM_MANIFESTS_PATH}/repositories/sealed-secrets.yaml"
Explanations for the above command:
--url: Helm repository address.--interval: Source sync interval (default1m0s).--export: Export inYAMLformat to stdout.
The output looks similar to (you can notice that it has a similar structure as explained in Using HelmRepository CRD to Define Helm Repositories):
apiVersion: source.toolkit.fluxcd.io/v1beta1
kind: HelmRepository
metadata:
  name: sealed-secrets
  namespace: flux-system
spec:
  interval: 10m0s
  url: https://bitnami-labs.github.io/sealed-secrets
- Next, fetch the
Starter Kitvalues file forSealed Secrets. Please make sure to inspect the values file first and replace the<>placeholders where needed:
SEALED_SECRETS_CHART_VERSION="2.4.0"
curl "https://raw.githubusercontent.com/digitalocean/Kubernetes-Starter-Kit-Developers/main/06-kubernetes-secrets/assets/manifests/sealed-secrets-values-v${SEALED_SECRETS_CHART_VERSION}.yaml" > "sealed-secrets-values-v${SEALED_SECRETS_CHART_VERSION}.yaml"
- Now, create the
Sealed SecretsHelmRelease manifest forFlux CD.KubesealCLI expects by default to find the controller in thekube-systemnamespace and to be namedsealed-secrets-controller, hence we override the release name via the--release-nameand--target-namespaceflags. This is not mandatory, butkube-systemis usually accessible only to power users (administrators):
SEALED_SECRETS_CHART_VERSION="2.4.0"

flux create helmrelease "sealed-secrets-controller" \
  --release-name="sealed-secrets-controller" \
  --source="HelmRepository/sealed-secrets" \
  --chart="sealed-secrets" \
  --chart-version "$SEALED_SECRETS_CHART_VERSION" \
  --values="sealed-secrets-values-v${SEALED_SECRETS_CHART_VERSION}.yaml" \
  --target-namespace="flux-system" \
  --crds=CreateReplace \
  --export > "${FLUXCD_HELM_MANIFESTS_PATH}/releases/sealed-secrets-v${SEALED_SECRETS_CHART_VERSION}.yaml"
Explanations for the above command:
--release-name: What name to use for the Helm release (defaults to<target-namespace>-<HelmRelease-name>otherwise).--source: Source that contains the chart in the format<kind>/<name>.<namespace>, where kind must be one of: (HelmRepository,GitRepository,Bucket).--chart: Helm chart name.--chart-version: Helm chart version.--values: Local path to values file.--target-namespace: Namespace to install this release.--crds: Upgrade CRDs policy, available options are: (Skip,Create,CreateReplace).--export: Export inYAMLformat to stdout.
The output looks similar to (you can observe that it has a similar structure as explained in Using HelmRelease CRD to Install Helm Charts):
---
apiVersion: helm.toolkit.fluxcd.io/v2beta1
kind: HelmRelease
metadata:
  name: sealed-secrets-controller
  namespace: flux-system
spec:
  chart:
    spec:
      chart: sealed-secrets
      sourceRef:
        kind: HelmRepository
        name: sealed-secrets
      version: 2.4.0
  interval: 1m0s
  releaseName: sealed-secrets-controller
  targetNamespace: flux-system
  install:
    crds: Create
  upgrade:
    crds: CreateReplace
  values:
    ingress:
      enabled: false
- Finally, commit
Gitchanges toremotebranch:
SEALED_SECRETS_CHART_VERSION="2.4.0"
git add "${FLUXCD_HELM_MANIFESTS_PATH}/repositories/sealed-secrets.yaml"
git add "${FLUXCD_HELM_MANIFESTS_PATH}/releases/sealed-secrets-v${SEALED_SECRETS_CHART_VERSION}.yaml"
git commit -am "Adding Sealed Secrets manifests for Flux CD"
git push origin
After completing the above steps, Flux CD will start your DOKS cluster reconciliation (in about one minute or so if using the default interval). If you don’t want to wait, you can always force reconciliation via:
flux reconcile source git flux-system
After a few moments, please inspect the Flux CD Sealed Secrets Helm release:
flux get helmrelease sealed-secrets-controller
The output looks similar to:
NAME                        READY   MESSAGE                                 REVISION        SUSPENDED
sealed-secrets-controller   True    Release reconciliation succeeded        2.4.0          False
Look for the READY column value - it should say True. Reconciliation status is displayed in the MESSAGE column, along with the REVISION number, which represents the Helm chart version. Please bear in mind that some releases take longer to complete (like Prometheus stack, for example), so please be patient.
- The
MESSAGEcolumn will displayReconciliation in progress, as long as theHelmControlleris installing the specifiedHelmchart. If something goes wrong, you’ll get another message stating the reason, so please make sure to check the Helm release state. - You can use the
--watchflag for example:flux get helmrelease <name> --wait, to wait until the command finishes. Please bear in mind that in this mode,Fluxwill block your terminal prompt until the default timeout of5 minutesoccurs (can be overridden via the--timeoutflag). - In case something goes wrong, you can search the
Fluxlogs and filterHelmReleasemessages only:
flux logs --kind=HelmRelease
- In case the
Fluxlogs do not offer sufficient information you can use thedescribecommand on thehelmreleaseusingkubectlas follows:
kubectl describe helmrelease sealed-secrets-controller -n flux-system
Exporting the Sealed Secrets Controller Public Key
To be able to encrypt secrets, you need the public key that was generated by the Sealed Secrets Controller when it was deployed by Flux CD in your DOKS cluster.
First, change the directory where you cloned your Flux CD Git repository, and do the following (please replace the <> placeholders accordingly):
kubeseal --controller-namespace=flux-system --fetch-cert > pub-sealed-secrets-<YOUR_DOKS_CLUSTER_NAME_HERE>.pem
If, for some reason, the kubeseal certificate fetch command hangs (or you get an empty/invalid certificate file), you can use the following steps to work around this issue:
- First, open a new terminal window and
exposetheSealed Secrets Controllerservice on yourlocalhost(you can useCTRL - Cto terminate after fetching the public key):
kubectl port-forward service/sealed-secrets-controller 8080:8080 -n flux-system
- Then, you can go back to your working terminal and fetch the public key (please replace the
<>placeholders accordingly):
curl --retry 5 --retry-connrefused localhost:8080/v1/cert.pem > pub-sealed-secrets-<YOUR_DOKS_CLUSTER_NAME_HERE>.pem
Finally, commit the public key file to the remote Git repository for later use (it’s safe to do this because the public key is useless without the private key which is stored in your DOKS cluster only). Please run bellow commands, and make sure to replace the <> placeholders accordingly:
git add pub-sealed-secrets-<YOUR_DOKS_CLUSTER_NAME_HERE>.pem
git commit -m "Adding Sealed Secrets public key for cluster <YOUR_DOKS_CLUSTER_NAME_HERE>"
git push origin
Important note:
In this tutorial the flux-system namespace is used to hold Kubernetes Secrets, so please ensure that it is restricted to regular users/ applications via RBAC.
Next, you will perform similar steps to define Helm releases for the remaining components of the Starter Kit.
Step 6 [OPTIONAL] - Creating the Cert-Manager Helm Release
If you want to have wildcard certificates support for your cluster, you need to provision Cert-Manager as well. This step is also required if proper TLS termination is needed for the Nginx Ingress Controller.
Steps to follow:
-
First, change the directory where your
Flux CDGit repository was cloned. Also, please check that the required directory structure for this tutorial is created, and that theFLUXCD_HELM_MANIFESTS_PATHenvironment variable is set (please refer to Step 4 - Cloning the Flux CD Git Repository and Preparing the Layout, for details). -
Then, fetch the Jetstack
HelmRepositorymanifest file provided by theStarter KitGit repository:curl "https://raw.githubusercontent.com/digitalocean/Kubernetes-Starter-Kit-Developers/main/14-continuous-delivery-using-gitops/assets/manifests/fluxcd/helm/repositories/jetstack.yaml" > "${FLUXCD_HELM_MANIFESTS_PATH}/repositories/jetstack.yaml" -
Now, fetch the Cert-Manager
HelmReleasemanifest file provided by theStarter KitGit repository:
CERT_MANAGER_CHART_VERSION="1.8.0"

curl "https://raw.githubusercontent.com/digitalocean/Kubernetes-Starter-Kit-Developers/main/14-continuous-delivery-using-gitops/assets/manifests/fluxcd/helm/releases/cert-manager-v${CERT_MANAGER_CHART_VERSION}.yaml" > "${FLUXCD_HELM_MANIFESTS_PATH}/releases/cert-manager-v${CERT_MANAGER_CHART_VERSION}.yaml"
- Next, inspect the downloaded
HelmReleasemanifest file using an editor of your choice (preferably withYAMLlint support), and adjust to your needs. For example, you can use VS Code (make sure to replace the<>placeholders accordingly, if present):
CERT_MANAGER_CHART_VERSION="1.8.0"
code "${FLUXCD_HELM_MANIFESTS_PATH}/releases/cert-manager-v${CERT_MANAGER_CHART_VERSION}.yaml"
- Finally, commit
Gitchanges toremotebranch:
CERT_MANAGER_CHART_VERSION="1.8.0"
git add "${FLUXCD_HELM_MANIFESTS_PATH}/repositories/jetstack.yaml"
git add "${FLUXCD_HELM_MANIFESTS_PATH}/releases/cert-manager-v${CERT_MANAGER_CHART_VERSION}.yaml"
git commit -am "Adding Cert-Manager manifests for Flux CD"
git push origin
After completing the above steps, Flux CD will start your DOKS cluster reconciliation (in about one minute or so, if using the default interval). If you don’t want to wait, you can always force reconciliation via:
flux reconcile source git flux-system
After a few moments, please inspect the HelmRelease status:
flux get helmrelease cert-manager
The output looks similar to:
OutputNAME                READY   MESSAGE                                 REVISION       SUSPENDED
cert-manager        True    Release reconciliation succeeded        v1.6.1         False
Look for the READY column value - it should say True. Reconciliation status is displayed in the MESSAGE column, along with the REVISION number, which represents the Helm chart version. Please remember that some releases take longer to complete (like Prometheus stack, for example), so please be patient.
- The
MESSAGEcolumn will displayReconciliation in progress, as long as theHelmControlleris installing the specifiedHelmchart. If something goes wrong, you’ll get another message stating the reason, so please make sure to check Helm release state. - You can use the
--watchflag for example:flux get helmrelease <name> --wait, to wait until the command finishes. Please bear in mind that in this mode,Fluxwill block your terminal prompt until the default timeout of5 minutesoccurs (can be overridden via the--timeoutflag). - In case something goes wrong, you can search the
Fluxlogs, and filterHelmReleasemessages only:
flux logs --kind=HelmRelease
- In case the
Fluxlogs do not offer sufficient information you can use thedescribecommand on thehelmreleaseusing ``kubectl` as follows:
kubectl describe helmrelease cert-manager -n flux-system
Next, you’re going to create Flux CD manifests for the Ambassador (or Nginx) ingress.
Step 7 - Creating the Ingress Controller Helm Release
In this step, you will use pre-made manifests to create your preferred Ingress Controller Helm release for Flux CD. Then, Flux will trigger the Ingress Controller installation process for your DOKS cluster.
There are two options available, depending on what Ingress Controller you feel most comfortable:
AmbassadorIngress Helm Release.NginxIngress Helm Release.
Steps to follow:
-
First, change the directory where your
Flux CDGit repository was cloned. Also, please check that the required directory structure for this tutorial is created and that theFLUXCD_HELM_MANIFESTS_PATHenvironment variable is set (please refer to Step 4 - Cloning the Flux CD Git Repository and Preparing the Layout, for details). -
Then, fetch the
HelmRepositorymanifest file provided by theStarter KitGit repository (please pick only one option, depending on whatIngress Controlleryou want to install and configure):
Ambassador Ingress:
curl "https://raw.githubusercontent.com/digitalocean/Kubernetes-Starter-Kit-Developers/main/14-continuous-delivery-using-gitops/assets/manifests/fluxcd/helm/repositories/ambassador.yaml" > "${FLUXCD_HELM_MANIFESTS_PATH}/repositories/ambassador.yaml"
Nginx Ingress:
curl "https://raw.githubusercontent.com/digitalocean/Kubernetes-Starter-Kit-Developers/main/14-continuous-delivery-using-gitops/assets/manifests/fluxcd/helm/repositories/kubernetes-community-nginx.yaml" > "${FLUXCD_HELM_MANIFESTS_PATH}/repositories/kubernetes-community-nginx.yaml"
- Now, fetch the
HelmReleasemanifest file provided by theStarter KitGit repository (please pick only one option, depending on whatIngress Controlleryou want to install and configure):
Ambassador Ingress:
AMBASSADOR_CHART_VERSION="7.3.2"
curl "https://raw.githubusercontent.com/digitalocean/Kubernetes-Starter-Kit-Developers/main/14-continuous-delivery-using-gitops/assets/manifests/fluxcd/helm/releases/ambassador-stack-v${AMBASSADOR_CHART_VERSION}.yaml" > "${FLUXCD_HELM_MANIFESTS_PATH}/releases/ambassador-stack-v${AMBASSADOR_CHART_VERSION}.yaml"
Nginx Ingress:
NGINX_CHART_VERSION="4.1.3"
curl "https://raw.githubusercontent.com/digitalocean/Kubernetes-Starter-Kit-Developers/main/14-continuous-delivery-using-gitops/assets/manifests/fluxcd/helm/releases/nginx-v${NGINX_CHART_VERSION}.yaml" > "${FLUXCD_HELM_MANIFESTS_PATH}/releases/nginx-v${NGINX_CHART_VERSION}.yaml"
- Next, inspect the downloaded
HelmReleasemanifest file using an editor of your choice (preferably withYAMLlint support), and adjust to your needs. For example, you can use VS Code. Make sure to replace the<>placeholders accordingly, if present ((please pick only one option, depending on whatIngress Controlleryou want to install and configure):
Ambassador Ingress:
AMBASSADOR_CHART_VERSION="7.3.2"
code "${FLUXCD_HELM_MANIFESTS_PATH}/releases/ambassador-stack-v${AMBASSADOR_CHART_VERSION}.yaml"
Nginx Ingress:
NGINX_CHART_VERSION="4.1.3"
code "${FLUXCD_HELM_MANIFESTS_PATH}/releases/nginx-v${NGINX_CHART_VERSION}.yaml"
Note:
Notice how the HelmRelease manifest configures remediation actions (you can visit Configuring Failure Remediation, for more details about Helm install/upgrade failure remediation options available in Flux CD):
...
install:
  createNamespace: true
  remediation:
    retries: 3
upgrade:
  remediation:
    retries: 3
...
- Finally, commit
Gitchanges toremotebranch (please pick only one option, depending on whatIngress Controlleryou want to install and configure):
Ambassador Ingress:
AMBASSADOR_CHART_VERSION="7.3.2"
git add "${FLUXCD_HELM_MANIFESTS_PATH}/repositories/ambassador.yaml"
git add "${FLUXCD_HELM_MANIFESTS_PATH}/releases/ambassador-stack-v${AMBASSADOR_CHART_VERSION}.yaml"
git commit -am "Adding Ambassador manifests for Flux CD"
git push origin
Nginx Ingress:
NGINX_CHART_VERSION="4.1.3"
git add "${FLUXCD_HELM_MANIFESTS_PATH}/repositories/kubernetes-community-nginx.yaml"
git add "${FLUXCD_HELM_MANIFESTS_PATH}/releases/nginx-v${NGINX_CHART_VERSION}.yaml"
git commit -am "Adding Nginx manifests for Flux CD"
git push origin
After completing the above steps, Flux CD will start your DOKS cluster reconciliation (in about one minute or so, if using the default interval). If you don’t want to wait, you can always force reconciliation via:
flux reconcile source git flux-system
After a few moments, please inspect the HelmRelease status (please pick only one option, depending on the installed Ingress Controller):
Ambassador Ingress:
flux get helmrelease ambassador-stack
The output looks similar to:
OutputNAME                    READY   MESSAGE                                 REVISION       SUSPENDED
ambassador-stack        True    Release reconciliation succeeded        7.3.2          False
Nginx Ingress:
flux get helmrelease ingress-nginx
The output looks similar to:
OutputNAME                 READY   MESSAGE                                 REVISION       SUSPENDED
ingress-nginx        True    Release reconciliation succeeded        4.1.3          False
Look for the READY column value - it should say True. Reconciliation status is displayed in the MESSAGE column, along with the REVISION number, which represents the Helm chart version. Please bear in mind that some releases take longer to complete (like Prometheus stack, for example), so please be patient.
- The
MESSAGEcolumn will displayReconciliation in progress, as long as theHelmControlleris installing the specifiedHelmchart. If something goes wrong, you’ll get another message stating the reason, so please make sure to check Helm release state. - You can use the
--watchflag for example:flux get helmrelease <name> --wait, to wait until the command finishes. Please bear in mind that in this mode,Fluxwill block your terminal prompt until the default timeout of5 minutesoccurs (can be overridden via the--timeoutflag). - In case something goes wrong, you can search the
Fluxlogs and filterHelmReleasemessages only:
flux logs --kind=HelmRelease
- In case the
Fluxlogs do not offer sufficient information you can use thedescribecommand on thehelmreleaseusingkubectlas follows:
kubectl describe helmrelease ingress-nginx -n flux-system
Please refer to the Ambassador Ingress or Nginx Ingress tutorial for more details about checking the Ingress Controller deployment status and functionality.
Next, you’re going to create Flux CD manifests for the Prometheus stack.
Step 8 - Creating the Prometheus Stack Helm Release
In this step, you will use pre-made manifests to create the Prometheus Helm release for Flux CD. Then, Flux will trigger the Prometheus installation process for your DOKS cluster. The Prometheus stack deploys Grafana as well, so you need to set the administrator credentials for accessing the dashboards. You will learn how to use kubeseal CLI with Sealed Secrets Controller to encrypt sensitive data stored in Kubernetes Secrets. Then, you will see how the Flux CD HelmRelease manifest is used to reference Grafana credentials stored in the Kubernetes Secret.
Steps to follow:
- First, change the directory where your
Flux CDGit repository was cloned. Also, please check that the required directory structure for this tutorial is created and that theFLUXCD_HELM_MANIFESTS_PATHenvironment variable is set (please refer to Step 4 - Cloning the Flux CD Git Repository and Preparing the Layout, for details). - Then, fetch the
PrometheusHelmRepository manifest provided by theStarter KitGit repository:
curl "https://raw.githubusercontent.com/digitalocean/Kubernetes-Starter-Kit-Developers/main/14-continuous-delivery-using-gitops/assets/manifests/fluxcd/helm/repositories/prometheus-community.yaml" > "${FLUXCD_HELM_MANIFESTS_PATH}/repositories/prometheus-community.yaml"
- Next,
createandencrypttheKubernetes Secretholding yourGrafanadashboardadmin password. Make sure that you have theSealed Secretspublic key exported as mentioned in Exporting the Sealed Secrets Controller Public Key (please replace the<>placeholders accordingly):
    SEALED_SECRETS_PUB_KEY="<YOUR_SEALED_SECRETS_PUB_KEY_NAME_HERE>"
    GRAFANA_ADMIN_PASSWORD="<YOUR_GRAFANA_ADMIN_PASSWORD_HERE>"
    kubectl create secret generic "prometheus-stack-credentials" \
        --namespace flux-system \
        --from-literal=grafana_admin_password="${GRAFANA_ADMIN_PASSWORD}" \
        --dry-run=client -o yaml | kubeseal --cert="${SEALED_SECRETS_PUB_KEY}" \
        --format=yaml > "${FLUXCD_HELM_MANIFESTS_PATH}/secrets/prometheus-stack-credentials-sealed.yaml"
Explanations for the above command:
--namespace: Namespace where the Kubernetes secret should be created.--from-literal: Create a Kubernetes secret from a literal value containing thegrafana_admin_password. Theprometheus-stack-credentialssecret andgrafana_admin_passwordvalue is used by the prometheus-stack-v35.5.1.yaml manifest (spec.valuesFromkey).--dry-run=client: Exports the Kubernetes secret on your local machine using standard output (and afterward, piped tokubesealto encrypt the final result).
-
Now, fetch the
PrometheusHelmRelease manifest provided by theStarter KitGit repository:PROMETHEUS_CHART_VERSION="35.5.1" curl "https://raw.githubusercontent.com/digitalocean/Kubernetes-Starter-Kit-Developers/main/14-continuous-delivery-using-gitops/assets/manifests/fluxcd/helm/releases/prometheus-stack-v${PROMETHEUS_CHART_VERSION}.yaml" > "${FLUXCD_HELM_MANIFESTS_PATH}/releases/prometheus-stack-v${PROMETHEUS_CHART_VERSION}.yaml" -
Then, inspect the downloaded Prometheus
HelmReleasemanifest using an editor of your choice (preferably withYAMLlint support), and adjust to your needs. For example, you can use VS Code (please make sure to replace the<>placeholders accordingly, if present):PROMETHEUS_CHART_VERSION="35.5.1" code "${FLUXCD_HELM_MANIFESTS_PATH}/releases/prometheus-stack-v${PROMETHEUS_CHART_VERSION}.yaml"
Note:
You can see how the prometheus-stack-credentials secret is referenced inside the Prometheus HelmRelease manifest by looking at the snippet below:
valuesFrom:
  - kind: Secret
    name: do-spaces-credentials  # Kubernetes secret holding DO Spaces credentials
    valuesKey: access_key_id     # Key from the `do-spaces-credentials` secret, holding the DO Spaces Access Key ID
    targetPath: loki.config.storage_config.aws.access_key_id  # Helm value to override
    optional: false  # Helm release will fail if value is not found
  - kind: Secret
    name: do-spaces-credentials
    valuesKey: secret_access_key  # Key from the `do-spaces-credentials` secret, holding the DO Spaces Secret Key
    targetPath: loki.config.storage_config.aws.secret_access_key
    optional: false
- Finally, commit
Gitchanges toremotebranch:
LOKI_CHART_VERSION="2.6.4"

git add "${FLUXCD_HELM_MANIFESTS_PATH}/repositories/grafana.yaml"

git add "${FLUXCD_HELM_MANIFESTS_PATH}/releases/loki-stack-v${LOKI_CHART_VERSION}.yaml"

git add "${FLUXCD_HELM_MANIFESTS_PATH}/secrets/do-spaces-credentials-sealed.yaml"

git commit -am "Adding Loki stack manifests for Flux CD"

git push origin
After a few moments, please inspect the Prometheus HelmRelease:
flux get helmrelease kube-prometheus-stack
The output looks similar to:
OutputNAME                    READY   MESSAGE                                 REVISION        SUSPENDED
kube-prometheus-stack   True    Release reconciliation succeeded        35.5.1          False
Look for the READY column value - it should say True. Reconciliation status is displayed in the MESSAGE column, along with the REVISION number, which represents the Helm chart version. Please bear in mind that some releases take longer to complete (like Prometheus stack, for example), so please be patient.
-
The
MESSAGEcolumn will displayReconciliation in progress, as long as theHelmControlleris installing the specifiedHelmchart. If something goes wrong, you’ll get another message stating the reason, so please make sure to check Helm release state. -
You can use the
--watchflag for example:flux get helmrelease <name> --wait, to wait until the command finishes. Please bear in mind that in this mode,Fluxwill block your terminal prompt until the default timeout of5 minutesoccurs (can be overridden via the--timeoutflag). -
In case something goes wrong, you can search the
Fluxlogs, and filterHelmReleasemessages only:flux logs --kind=HelmRelease -
In case the
Fluxlogs do not offer sufficient information you can use thedescribecommand on thehelmreleaseusingkubectlas follows:kubectl describe helmrelease kube-prometheus-stack -n flux-system
Now, check if the prometheus-stack-credentials Kubernetes secret was created as well (then, you can use kubectl get secret prometheus-stack-credentials -n flux-system -o yaml for secret contents inspection):
kubectl get secret prometheus-stack-credentials -n flux-system
Finally, perform a quick check of Prometheus stack main services, and PVC:
- Prometheus dashboard:
kubectl port-forward svc/kube-prom-stack-kube-prome-prometheus 9090:9090 -n monitoring. - Grafana dashboards:
kubectl --namespace monitoring port-forward svc/kube-prom-stack-grafana 3000:80. - Prometheus PVC:
kubectl get pvc -n monitoring.
Please refer to the 04-setup-observability tutorial for more details about checking the Prometheus stack deployment status and functionality.
Next, you’re going to create the manifests for the Loki stack and let Flux CD handle the Helm release automatically.
Step 9 - Creating the Loki Stack Helm Release
In this step, you will use pre-made manifests to create the Loki Helm release for Flux CD. Then, Flux will trigger the Loki installation process for your DOKS cluster. Loki needs a DO Spaces bucket for storing backups, hence you need to use DO Spaces credentials. You will learn how to use kubeseal CLI with Sealed Secrets Controller to encrypt sensitive data stored in Kubernetes Secrets. Then, you will see how the Flux CD HelmRelease manifest is used to reference DO Spaces credentials stored in the Kubernetes Secret.
Steps to follow:
- First, change the directory where your
Flux CDGit repository was cloned. Also, please check that the required directory structure for this tutorial is created and that theFLUXCD_HELM_MANIFESTS_PATHenvironment variable is set (please refer to Step 4 - Cloning the Flux CD Git Repository and Preparing the Layout, for details). - Then, fetch the
LokiHelmRepository manifest provided by theStarter KitGit repository:
curl "https://raw.githubusercontent.com/digitalocean/Kubernetes-Starter-Kit-Developers/main/14-continuous-delivery-using-gitops/assets/manifests/fluxcd/helm/repositories/grafana.yaml" > "${FLUXCD_HELM_MANIFESTS_PATH}/repositories/grafana.yaml"
- Next,
createandencryptthe Kubernetes secret for yourDO Spacescredentials. Make sure that you have theSealed Secretspublic key exported as mentioned in Exporting the Sealed Secrets Controller Public Key (please replace the<>placeholders accordingly):
SEALED_SECRETS_PUB_KEY="<YOUR_SEALED_SECRETS_PUB_KEY_NAME_HERE>"
DO_SPACES_ACCESS_KEY="<YOUR_DO_SPACES_ACCESS_KEY_HERE>"
DO_SPACES_SECRET_KEY="<YOUR_DO_SPACES_SECRET_KEY_HERE>"
kubectl create secret generic "do-spaces-credentials" \
--namespace flux-system \
--from-literal=access_key_id="${DO_SPACES_ACCESS_KEY}" \
--from-literal=secret_access_key="${DO_SPACES_SECRET_KEY}" \
--dry-run=client -o yaml | kubeseal --cert="${SEALED_SECRETS_PUB_KEY}" \
--format=yaml > "${FLUXCD_HELM_MANIFESTS_PATH}/secrets/do-spaces-credentials-sealed.yaml"
Explanations for the above command:
--namespace: Namespace where the Kubernetes secret should be created.--from-literal: Create a Kubernetes secret from a literal value containing the DO Spacesaccess_key_idandsecret_access_key. Thedo-spaces-credentialssecret andaccess_key_id/secret_access_keyvalue is used by the loki-stack-v2.6.4.yaml manifest (spec.valuesFromkey).--dry-run=client: Exports the Kubernetes secret on your local machine using standard output (and afterward, piped tokubesealto encrypt the final result).
- Now, fetch the
Lokistack HelmRelease manifest provided by theStarter KitGit repository:
LOKI_CHART_VERSION="2.6.4"
curl "https://raw.githubusercontent.com/digitalocean/Kubernetes-Starter-Kit-Developers/main/14-continuous-delivery-using-gitops/assets/manifests/fluxcd/helm/releases/loki-stack-v${LOKI_CHART_VERSION}.yaml" > "${FLUXCD_HELM_MANIFESTS_PATH}/releases/loki-stack-v${LOKI_CHART_VERSION}.yaml"
- Then, inspect the downloaded Loki
HelmReleasemanifest using an editor of your choice (preferably withYAMLlint support), and adjust to your needs. For example, you can use VS Code (please make sure to replace the<>placeholders accordingly, if present):
LOKI_CHART_VERSION="2.6.4"
code "${FLUXCD_HELM_MANIFESTS_PATH}/releases/loki-stack-v${LOKI_CHART_VERSION}.yaml"
Note:
You can see how the do-spaces-credentials secret is referenced inside the Loki HelmRelease manifest by looking at the snippet below:
valuesFrom:
  - kind: Secret
    name: do-spaces-credentials  # Kubernetes secret holding DO Spaces credentials
    valuesKey: access_key_id     # Key from the `do-spaces-credentials` secret, holding the DO Spaces Access Key ID
    targetPath: loki.config.storage_config.aws.access_key_id  # Helm value to override
    optional: false  # Helm release will fail if value is not found
  - kind: Secret
    name: do-spaces-credentials
    valuesKey: secret_access_key  # Key from the `do-spaces-credentials` secret, holding the DO Spaces Secret Key
    targetPath: loki.config.storage_config.aws.secret_access_key
    optional: false
- Finally, commit
Gitchanges toremotebranch:
LOKI_CHART_VERSION="2.6.4"
git add "${FLUXCD_HELM_MANIFESTS_PATH}/repositories/grafana.yaml"
git add "${FLUXCD_HELM_MANIFESTS_PATH}/releases/loki-stack-v${LOKI_CHART_VERSION}.yaml"
git add "${FLUXCD_HELM_MANIFESTS_PATH}/secrets/do-spaces-credentials-sealed.yaml"
git commit -am "Adding Loki stack manifests for Flux CD"
git push origin
After a few moments, please inspect the Loki HelmRelease:
flux get helmrelease loki-stack
The output looks similar to:
OutputNAME         READY   MESSAGE                                 REVISION       SUSPENDED
loki-stack   True    Release reconciliation succeeded        2.6.4          False
Look for the READY column value - it should say True. Reconciliation status is displayed in the MESSAGE column, along with the REVISION number, which represents the Helm chart version. Please bear in mind that some releases take longer to complete (like Prometheus stack, for example), so please be patient.
- The
MESSAGEcolumn will displayReconciliation in progress, as long as theHelmControlleris installing the specifiedHelmchart. If something goes wrong, you’ll get another message stating the reason, so please make sure to check Helm release state. - You can use the
--watchflag for example:flux get helmrelease <name> --wait, to wait until the command finishes. Please bear in mind that in this mode,Fluxwill block your terminal prompt until the default timeout of5 minutesoccurs (can be overridden via the--timeoutflag). - In case something goes wrong, you can search the
Fluxlogs, and filterHelmReleasemessages only:
flux logs --kind=HelmRelease
- In case the
Fluxlogs do not offer sufficient information you can use thedescribecommand on thehelmreleaseusingkubectlas follows:
kubectl describe helmrelease loki-stack -n flux-system
Finally, check if the do-spaces-credentials Kubernetes secret was created as well (then, you can use kubectl get secret do-spaces-credentials -n flux-system -o yaml for secret contents inspection):
kubectl get secret do-spaces-credentials -n flux-system
Please refer to the 04-setup-observability tutorial for more details about checking the Loki Stack deployment status and functionality.
Next, you’re going to create the manifests and let Flux CD handle the Velero Helm release automatically.
Step 10 - Creating the Velero Helm Release
In this step, you will use pre-made manifests to create the Velero Helm release for Flux CD. Then, Flux will trigger the Velero installation process for your DOKS cluster. Velero needs a DO Spaces bucket for storing backups. Hence, you need to use DO Spaces credentials. You will learn how to use kubeseal CLI with Sealed Secrets Controller to encrypt sensitive data stored in Kubernetes Secrets. Then, you will see how the Flux CD HelmRelease manifest is used to reference DO API credentials stored in the Kubernetes Secret.
Important note:
Before following the steps, make sure that the do-spaces-credentials sealed secret was provisioned to your DOKS cluster as detailed in Step 8 - Creating the Loki Stack Helm Release.
Steps to follow:
- First, change the directory where your
Flux CDGit repository was cloned. Also, please check that the required directory structure for this tutorial is created and that theFLUXCD_HELM_MANIFESTS_PATHenvironment variable is set (please refer to Step 4 - Cloning the Flux CD Git Repository and Preparing the Layout, for details). - Then, fetch the
VeleroHelmRepository manifest provided by theStarter KitGit repository:
curl "https://raw.githubusercontent.com/digitalocean/Kubernetes-Starter-Kit-Developers/main/14-continuous-delivery-using-gitops/assets/manifests/fluxcd/helm/repositories/vmware-tanzu.yaml" > "${FLUXCD_HELM_MANIFESTS_PATH}/repositories/vmware-tanzu.yaml"
- Next,
createandencryptthe Kubernetes secret for VeleroHelmReleaseto consume (DO API TOKEN). Make sure that you have theSealed Secretspublic key exported as mentioned in Exporting the Sealed Secrets Controller Public Key (please replace the<>placeholders accordingly):
SEALED_SECRETS_PUB_KEY="<YOUR_SEALED_SECRETS_PUB_KEY_NAME_HERE>"
DO_API_TOKEN="<YOUR_DO_API_TOKEN_HERE>"

kubectl create secret generic "do-api-credentials" \
--namespace flux-system \
--from-literal=do_api_token="${DO_API_TOKEN}" \
--dry-run=client -o yaml | kubeseal --cert="${SEALED_SECRETS_PUB_KEY}" \
--format=yaml > "${FLUXCD_HELM_MANIFESTS_PATH}/secrets/do-api-credentials-sealed.yaml"
Explanations for the above command:
--namespace: Namespace where the Kubernetes secret should be created.--from-literal: Create a Kubernetes secret from a literal value containing the DO API token. Thedo-credentialssecret anddo_api_tokenvalue is used by the velero-v2.27.3.yaml manifest (spec.valuesFromkey).--dry-run=client: Exports the Kubernetes secret on your local machine using standard output (and afterward, piped tokubesealto encrypt the final result).
- Now, fetch the
Lokistack HelmRelease manifest provided by theStarter KitGit repository:
VELERO_CHART_VERSION="2.29.7"
curl "https://raw.githubusercontent.com/digitalocean/Kubernetes-Starter-Kit-Developers/main/14-continuous-delivery-using-gitops/assets/manifests/fluxcd/helm/releases/velero-v${VELERO_CHART_VERSION}.yaml" > "${FLUXCD_HELM_MANIFESTS_PATH}/releases/velero-v${VELERO_CHART_VERSION}.yaml"
- Then, inspect the downloaded Velero
HelmReleasemanifest using an editor of your choice (preferably withYAMLlint support), and adjust to your needs. For example, you can use VS Code (please make sure to replace the<>placeholders accordingly, if present):
VELERO_CHART_VERSION="2.29.7"
code "${FLUXCD_HELM_MANIFESTS_PATH}/releases/velero-v${VELERO_CHART_VERSION}.yaml"
- You can see how
do-api-credentialsanddo-spaces-credentialssecrets are referenced inside the VeleroHelmReleasemanifest by looking at below snippet:
      valuesFrom:
        - kind: Secret
          name: do-api-credentials  # Kubernetes secret holding DO API token
          valuesKey: do_api_token   # Key from the `do-api-credentials` secret, holding the DO API token
          targetPath: configuration.extraEnvVars.DIGITALOCEAN_TOKEN  # Helm value to override
          optional: false  # Helm release will fail if value is not found
        - kind: Secret
          name: do-spaces-credentials  # Kubernetes secret holding DO Spaces credentials
          valuesKey: access_key_id     # Key from the `do-spaces-credentials` secret, holding the DO Spaces Access Key ID
          targetPath: configuration.extraEnvVars.AWS_ACCESS_KEY_ID
          optional: false
        - kind: Secret
          name: do-spaces-credentials
          valuesKey: secret_access_key  # Key from the `do-spaces-credentials` secret, holding the DO Spaces Secret Key
          targetPath: configuration.extraEnvVars.AWS_SECRET_ACCESS_KEY
          optional: false
- Please bear in mind that the above secret data is placed inside environment variables (
configuration.extraEnvVars), so values will be visible in clear text if you describe theVelerodeployment (onproductionenvironments you can restrictvelero namespaceaccess viaRBAC, for example).
kubectl describe deployment velero -n velero | grep AWS_ACCESS_KEY_ID
- Finally, commit
Gitchanges toremotebranch:
VELERO_CHART_VERSION="2.29.7"
git add "${FLUXCD_HELM_MANIFESTS_PATH}/repositories/vmware-tanzu.yaml"
git add "${FLUXCD_HELM_MANIFESTS_PATH}/releases/velero-v${VELERO_CHART_VERSION}.yaml"
git add "${FLUXCD_HELM_MANIFESTS_PATH}/secrets/do-api-credentials-sealed.yaml"
git commit -am "Adding Velero manifests for Flux CD"
git push origin
After a few moments, please inspect the Velero HelmRelease:
flux get helmrelease velero-stack
The output looks similar to:
OutputNAME                 READY  MESSAGE                             REVISION    SUSPENDED
velero-stack         True   Release reconciliation succeeded    2.29.7      False
Look for the READY column value - it should say True. Reconciliation status is displayed in the MESSAGE column, along with the REVISION number, which represents the Helm chart version. Please bear in mind that some releases take longer to complete (like Prometheus stack, for example), so please be patient.
- The
MESSAGEcolumn will displayReconciliation in progress, as long as theHelmControlleris installing the specifiedHelmchart. If something goes wrong, you’ll get another message stating the reason, so please make sure to check Helm release state. - You can use the
--watchflag for example:flux get helmrelease <name> --wait, to wait until the command finishes. Please bear in mind that in this mode,Fluxwill block your terminal prompt until the default timeout of5 minutesoccurs (can be overridden via the--timeoutflag). - In case something goes wrong, you can search the
Fluxlogs, and filterHelmReleasemessages only:
flux logs --kind=HelmRelease
- In case the
Fluxlogs do not offer sufficient information you can use thedescribecommand on thehelmreleaseusingkubectlas follows:
kubectl describe helmrelease velero-stack -n flux-system
Finally, check if the do-api-credentials Kubernetes secret was created as well (then, you can use kubectl get secret do-api-credentials -n flux-system -o yaml for secret contents inspection):
kubectl get secret do-api-credentials -n flux-system
Please refer to the Velero tutorial for more details about checking Velero deployment status and functionality.
Conclusion
In this tutorial, you learned the automation basics for a GitOps based setup using Flux CD. Then, you configured Flux CD to perform Helm releases for you automatically, and deploy all the Starter Kit components in a GitOps fashion. Finally, you applied security best practices as well by using the Sealed Secrets controller to encrypt sensitive data for your applications.
Going further, Flux CD supports other features, like:
- Notifications, to configure notifications (e.g.,
Slack). - Images Update Automation, to update a Git repository when new container images are available.
- Prometheus Monitoring
- Progressive Delivery using Flagger
- Security Considerations
You can visit the official Flux CD Guides page for more interesting stuff and ideas, like how to structure your Git repositories, as well as application manifests for multi-cluster and multi-environment setups.
To estimate the resource usage of the Starter Kit, please follow the Starter Kit Resource Usage chapter.
Thanks for learning with the DigitalOcean Community. Check out our offerings for compute, storage, networking, and managed databases.
About the author(s)
I help Businesses scale with AI x SEO x (authentic) Content that revives traffic and keeps leads flowing | 3,000,000+ Average monthly readers on Medium | Sr Technical Writer(Team Lead) @ DigitalOcean | Ex-Cloud Consultant @ AMEX | Ex-Site Reliability Engineer(DevOps)@Nutanix
Still looking for an answer?
This textbox defaults to using Markdown to format your answer.
You can type !ref in this text area to quickly search our full set of tutorials, documentation & marketplace offerings and insert the link!
How do you ensure order of operations in the above walkthrough? for example when fluxcd deploys from scratch making sure that the secrets are created before the helmreleases that use them spin up
@asinghwalia @bgupta what is the behaviour of volumes?
We have a kube cluster built using flux on Digital Ocean. We have already attached volumes for secrets, but today we had to attach a volume to manage some data for a CMS we use: images.
We don’t have a clear picture about how DO handles volumes with flux:
- we defined and then created a 20GB volume using flux definition
- then we changed the volume spec, but nothing happens
- we manually changed the volume size from DO dashboard
- the volume does no reflect the flux definition, but it keeps existing with the size we manually changed
 This work is licensed under a Creative Commons Attribution-NonCommercial- ShareAlike 4.0 International License.
Become a contributor for community
Get paid to write technical tutorials and select a tech-focused charity to receive a matching donation.

DigitalOcean Documentation
Full documentation for every DigitalOcean product.

Resources for startups and AI-native businesses
The Wave has everything you need to know about building a business, from raising funding to marketing your product.
The developer cloud
Scale up as you grow — whether you're running one virtual machine or ten thousand.

Start building today
From GPU-powered inference and Kubernetes to managed databases and storage, get everything you need to build, scale, and deploy intelligent applications.
