- Log in to:
- Community
- DigitalOcean
- Sign up for:
- Community
- DigitalOcean
I’ve taken extra 40 GB disk space with my droplet to store my all media files there and I wanted to access my existing media file from there and view them as per product images.
So I need to move my previous wp-content/upload media files to new the volume.
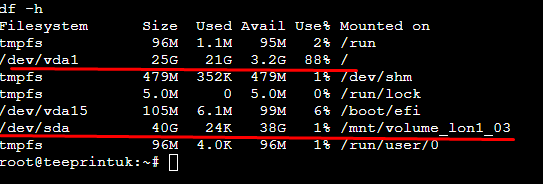
Here you can see on the image I have 40 GB unused storage.

I wanted to move my existing file there and use them from that folder as I’m using from the main storage.
How can I move all data from main storage to new disk space? How can point that data so that there will be no problem to my product image view?
This textbox defaults to using Markdown to format your answer.
You can type !ref in this text area to quickly search our full set of tutorials, documentation & marketplace offerings and insert the link!
Hey!
Before proceeding, I would strongly recommend making sure that you have a backup of your Droplet, just in case, so that you can revert to a working version of your website if ever needed.
Once you have a backup, to move your WordPress media files to the new volume and use it for your existing site, you can follow these steps:
-
Copy Existing Media Files to the New Volume: First, copy your existing
uploadsdirectory to the new volume.sudo rsync -avP /var/www/html/wp-content/uploads/ /mnt/volume_lon1_03/wp-content/uploads/ -
Backup and Remove the Old
uploadsDirectory: Backup your currentuploadsdirectory and then remove it.sudo mv /var/www/html/wp-content/uploads /var/www/html/wp-content/uploads.bak -
Unmount the New Volume: Unmount the new volume from its current mount point.
sudo umount /mnt/volume_lon1_03 -
Mount the New Volume to the Correct Path: Mount the new volume to the
/var/www/html/wp-content/uploadsdirectory.sudo mount /dev/sda /var/www/html/wp-content/uploads -
Update
/etc/fstabfor Persistent Mounting: To ensure the new volume mounts automatically at the correct path after a reboot, update the/etc/fstabfile.Open the
/etc/fstabfile:sudo nano /etc/fstabAdd the following line to mount the volume at boot:
/dev/sda /var/www/html/wp-content/uploads ext4 defaults,nofail 0 2 -
Set Correct Permissions: Ensure the new
uploadsdirectory has the correct permissions so that the web server can read and write to it.sudo chown -R www-data:www-data /var/www/html/wp-content/uploads -
Verify the Setup:
- Check that the new
uploadsdirectory is accessible and correctly mounted. - Visit your WordPress media library and ensure that previously uploaded images load correctly.
- Try uploading a new media file through the WordPress admin to verify everything works as expected.
- Check that the new
For more detailed information, you can refer to the following resources:
Let me know if you have any questions!
Best,
Bobby
Become a contributor for community
Get paid to write technical tutorials and select a tech-focused charity to receive a matching donation.
DigitalOcean Documentation
Full documentation for every DigitalOcean product.
Resources for startups and SMBs
The Wave has everything you need to know about building a business, from raising funding to marketing your product.
Get our newsletter
Stay up to date by signing up for DigitalOcean’s Infrastructure as a Newsletter.
New accounts only. By submitting your email you agree to our Privacy Policy
The developer cloud
Scale up as you grow — whether you're running one virtual machine or ten thousand.
Get started for free
Sign up and get $200 in credit for your first 60 days with DigitalOcean.*
*This promotional offer applies to new accounts only.