By Jordan Irabor

Introduction
The advent of modern JavaScript libraries such as React.js and Vue.js has changed frontend web development for the better. These libraries ship with features including SPA (Single Page Applications), which is the dynamic loading of the content in web pages without a full reload to the browser.
The concept behind most Single Page Applications is client-side rendering. In client-side rendering, the majority of content is rendered in a browser using JavaScript; on page load, the content doesn’t load initially until the JavaScript has been fully downloaded and renders the rest of the site.
Client-side rendering is a relatively recent concept and there are trade-offs associated with its use. A notable negative side is that, since the content is not exactly rendered until the page is updated using JavaScript, SEO (Search Engine Optimization) for the website will suffer as there will hardly be any data for search engines to crawl.
Server-side rendering, on the other hand, is the conventional way of getting HTML pages rendered on a browser. In the older server-side rendered applications, the web application is built using a server-side language such as PHP. When a web page is requested by a browser, the remote server adds the (dynamic) content and delivers a populated HTML page.
Just as there are downsides to client-side rendering, server-side rendering makes the browser send server requests too frequently and performs repetitions of full-page reloads for similar data. There are JavaScript frameworks that can initially load the web page with an SSR (Server-Side Rendering) solution, then use a framework to handle the further dynamic routing and fetch only necessary data. The resulting applications are called Universal Applications.
In summary, a universal application is used to describe JavaScript code that can execute on the client and the server-side. In this article, we will build a Universal Recipe application using Nuxt.js.
Nuxt.js is a higher-level framework for developing Universal Vue.js applications. Its creation was inspired by React’s Next.js and it helps to abstract the difficulties (server configuration and client code distribution) that arise in setting up server-side rendered Vue.js applications. Nuxt.js also ships with features that aid development between client-side and server-side such as async data, middleware, layouts, and so on.
Note: We can refer to the application we build as Server-Side rendered (SSR) because Vue.js already implements Client-Side rendering by default when we create a Single Page Application. The application is, in fact, a Universal application.
In this article, we will see how to create a Universal application using Django and Nuxt.js. Django will handle the backend operations and provide the APIs using the DRF (Django Rest Framework), while Nuxt.js will create the frontend.
Here’s a demo of the final application:

We see that the final application is a recipes application that performs CRUD operations.
Prerequisites
To follow along with this tutorial, you will need the following installed on your machine:
- Node.js installed locally, which you can do by following How to Install Node.js and Create a Local Development Environment.
- This project will require Python installed in a local environment.
- This project will utilize Pipenv. A production-ready tool that aims to bring the best of all packaging worlds to the Python world. It harnesses Pipfile, pip, and virtualenv into one single command.
The tutorial assumes that the reader has the following:
- Basic working knowledge of Django and Django REST Framework.
- Basic working knowledge of Vue.js.
This tutorial was verified with Python v3.7.7, Django v3.0.7, Node v14.4.0, npm v6.14.5, and nuxt v2.13.0.
Step 1 — Setting up the Backend
In this section, we will set up the backend and create all the directories that we need to get things up and running, so launch a new instance of a terminal and create the project’s directory by running this command:
- mkdir recipes_app
Next, we will navigate into the directory:
- cd recipes_app
Now, we will install Pipenv using Pip:
- pip install pipenv
And activate a new virtual environment:
- pipenv shell
Note: You should skip the first command if you already have Pipenv installed on your computer.
Let’s install Django and other dependencies using Pipenv:
- pipenv install django django-rest-framework django-cors-headers
Note: After activating a new virtual environment using Pipenv, each command line in the terminal will be prefixed with the name of the present working directory. In this case, it is (recipes_app).
Now, we will create a new Django project called api:
- django-admin startproject api
Navigate to the project directory:
- cd api
Create a Django application called core:
- python manage.py startapp core
Let’s register the core application, together with rest_framework and cors-headers, so that the Django project recognizes it. Open the api/settings.py file and update it accordingly:
# ...

# Application definition
INSTALLED_APPS = [
    'django.contrib.admin',
    'django.contrib.auth',
    'django.contrib.contenttypes',
    'django.contrib.sessions',
    'django.contrib.messages',
    'django.contrib.staticfiles',
    'rest_framework', # add this
    'corsheaders', # add this
    'core' # add this
  ]

MIDDLEWARE = [
    'corsheaders.middleware.CorsMiddleware', # add this
    'django.middleware.security.SecurityMiddleware',
    'django.contrib.sessions.middleware.SessionMiddleware',
    'django.middleware.common.CommonMiddleware',
    'django.middleware.csrf.CsrfViewMiddleware',
    'django.contrib.auth.middleware.AuthenticationMiddleware',
    'django.contrib.messages.middleware.MessageMiddleware',
    'django.middleware.clickjacking.XFrameOptionsMiddleware',
]

# add this block below MIDDLEWARE
CORS_ORIGIN_WHITELIST = (
    'http://localhost:3000',
)

# ...

# add the following just below STATIC_URL
MEDIA_URL = '/media/' # add this
MEDIA_ROOT = os.path.join(BASE_DIR, 'media') # add this
We added http://localhost:3000 to the whitelist because the client application will be served on that port and we want to prevent CORS (Cross-Origin Resource Sharing) errors. We also added MEDIA_URL and MEDIA_ROOT because we will need them when serving images in the application.
Defining the Recipe Model
Let’s create a model to define how the Recipe items should be stored in the database, open the core/models.py file and completely replace it with the snippet below:
from django.db import models
# Create your models here.

class Recipe(models.Model):
    DIFFICULTY_LEVELS = (
        ('Easy', 'Easy'),
        ('Medium', 'Medium'),
        ('Hard', 'Hard'),
    )
    name = models.CharField(max_length=120)
    ingredients = models.CharField(max_length=400)
    picture = models.FileField()
    difficulty = models.CharField(choices=DIFFICULTY_LEVELS, max_length=10)
    prep_time = models.PositiveIntegerField()
    prep_guide = models.TextField()

    def __str_(self):
        return "Recipe for {}".format(self.name)
The code snippet above describes six properties on the Recipe model:
nameingredientspicturedifficultyprep_timeprep_guide
Creating Serializers for the Recipe Model
We need serializers to convert model instances to JSON so that the frontend can work with the received data. We will create a core/serializers.py file and update it with the following:
from rest_framework import serializers
from .models import Recipe
class RecipeSerializer(serializers.ModelSerializer):

    class Meta:
        model = Recipe
        fields = ("id", "name", "ingredients", "picture", "difficulty", "prep_time", "prep_guide")
In the code snippet above, we specified the model to work with and the fields we want to be converted to JSON.
Setting Up the Admin Panel
Django provides us with an admin interface out of the box; the interface will make it easy to test CRUD operations on the Recipe model we just created, but first, we will do a little configuration.
Open the core/admin.py file and completely replace it with the snippet below:
from django.contrib import admin
from .models import Recipe  # add this
# Register your models here.

admin.site.register(Recipe) # add this
Creating the Views
Let’s create a RecipeViewSet class in the core/views.py file, completely replace it with the snippet below:
from rest_framework import viewsets
from .serializers import RecipeSerializer
from .models import Recipe

class RecipeViewSet(viewsets.ModelViewSet):
    serializer_class = RecipeSerializer
    queryset = Recipe.objects.all()
The viewsets.ModelViewSet provides methods to handle CRUD operations by default. We just need to do specify the serializer class and the queryset.
Setting up the URLs
Head over to the api/urls.py file and completely replace it with the code below. This code specifies the URL path for the API:
from django.contrib import admin
from django.urls import path, include        # add this
from django.conf import settings             # add this
from django.conf.urls.static import static   # add this

urlpatterns = [
    path('admin/', admin.site.urls),
    path("api/", include('core.urls'))       # add this
]

# add this
if settings.DEBUG:
    urlpatterns += static(settings.MEDIA_URL, document_root=settings.MEDIA_ROOT)
Now, create a urls.py file in the core directory and paste in the snippet below:
from django.urls import path, include
from rest_framework.routers import DefaultRouter
from .views import RecipeViewSet

router = DefaultRouter()
router.register(r'recipes', RecipeViewSet)

urlpatterns = [
    path("", include(router.urls))
]
In the code above, the router class generates the following URL patterns:
/recipes/- CREATE and READ operations can be performed on this route./recipes/{id}- READ, UPDATE, and DELETE operations can be performed on this route.
Running Migrations
Because we recently created a Recipe model and defined its structure, we need to make a Migration file and apply the changes on the model to the database, so let’s run the following commands:
- python manage.py makemigrations
- python manage.py migrate
Now, we will create a superuser account to access the admin interface:
- python manage.py createsuperuser
You will be prompted to enter a username, email, and password for the superuser. Be sure to enter details that you can remember because you will need them to log in to the admin dashboard shortly.
That’s all the configuration that needs to be done on the backend. We can now test the APIs we created, so let’s start the Django server:
- python manage.py runserver
Once the server is running, head over to localhost:8000/api/recipes/ to ensure it works:

We can create a new Recipe item using the interface:

We can also perform DELETE, PUT, and PATCH operations on specific Recipe items using their id primary keys. To do this, we will visit an address with this structure /api/recipe/{id}. Let’s try with this address — localhost:8000/api/recipes/1:

That’s all for the backend of the application, now we can move on to fleshing out the frontend.
Step 2 — Setting up the Frontend
In this section of the tutorial, we will build the frontend of the application. We want to place the directory for the frontend code in the root of the recipes_app directory. So, navigate out of the api directory (or spin up a fresh terminal to run alongside the previous one) before running the commands in this section.
Let’s create a nuxt application called client with this command:
- npx create-nuxt-app client
Note: Preceding create-nuxt-app with npx installs the package if it is not already installed globally on your machine.
Once the installation is complete, create-nuxt-app will ask a few questions about extra tools to be added. For this tutorial, the following choices were made:
? Project name: client
? Programming language: JavaScript
? Package manager: Npm
? UI framework: Bootstrap Vue
? Nuxt.js modules: Axios
? Linting tools:
? Testing framework: None
? Rendering mode: Universal (SSR / SSG)
? Deployment target: Server (Node.js hosting)
? Development tools:
This will trigger the installation of dependencies using the selected package manager.
Navigate to the client directory:
- cd client
Let’s run the following commands to start the application in development mode:
npm run dev
Once the development server has started, head over to localhost:3000 to see the application:

Now, let’s take a look at the directory structure of the client directory:
├── client
  ├── assets/
  ├── components/
  ├── layouts/
  ├── middleware/
  ├── node_modules/
  ├── pages/
  ├── plugins/
  ├── static/
  └── store/
Here’s a breakdown of what these directories are for:
- Assets - Contains uncompiled files such as images, CSS, Sass, and JavaScript files.
- Components - Contains Vue.js components.
- Layouts - Contains the application’s Layouts; Layouts are used to change the appearance of a page and can be used for multiple pages.
- Middleware - Contains the application’s Middleware; Middleware are custom functions that are run before a page is rendered.
- Pages - Contains the application’s Views and Routes. Nuxt.js reads all the
.vuefiles in this directory and uses the information to create the application’s router. - Plugins - Contains JavaScript plugins to be run before the root Vue.js application is instantiated.
- Static - Contains static files (files that are unlikely to change) and all these files are mapped to the root of the application, which is
/. - Store - Contains store files if we intend to use Vuex with Nuxt.js.
There is also a nuxt.config.js file in the client directory, this file contains custom configuration for the Nuxt.js app.
Before we continue, download this zip file of image assets, extract it, and put the images directory inside the static directory.
Structure of the Pages
In this section, we will add some .vue files to the pages directory so that our application will have five pages:
- Homepage
- All Recipes list page
- Single Recipe view page
- Single Recipe edit page
- Add Recipe page
Let’s add the following .vue files and folders to the pages directory so we have this exact structure:
├── pages/
   ├── recipes/
     ├── _id/
       └── edit.vue
       └── index.vue
     └── add.vue
     └── index.vue
  └── index.vue
The file structure above will generate the following routes:
/→ handled bypages/index.vue/recipes/add→ handled bypages/recipes/add.vue/recipes/→ handled bypages/recipes/index.vue/recipes/{id}/→ handled bypages/recipes/_id/index.vue/recipes/{id}/edit→ handled bypages/recipes/_id/edit.vue
A .vue file or directory prefixed by an underscore will create a dynamic route. This is useful in our application as it will make it easy to display different recipes based on their IDs (e.g., recipes/1/, recipes/2/, and so on).
Creating the Homepage
In Nuxt.js, Layouts are a great help when you want to change the look and feel of your application. Now, each instance of a Nuxt.js application ships with a default Layout, we want to remove all the styles so they do not interfere with our application.
Open the layouts/default.vue file and replace it with the following snippet below:
<template>
  <div>
    <nuxt/>
  </div>
</template>

<style>
</style>
Let’s update the pages/index.vue file with the code below:
<template>
<header>
<div class="text-box">
<h1>La Recipes ?</h1>
<p class="mt-3">Recipes for the meals we love ❤️</p>
<nuxt-link class="btn btn-outline btn-large btn-info" to="/recipes">
View Recipes <span class="ml-2">→</span>
</nuxt-link>
</div>
</header>
</template>
<script>
export default {
head() {
return {
title: "Home page"
};
},
};
</script>
<style>
header {
min-height: 100vh;
background-image: linear-gradient(
to right,
rgba(0, 0, 0, 0.9),
rgba(0, 0, 0, 0.4)
),
url("/images/banner.jpg");
background-position: center;
background-size: cover;
position: relative;
}
.text-box {
position: absolute;
top: 50%;
left: 10%;
transform: translateY(-50%);
color: #fff;
}
.text-box h1 {
font-family: cursive;
font-size: 5rem;
}
.text-box p {
font-size: 2rem;
font-weight: lighter;
}
</style>
From the code above, <nuxt-link> is a Nuxt.js component that can be used to navigate between pages. It is very similar to the <router-link> component from Vue Router.
Let’s start the frontend development server (if it isn’t already running):
- npm run dev
Then visit localhost:3000 and observe the Homepage:

Always ensure that the Django backend server is always running in another instance of the terminal because the frontend will begin communicating with it for data shortly.
Every page in this application will be a Vue Component and Nuxt.js provides special attributes and functions to make the development of applications seamless. You can find all these special attributes in the official documentation.
For the sake of this tutorial, we will make use of two of these functions:
head()- This method is used to set specific<meta>tags for the current page.asyncData()- This method is used to fetch data before the page component is loaded. The object returned is then merged with the page component’s data. We will make use of this later in this tutorial.
Creating the Recipes List Page
Let’s create a Vue.js component called RecipeCard.vue in the components directory and update it with the snippet below:
<template>
  <div class="card recipe-card">
    <img :src="recipe.picture" class="card-img-top" >
    <div class="card-body">
      <h5 class="card-title">{{ recipe.name }}</h5>
      <p class="card-text">
        <strong>Ingredients:</strong> {{ recipe.ingredients }}
      </p>
      <div class="action-buttons">
        <nuxt-link :to="`/recipes/${recipe.id}/`" class="btn btn-sm btn-success">View</nuxt-link>
        <nuxt-link :to="`/recipes/${recipe.id}/edit/`" class="btn btn-sm btn-primary">Edit</nuxt-link>
        <button @click="onDelete(recipe.id)" class="btn btn-sm btn-danger">Delete</button>
      </div>
    </div>
  </div>
</template>

<script>
export default {
    props: ["recipe", "onDelete"]
};
</script>

<style>
.recipe-card {
    box-shadow: 0 1rem 1.5rem rgba(0,0,0,.6);
}
</style>
The component above accepts two props:
- A
recipeobject which contains information about a particular recipe. - An
onDeletemethod will be triggered whenever a user clicks on the button to delete a recipe.
Next, open the pages/recipes/index.vue and update it with the snippet below:
<template>
  <main class="container mt-5">
    <div class="row">
      <div class="col-12 text-right mb-4">
        <div class="d-flex justify-content-between">
          <h3>La Recipes</h3>
          <nuxt-link to="/recipes/add" class="btn btn-info">Add Recipe</nuxt-link>
        </div>
      </div>
      <template v-for="recipe in recipes">
        <div :key="recipe.id" class="col-lg-3 col-md-4 col-sm-6 mb-4">
          <recipe-card :onDelete="deleteRecipe" :recipe="recipe"></recipe-card>
        </div>
      </template>
    </div>
  </main>
</template>

<script>
import RecipeCard from "~/components/RecipeCard.vue";

const sampleData = [
  {
    id: 1,
    name: "Jollof Rice",
    picture: "/images/food-1.jpeg",
    ingredients: "Beef, Tomato, Spinach",
    difficulty: "easy",
    prep_time: 15,
    prep_guide:
      "Lorem ipsum dolor sit amet consectetur adipisicing elit. Omnis, porro. Dignissimos ducimus ratione totam fugit officiis blanditiis exercitationem, nisi vero architecto quibusdam impedit, earum "
  },
  {
    id: 2,
    name: "Macaroni",
    picture: "/images/food-2.jpeg",
    ingredients: "Beef, Tomato, Spinach",
    difficulty: "easy",
    prep_time: 15,
    prep_guide:
      "Lorem ipsum dolor sit amet consectetur adipisicing elit. Omnis, porro. Dignissimos ducimus ratione totam fugit officiis blanditiis exercitationem, nisi vero architecto quibusdam impedit, earum "
  },
  {
    id: 3,
    name: "Fried Rice",
    picture: "/images/banner.jpg",
    ingredients: "Beef, Tomato, Spinach",
    difficulty: "easy",
    prep_time: 15,
    prep_guide:
      "Lorem ipsum dolor sit amet consectetur adipisicing elit. Omnis, porro. Dignissimos ducimus ratione totam fugit officiis blanditiis exercitationem, nisi vero architecto quibusdam impedit, earum "
  }
];

export default {
  head() {
    return {
      title: "Recipes list"
    };
  },
  components: {
    RecipeCard
  },
  asyncData(context) {
    let data = sampleData;
    return {
      recipes: data
    };
  },
  data() {
    return {
      recipes: []
    };
  },
  methods: {
    deleteRecipe(recipe_id) {
      console.log(deleted `${recipe.id}`)
    }
  }
};
</script>

<style scoped>
</style>
Let’s start the frontend development server (if it isn’t already running):
- npm run dev
Then, visit localhost:3000/recipes, and observe the recipes listing page:
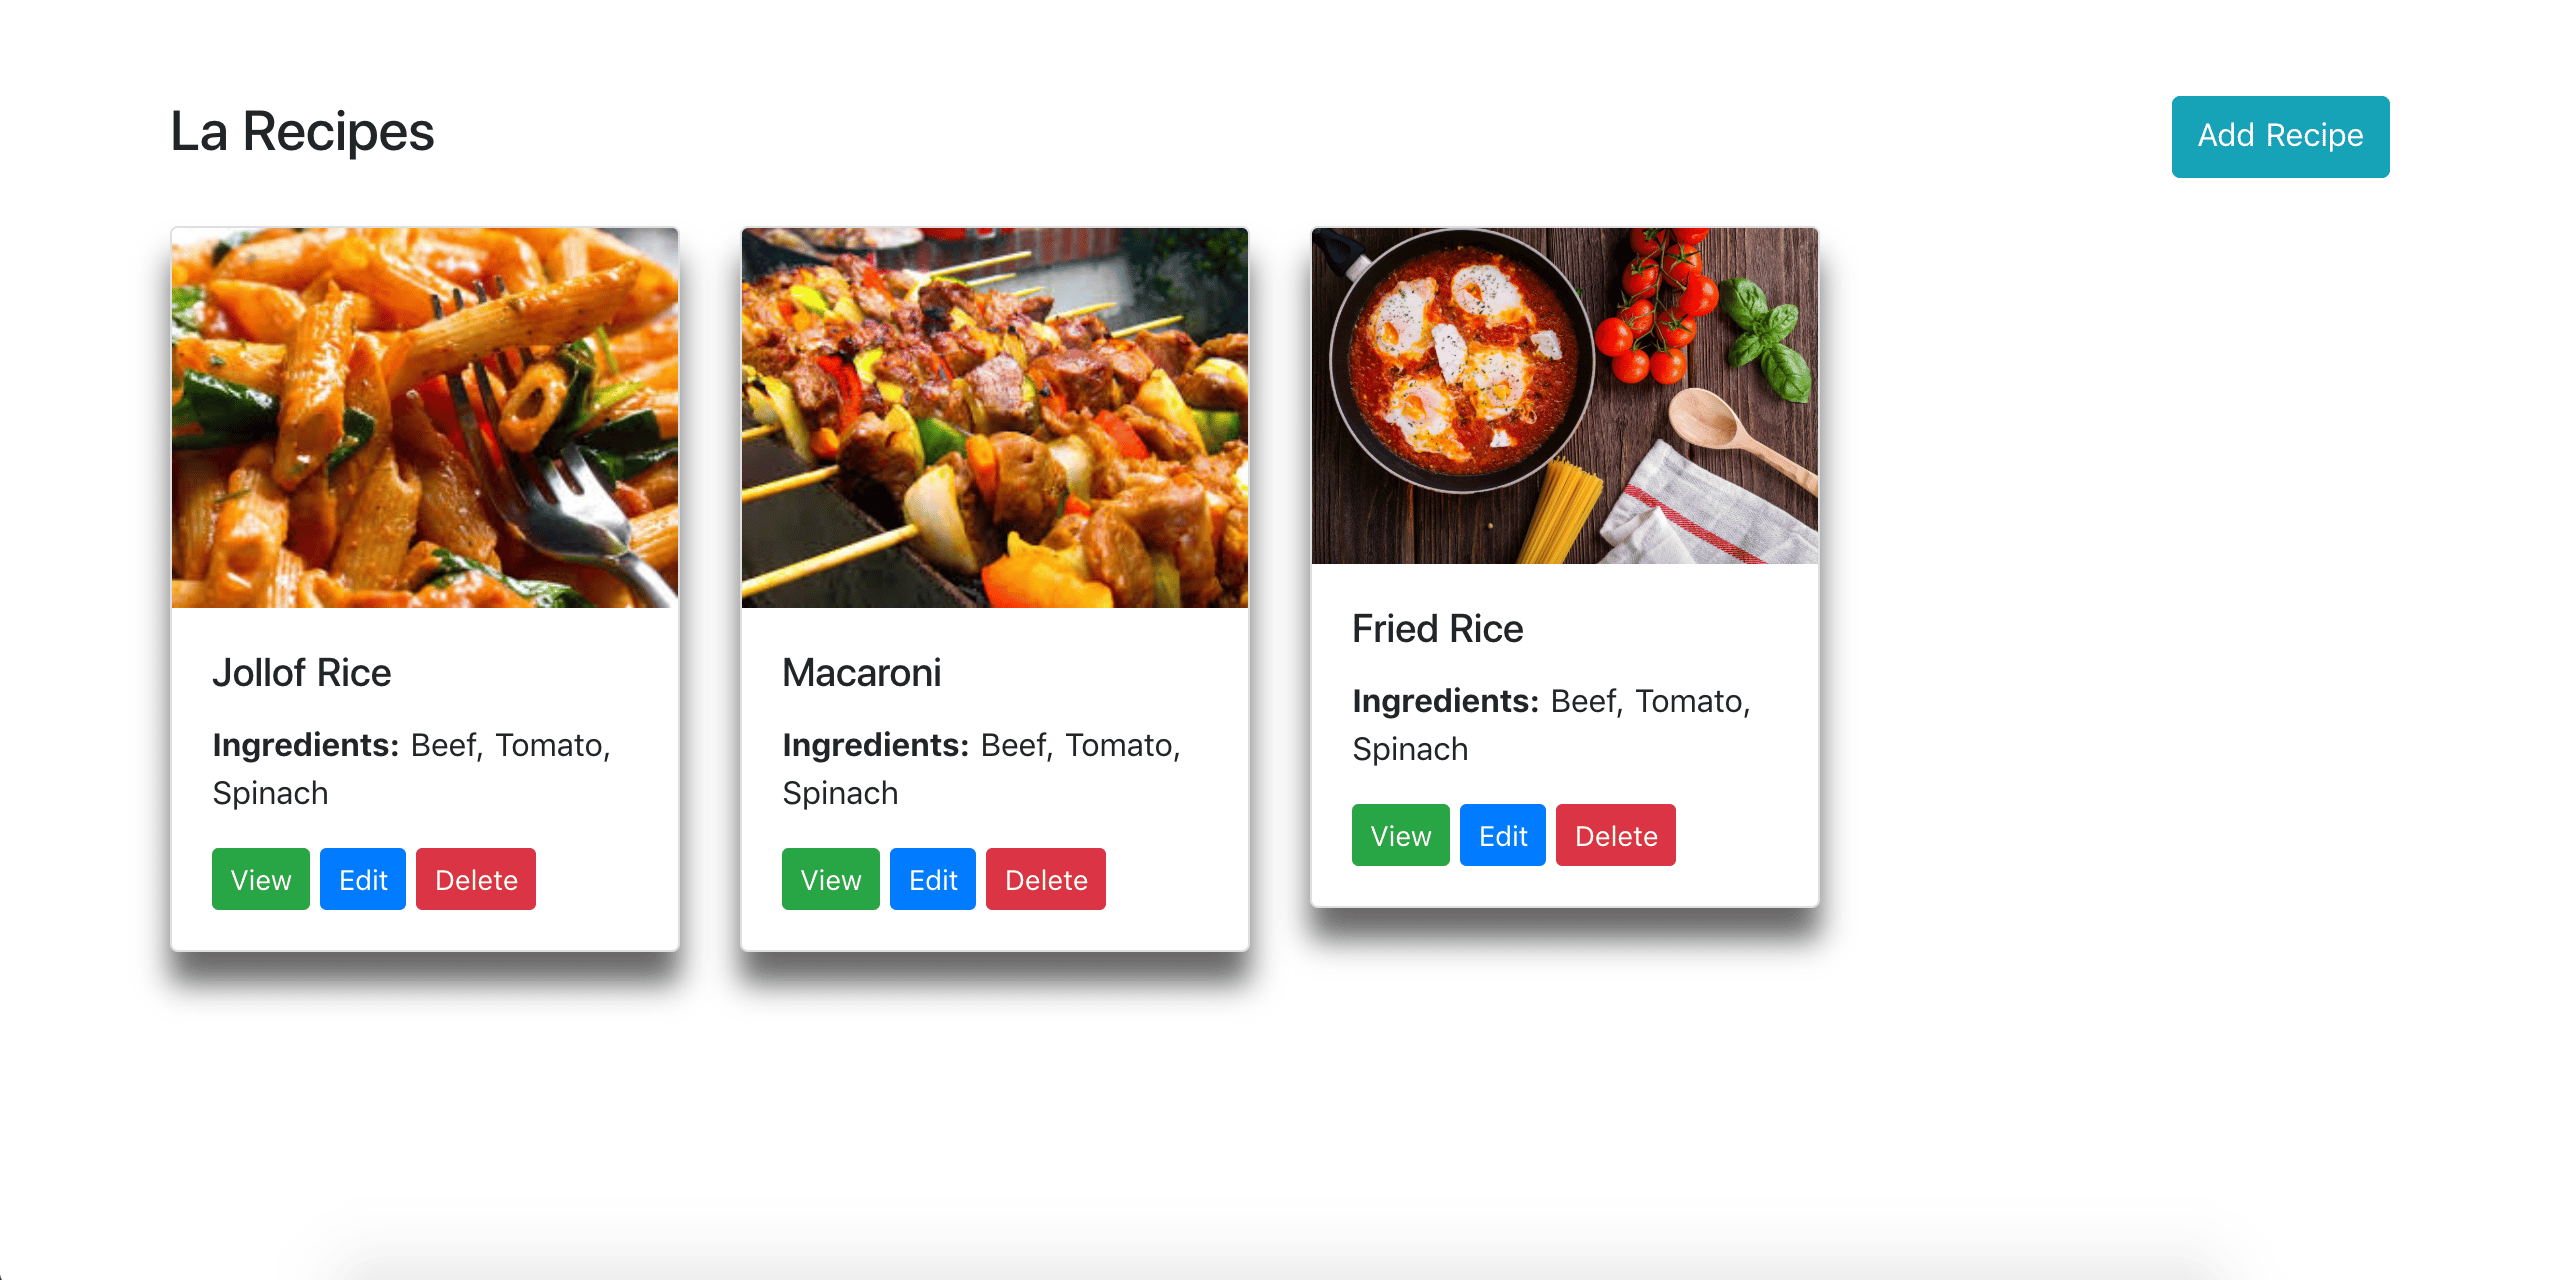
From the image above, we see that three recipe cards appear even though we set recipes to an empty array in the component’s data section. The explanation for this is that the method asyncData is executed before the page loads and it returns an object that updates the component’s data.
Now, all we need to do is modify the asyncData method to make an api request to the Django backend and update the component’s data with the result.
Before we do that, we have to configure Axios. Open the nuxt.config.js file and update it accordingly:
// add this Axios object
axios: {
  baseURL: "http://localhost:8000/api"
},
Note: This assumes you selected Axios when using create-nuxt-app. If you did not, you will need to manually install and configure the modules array.
Now, open the pages/recipes/index.vue file and replace the <script> section with the one below:
[...]

<script>
import RecipeCard from "~/components/RecipeCard.vue";

export default {
  head() {
    return {
      title: "Recipes list"
    };
  },
  components: {
    RecipeCard
  },
  async asyncData({ $axios, params }) {
    try {
      let recipes = await $axios.$get(`/recipes/`);
      return { recipes };
    } catch (e) {
      return { recipes: [] };
    }
  },
  data() {
    return {
      recipes: []
    };
  },
  methods: {
    async deleteRecipe(recipe_id) {
      try {
        await this.$axios.$delete(`/recipes/${recipe_id}/`); // delete recipe
        let newRecipes = await this.$axios.$get("/recipes/"); // get new list of recipes
        this.recipes = newRecipes; // update list of recipes
      } catch (e) {
        console.log(e);
      }
    }
  }
};
</script>

[...]
In the code above, asyncData() receives an object called context, which we destructure to get $axios. You can check out all the attributes of context in the official documentation.
We wrap asyncData() in a try...catch block because we want to prevent the bug which will occur if the backend server isn’t running and Axios fails to retrieve data. Whenever that happens, recipes is just set to an empty array instead.
This line of code:
let recipes = await $axios.$get("/recipes/")
Is a shorter version of:
let response = await $axios.get("/recipes")
let recipes = response.data
The deleteRecipe() method deletes a particular recipe, fetches the most recent list of recipes from the Django backend, and finally updates the component’s data.
We can start the frontend development server (if it isn’t already running) now and we will see that the recipe cards are now being populated with data from the Django backend.
For this to work, the Django backend server has to be running and there must be some data (entered from the admin interface) available for the Recipe items.
- npm run dev
Let’s visit localhost:3000/recipes:

You can also try deleting recipe items and watch them update accordingly.
Adding New Recipes
As we already discussed, we want to be able to add new recipes from the frontend of the application so open the pages/recipes/add/ file and update it with the following snippet:
<template>
  <main class="container my-5">
    <div class="row">
      <div class="col-12 text-center my-3">
        <h2 class="mb-3 display-4 text-uppercase">{{ recipe.name }}</h2>
      </div>
      <div class="col-md-6 mb-4">
        <img
          v-if="preview"
          class="img-fluid"
          style="width: 400px; border-radius: 10px; box-shadow: 0 1rem 1rem rgba(0,0,0,.7);"
          :src="preview"
          alt
        >
        <img
          v-else
          class="img-fluid"
          style="width: 400px; border-radius: 10px; box-shadow: 0 1rem 1rem rgba(0,0,0,.7);"
          src="@/static/images/placeholder.png"
        >
      </div>
      <div class="col-md-4">
        <form @submit.prevent="submitRecipe">
          <div class="form-group">
            <label for>Recipe Name</label>
            <input type="text" class="form-control" v-model="recipe.name">
          </div>
          <div class="form-group">
            <label for>Ingredients</label>
            <input v-model="recipe.ingredients" type="text" class="form-control">
          </div>
          <div class="form-group">
            <label for>Food picture</label>
            <input type="file" name="file" @change="onFileChange">
          </div>
          <div class="row">
            <div class="col-md-6">
              <div class="form-group">
                <label for>Difficulty</label>
                <select v-model="recipe.difficulty" class="form-control">
                  <option value="Easy">Easy</option>
                  <option value="Medium">Medium</option>
                  <option value="Hard">Hard</option>
                </select>
              </div>
            </div>
            <div class="col-md-6">
              <div class="form-group">
                <label for>
                  Prep time
                  <small>(minutes)</small>
                </label>
                <input v-model="recipe.prep_time" type="number" class="form-control">
              </div>
            </div>
          </div>
          <div class="form-group mb-3">
            <label for>Preparation guide</label>
            <textarea v-model="recipe.prep_guide" class="form-control" rows="8"></textarea>
          </div>
          <button type="submit" class="btn btn-primary">Submit</button>
        </form>
      </div>
    </div>
  </main>
</template>

<script>
export default {
  head() {
    return {
      title: "Add Recipe"
    };
  },
  data() {
    return {
      recipe: {
        name: "",
        picture: "",
        ingredients: "",
        difficulty: "",
        prep_time: null,
        prep_guide: ""
      },
      preview: ""
    };
  },
  methods: {
    onFileChange(e) {
      let files = e.target.files || e.dataTransfer.files;
      if (!files.length) {
        return;
      }
      this.recipe.picture = files[0];
      this.createImage(files[0]);
    },
    createImage(file) {
      // let image = new Image();
      let reader = new FileReader();
      let vm = this;
      reader.onload = e => {
        vm.preview = e.target.result;
      };
      reader.readAsDataURL(file);
    },
    async submitRecipe() {
      const config = {
        headers: { "content-type": "multipart/form-data" }
      };
      let formData = new FormData();
      for (let data in this.recipe) {
        formData.append(data, this.recipe[data]);
      }
      try {
        let response = await this.$axios.$post("/recipes/", formData, config);
        this.$router.push("/recipes/");
      } catch (e) {
        console.log(e);
      }
    }
  }
};
</script>

<style scoped>
</style>
In submitRecipe(), once the form data has been posted and the recipe is created successfully, the app is redirected to /recipes/ using this.$router.
Creating the Single Recipe View Page
Let’s create the view that allows a user to view a single Recipe item, open the /pages/recipes/_id/index.vue file and paste in the snippet below:
<template>
  <main class="container my-5">
    <div class="row">
      <div class="col-12 text-center my-3">
        <h2 class="mb-3 display-4 text-uppercase">{{ recipe.name }}</h2>
      </div>
      <div class="col-md-6 mb-4">
        <img
          class="img-fluid"
          style="width: 400px; border-radius: 10px; box-shadow: 0 1rem 1rem rgba(0,0,0,.7);"
          :src="recipe.picture"
          alt
        >
      </div>
      <div class="col-md-6">
        <div class="recipe-details">
          <h4>Ingredients</h4>
          <p>{{ recipe.ingredients }}</p>
          <h4>Preparation time ⏱</h4>
          <p>{{ recipe.prep_time }} mins</p>
          <h4>Difficulty</h4>
          <p>{{ recipe.difficulty }}</p>
          <h4>Preparation guide</h4>
          <textarea class="form-control" rows="10" v-html="recipe.prep_guide" disabled />
        </div>
      </div>
    </div>
  </main>
</template>

<script>
export default {
  head() {
    return {
      title: "View Recipe"
    };
  },
  async asyncData({ $axios, params }) {
    try {
      let recipe = await $axios.$get(`/recipes/${params.id}`);
      return { recipe };
    } catch (e) {
      return { recipe: [] };
    }
  },
  data() {
    return {
      recipe: {
        name: "",
        picture: "",
        ingredients: "",
        difficulty: "",
        prep_time: null,
        prep_guide: ""
      }
    };
  }
};
</script>

<style scoped>
</style>
We introduce the params key seen in the asyncData() method. In this case, we are using params to get the ID of the recipe we want to view. We extract params from the URL and pre-fetch its data before displaying it on the page.

We can observe a single Recipe item on the web browser.
Creating the Single Recipe Edit Page
We need to create the view that allows the user to edit and update a single Recipe item, so open the /pages/recipes/_id/edit.vue file and paste in the snippet below:
<template>
  <main class="container my-5">
    <div class="row">
      <div class="col-12 text-center my-3">
        <h2 class="mb-3 display-4 text-uppercase">{{ recipe.name }}</h2>
      </div>
      <div class="col-md-6 mb-4">
        <img v-if="!preview" class="img-fluid" style="width: 400px; border-radius: 10px; box-shadow: 0 1rem 1rem rgba(0,0,0,.7);"  :src="recipe.picture">
        <img v-else class="img-fluid" style="width: 400px; border-radius: 10px; box-shadow: 0 1rem 1rem rgba(0,0,0,.7);"  :src="preview">
      </div>
      <div class="col-md-4">
        <form @submit.prevent="submitRecipe">
          <div class="form-group">
            <label for>Recipe Name</label>
            <input type="text" class="form-control" v-model="recipe.name" >
          </div>
          <div class="form-group">
            <label for>Ingredients</label>
            <input type="text" v-model="recipe.ingredients" class="form-control" name="Ingredients" >
          </div>
          <div class="form-group">
            <label for>Food picture</label>
            <input type="file" @change="onFileChange">
          </div>
          <div class="row">
            <div class="col-md-6">
              <div class="form-group">
                <label for>Difficulty</label>
                <select v-model="recipe.difficulty" class="form-control" >
                  <option value="Easy">Easy</option>
                  <option value="Medium">Medium</option>
                  <option value="Hard">Hard</option>
                </select>
              </div>
            </div>
            <div class="col-md-6">
              <div class="form-group">
                <label for>
                  Prep time
                  <small>(minutes)</small>
                </label>
                <input type="text" v-model="recipe.prep_time" class="form-control" name="Ingredients" >
              </div>
            </div>
          </div>
          <div class="form-group mb-3">
            <label for>Preparation guide</label>
            <textarea v-model="recipe.prep_guide" class="form-control" rows="8"></textarea>
          </div>
          <button type="submit" class="btn btn-success">Save</button>
        </form>
      </div>
    </div>
  </main>
</template>

<script>
export default {
  head(){
      return {
        title: "Edit Recipe"
      }
    },
  async asyncData({ $axios, params }) {
    try {
      let recipe = await $axios.$get(`/recipes/${params.id}`);
      return { recipe };
    } catch (e) {
      return { recipe: [] };
    }
  },
  data() {
    return {
      recipe: {
        name: "",
        picture: "",
        ingredients: "",
        difficulty: "",
        prep_time: null,
        prep_guide: ""
      },
      preview: ""
    };
  },
  methods: {
    onFileChange(e) {
      let files = e.target.files || e.dataTransfer.files;
      if (!files.length) {
        return;
      }
      this.recipe.picture = files[0]
      this.createImage(files[0]);
    },
    createImage(file) {
      let reader = new FileReader();
      let vm = this;
      reader.onload = e => {
        vm.preview = e.target.result;
      };
      reader.readAsDataURL(file);
    },
    async submitRecipe() {
      let editedRecipe = this.recipe
      if (editedRecipe.picture.name.indexOf("http://") != -1){
        delete editedRecipe["picture"]
      }
      const config = {
        headers: { "content-type": "multipart/form-data" }
      };
      let formData = new FormData();
      for (let data in editedRecipe) {
        formData.append(data, editedRecipe[data]);
      }
      try {
        let response = await this.$axios.$patch(`/recipes/${editedRecipe.id}/`, formData, config);
        this.$router.push("/recipes/");
      } catch (e) {
        console.log(e);
      }
    }
  }
};
</script>

<style scoped>
</style>
In the code above, the submitRecipe() method has a conditional statement whose purpose is to remove the picture of an edited Recipe item from the data to be submitted if the picture was not changed.
Once the Recipe item has been updated, the application is redirected to the Recipes list page — /recipes/.
Setting Up Transitions
The application is fully functional, however, we can give it a smoother look by adding transitions, which allow us to smoothly change CSS property values (from one value to another), over a given duration.
We will set up transitions in the nuxt.config.js file. By default, the transition name is set to page, which means that the transitions we define will be active on all pages.
Let’s include the styling for the transition. Create a directory called css in the assets directory and add a transitions.css file within. Now open the transitions.css file and paste in the snippet below:
.page-enter-active,
.page-leave-active {
  transition: opacity .3s ease;
}
.page-enter,
.page-leave-to {
  opacity: 0;
}
Open the nuxt.config.js file and update it accordingly to load the CSS file we just created:
/*
** Global CSS
*/
css: [
  '~/assets/css/transitions.css', // update this
],
Save your changes and open the application in your browser:

Now, our application will change frames on each navigation in a sleek way.
Conclusion
In this article, we started out by learning the differences between client-side and server-side rendered applications. We went on to learn what a universal application is and finally, we saw how to build a universal application using Nuxt.js and Django.
Thanks for learning with the DigitalOcean Community. Check out our offerings for compute, storage, networking, and managed databases.
About the author
Still looking for an answer?
This textbox defaults to using Markdown to format your answer.
You can type !ref in this text area to quickly search our full set of tutorials, documentation & marketplace offerings and insert the link!
Thanks for the article, but the main point is not described. How to make Django and Nuxt work together in a single environment? You writing axios requests like Nuxt and Django working on the same server, but this is not true. Django backend working on port 8000, Nuxt on 3000 and $axios.$get(‘/recipes/’) doesn’t works. As well as other requests to the backend.
A minute to say this is a great tutorial i learned a lot just from understanding the code and the steps. thanks a lot just one thing to report is the following: When trying to EDIT a recipe if we try to change the image an error gonna occur is that editedRecipe.IMAGE.INCLUDES IS NOT A FUNCTION the solution taht i found is this : if(typeof editedRecipe.image === ‘string’ && editedRecipe.image.includes(“http://”)){ delete editedActor[“image”] }
IT HAS to check if the image is a string data to do the includes of indexOf function or we fgonna have the error. thanks for the awsome work continue :)
I am getting the following error even after setting up the CORS in django as per the notes above:
Access to XMLHttpRequest at ‘http://127.0.0.1:8000/api/leagues’ from origin ‘http://192.168.0.11:3000’ has been blocked by CORS policy: No ‘Access-Control-Allow-Origin’ header is present on the requested resource.
Any help would be appreciated.
not working tutorial. after try migration we have error: MEDIA_ROOT = os.path.join(BASE_DIR, ‘media’) NameError: name ‘os’ is not defined
 This work is licensed under a Creative Commons Attribution-NonCommercial- ShareAlike 4.0 International License.
Become a contributor for community
Get paid to write technical tutorials and select a tech-focused charity to receive a matching donation.

DigitalOcean Documentation
Full documentation for every DigitalOcean product.

Resources for startups and AI-native businesses
The Wave has everything you need to know about building a business, from raising funding to marketing your product.
The developer cloud
Scale up as you grow — whether you're running one virtual machine or ten thousand.

Start building today
From GPU-powered inference and Kubernetes to managed databases and storage, get everything you need to build, scale, and deploy intelligent applications.
