Spaces Object Storage is an S3-compatible object storage service. Spaces buckets let you store and serve large amounts of data, and the built-in CDN minimizes page load times and improves performance.
Many Spaces settings are done via the command line. Please refer to the Spaces documentation for more information.
Ensure Access Control to Spaces are Set
Spaces owners can create, destroy, and read all content in all the Spaces buckets for an account. They also make decisions and manage what everyone else can see. If an owner wants to allow one or more people to co-manage buckets, there are two options: Access Keys and DigitalOcean Teams.
Access Keys
Users who connect with access keys can create, destroy, read, and write to all of the buckets for the account. However, the privileges granted by Spaces access keys do not provide access to the control panel and do not extend to other DigitalOcean resources.
DigitalOcean Teams
Teams allow members to use the control panel, including creating, managing, and destroying buckets associated with the Team account.Team members can also create, delete, and regenerate access keys for buckets.
Unlike Spaces access keys, members of a Team can also access other Team resources like Droplets, Firewalls, and more.
Rationale
Managing access to your DigitalOcean Spaces Object Storage is important for:
- Data Security - Unauthorized access can lead to data breaches, exposure of sensitive information, and potential manipulation or deletion of critical data.
- Compliance Regulations - Many organizations are subject to regulations such as GDPR, HIPAA, or PCI-DSS, which require strict data protection controls and protocols.
- Insider Threat Protection - Insider threats, either malicious or accidental, can be as dangerous as external attacks. Properly managing access helps mitigate the risks posed by insiders by ensuring that individuals only have access to the data and resources necessary for their job functions.
Impact
Misconfigured permissions can either expose sensitive data or lock users out of the data they need to perform their jobs. Frequent changes in team structures or project scopes can exacerbate these risks as updates to access controls may not keep pace.
Remediation Procedure
- Sign into your DigitalOcean account
- Navigate to the Spaces Object Storage page
- Select the Access Keys tab
- Review the relationships between key permissions and buckets
- If changes are necessary, review our How to Manage Administrative Access to Spaces guide to learn more
Default Value
File listings are restricted by default.
Back to Security Best Practices Guides Intro
Create Access and Secret Keys
DigitalOcean Spaces Object Storage uses access and secret keys to control and manage access to data. Access and secret keys are used for authentication and authorization when accessing the Spaces service.
The access key is a public identifier for your account. It is used to identify the user making the request to a Spaces bucket. The secret key is a private key associated with your access key. It should be kept confidential and secure. This key is used in conjunction with the access key to sign requests to the Spaces API, ensuring that the request is authorized.
There are two scope options for access keys:
- Limited, which grants access to specific buckets with read or read/write/delete permissions.
- Full Access, which grants unrestricted access to all supported S3 APIs,including bucket creation and configuration (lifecycle, bucket policies, versioning, CORS, and website), and listing all buckets.
Rationale
Creating access and secret keys is important for the following reasons:
- Security: Access and secret keys allow you to securely access your DigitalOcean Spaces. They function similarly to a username and password, ensuring that only authorized users and applications can access your data.
- Authentication: Access and secret keys are used to authenticate your requests to the Spaces API. Without proper authentication, your requests will be denied, preventing unauthorized access.
Impact
While creating access and secret keys are considered a best Security practice, there are considerations to remain abreast of. For instance, if access keys are hard-coded into applications or stored insecurely, they can be exposed through source code repositories, configuration files, or logs, which increases the risk of unauthorized access. In addition, rotating or revoking keys without proper planning can lead to service disruptions. Furthermore, applications or users relying on the old keys might lose access until updated keys are deployed.
Audit Procedure
- Sign in to your DigitalOcean account
- Navigate to the Spaces Access Keys page
- Review Access Key permissions relative to their affiliated buckets and Read/Write/Delete capabilities
- If augmentations are necessary, follow the steps outlined in the Description or in the Remediation Procedure
Remediation Procedure
Below, please find guidance on how to create and edit Spaces Access Keys
Create Spaces Access Key
- Sign in to your DigitalOcean account
- Navigate to the Spaces Object Storage page
- Select the Access Keys tab.
- If necessary, select Create Access Key to open the New Spaces Access Key window

- Select the key’s access scope a. Full access: Allows all S3 API commands on all buckets b. Limited access: Permits more specific Read or Read/Write/Delete permissions for each bucket
- If limited access was selected, check the boxes for the buckets the key should have access to. For each bucket, use the drop down menu to designate Read or Read/Write/Delete permissions
- Name the key and click Create Access Key
- Immediately copy the Secret Key to a secure location as it will not be shown again
Edit Limited Access Spaces Key Permissions
- Sign in to your DigitalOcean account
- Navigate to the Spaces Access Keys page
- Locate the key and select More (…)
- Select Edit Permissions to open the Edit Permissions window

- Select the boxes for the buckets they key should have access to
- If necessary, change the permissions level via the provided dropdown
For more information on creating and managing access to Access Keys, please visit our How to Manage Access Keys documentation.
Back to Security Best Practices Guides Intro
Set Spaces Bucket Lifecycle Policy
A lifecycle configuration rule is a policy or rule set to manage the lifecycle of objects in a storage bucket. These rules automate the process of transitioning objects through different storage classes or deleting them after they are no longer needed. The objective is to optimize costs and manage data efficiently without manual intervention.
There are several cross-platform command-line tools available to tools for managing S3 and S3-compatible stores, but this example offers guidance on s3cmd. For more information on S3, including local installation instructions, refer to DigitalOcean’s Setting Up s3cmd 2.x with DigitalOcean Spaces reference.
Rationale
Creating a lifecycle configuration rule is important for the following reasons:
- Data management: Lifecycle rules automate the management process, ensuring that data is handled systematically according to predefined policies. This reduces the likelihood of human error and the administrative burden associated with manual data management.
- Risk Mitigation: Proper data lifecycle management helps in mitigating risks associated with data breaches. By ensuring that data is only stored as long as necessary, lifecycle rules reduce the volume of sensitive data at risk.
- Compliance: Many industries are governed by regulations that require data to be retained for certain periods and deleted thereafter. Lifecycle rules help ensure compliance with such regulations automatically, reducing the risk of costly legal or regulatory penalties.
Impact
A significant risk associated with lifecycle configuration rules is unintended data loss. For example, if the expiration period is set too short, data might be deleted before its utility has expired. Another potential risk is not aligning lifecycle rules with compliance and security policies as that presents the risk of violating legal or regulatory requirements.
A lifecycle rule that deletes a large amount of objects can take hours or days to finish running. During this process, you are still billed for any objects that have not been deleted yet. To delete objects faster, use the S3 DeleteObject or DeleteObjects commands:
Audit Procedure
- List your Spaces.
- s3cmd ls
- Get the lifecycle policy for your selected Space.
- s3cmd getlifecycle s3://selected-space
- If no lifecycle configurations exist, the following message will be displayed
- ERROR: S3 error: 404 (NoSuchLifecycleConfiguration)
Remediation Procedure
Lifecycle rules can be used to perform different actions on objects in a Spaces bucket over the course of their “life.” For example, a Spaces bucket may be configured so that objects in it expire and are automatically deleted after a certain length of time. Lifecycle rules based on tagging are not supported.
Before creating lifecycle rules, set up s3cmd 2.x with DigitalOcean Spaces. After setting up s3cmd, follow the How to Configure Lifecycle Rules guide.
Back to Security Best Practices Guides Intro
Set the File Listing Permissions
A Spaces bucket’s file listing is a list of the bucket’s contents in XML. It displays the names (called keys) of every file in the bucket as well as other file information, like the file sizes and last modified dates.
Owners of a bucket set the visibility permissions of this file listing, which can be:
- Public:Anyone on the internet can view the listing by visiting the base URL of the bucket, even if the contents of individual files are set to Private.
- **Private:**Only users who connect to the bucket using access keys can see the contents.
You can set the visibility of the file listing when creating a bucket. On existing buckets, you can view and edit the permissions on the bucket’s Settings tab. The bucket’s Settings tab can be found by selecting the individual bucket from the Spaces Access Keys landing page.

Rationale
Setting the file listing permission is important for several reasons, including:
- Preventing Unauthorized Access: Public file listings can give attackers insight into the structure and contents of your storage. If they can see files that should remain private, they might attempt to access them. Properly setting file listing permissions can help reduce this risk.
- Resource Control: Public file listings can lead to unnecessary or unintended traffic, as users or bots may try to access files they don’t need. By restricting file listing access, you have more control over who can access your resources, helping to reduce unnecessary bandwidth usage and avoid overloading your systems with irrelevant requests.
Impact
Setting the file listing to “Public” exposes individual files you may want to keep private. To keep files private, store them in a private bucket.
Audit Procedure
- From the control panel, select Spaces Object Storage
- Navigate to the bucket’s detail page by clicking the name of the bucket
- Click the Settings tab.
- Locate the listing permission in the File Listing row.
Remediation Procedure
For more information, please review our How to Set File Listing Permissions documentation.
Default Value
The permission to list the contents of a DigitalOcean Spaces bucket is Private by default.
Back to Security Best Practices Guides Intro
Enable the Spaces CDN
Spaces provides a built-in content delivery network (CDN), which is a network of edge servers that deliver content to users. Each point of presence (PoP), the location of a group of edge servers, sends content to the users that are physically closest to it. CDNs help deliver static and dynamic online content faster and more reliably, and provides a layer of redundancy for websites.
Rationale
Enabling the Spaces CDN is important for several reasons, including:
- Improved Performance and Speed: The CDN caches your content in multiple locations, reducing the distance between your users and the server hosting your data. This results in faster load times for your content.
- Reliability and Redundancy: The CDN provides redundancy and fault tolerance by distributing your content across multiple servers. If one server or data center fails, traffic is automatically rerouted to another, ensuring your content remains accessible without downtime.
Impact
We do not recommend or support using multiple CDNs from separate vendors with your Spaces buckets (such as the Spaces built-in CDN and another vendor’s CDN), as it can cause performance issues and be complex to manage.
Audit Procedure
- From the control panel, select Spaces Object Storage
- Navigate to the bucket’s detail page by clicking the name of the bucket
- Click the Settings tab.
- Locate the CDN’s classification in the CDN (Content Delivery Network) section
- If Disabled, follow the steps in the Description to Enable the CDN
Remediation Procedure
Enable the CDN during Bucket Creation
The Spaces CDN can be enabled during bucket creation by identifying the CDN (Content Delivery Network) section on the Spaces create page.

Click Enable CDN. An Edge Cache TTL drop-down menu will appear. This setting determines the amount of time that the content is cached. You can keep the default of 1 hour or choose another value. You can also customize the CDN endpoint with a secure subdomain you own.
Finish choosing the rest of the settings for the bucket, then click Create a Space. Once the bucket is created, you can modify the edge cache TTL setting and custom subdomain at any time on the bucket’s Settings page.
Enable the CDN for an Existing Bucket
The Spaces CDN can also be enabled for an existing bucket. From the Control Panel, navigate to the bucket’s detail page by selecting Spaces Object Storage and subsequently, selecting the name of the bucket. From there, click the Settings tab. The text in the CDN (Content Delivery Network) section will tell you if the CDN is currently Enabled or Disabled for the bucket.
To enable the CDN, in the same CDN (Content Delivery Network) section, click Edit. In the options that open, click Enable CDN. When you do, several options for the CDN will appear.
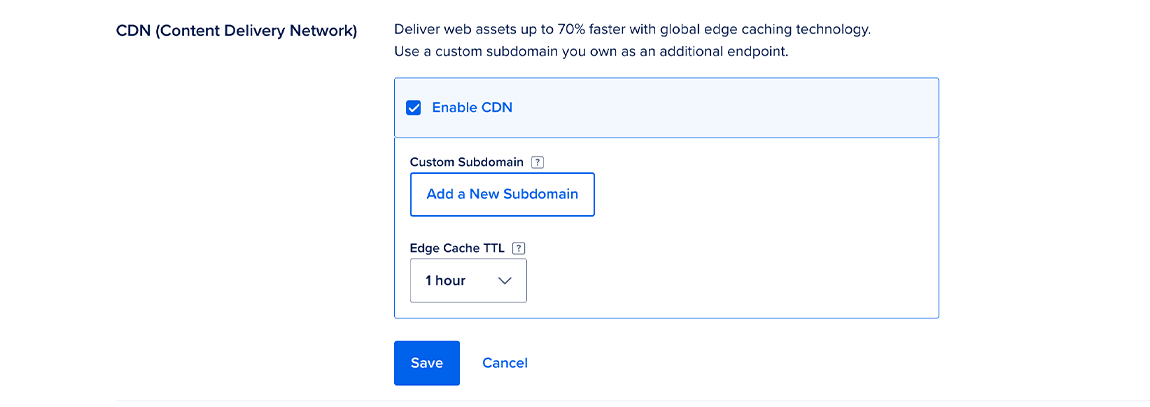
You can customize the CDN endpoint with a secure subdomain you own using the Use a custom subdomain menu. The Edge Cache TTL determines the amount of time that the content is cached. You can keep the default of 1 hour or choose another value.
When you’re done choosing options, click Save. Once the CDN is enabled, you can return to this page to modify the edge cache TTL setting and custom subdomain.
Back to Security Best Practices Guides Intro
Enable CORS
Client web applications loaded in one domain can interact with resources in a Spaces bucket with Cross-Origin Resource Sharing (CORS) configured.
Rationale
Configuring CORS for a Spaces bucket is important for several reasons, including:
- Improved Content Delivery: If your web app needs to serve static assets from a Spaces bucket, CORS enables these assets to be used in your application even when they reside in different origins. It helps in delivering these assets efficiently across different domains without encountering browser restrictions.
- Access Control: With CORS, you can set specific policies on which domains are allowed to interact with your Spaces bucket, which HTTP methods are allowed, and which headers can be used. This provides control over who can access your data and under what conditions, helping you maintain security while enabling cross-origin resource sharing.
Impact Statement
Overly permissive CORS can expose your data to unauthorized applications.
Audit Procedure
- From the control panel, select Spaces Object Storage
- Navigate to the bucket’s detail page by clicking the name of the bucket
- Click the Settings tab.
- Locate the applicable configurations within the CORS Configurations section
Remediation Procedure
You can configure CORS via the control panel by navigating to the designated bucket’s Settings page. In the CORS Configuration row, click Add.

This opens the following Advanced CORS Options window:

Within the Advanced CORS Options window, the following can be completed:
-
Origin: Specifies the complete domain of the client you want to access your bucket’s resources. The domain should start with a protocol identifier, such as http, end with a hostname or hostname and port, and optionally include a wildcard character (*) at the start of the hostname. For example, https://*.example.com. All other settings are only applied to requests from this Origin.
-
Allowed Methods: Determines which API methods can interact with your bucket. You can allow or prohibit the following methods:
- GET: Downloads a resource.
- PUT: Updates a resource’s properties or information.
- DELETE: Deletes a resource.
- POST: Creates a new resource.
- HEAD: Retrieves a resource’s metadata, such as its file size.
-
Allowed Headers: Determines which non-default headers are accepted in your bucket. To verify that an incoming HTTP request abides by your CORS settings, your bucket checks the request’s list of headers. Each header describes a property of the request. For example, Content-Length and Content-Type are some of the default headers that CORS automatically accepts. However, if your client sends any non-default headers, you must first add them in your CORS configuration.
-
Access Control Max Age: Determines how long a request’s verification is cached, in seconds. While verification is cached, the bucket can accept more requests from the same origin without needing to be verified, which improves performance. The recommended value is 5 seconds. Lower values may be useful during development, and higher values may be useful if a single browser is issuing many requests at once. Some browsers may also limit this value to as high as 10 minutes.
CORS configurations unavailable via the control panel, such as ExposeHeaders, can be implemented by uploading a configuration XML file via s3cmd. Please visit this tutorial for more information about setting up s3cmd.
For more information on configuring CORS, please review our How to Configure CORS on DigitalOcean Spaces documentation.
Back to Security Best Practices Guides Intro
Destroy a Spaces Bucket
Destroying a Spaces bucket permanently and irrecoverably destroys the bucket and all of its objects. When you confirm the destruction of your last bucket, your Spaces subscription ends automatically and you are no longer charged.
Spaces buckets can be destroyed by selecting the designated buckets name on the Spaces page to go to its detail page. From there, select the Settings tab and identify the Delete this Spaces Bucket row. Select Delete to open the Spaces Destruction configuration window. Enter the name of the bucket and click Destroy to confirm destruction. As a best practice, ensure all data is backed up, as appropriate, before deletion.
Rationale
Destroying a Spaces bucket is important for several reasons, including:
- Data leak prevention: Deleting buckets that are no longer needed ensures that old or sensitive data is not accidentally exposed or accessed by unauthorized parties.
- Cost control: Spaces buckets incur storage costs, so destroying unused buckets can help minimize expenses. Your Spaces subscription automatically ends when you destroy all your buckets.
Impact
In the event buckets targeted for destruction no longer need to be destroyed, not cancelling bucket destruction before its destruction time leads to permanent data loss.
Audit Procedure
- From the control panel, select Spaces Object Storage
- Locate the bucket which has been targeted for deletion
- Confirm the designated bucket is greyed out, which means the bucket is pending destruction and the Overview page and More menu are not viewable.

Remediation Procedure
For more information on destroying a Spaces bucket, please review our How to Destroy Spaces documentation.
