Sr. Developer Advocate - AI/ML

What actually happens when you run an AI model in PyTorch?
Many AI practitioners never have to think about this. They design and train models using high-level frameworks and know that the calculations happen on a GPU, but they rarely have to think about how this works under the hood.
This is because these frameworks, like PyTorch, provide easy-to-use interfaces for interacting with the GPU. But to make this possible, there are layers and layers of software to translate this code into instructions that a physical chip can understand. These layers are called an “AI compute stack”, and hardware providers each have their own versions - CUDA for NVIDIA and ROCm for AMD.
In this post, we’re going to peel back the layers of abstraction within these compute stacks. We will build up each layer from the physical GPU all the way to high level frameworks like PyTorch, highlighting the corresponding components of both NVIDIA’s and AMD’s ecosystems.
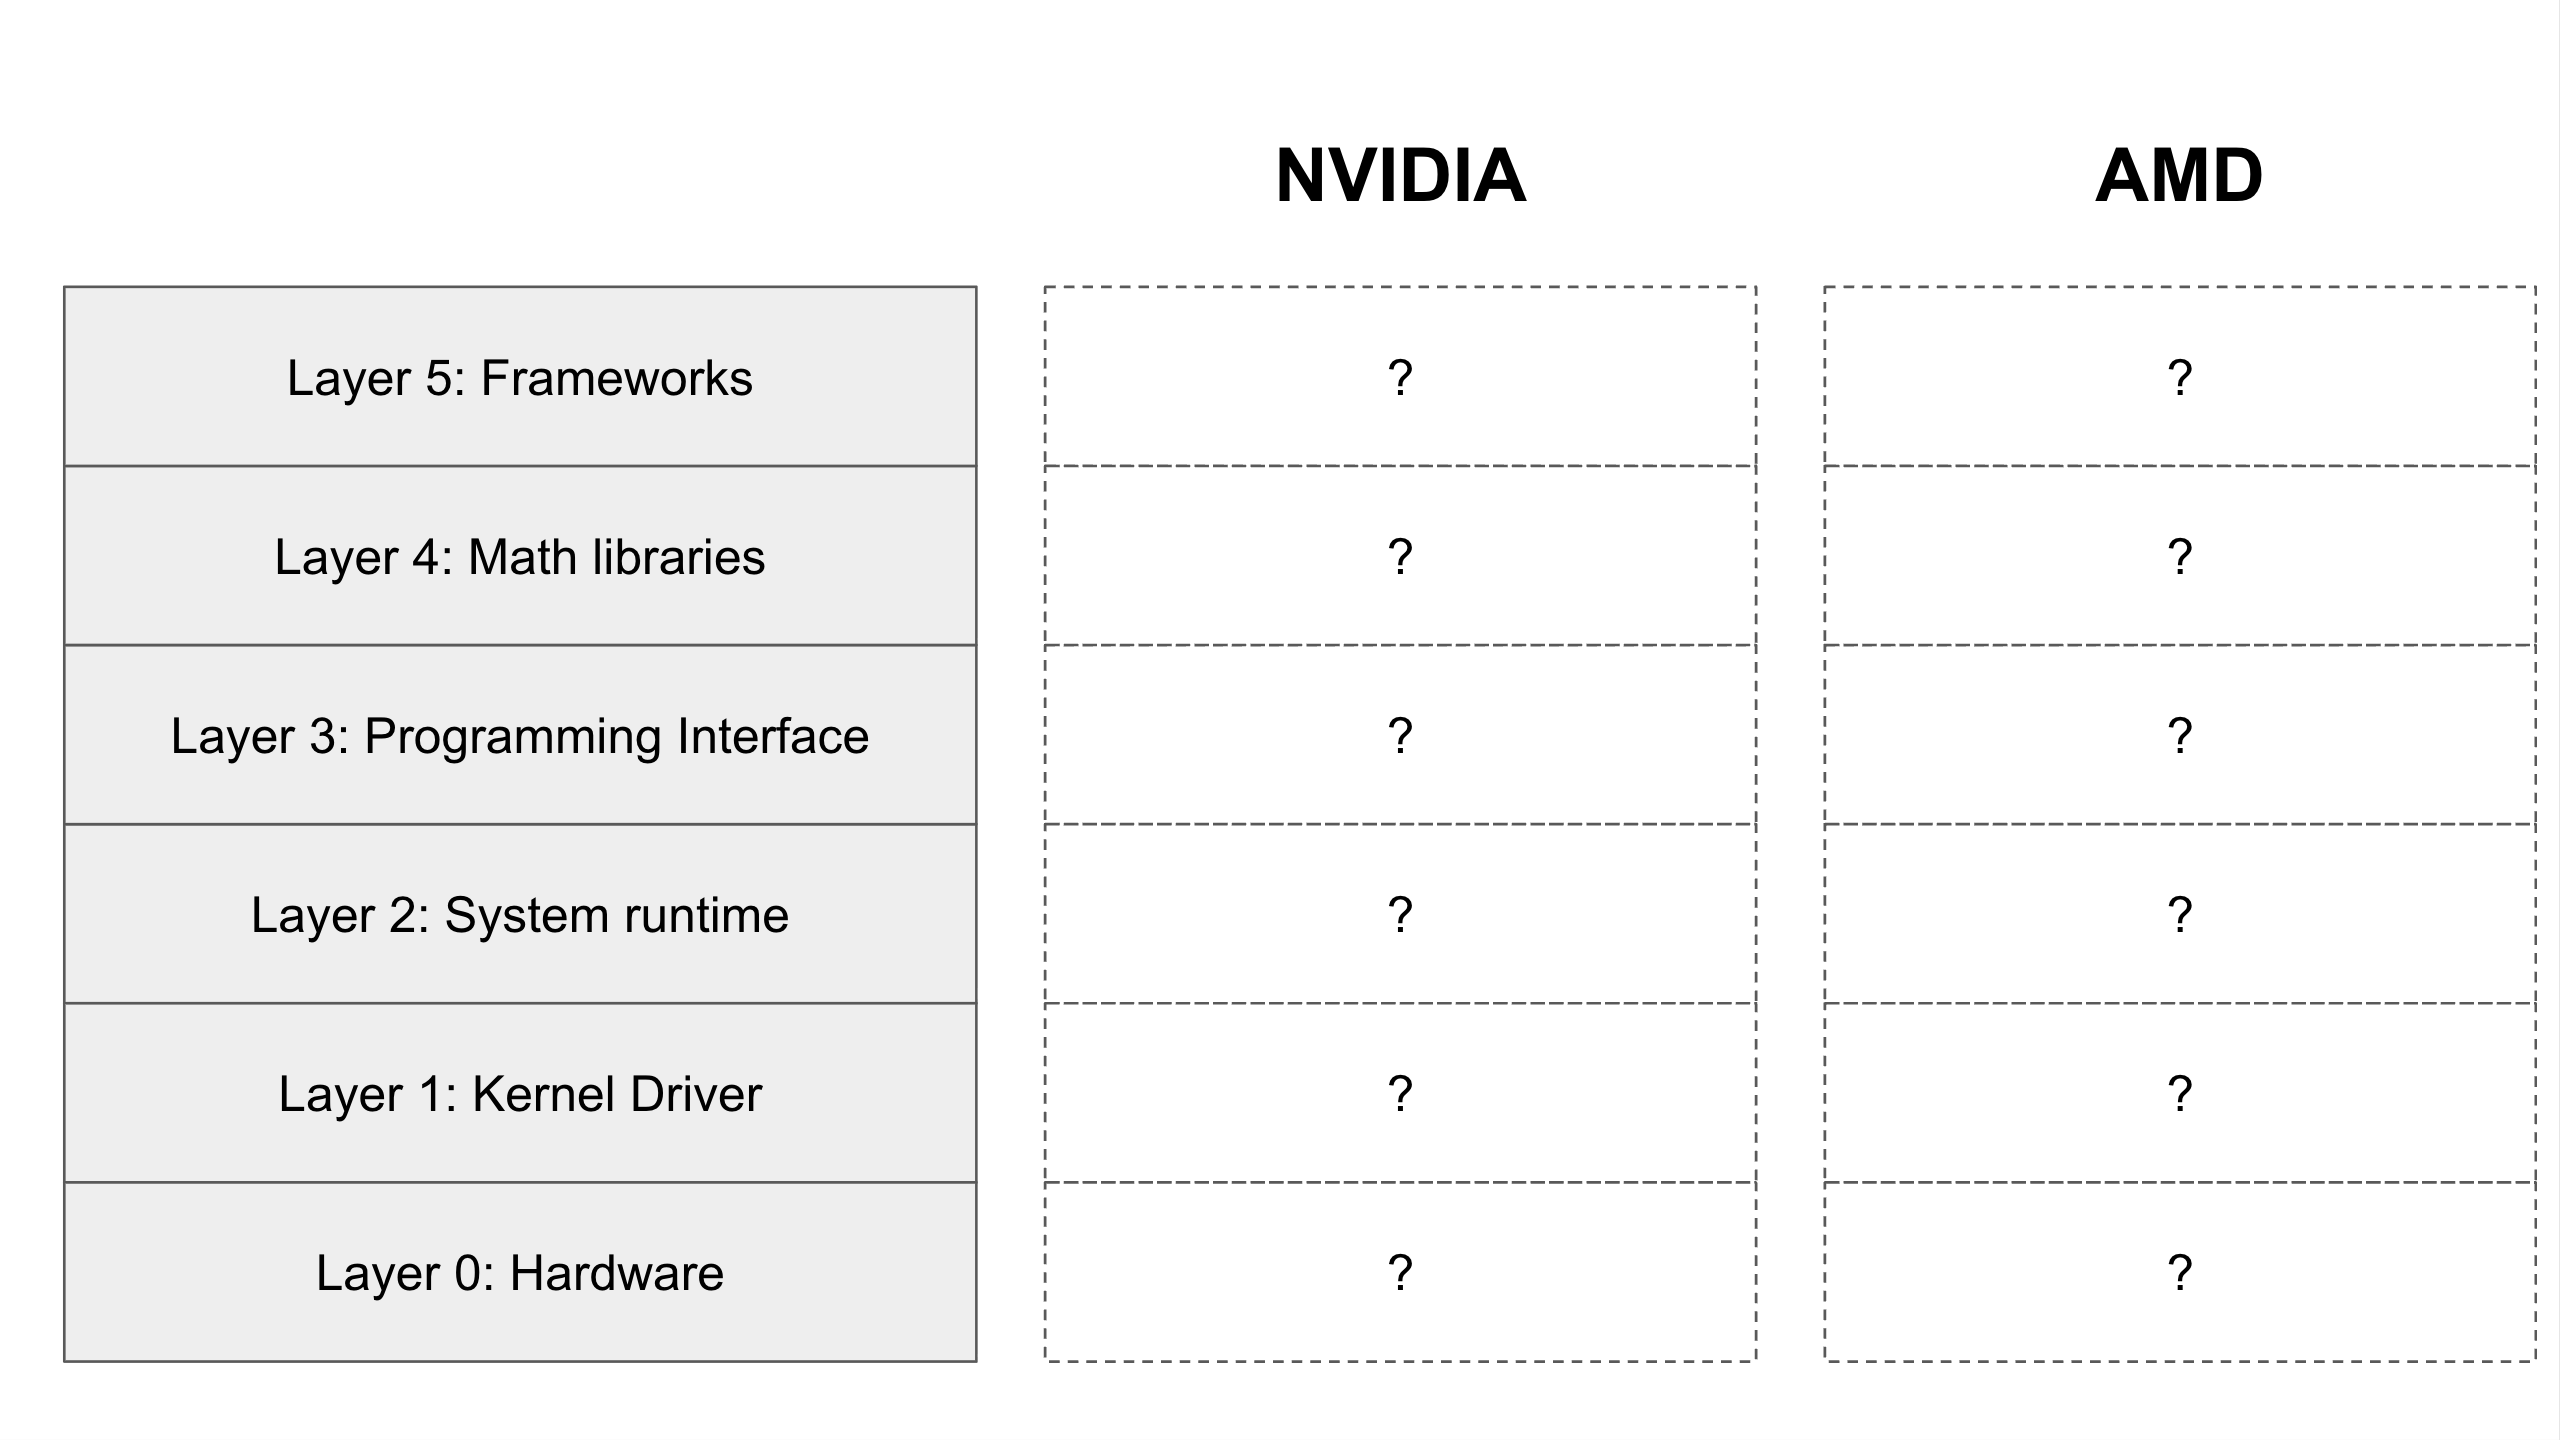
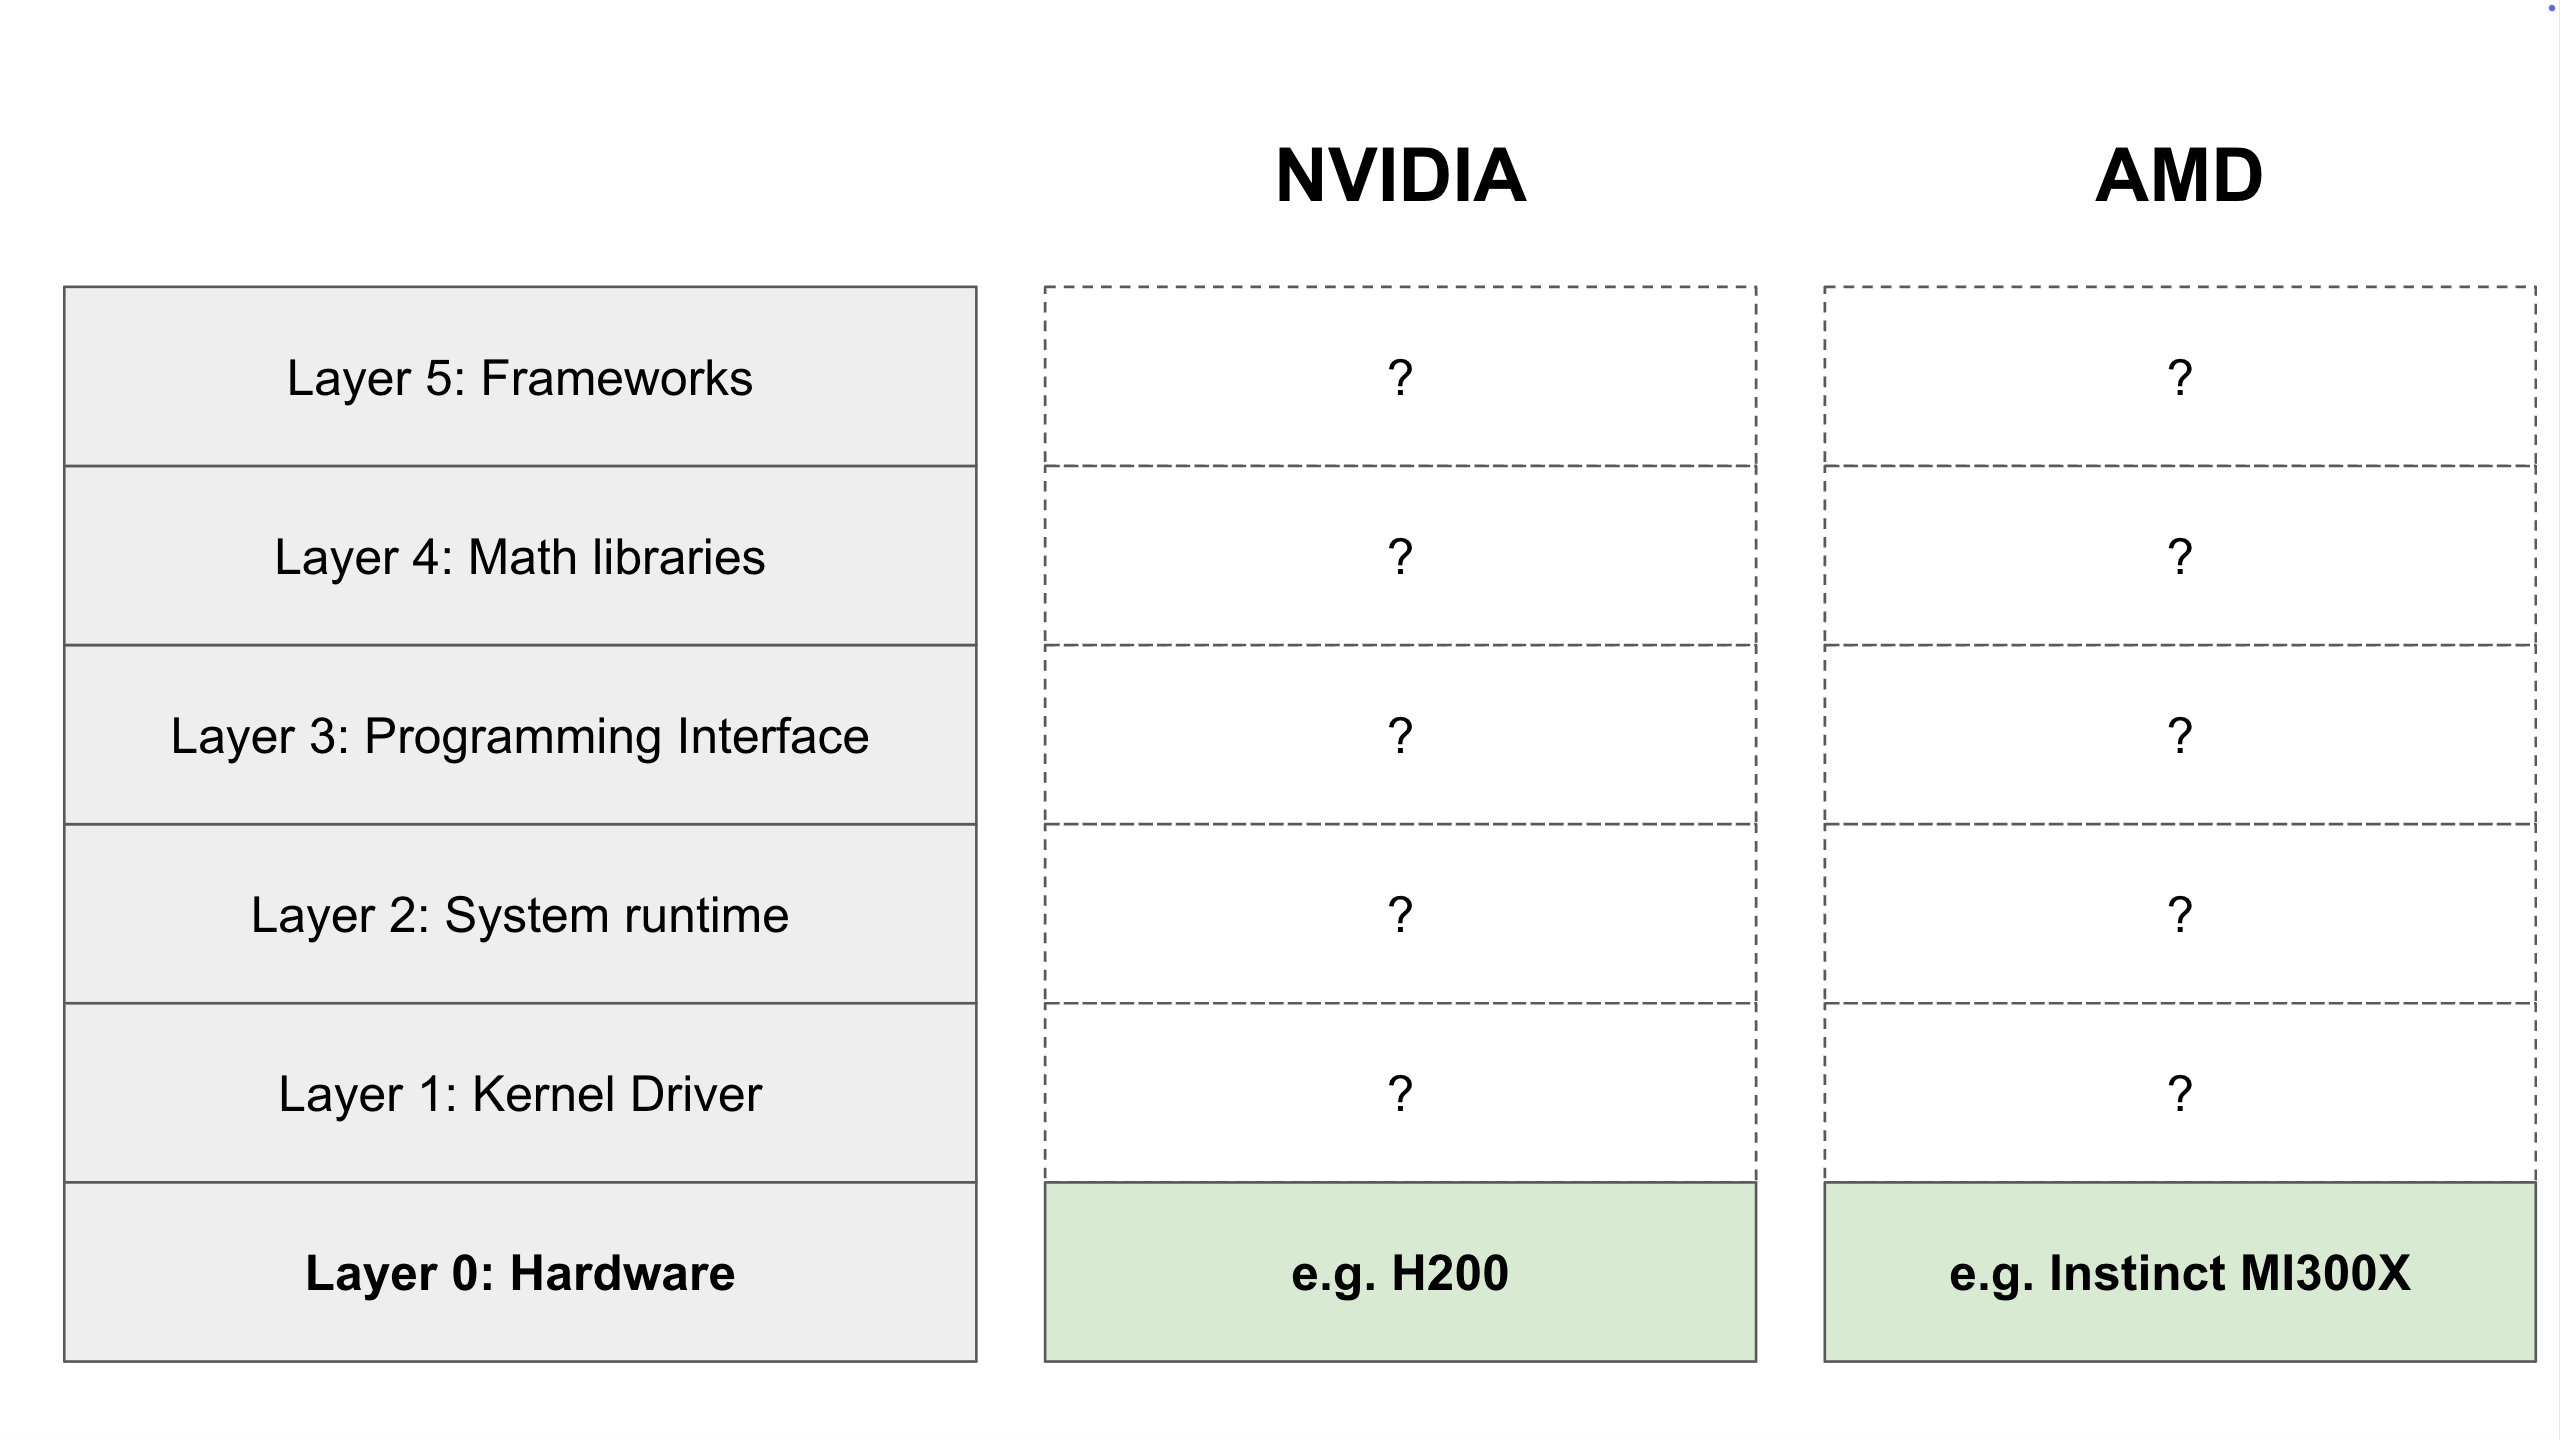
Layer 0: The Hardware (The Foundation)
At the very bottom of the stack, we have the physical component: the GPU itself (e.g., an NVIDIA H200 or AMD Instinct MI300X).
These components are valuable because they are very efficient at performing matrix multiplication. This is the mathematical operation which powers many AI models, like LLMs. To calculate a single matrix multiplication, a computer needs to perform billions of regular multiplications (like 2 x 3), called “scalar multiplications.”
People used to perform these operations on CPUs (Central Processing Units), which is often referred to as the “brain” of a computer. But in 2012 a model called AlexNet demonstrated that a different type of hardware components called GPUs (Graphical Processing Units) are actually better suited to this task of matrix multiplication.
CPUs are smart but sequential. They are designed to do complex tasks one after another very quickly. GPUs are “dumb” but massive. They possess thousands of “cores” that can process simple operations in parallel.

A GPU can perform many simple operations (green boxes) in parallel, leading to extremely high efficiency gains compared to CPUs which must perform these operations in sequence
These “simple operations” that GPUs can efficiently perform include scalar multiplications, the exact thing that powers matrix multiplication (and therefore AI models). So GPUs are much more efficient at training and running AI models than CPUs are.
The constraint is that the GPU has a language barrier. It does not understand programming languages like Python, C++, or even Assembly. It only understands specific machine code (the Instruction Set Architecture or ISA) designed for that exact chip.
To bridge this gap, we need software.
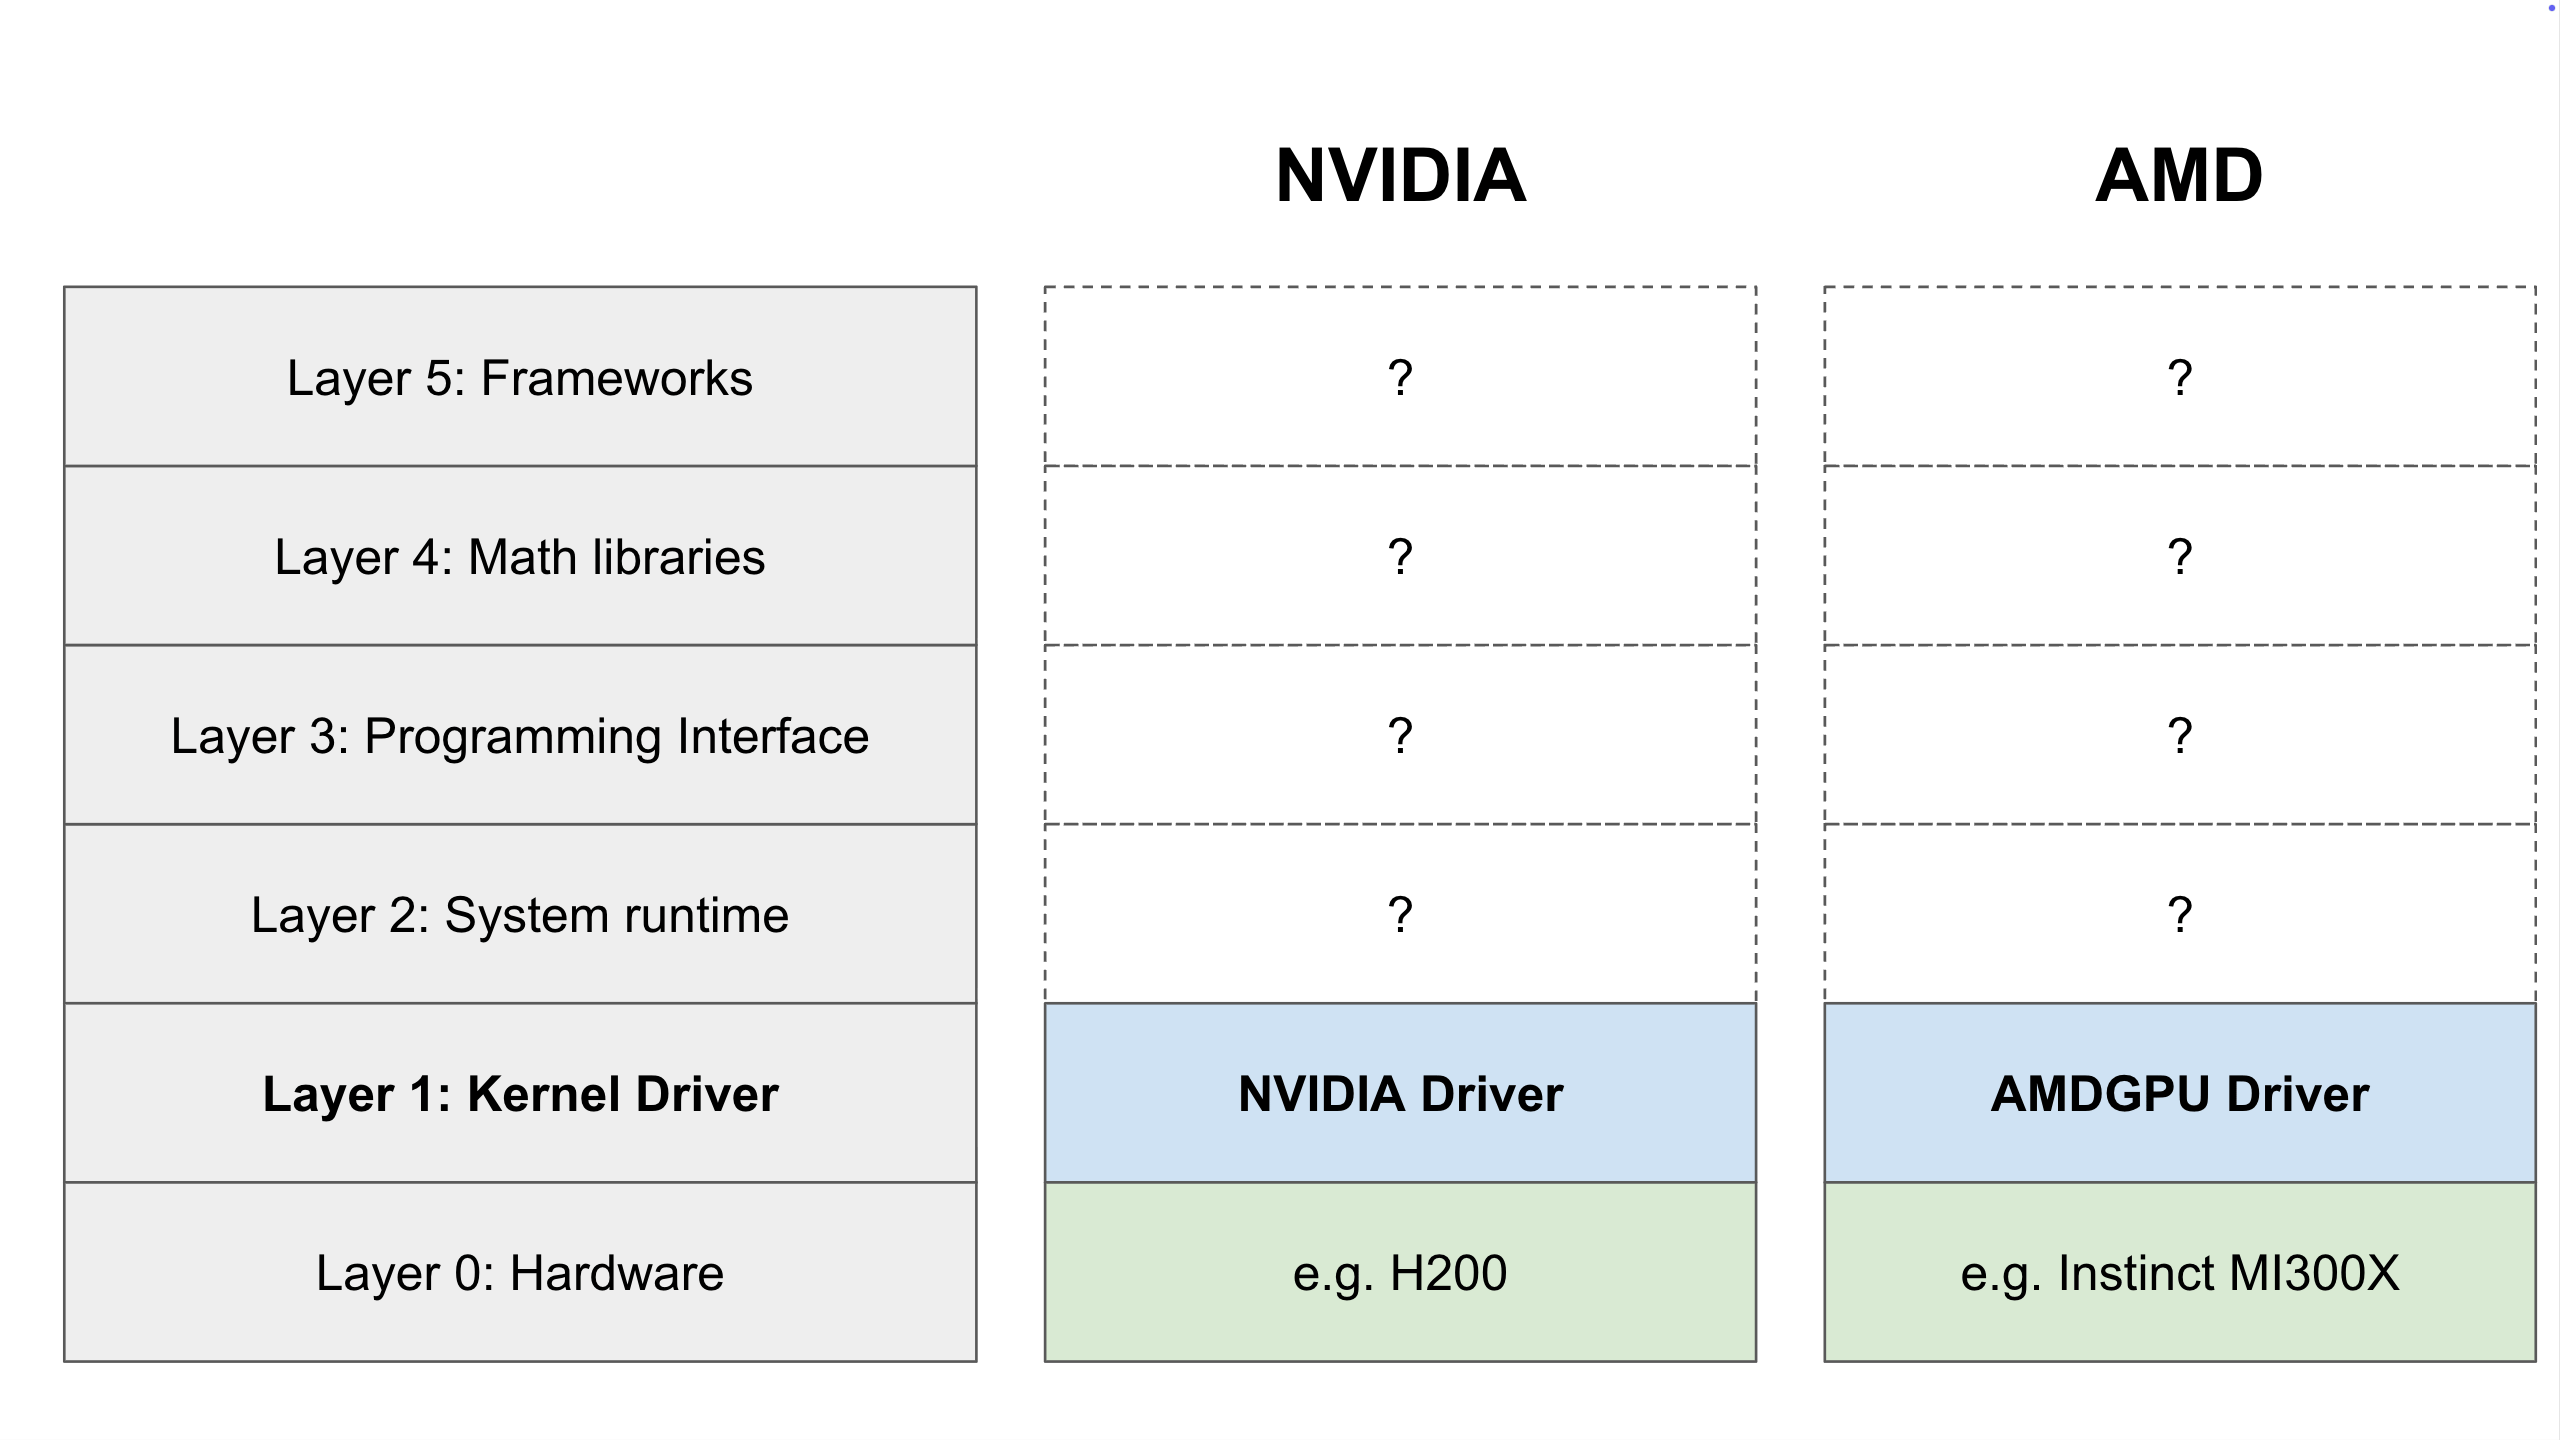
Layer 1: The Kernel Driver
First, a jargon warning: In AI, you will hear the word “kernel” a lot. This layer, the Kernel Driver, refers to the operating system Kernel Driver. This is different from a “GPU Compute Kernel,” which we will discuss in Layer 4.
The Kernel Driver is a module within your system kernel that acts as the bridge between your physical GPU and your computer. It is the first layer of this stack that is within the CUDA (pronounced “coo-dah”) and ROCm (pronounced “rock-um”) ecosystems.
Physically, your GPU connects to the motherboard via PCIe. The Kernel Driver is the software component that sends data back and forth over that physical connection, enabling your computer’s operating system (like MacOS, Windows 11, Ubuntu, etc.) to communicate with the GPU’s firmware. The Kernel Driver operates in “kernel mode” with the highest privileges, which it needs to manage the GPU’s memory, power consumption, and temperature over this connection
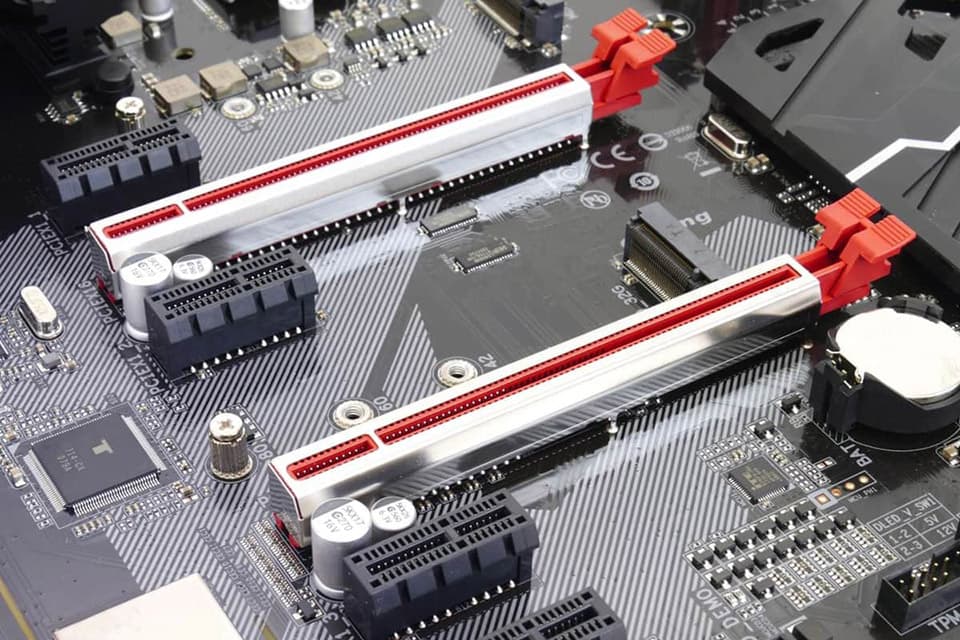
The white and red connectors you see above are PCIe slots. These are what you plug your GPU into on your computer’s motherboard, and the connection over which the Kernel Driver communicates with the GPU (source
Crucially, the Kernel Driver is the only layer that talks directly to the GPU. Every layer above this one must pass its messages through the Kernel Driver.
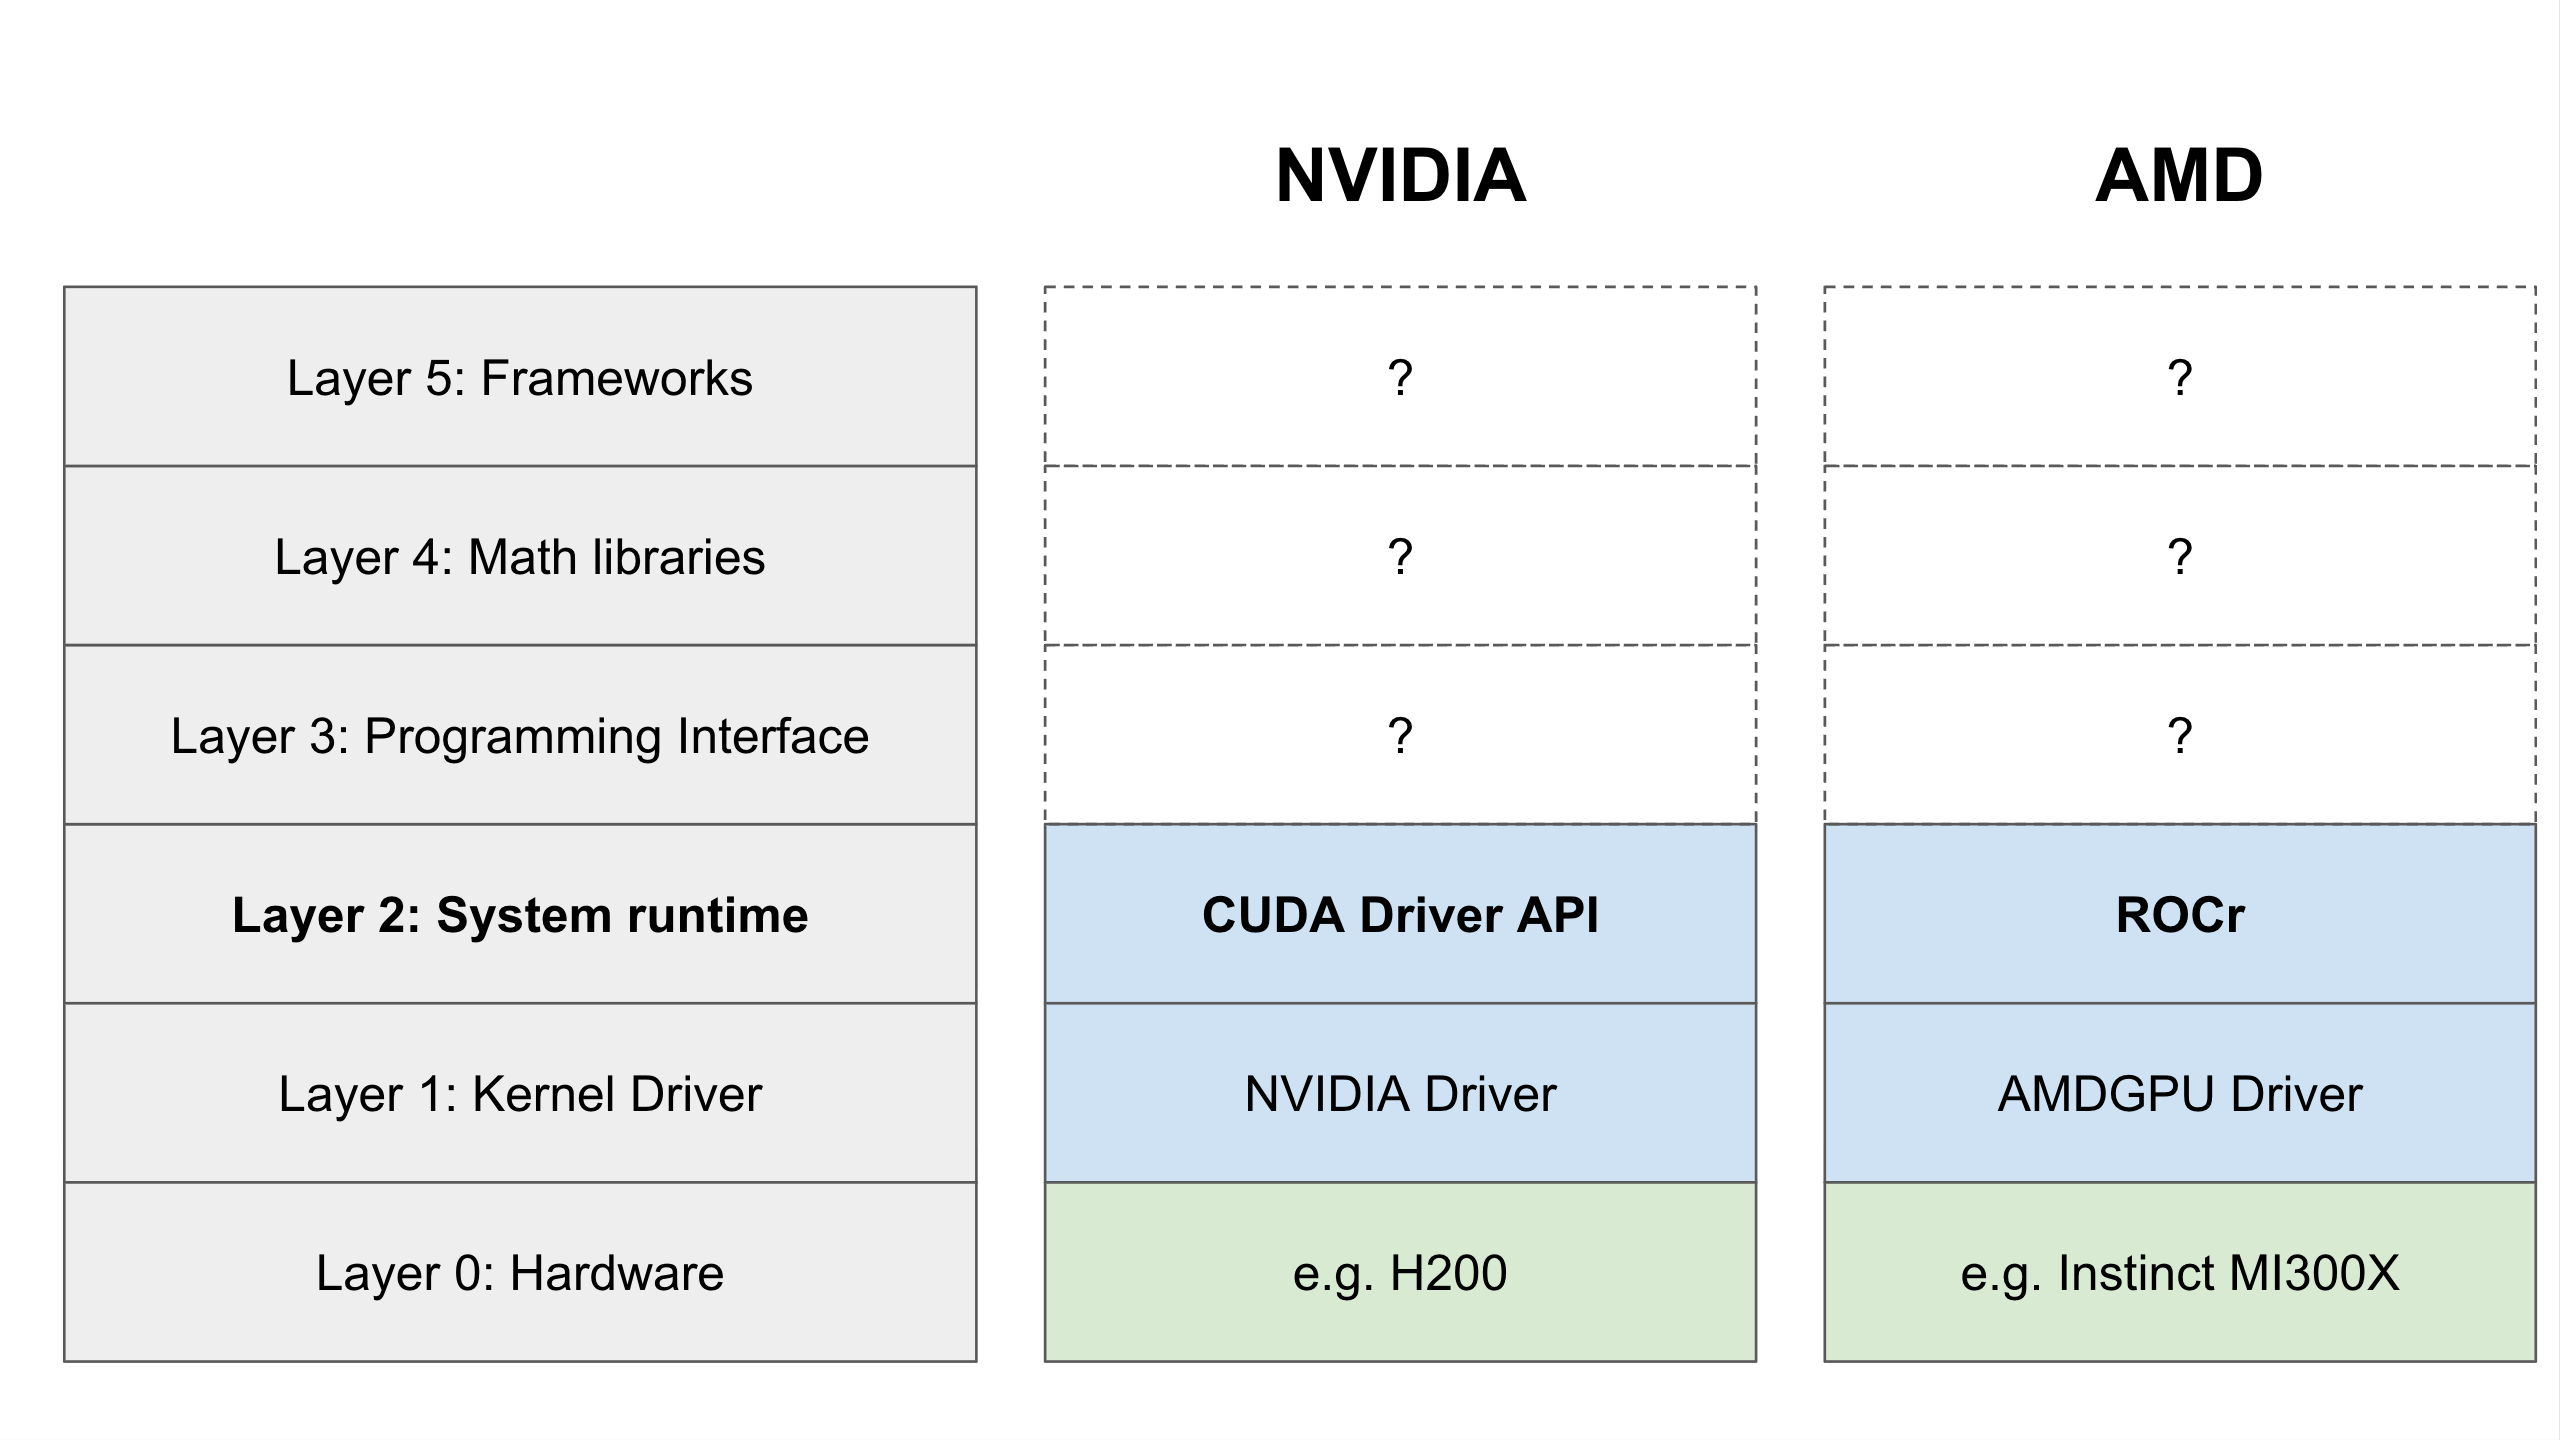
Layer 2: The System Runtime
Moving up one step, we reach the System Runtime. Think of this layer as the Air Traffic Controller for the combined CPU + GPU system, treated as one unified computational unit.
The System Runtime acts as a job scheduler. It creates “packets” of commands, organizes them into queues, and dispatches them to the GPU. It also waits for the GPU to signal back, “Hey, I’m done with that job”.
We need Layer 2 because Layer 1, the Kernel Driver, is only concerned with the direct communication with the GPU. It doesn’t make sense to have each individual program that wants to use the GPU try to communicate with it directly. The System Runtime acts as the central controller which orchestrates all of the work that needs to be done on the GPU so the Kernel Driver can focus on communicating with the GPU to get an individual job done.
ROCm’s System Runtime is called ROCr. It implements an open standard called the “Heterogeneous System Architecture” (HSA). This standard defines how systems of heterogeneous computational units (like a combined CPU and GPU) should work together as one unit.
CUDA doesn’t have an exact equivalent, but the closest match is the CUDA Driver API, which is a proprietary API that performs a similar function (although it can also be considered part of the next layer since you can program against it directly).
Layer 3: The Programming Interface
Layer 3 is where software engineers who are writing code for a GPU actually start to interact with the stack, which they do through the Programming Interface for their ecosystem.
Directly programming a GPU in machine code is impractical for humans. To solve this, vendors provide C++ extensions that allow developers to write conventional code that can then be compiled to machine code for the GPU.*
There are two of these C++ extensions:
- NVIDIA uses CUDA C++, this is the industry incumbent and has been the standard for over a decade
- AMD uses HIP (Heterogeneous-Compute Interface for Portability)
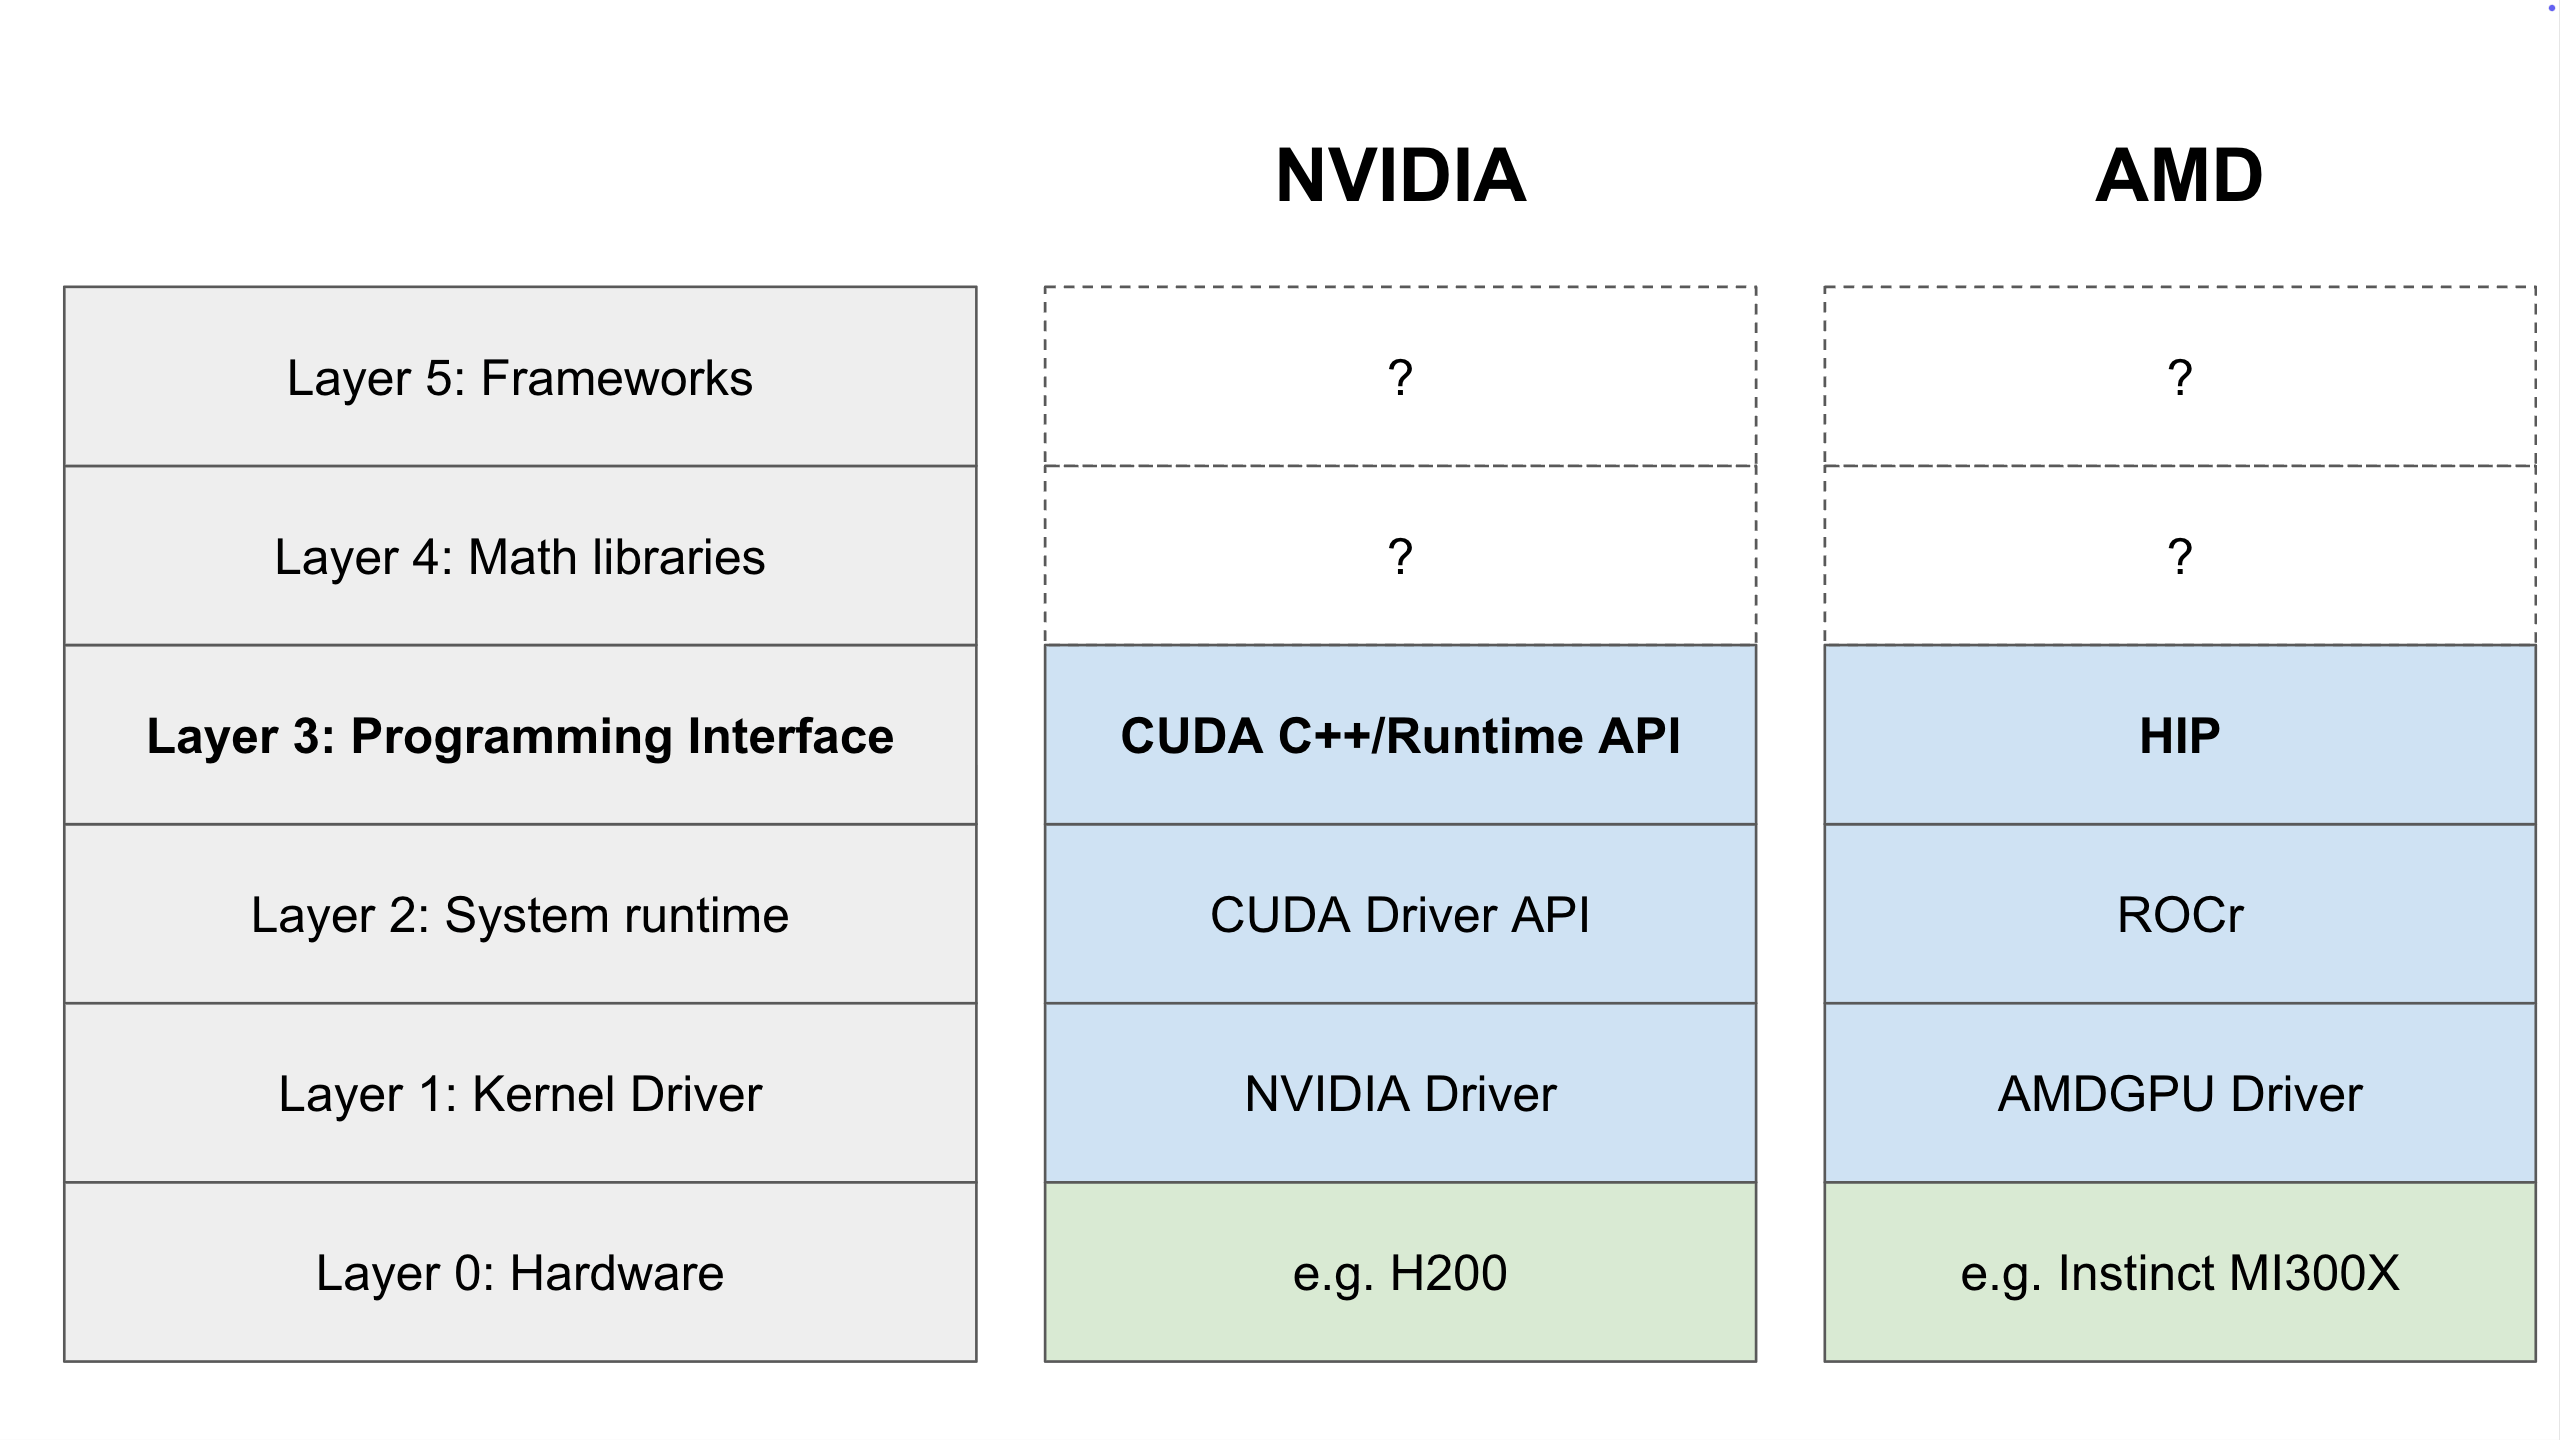
Now technically the equivalent of HIP is the combination of both CUDA C++ and the CUDA Runtime API together, commonly referred to just as “CUDA”. Both HIP and CUDA are basically just C++, but they provide additional keywords and functions for critical capabilities relating to GPU programming, like:
- Allocation: Reserving memory on the GPU
- Movement: Moving data from the CPU to the GPU
- Execution: Launching calculations on the GPU
When you execute a program written in HIP or CUDA (the programming interface), these GPU-related commands are handed off to the System Runtime (Layer 2)**, which does the work of making sure they get executed.
The lines get a little blurry between the two ecosystems at layers 2 and 3 - they are not directly equivalent at these layers. For example, ROCr is pure infrastructure and not directly programmable by developers, while the CUDA Driver API exposes functionality that you can program against with CUDA C++. But, these specifics are not important for most developers.
What is important is to understand (1) that ROCm and CUDA (the ecosystem) are architecturally different, and more importantly (2) that when people say “CUDA”, they could either be referring to the programming interface of CUDA C++ together with the CUDA Runtime API, or to the entire ecosystem CUDA.
A Note on Compatibility
AMD made a strategic choice with HIP, which was released years after CUDA. AMD designed HIP to look almost exactly like CUDA. This allows developers to port CUDA code to HIP with minimal changes. AMD even provides a tool called hipify to automate this translation. HIP is designed to be portable meaning that it can run both on AMD GPUs and on NVIDIA GPUs.
CUDA can’t always be ported to HIP because ROCm’s libraries aren’t as mature, so whether your CUDA is convertible to HIP depends on your particular use case. The gap is closing, but NVIDIA still holds an advantage in niche fields (like Quantum Computing). However, for mainstream AI applications and standard scientific computing, AMD’s ecosystem has matured significantly and has reached parity for many workloads.
* Footnote: “compiled to machine code” is a simplification. In reality, CUDA C++ and HIP programs are split when compiled. The CPU parts of the code are compiled by the system’s normal C++ compiler, and the GPU parts are compiled by the GPU compiler and stored in the program as a block of data in the program.
When the program executes, it runs on the CPU. When a GPU section of the code is encountered, the CPU delegates the execution of it to the GPU, sending along the block of pre-compiled code to the GPU runtime for it to manage getting the code executed on the GPU.
** Footnote: For completeness, AMD uses an intermediate layer called ROCclr (ROCm Common Language Runtime) between HIP and ROCr. This abstraction layer allows AMD to support multiple programming interfaces (HIP and OpenCL) with the same underlying runtime. For simplicity, we treat this as part of the HIP → ROCr connection.
Layer 4: Math Libraries
If you are building an AI application, you probably aren’t writing raw CUDA C++ or HIP to multiply matrices. That would be like writing your own database engine just to store a user’s email address - inefficient and error-prone.
Instead, you use math libraries - the last layer in the stack that is within the CUDA and ROCm ecosystems.
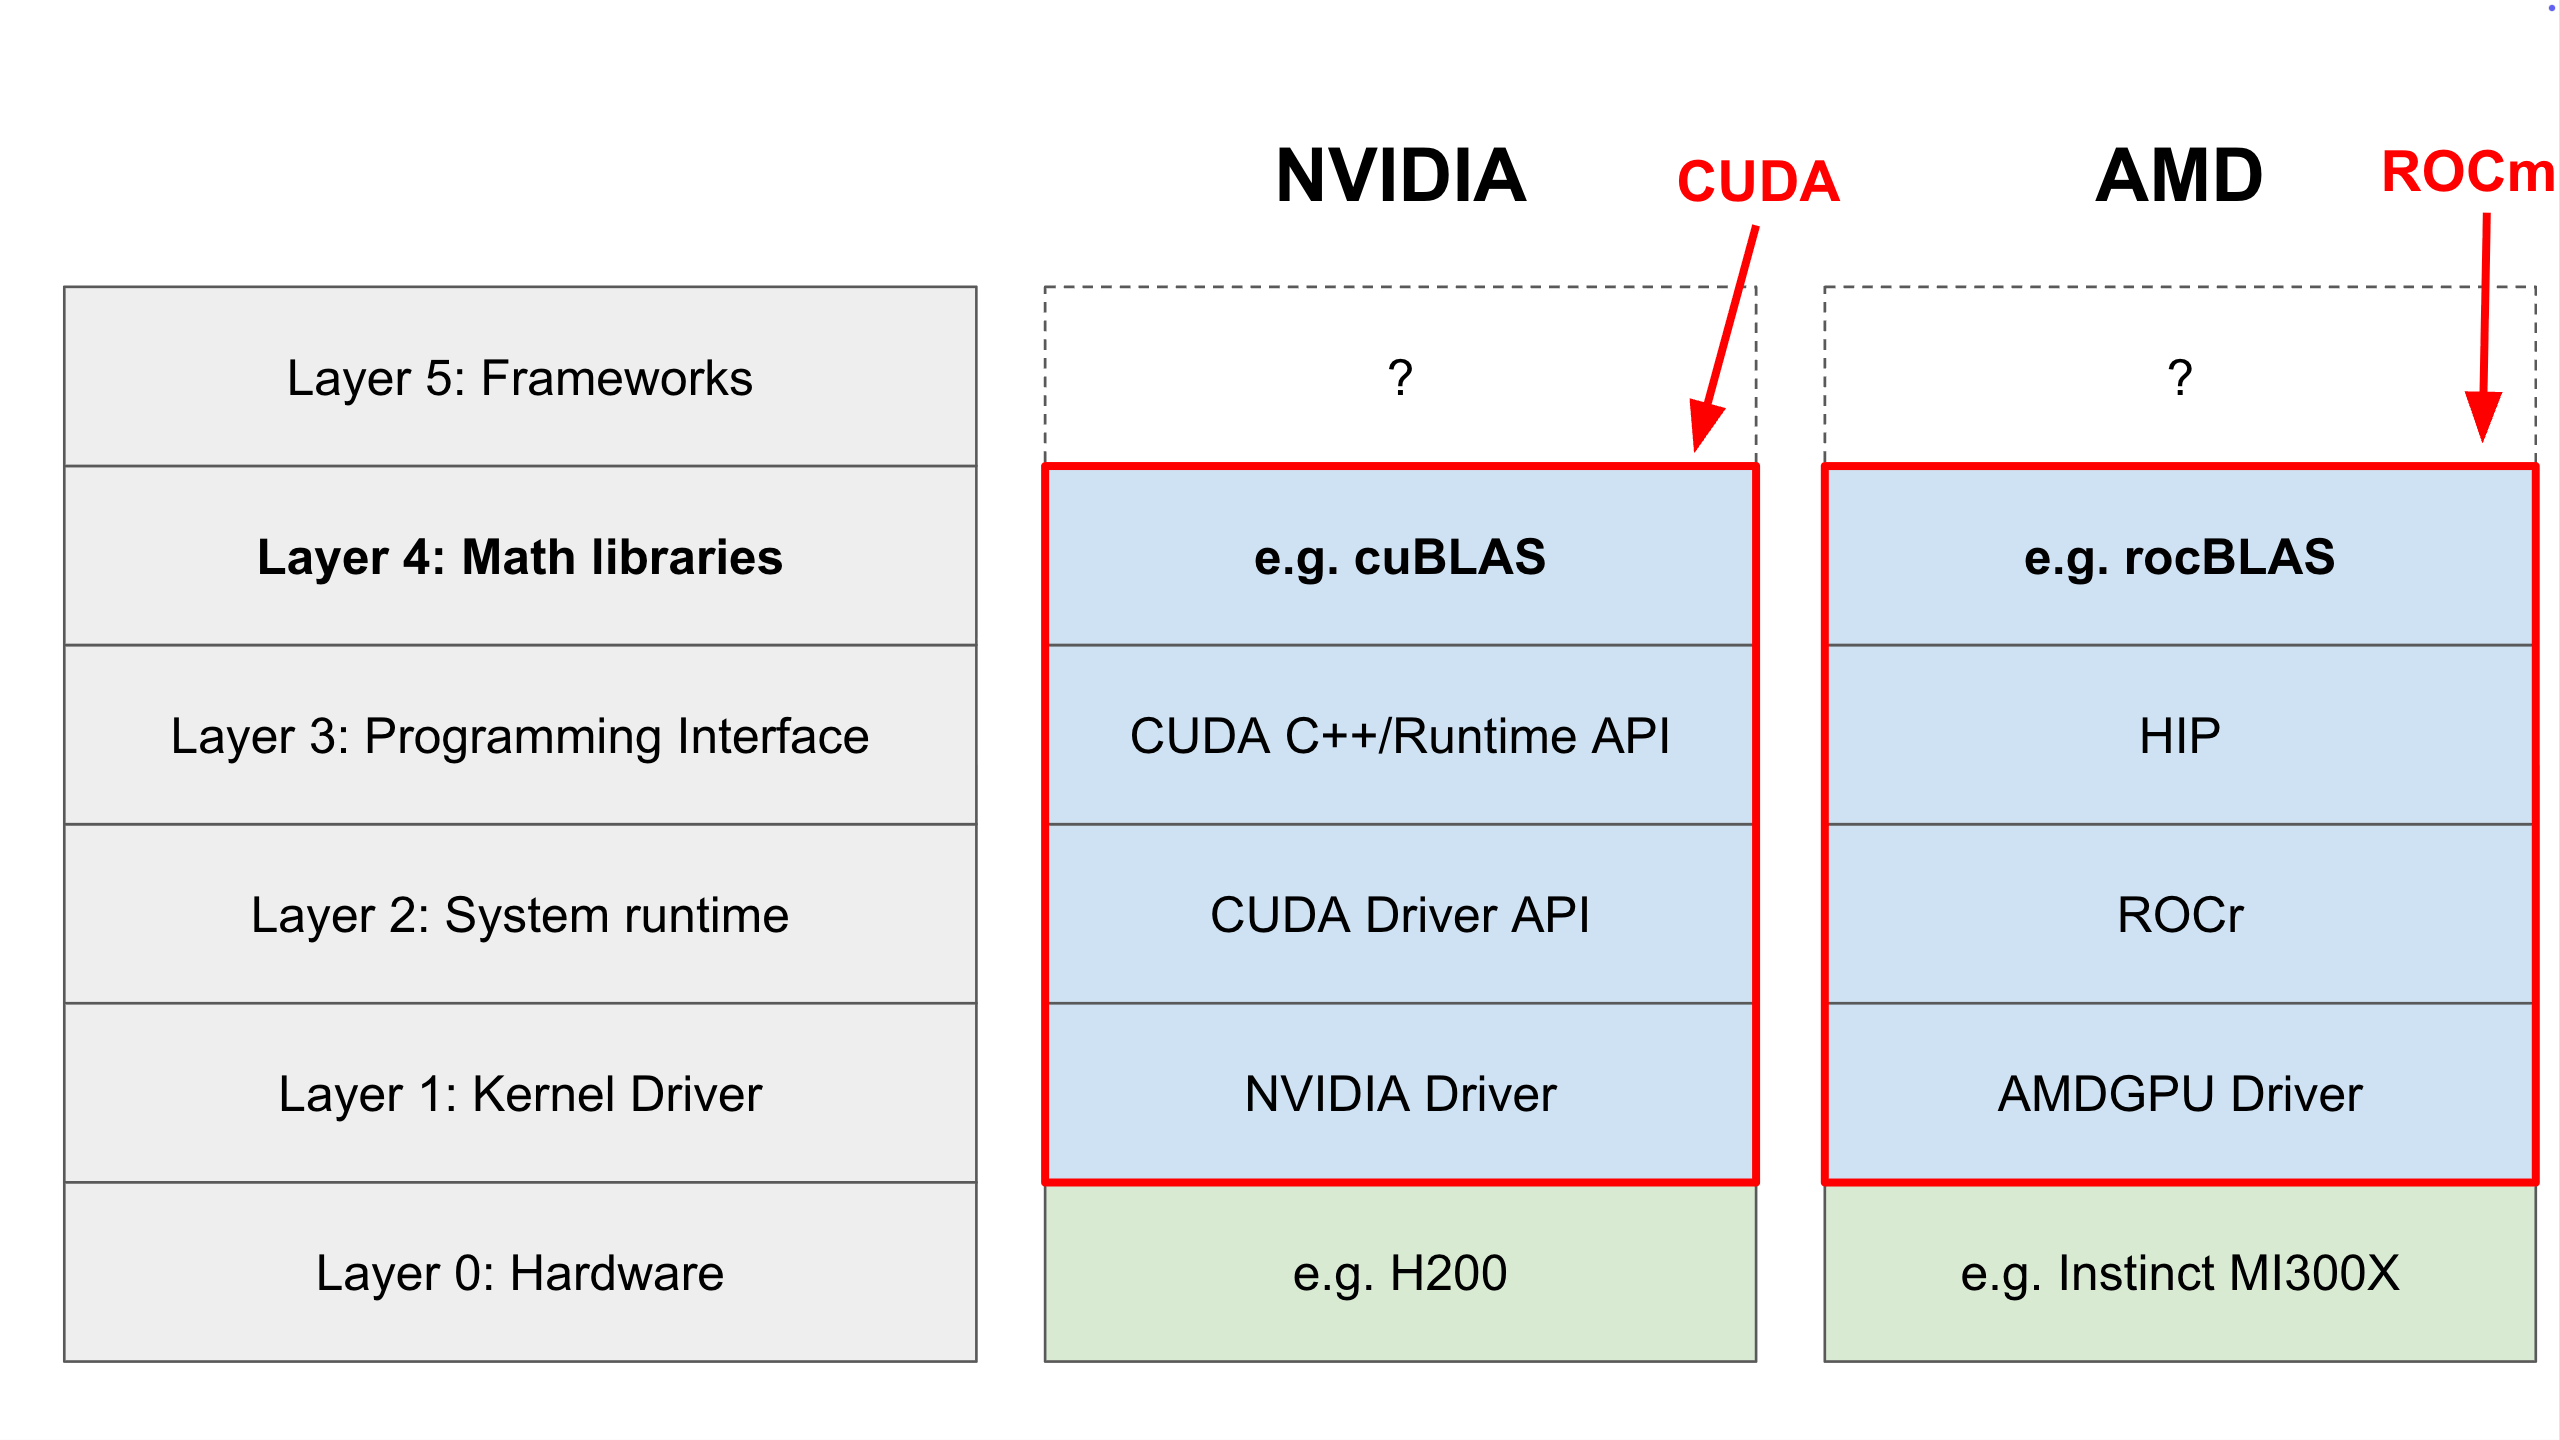
These are collections of optimized “compute kernels” (small programs that run on the GPU) written by the hardware vendors themselves. They are highly optimized to squeeze every drop of performance out of the hardware.
Most of these libraries mirror each other across ecosystems:
| Operation Type | NVIDIA (CUDA) | AMD (ROCm) |
|---|---|---|
| Basic Linear Algebra | cuBLAS, cuSPARSE |
rocBLAS, rocSPARSE |
| Deep Learning | cuDNN |
MIOpen |
| Solvers | cuSOLVER |
rocSOLVER |
When a researcher talks about “optimizing kernels,” they are usually talking about rewriting the code inside these libraries to run faster on specific hardware architectures.
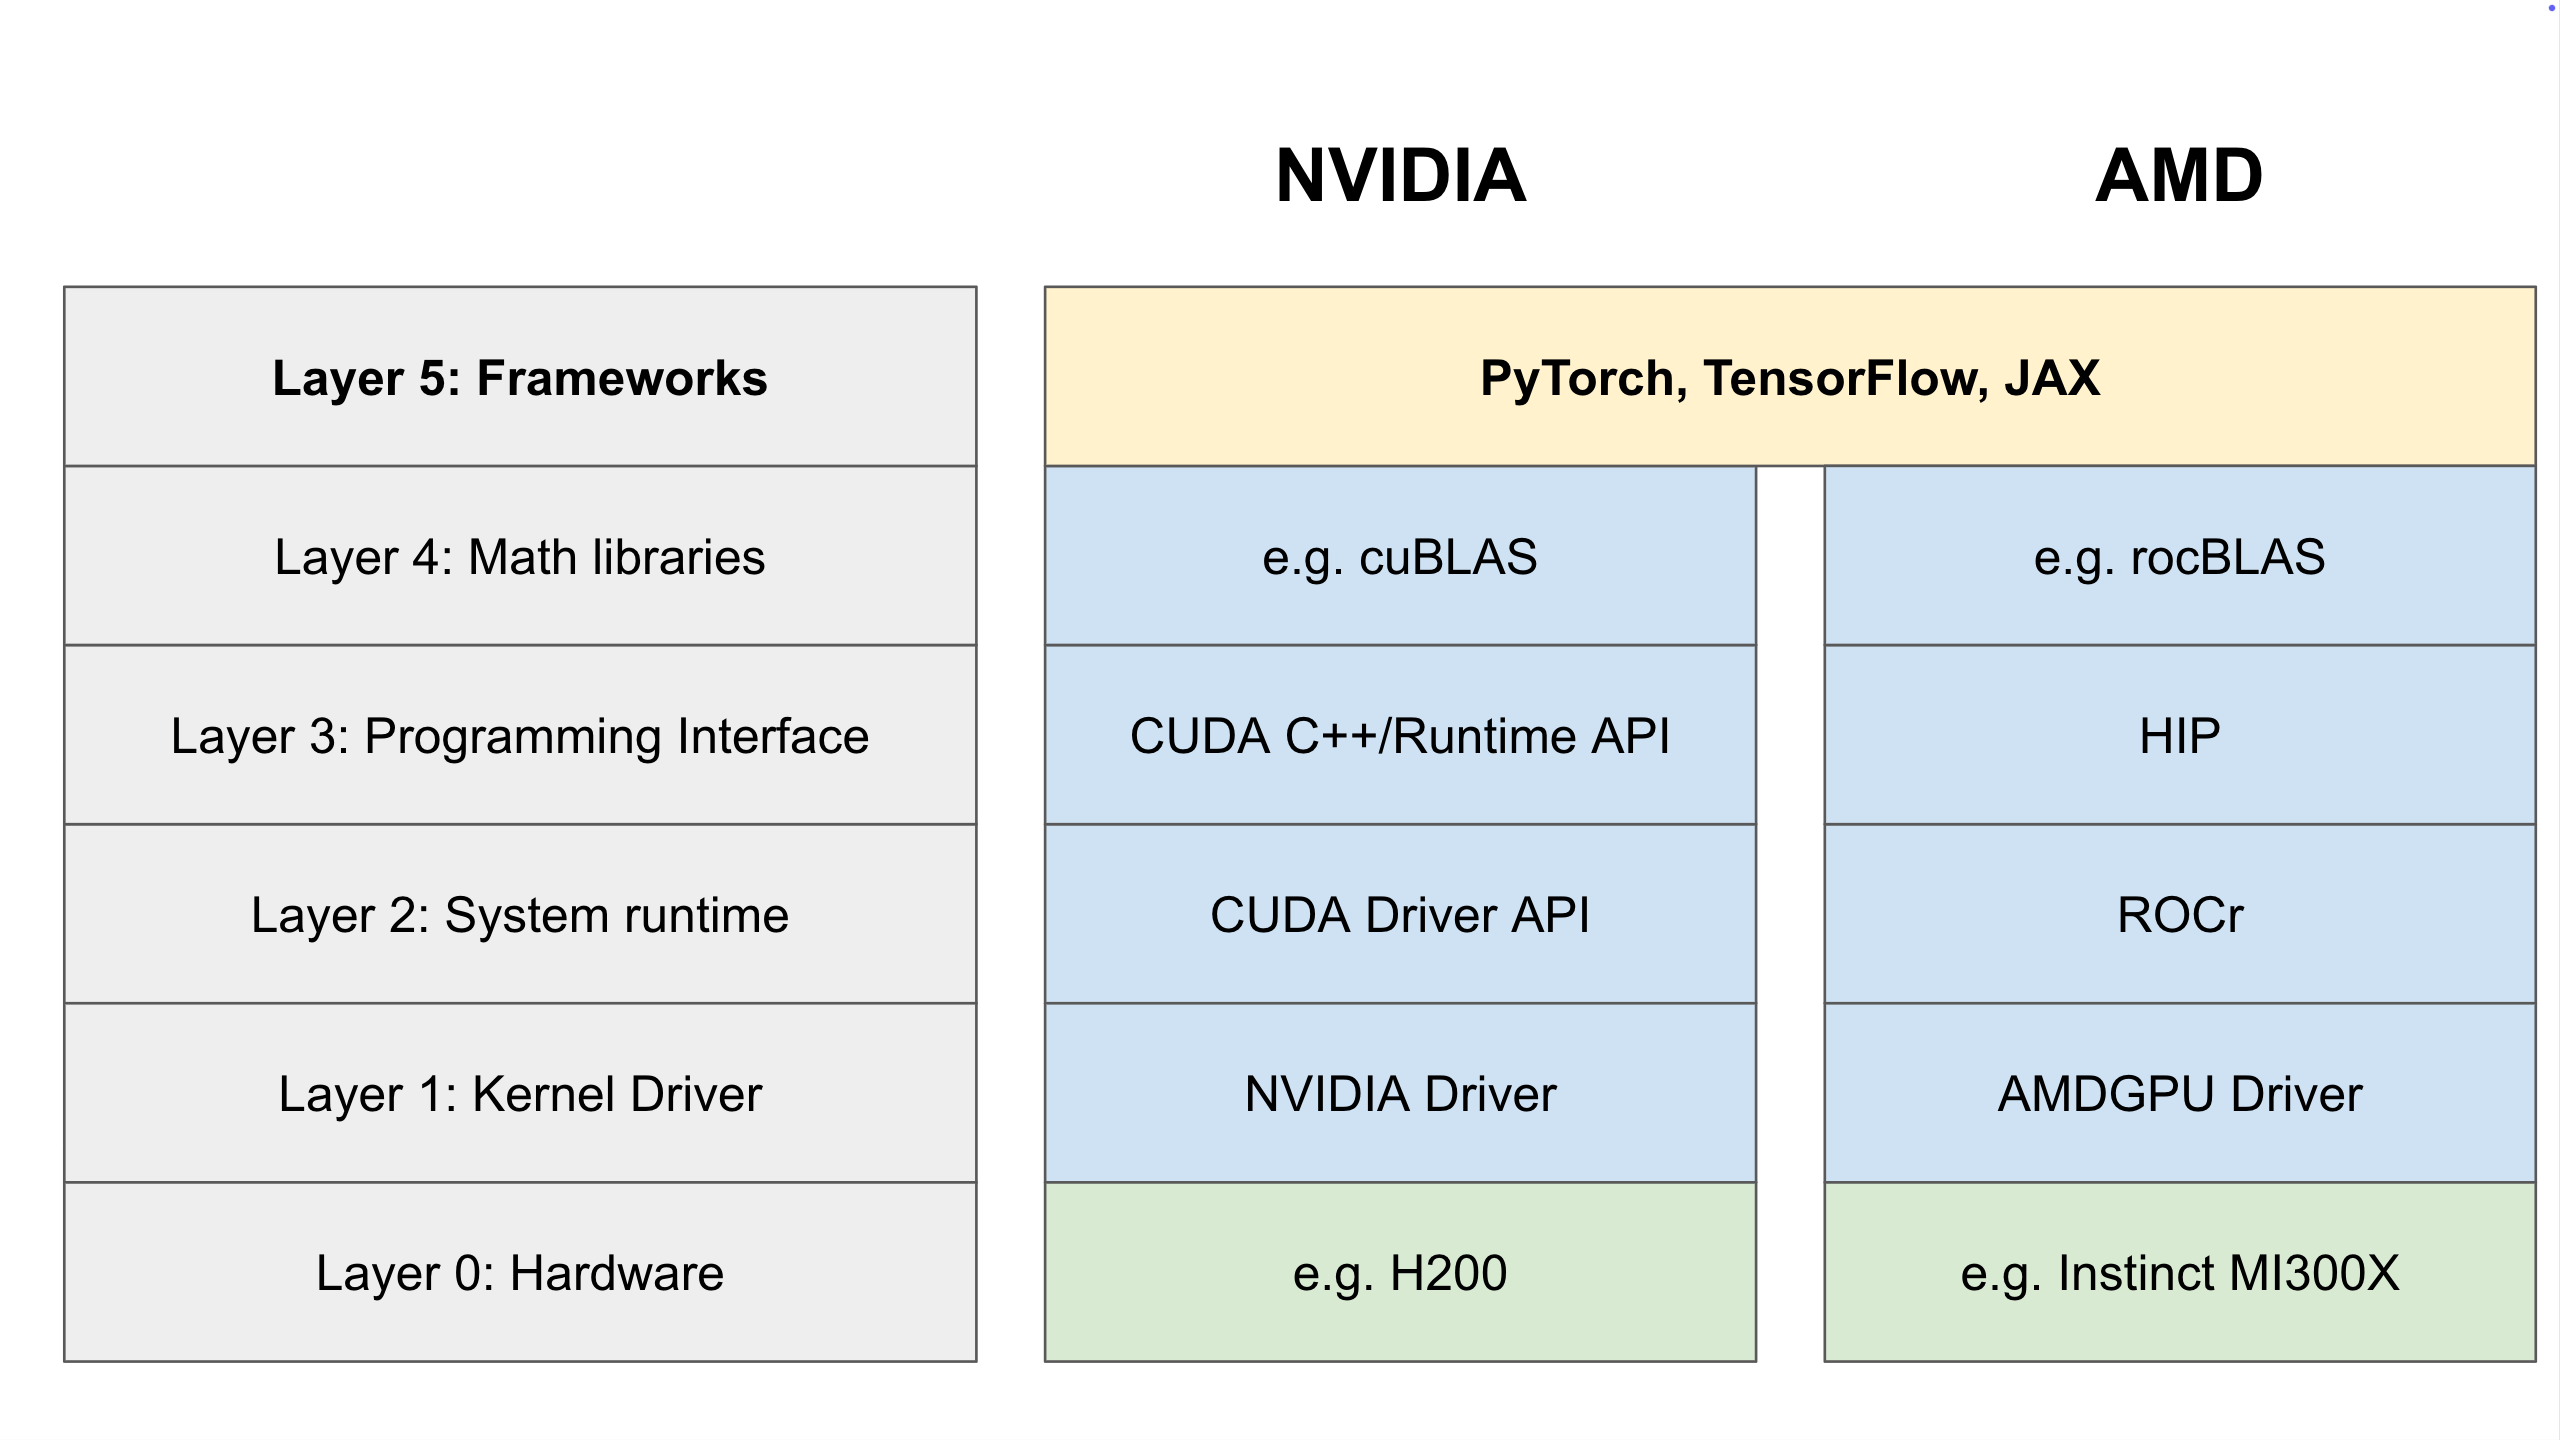
Layer 5: AI Frameworks
Finally, we reach the top of the stack: The AI Frameworks.
This is where PyTorch, TensorFlow, and JAX live, and where most AI developers work. These frameworks abstract away all the complexity we just discussed, providing an intuitive, Pythonic way to build models without worrying about memory allocation or PCIe bandwidth. These frameworks have different versions of their backends, one for CUDA and one for ROCm.
But that simplicity doesn’t come at the cost of speed. When you run a function in PyTorch, it is mostly acting as a wrapper that calls down to those highly optimized Layer 4 libraries. So, when you use a framework, you get the flexibility and simplicity of Python with the performance of optimized GPU kernels.
These frameworks allow you to write readable code like this:
import torch

# 1. define the device (the GPU)
device = torch.device('cuda')

# 2. Create two random matrices on the GPU
A = torch.randn(1024, 1024, device=device)
B = torch.randn(1024, 1024, device=device)

# 3. Perform the calculation (Matrix Multiplication)
C = torch.matmul(A, B)

print(f"Calculation complete. Result shape: {C.shape}")
Rather than try to write such programs in low-level, confusing GPU instructions:
// Address      // Hex Encoding        // Disassembly (Operation)
/*0000*/        0x00005a0000057ab9     IMAD.MOV.U32 R1, RZ, RZ, c[0x0][0x28]
/*0010*/        0x0000980000000a00     IMAD.MOV.U32 R0, RZ, RZ, c[0x0][0x20]
/*0020*/        0x0000020000027a02     MOV R2, c[0x0][0x0]
/*0030*/        0x3800000000025910     IMAD.WIDE.U32 R2, R2, R0, c[0x0][0x0]
/*0040*/        0x0000580000000a00     IMAD.MOV.U32 R0, RZ, RZ, c[0x0][0x24]
/*0050*/        0x0000000002037202     IADD3 R3, R2, c[0x0][0x0], RZ
/*0060*/        0x0001940003027981     LDG.E.SYS R2, [R2]
/*0070*/        0x0000020000007200     IADD3 R0, R0, 0x1, RZ
/*0080*/        0x000000000000794d     STG.E.SYS [R2], R0
/*0090*/        0x0000000000007943     EXIT
Summary: The Full Trace
To visualize how this all connects, let’s trace a single command. Imagine you are using PyTorch on an AMD machine and you run a matrix multiplication: torch.matmul().
- Python (Layer 5): You run the command. PyTorch’s backend activates.
- Math Library (Layer 4): PyTorch calls
rocBLAS, requesting a matrix multiplication kernel. - Programming Interface (Layer 3):
rocBLAScalls the HIP API to launch that kernel. - System Runtime (Layer 2): The Runtime queues the job and schedules it.
- Kernel Driver (Layer 1): The driver takes the packet and sends it over the PCIe bus.
- Hardware (Layer 0): The GPU silicon receives the machine code and executes the math.
This entire stack - from Python to Silicon - is a remarkable feat of engineering. It bridges the gap between human logic and raw computational power, enabling the AI explosion we see today.
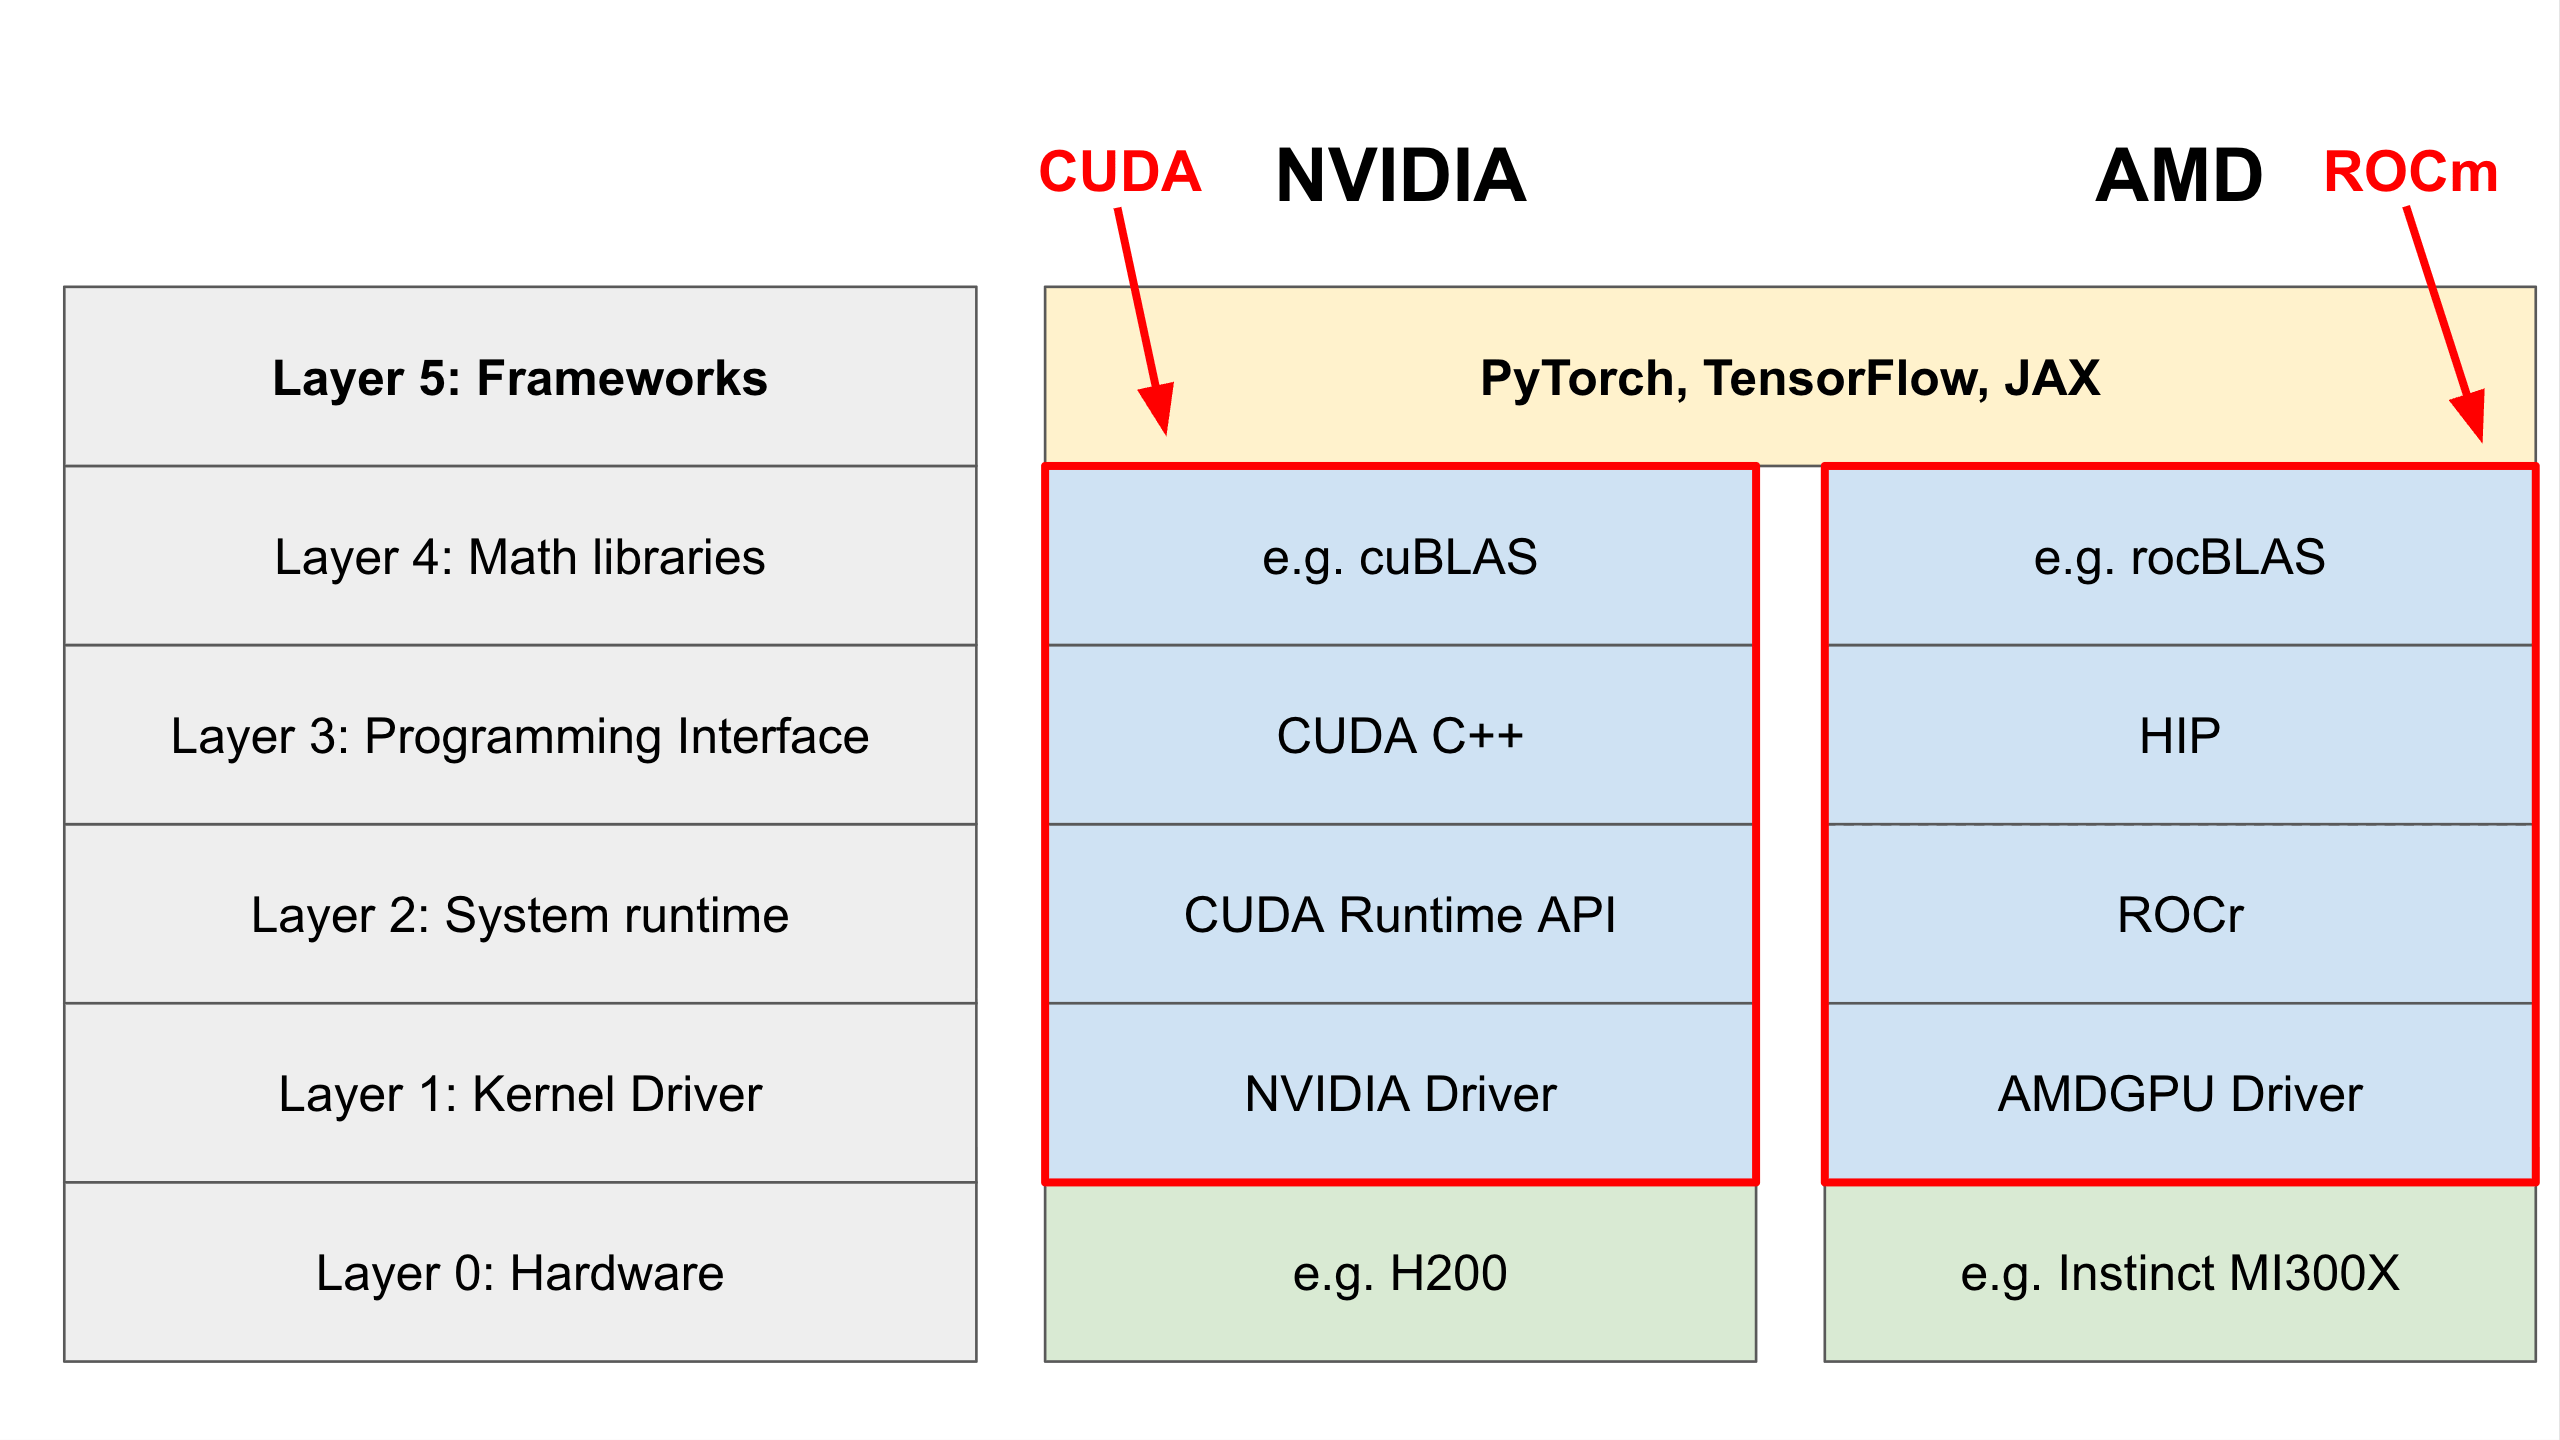
The full AI Compute Stack, from the hardware (green), through the CUDA and ROCm ecosystems (blue), up to AI frameworks (yellow)
Thanks for learning with the DigitalOcean Community. Check out our offerings for compute, storage, networking, and managed databases.
About the author
Still looking for an answer?
This textbox defaults to using Markdown to format your answer.
You can type !ref in this text area to quickly search our full set of tutorials, documentation & marketplace offerings and insert the link!
 This work is licensed under a Creative Commons Attribution-NonCommercial- ShareAlike 4.0 International License.
Become a contributor for community
Get paid to write technical tutorials and select a tech-focused charity to receive a matching donation.

DigitalOcean Documentation
Full documentation for every DigitalOcean product.

Resources for startups and AI-native businesses
The Wave has everything you need to know about building a business, from raising funding to marketing your product.
The developer cloud
Scale up as you grow — whether you're running one virtual machine or ten thousand.

Start building today
From GPU-powered inference and Kubernetes to managed databases and storage, get everything you need to build, scale, and deploy intelligent applications.
