By Mark Drake
Manager, Developer Education
Not using Debian 10?
Choose a different version or distribution.
Introduction
While many users need the functionality of a database management system like MariaDB, they may not feel comfortable interacting with the system solely from the MariaDB prompt.
phpMyAdmin was created so that users can interact with MariaDB through a web interface. In this guide, we’ll discuss how to install and secure phpMyAdmin so that you can safely use it to manage your databases on a Debian 10 system.
Prerequisites
Before you get started with this guide, you’ll need the following:
- Access to a Debian 10 server. This server should have a non-root user with
sudoprivileges and a firewall configured withufw. To set this up, follow our Initial Server Setup Guide for Debian 10. - A LAMP (Linux, Apache, MariaDB, and PHP) stack installed on your Debian 10 server. Follow our guide on installing a LAMP stack on Debian 10 to set this up.
Note: MariaDB is a community-developed fork of MySQL, and although the two programs are closely related, they are not completely interchangeable. While phpMyAdmin was designed specifically for managing MySQL databases and makes reference to MySQL in various dialogue boxes, rest assured that your installation of MariaDB will work correctly with phpMyAdmin.
Finally, there are important security considerations when using software like phpMyAdmin, since it:
- Communicates directly with your MariaDB installation
- Handles authentication using MariaDB credentials
- Executes and returns results for arbitrary SQL queries
For these reasons, and because it is a widely-deployed PHP application which is frequently targeted for attack, you should never run phpMyAdmin on remote systems over a plain HTTP connection.
If you do not have an existing domain configured with an SSL/TLS certificate, you can follow this guide on securing Apache with Let’s Encrypt on Debian 10 to set one up. This will require you to register a domain name, create DNS records for your server, and set up an Apache Virtual Host.
Once you are finished with these steps, you’re ready to get started with this guide.
Step 1 — Installing phpMyAdmin and Recommended Packages
Before installing and configuring phpMyAdmin, the official documentation recommends that you install a few PHP extensions onto your server to enable certain functionalities and improve performance.
If you followed the prerequisite LAMP stack tutorial, several of these modules will have been installed along with the php package. However, it’s recommended that you also install these packages:
php-mbstring: a PHP extension used to manage non-ASCII strings and convert strings to different encodingsphp-zip: a PHP module that supports uploading.zipfiles to phpMyAdminphp-gd: another PHP module, this one enables support for the GD Graphics Library
First, update your server’s package index if you’ve not done so recently:
- sudo apt update
Then use apt to pull down the files and install them on your system:
- sudo apt install php-mbstring php-zip php-gd
Next, we can install phpMyAdmin. As of this writing, phpMyAdmin is not available from the default Debian repositories, so you will need to download the source code to your server from the phpMyAdmin site.
In order to do that, navigate to the phpMyAdmin Downloads page, scroll down to the table with download links for the latest stable release, and copy the download link ending in tar.gz. This link points to an archive file known as a tarball that, when extracted, will create a number of files on your system. At the time of this writing, the latest release is version 4.9.7.
Note: On this Downloads page, you will notice that there are download links labeled all-languages and english. The all-languages links will download a version of phpMyAdmin that will allow you to select one of 72 available languages, while the english links will only allow you to use phpMyAdmin in English.
This guide will use the all-languages package to illustrate how to install phpMyAdmin, but if you plan to use phpMyAdmin in English, you can install the english package. Just be sure to replace the links and file names as necessary in the following commands.
Replace the link in the following wget command with the download link you just copied, then press ENTER. This will run the command and download the tarball to your server:
- wget https://files.phpmyadmin.net/phpMyAdmin/4.9.7/phpMyAdmin-4.9.7-all-languages.tar.gz
Then extract the tarball:
- tar xvf phpMyAdmin-4.9.7-all-languages.tar.gz
This will create a number of new files and directories on your server under a parent directory named phpMyAdmin-4.9.7-all-languages.
Then run the following command. This will move the phpMyAdmin-4.9.7-all-languages directory and all its subdirectories to the /usr/share/ directory, the location where phpMyAdmin expects to find its configuration files by default. It will also rename the directory in place to just phpmyadmin:
- sudo mv phpMyAdmin-4.9.7-all-languages/ /usr/share/phpmyadmin
With that, you’ve installed phpMyAdmin, but there are a number of configuration changes you must make in order to be able to access phpMyAdmin through a web browser.
Step 2 — Configuring phpMyAdmin Manually
When installing phpMyAdmin with a package manager, as one might in an Ubuntu environment, phpMyAdmin defaults to a “Zero Configuration” mode which performs several actions automatically to set up the program. Because we installed it from source in this guide, we will need to perform those steps manually.
To begin, make a new directory where phpMyAdmin will store its temporary files:
- sudo mkdir -p /var/lib/phpmyadmin/tmp
Set www-data — the Linux user profile that web servers like Apache use by default for normal operations in Ubuntu and Debian systems — as the owner of this directory:
- sudo chown -R www-data:www-data /var/lib/phpmyadmin
The files you extracted previously include a sample configuration file that you can use as your base configuration file. Make a copy of this file, keeping it in the /usr/share/phpmyadmin directory, and rename it config.inc.php:
- sudo cp /usr/share/phpmyadmin/config.sample.inc.php /usr/share/phpmyadmin/config.inc.php
Open this file using your preferred text editor. Here, we’ll use nano:
- sudo nano /usr/share/phpmyadmin/config.inc.php
phpMyAdmin uses the cookie authentication method by default, which allows you to log in to phpMyAdmin as any valid MariaDB user with the help of cookies. In this method, the MariaDB user password is stored and encrypted with the Advanced Encryption Standard (AES) algorithm in a temporary cookie.
Historically, phpMyAdmin instead used the Blowfish cipher for this purpose, and this is still reflected in its configuration file. Scroll down to the line that begins with $cfg['blowfish_secret']. It will look like this:
. . .
$cfg['blowfish_secret'] = ''; /* YOU MUST FILL IN THIS FOR COOKIE AUTH! */
. . .
In between the single quotes, enter a string of 32 random characters. This isn’t a passphrase you need to remember, it will just be used internally by the AES algorithm:
. . .
$cfg['blowfish_secret'] = 'STRINGOFTHIRTYTWORANDOMCHARACTERS'; /* YOU MUST FILL IN THIS FOR COOKIE AUTH! */
. . .
Note: If the passphrase you enter here is shorter than 32 characters in length, it will result in the encrypted cookies being less secure. Entering a string longer than 32 characters, though, won’t cause any harm.
To generate a truly random string of characters, you can install and use the pwgen program:
- sudo apt install pwgen
By default, pwgen creates easily pronounceable, though less secure, passwords. However, by including the -s flag, as in the following command, you can create a completely random, difficult-to-memorize password. Note the final two arguments to this command: 32, which dictates how long the password string pwgen will generate should be; and 1 which tells pwgen how many strings it should generate:
- pwgen -s 32 1
Next, scroll down to the comment reading /* User used to manipulate with storage */. This section includes some directives that define a MariaDB database user named pma which performs certain administrative tasks within phpMyAdmin. According to the official documentation, this special user account isn’t necessary in cases where only one user will access phpMyAdmin, but it is recommended in multi-user scenarios.
Uncomment the controluser and controlpass directives by removing the preceding slashes. Then update the controlpass directive to point to a secure password of your choosing. If you don’t do this, the default password will remain in place and unknown users could easily gain access to your database through the phpMyAdmin interface.
After making these changes, this section of the file will look like this:
. . .
/* User used to manipulate with storage */
// $cfg['Servers'][$i]['controlhost'] = '';
// $cfg['Servers'][$i]['controlport'] = '';
$cfg['Servers'][$i]['controluser'] = 'pma';
$cfg['Servers'][$i]['controlpass'] = 'password';
. . .
Below this section, you’ll find another section preceded by a comment reading /* Storage database and tables */. This section includes a number of directives that define the phpMyAdmin configuration storage, a database and several tables used by the administrative pma database user. These tables enable a number of features in phpMyAdmin, including Bookmarks, comments, PDF generation, and more.
Uncomment each line in this section by removing the slashes at the beginning of each line so it looks like this:
. . .
/* Storage database and tables */
$cfg['Servers'][$i]['pmadb'] = 'phpmyadmin';
$cfg['Servers'][$i]['bookmarktable'] = 'pma__bookmark';
$cfg['Servers'][$i]['relation'] = 'pma__relation';
$cfg['Servers'][$i]['table_info'] = 'pma__table_info';
$cfg['Servers'][$i]['table_coords'] = 'pma__table_coords';
$cfg['Servers'][$i]['pdf_pages'] = 'pma__pdf_pages';
$cfg['Servers'][$i]['column_info'] = 'pma__column_info';
$cfg['Servers'][$i]['history'] = 'pma__history';
$cfg['Servers'][$i]['table_uiprefs'] = 'pma__table_uiprefs';
$cfg['Servers'][$i]['tracking'] = 'pma__tracking';
$cfg['Servers'][$i]['userconfig'] = 'pma__userconfig';
$cfg['Servers'][$i]['recent'] = 'pma__recent';
$cfg['Servers'][$i]['favorite'] = 'pma__favorite';
$cfg['Servers'][$i]['users'] = 'pma__users';
$cfg['Servers'][$i]['usergroups'] = 'pma__usergroups';
$cfg['Servers'][$i]['navigationhiding'] = 'pma__navigationhiding';
$cfg['Servers'][$i]['savedsearches'] = 'pma__savedsearches';
$cfg['Servers'][$i]['central_columns'] = 'pma__central_columns';
$cfg['Servers'][$i]['designer_settings'] = 'pma__designer_settings';
$cfg['Servers'][$i]['export_templates'] = 'pma__export_templates';
. . .
These tables don’t yet exist, but we will create them shortly.
Lastly, scroll down to the bottom of the file and add the following line. This will configure phpMyAdmin to use the /var/lib/phpmyadmin/tmp directory you created earlier as its temporary directory. phpMyAdmin will use this temporary directory as a templates cache which allows for faster page loading:
. . .
$cfg['TempDir'] = '/var/lib/phpmyadmin/tmp';
Save and close the file after adding this line. If you used nano, you can do so by pressing CTRL + X, Y, then ENTER.
Next, you’ll need to create the phpMyAdmin storage database and tables. When you installed phpMyAdmin in the previous step, it came with a file named create_tables.sql. This SQL file contains all the commands needed to create the configuration storage database and tables phpMyAdmin needs to function correctly.
Run the following command to use the create_tables.sql file to create the configuration storage database and tables:
- sudo mariadb < /usr/share/phpmyadmin/sql/create_tables.sql
Following that, you’ll need to create the administrative pma user. Open up the MariaDB prompt:
- sudo mariadb
From the prompt, run the following command to create the pma user and grant it the appropriate permissions. Be sure to change password to align with the password you defined in the config.inc.php file:
- GRANT SELECT, INSERT, UPDATE, DELETE ON phpmyadmin.* TO 'pma'@'localhost' IDENTIFIED BY 'password';
If haven’t created one already, you should also create a regular MariaDB user for the purpose of managing databases through phpMyAdmin, as it’s recommended that you log in using another account than the pma user. You could create a user that has privileges to all tables within the database, as well as the power to add, change, and remove user privileges, with this command. Whatever privileges you assign to this user, be sure to give it a strong password as well:
- GRANT ALL PRIVILEGES ON *.* TO 'sammy'@'localhost' IDENTIFIED BY 'password' WITH GRANT OPTION;
Following that, exit the MariaDB shell:
- exit
phpMyAdmin is now fully installed and configured on your server. However, your Apache server does not yet know how to serve the application. To resolve this, we will create an Apache configuration file for it.
Step 3 — Configuring Apache to Serve phpMyAdmin
When installing phpMyAdmin from the default repositories, the installation process creates an Apache configuration file automatically and places it in the /etc/apache2/conf-enabled/ directory. Because we installed phpMyAdmin from source, however, we will need to create and enable this file manually.
Create a file named phpmyadmin.conf in the /etc/apache2/conf-available/ directory:
- sudo nano /etc/apache2/conf-available/phpmyadmin.conf
Then add the following content to the file
# phpMyAdmin default Apache configuration

Alias /phpmyadmin /usr/share/phpmyadmin

<Directory /usr/share/phpmyadmin>
    Options SymLinksIfOwnerMatch
    DirectoryIndex index.php

    <IfModule mod_php5.c>
        <IfModule mod_mime.c>
            AddType application/x-httpd-php .php
        </IfModule>
        <FilesMatch ".+\.php$">
            SetHandler application/x-httpd-php
        </FilesMatch>

        php_value include_path .
        php_admin_value upload_tmp_dir /var/lib/phpmyadmin/tmp
        php_admin_value open_basedir /usr/share/phpmyadmin/:/etc/phpmyadmin/:/var/lib/phpmyadmin/:/usr/share/php/php-gettext/:/usr/share/php/php-php-gettext/:/usr/share/javascript/:/usr/share/php/tcpdf/:/usr/share/doc/phpmyadmin/:/usr/share/php/phpseclib/
        php_admin_value mbstring.func_overload 0
    </IfModule>
    <IfModule mod_php.c>
        <IfModule mod_mime.c>
            AddType application/x-httpd-php .php
        </IfModule>
        <FilesMatch ".+\.php$">
            SetHandler application/x-httpd-php
        </FilesMatch>

        php_value include_path .
        php_admin_value upload_tmp_dir /var/lib/phpmyadmin/tmp
        php_admin_value open_basedir /usr/share/phpmyadmin/:/etc/phpmyadmin/:/var/lib/phpmyadmin/:/usr/share/php/php-gettext/:/usr/share/php/php-php-gettext/:/usr/share/javascript/:/usr/share/php/tcpdf/:/usr/share/doc/phpmyadmin/:/usr/share/php/phpseclib/
        php_admin_value mbstring.func_overload 0
    </IfModule>

</Directory>

# Authorize for setup
<Directory /usr/share/phpmyadmin/setup>
    <IfModule mod_authz_core.c>
        <IfModule mod_authn_file.c>
            AuthType Basic
            AuthName "phpMyAdmin Setup"
            AuthUserFile /etc/phpmyadmin/htpasswd.setup
        </IfModule>
        Require valid-user
    </IfModule>
</Directory>

# Disallow web access to directories that don't need it
<Directory /usr/share/phpmyadmin/templates>
    Require all denied
</Directory>
<Directory /usr/share/phpmyadmin/libraries>
    Require all denied
</Directory>
<Directory /usr/share/phpmyadmin/setup/lib>
    Require all denied
</Directory>
This is the default phpMyAdmin Apache configuration file found on Ubuntu installations, though it will be adequate for a Debian setup as well.
Save and close the file, then enable it by typing:
- sudo a2enconf phpmyadmin.conf
Then reload the apache2 service to put the configuration changes into effect:
- sudo systemctl reload apache2
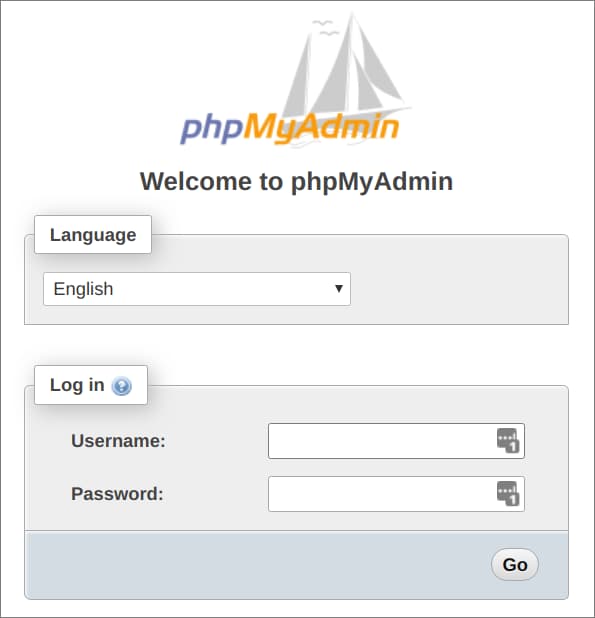
Following that, you’ll be able to access the phpMyAdmin login screen by navigating to the following URL in your web browser:
https://your_domain/phpmyadmin
You’ll see the following login screen:
Log in to the interface with the MariaDB username and password you configured. After logging in, you’ll see the user interface, which will look something like this:
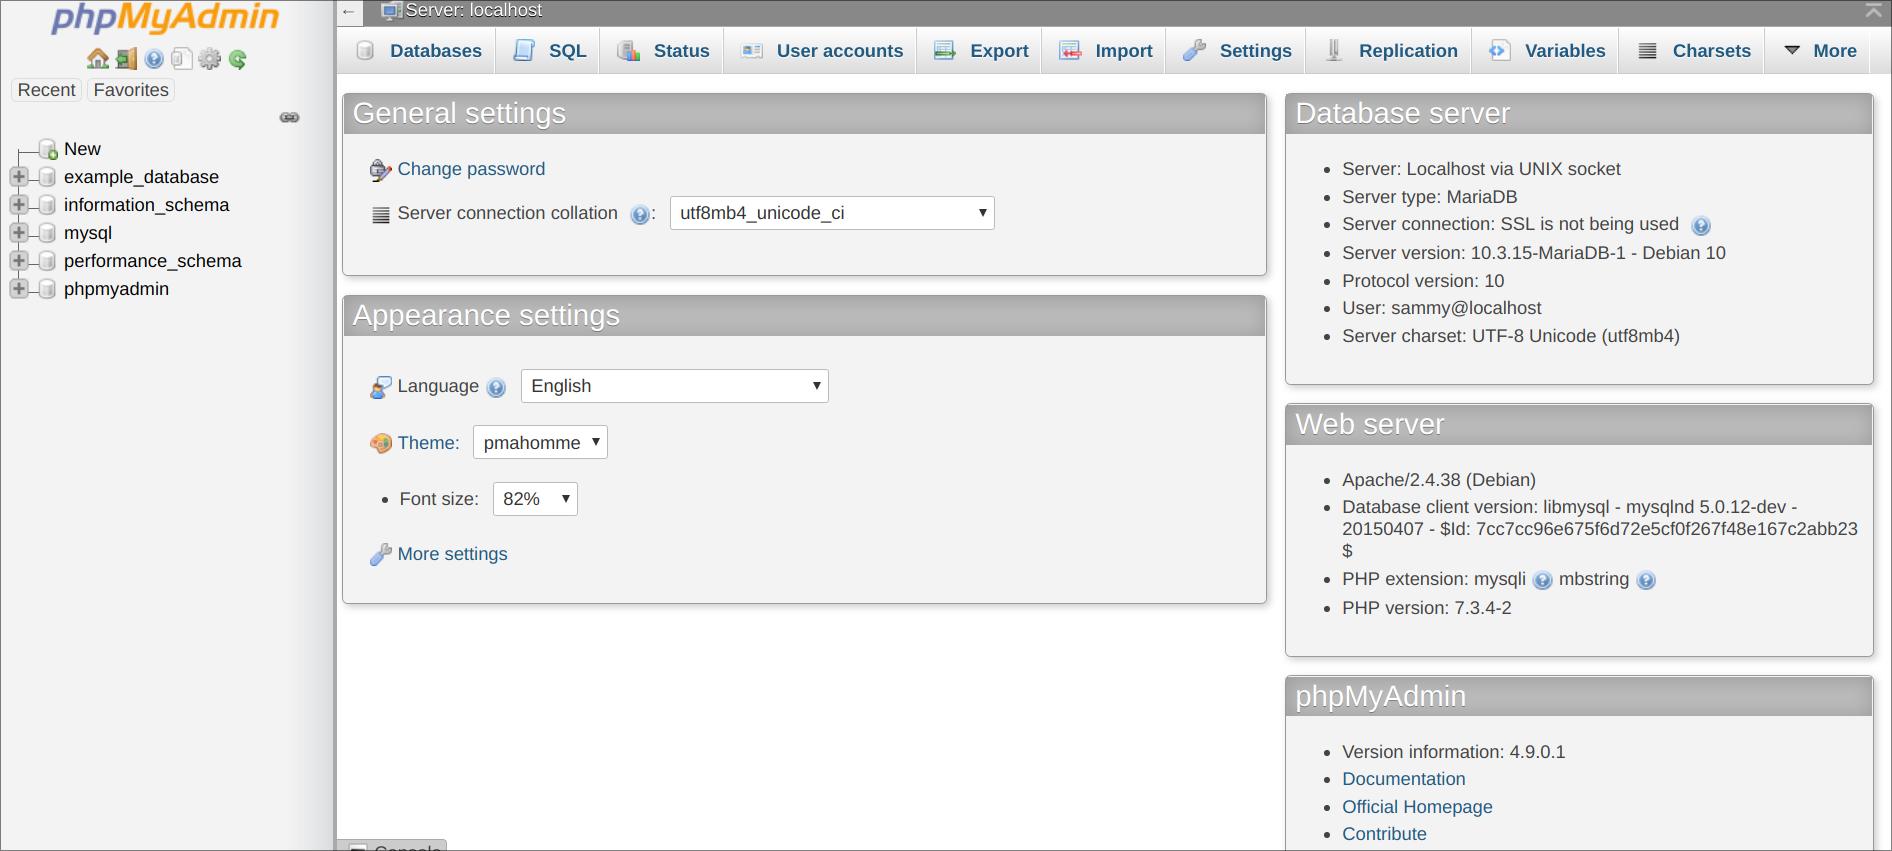
Now that you’re able to connect and interact with phpMyAdmin, all that’s left to do is harden your system’s security to protect it from attackers.
Step 4 — Securing Your phpMyAdmin Instance
Because of its ubiquity, phpMyAdmin is a popular target for attackers, and you should take extra care to prevent unauthorized access. One of the easiest ways of doing this is to place a gateway in front of the entire application by using Apache’s built-in .htaccess authentication and authorization functionalities.
To do this, you must first enable the use of .htaccess file overrides by editing your Apache configuration file.
Edit the linked file that has been placed in your Apache configuration directory:
- sudo nano /etc/apache2/conf-available/phpmyadmin.conf
Add an AllowOverride All directive within the <Directory /usr/share/phpmyadmin> section of the configuration file, like this:
<Directory /usr/share/phpmyadmin>
    Options FollowSymLinks
    DirectoryIndex index.php
    AllowOverride All

    <IfModule mod_php5.c>
    . . .
When you have added this line, save and close the file.
To implement the changes you made, restart Apache:
- sudo systemctl restart apache2
Now that you have enabled .htaccess use for your application, you need to create one to actually implement some security.
In order for this to be successful, the file must be created within the application directory. You can create the necessary file and open it in your text editor with root privileges by typing:
- sudo nano /usr/share/phpmyadmin/.htaccess
Within this file, enter the following content:
AuthType Basic
AuthName "Restricted Files"
AuthUserFile /usr/share/phpmyadmin/.htpasswd
Require valid-user
Here is what each of these lines mean:
AuthType Basic: This line specifies the authentication type that you are implementing. This type will implement password authentication using a password file.AuthName: This sets the message for the authentication dialog box. You should keep this generic so that unauthorized users won’t gain any information about what is being protected.AuthUserFile: This sets the location of the password file that will be used for authentication. This should be outside of the directories that are being served. We will create this file shortly.Require valid-user: This specifies that only authenticated users should be given access to this resource. This is what actually stops unauthorized users from entering.
When you are finished, save and close the file.
The location that you selected for your password file was /usr/share/phpmyadmin/.htpasswd. You can now create this file and pass it an initial user with the htpasswd utility:
- sudo htpasswd -c /usr/share/phpmyadmin/.htpasswd username
You will be prompted to select and confirm a password for the user you are creating. Afterwards, the file is created with the hashed password that you entered.
If you want to enter an additional user, you need to do so without the -c flag, like this:
- sudo htpasswd /etc/phpmyadmin/.htpasswd additionaluser
Now, when you access your phpMyAdmin subdirectory, you will be prompted for the additional account name and password that you just configured:
https://your_domain_or_IP/phpmyadmin
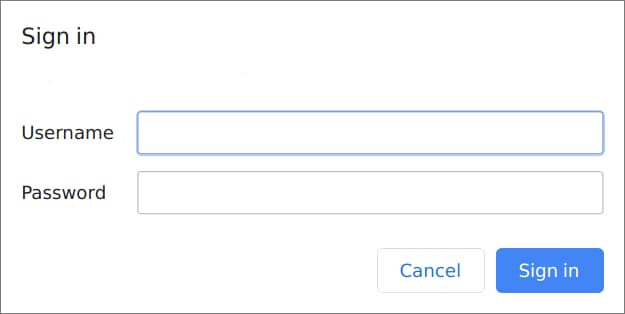
After entering the Apache authentication, you’ll be taken to the regular phpMyAdmin authentication page to enter your MariaDB credentials. This setup adds an additional layer of security, which is desirable since phpMyAdmin has suffered from vulnerabilities in the past.
Conclusion
You should now have phpMyAdmin configured and ready to use on your Debian 10 server. Using this interface, you can easily create databases, users, tables, etc., and perform the usual operations like deleting and modifying structures and data.
Thanks for learning with the DigitalOcean Community. Check out our offerings for compute, storage, networking, and managed databases.
About the author
Former Technical Writer at DigitalOcean. Focused on SysAdmin topics including Debian 11, Ubuntu 22.04, Ubuntu 20.04, Databases, SQL and PostgreSQL.
Still looking for an answer?
This textbox defaults to using Markdown to format your answer.
You can type !ref in this text area to quickly search our full set of tutorials, documentation & marketplace offerings and insert the link!
The users I created, pma, and the other one “GRANT ALL PRIVILEGES ON . TO ‘sammy’@‘localhost’ IDENTIFIED BY ‘password’ WITH GRANT OPTION;” don’t allow me to create new databases inside phpmyadmin.
I tried to add a user with database from phpmyadmin, then that database page allowed me to create new databases.
Is it a problem with phpmyadmin caching or something?
Greetings, excellent tutorial … Follow this installation and configuration step by step and at the end, when accessing the login screen of phpMyAdmin from my web browser, the style of the phpmyadmin homepage is not loaded. The source code and a series of parameters and functions appear in plain text.
Do you have any idea how to solve that?
@mdrake Could you update the tutorial to use latest 5.0 version or latest 4.9 security version ?
Thank you :)
I get the same result as ramonjosegt. Not using the same version of phpmyadmin must be the case. What needs to be different?
I needed to install mysqli myself, maybe include that in your tutorial or did i miss something?
All is working perfectly, but I think you did a small typo:
"If you want to enter an additional user, you need to do so without the -c flag, like this:
sudo htpasswd /etc/phpmyadmin/.htpasswd additionaluser"
should be:
“… sudo htpasswd /usr/share/phpmyadmin/.htpasswd additionaluser”
Right?
I prepared auto configurator from bash for myself it is helpful code for moving data between severs:
filewww=`dirname "$(realpath $0)"`/"phpmyadmin"
checkfilephpmy=`dirname "$(realpath $0)"`/"phpmyadmin/README"
phpmywww="/usr/share/phpmyadmin"
wgetphpmyadmin="https://www.phpmyadmin.net/downloads/phpMyAdmin-latest-all-languages.tar.gz"
filedownloaded=`dirname "$(realpath $0)"`/"phpMyAdmin-latest-all-languages.tar.gz"
dirdownloaded=`dirname "$(realpath $0)"`/"phpMyAdmin-latest-all-languages"
echo "Check If Exits $checkfilephpmy"
if [[ ! -f "$checkfilephpmy" ]] ; then
	echo "[no] ..."
	echo "Checking if exists ${filedownloaded}:"
	if [[ ! -f "$filedownloaded" ]] ; then
		echo "[no], start downloads..."
		wget "${wgetphpmyadmin}" && echo "[success]" || echo "[fail]"
	else
		echo "[yes]"
	fi
	takeFileInside=`dirname "$(realpath $0)"`/`tar --exclude="*/*" -tf "${filedownloaded}"`
	echo "Check if need unpack tar.gz: $takeFileInside"
	if [[ ! -d "$takeFileInside" ]] ; then
		tar -xf "${filedownloaded}" && echo "[success]" || echo "[fail]"
	else
		echo "exists"
	fi
	echo "Moving $takeFileInside to $filewww"
	mv "$takeFileInside" "$filewww"
else
	echo "[exists]"
fi
if [[ -d "$filewww" ]] ; then
	echo "Check if exists dir $phpmywww"
	if [[ ! -d "$phpmywww" ]] ; then
		echo "[no] ... create ln -s ..."
		ln -s "$filewww" "$phpmywww" && echo "[success]" || echo "[fail]"
	else
		echo "[yes]"
	fi
fi
checkfilephpconfig=`dirname "$(realpath $0)"`/"phpmyadmin/config.sample.inc.php"
checkfilephpconfig2=`dirname "$(realpath $0)"`/"phpmyadmin/config.inc.php"
echo "Check if exists config.inc.php"
#rm $checkfilephpconfig2
if [[ ! -f "$checkfilephpconfig2" ]] ; then
	echo "[no] creating config .."
	if [[ -f "$checkfilephpconfig" ]] ; then
		echo "Setting tmp dir.."
		if [[ -d "/mnt/tmp" ]] ; then
			echo "to /mnt/tmp"
			tmpdirpma="/mnt/tmp"
		else
			tmpdirpma=`dirname "$(realpath $0)"`/"tmp"
			echo "to $tmpdirpma"
			if [[ ! -d "$tmpdirpma" ]] ; then
				echo "creating dir $tmpdirpma";
				mkdir $tmpdirpma && echo "[success]" || echo "[fail]"
			fi
		fi
		passwordToPMA="OWNPASSWORD"
		echo "Coping config.sample.inc to config.sample.inc "
		cp $checkfilephpconfig $checkfilephpconfig2 && echo "[success]" || echo "[fail]"
		echo "Editing Config ..."
		getpwdhashtag=`pwgen -s 32 1`
		echo "\$cfg['blowfish_secret'] = '$getpwdhashtag';
		\$cfg['Servers'][\$i]['controlhost'] = '';
		\$cfg['Servers'][\$i]['controlport'] = '';
		\$cfg['Servers'][\$i]['controluser'] = 'pma';
		\$cfg['Servers'][\$i]['controlpass'] = '$passwordToPMA';

		/* Storage database and tables */
		\$cfg['Servers'][\$i]['pmadb'] = 'phpmyadmin';
		\$cfg['Servers'][\$i]['bookmarktable'] = 'pma__bookmark';
		\$cfg['Servers'][\$i]['relation'] = 'pma__relation';
		\$cfg['Servers'][\$i]['table_info'] = 'pma__table_info';
		\$cfg['Servers'][\$i]['table_coords'] = 'pma__table_coords';
		\$cfg['Servers'][\$i]['pdf_pages'] = 'pma__pdf_pages';
		\$cfg['Servers'][\$i]['column_info'] = 'pma__column_info';
		\$cfg['Servers'][\$i]['history'] = 'pma__history';
		\$cfg['Servers'][\$i]['table_uiprefs'] = 'pma__table_uiprefs';
		\$cfg['Servers'][\$i]['tracking'] = 'pma__tracking';
		\$cfg['Servers'][\$i]['userconfig'] = 'pma__userconfig';
		\$cfg['Servers'][\$i]['recent'] = 'pma__recent';
		\$cfg['Servers'][\$i]['favorite'] = 'pma__favorite';
		\$cfg['Servers'][\$i]['users'] = 'pma__users';
		\$cfg['Servers'][\$i]['usergroups'] = 'pma__usergroups';
		\$cfg['Servers'][\$i]['navigationhiding'] = 'pma__navigationhiding';
		\$cfg['Servers'][\$i]['savedsearches'] = 'pma__savedsearches';
		\$cfg['Servers'][\$i]['central_columns'] = 'pma__central_columns';
		\$cfg['Servers'][\$i]['designer_settings'] = 'pma__designer_settings';
		\$cfg['Servers'][\$i]['export_templates'] = 'pma__export_templates';
		\$cfg['UploadDir'] = '';
		\$cfg['SaveDir'] = '';
		\$cfg['TempDir'] = '$tmpdirpma';

		" >> $checkfilephpconfig2 &&  echo "[success]" || echo "[fail]"
		#sudo mariadb < /usr/share/phpmyadmin/sql/create_tables.sql
		#echo "sudo mariadb >> GRANT SELECT, INSERT, UPDATE, DELETE ON phpmyadmin.* TO 'pma'@'localhost' IDENTIFIED BY '$passwordToPMA';"
	else
		echo "[no] exist config.sample.inc.php"
	fi
else
	echo "[exist]"
fi
 This work is licensed under a Creative Commons Attribution-NonCommercial- ShareAlike 4.0 International License.
Become a contributor for community
Get paid to write technical tutorials and select a tech-focused charity to receive a matching donation.

DigitalOcean Documentation
Full documentation for every DigitalOcean product.

Resources for startups and AI-native businesses
The Wave has everything you need to know about building a business, from raising funding to marketing your product.
The developer cloud
Scale up as you grow — whether you're running one virtual machine or ten thousand.

Start building today
From GPU-powered inference and Kubernetes to managed databases and storage, get everything you need to build, scale, and deploy intelligent applications.
