Sr Technical Content Strategist and Team Lead

Introduction
Flask is a small and lightweight Python web framework that provides useful tools and features that make creating web applications in Python easier. It gives developers flexibility and is a more accessible framework for new developers since you can build a web application quickly using only a single Python file. Flask is also extensible and doesn’t force a particular directory structure or require complicated boilerplate code before getting started.
As part of this tutorial, you’ll use the Bootstrap toolkit to style your application so it is more visually appealing. Bootstrap will help you incorporate responsive web pages in your web application so that it also works well on mobile browsers without writing your own HTML, CSS, and JavaScript code to achieve these goals. The toolkit will allow you to focus on learning how Flask works.
Flask uses the Jinja template engine to dynamically build HTML pages using familiar Python concepts such as variables, loops, lists, and so on. You’ll use these templates as part of this project.
In this tutorial, you’ll build a small web blog using Flask and SQLite in Python 3. Users of the application can view all the posts in your database and click on the title of a post to view its contents with the ability to add a new post to the database and edit or delete an existing post.
Simplify deploying Flask applications with DigitalOcean App Platform. Deploy Flask directly from GitHub in minutes.
Key Takeaways
By the end of this tutorial, you’ll build a fully working blog application in Flask, complete with pages, a database, and CRUD features. You’ll practice real-world patterns for structuring routes, rendering templates, handling forms, and persisting data—then see how to take the project toward deployment.
- Define routes and view functions, wire up template rendering, serve static assets, and implement create/read/update/delete (CRUD) features for blog posts.
- Add responsive layout, navigation, forms, and alerts using Bootstrap without writing custom CSS so you can focus on application logic.
- Use Jinja variables and loops, pass data from views to templates, and apply template inheritance and
url_for()to avoid repetition. - Design a simple schema, initialize the database from a SQL script, run parameterized queries via
sqlite3, and return dict-like rows usingrow_factory. - Read
request.form, validate inputs, showflash()messages, redirect withurl_for(), and differentiate GET vs POST routes. - Understand development vs production servers and how to deploy this app on DigitalOcean App Platform from a GitHub repo.
Prerequisites
Before you start following this guide, you will need:
- A local Python 3 programming environment, follow the tutorial for your distribution in How To Install and Set Up a Local Programming Environment for Python 3 series for your local machine. In this tutorial we’ll call our project directory
flask_blog. - An understanding of Python 3 concepts, such as data types, conditional statements, for loops, functions, and other such concepts. If you are not familiar with Python, check out our How To Code in Python 3 series.
Step 1 — Installing Flask
In this step, you’ll activate your Python environment and install Flask using the pip package installer.
If you haven’t already activated your programming environment, make sure you’re in your project directory (flask_blog) and use the following command to activate the environment:
- source env/bin/activate
Once your programming environment is activated, your prompt will now have an env prefix that may look as follows:
-
This prefix is an indication that the environment env is currently active, which might have another name depending on how you named it during creation.
Note: You can use Git, a version control system, to effectively manage and track the development process for your project. To learn how to use Git, you might want to check out our Introduction to Git Installation Usage and Branches article.
If you are using Git, it is a good idea to ignore the newly created env directory in your .gitignore file to avoid tracking files not related to the project.
Now you’ll install Python packages and isolate your project code away from the main Python system installation. You’ll do this using pip and python.
To install Flask, run the following command:
- pip install flask
Once the installation is complete, run the following command to confirm the installation:
- python -c "import flask; print(flask.__version__)"
You use the python command line interface with the option -c to execute Python code. Next you import the flask package with import flask; then print the Flask version, which is provided via the flask.__version__ variable.
The output will be a version number similar to the following:
1.1.2
You’ve created the project folder, a virtual environment, and installed Flask. You’re now ready to move on to setting up your base application.
Step 2 — Creating a Base Application
Now that you have your programming environment set up, you’ll start using Flask. In this step, you’ll make a small web application inside a Python file and run it to start the server, which will display some information on the browser.
In your flask_blog directory, open a file named hello.py for editing, use nano or your favorite text editor:
- nano hello.py
This hello.py file will serve as a minimal example of how to handle HTTP requests. Inside it, you’ll import the Flask object, and create a function that returns an HTTP response. Write the following code inside hello.py:
from flask import Flask

app = Flask(__name__)


@app.route('/')
def hello():
    return 'Hello, World!'
In the preceding code block, you first import the Flask object from the flask package. You then use it to create your Flask application instance with the name app. You pass the special variable __name__ that holds the name of the current Python module. It’s used to tell the instance where it’s located—you need this because Flask sets up some paths behind the scenes.
Once you create the app instance, you use it to handle incoming web requests and send responses to the user. @app.route is a decorator that turns a regular Python function into a Flask view function, which converts the function’s return value into an HTTP response to be displayed by an HTTP client, such as a web browser. You pass the value '/' to @app.route() to signify that this function will respond to web requests for the URL /, which is the main URL.
The hello() view function returns the string 'Hello, World!' as a response.
Save and close the file.
To run your web application, you’ll first tell Flask where to find the application (the hello.py file in your case) with the FLASK_APP environment variable:
- export FLASK_APP=hello
Lastly, run the application using the flask run command with the --debug flag to enable the debugger and auto-reloader:
- flask run --debug
Once the application is running the output will be something like this:
 * Serving Flask app "hello" (lazy loading)
 * Environment: development
 * Debug mode: on
 * Running on http://127.0.0.1:5000/ (Press CTRL+C to quit)
 * Restarting with stat
 * Debugger is active!
 * Debugger PIN: 813-894-335
The preceding output has several pieces of information, such as:
- The name of the application you’re running.
- The environment in which the application is being run.
Debug mode: onsignifies that the Flask debugger is running. This is useful when developing because it gives us detailed error messages when things go wrong, which makes troubleshooting easier.- The application is running locally on the URL
http://127.0.0.1:5000/,127.0.0.1is the IP that represents your machine’slocalhostand:5000is the port number.
Open a browser and type in the URL http://127.0.0.1:5000/, you will receive the string Hello, World! as a response, this confirms that your application is successfully running.
Warning Flask uses a simple web server to serve our application in a development environment, which also means that the Flask debugger is running to make catching errors easier. This development server should not be used in a production deployment. See the Deployment Options page on the Flask documentation for more information, you can also check out this Flask deployment tutorial.
You can now leave the development server running in the terminal and open another terminal window. Move into the project folder where hello.py is located, activate the virtual environment, set the FLASK_APP environment variable, and continue to the next steps. (These commands are listed earlier in this step.)
Note: When opening a new terminal, it is important to remember activating the virtual environment and setting the FLASK_APP environment variable.
While a Flask application’s development server is already running, it is not possible to run another Flask application with the same flask run command. This is because flask run uses the port number 5000 by default, and once it is taken, it becomes unavailable to run another application on so you would receive an error similar to the following:
OSError: [Errno 98] Address already in use
To solve this problem, either stop the server that’s currently running via CTRL+C, then run flask run again, or if you want to run both at the same time, you can pass a different port number to the -p argument, for example, to run another application on port 5001 use the following command:
- flask run -p 5001
You now have a small Flask web application. You’ve run your application and displayed information on the web browser. Next, you’ll use HTML files in your application.
Step 3 — Using HTML templates
Currently your application only displays a simple message without any HTML. Web applications mainly use HTML to display information for the visitor, so you’ll now work on incorporating HTML files in your app, which can be displayed on the web browser.
Flask provides a render_template() helper function that allows use of the Jinja template engine. This will make managing HTML much easier by writing your HTML code in .html files as well as using logic in your HTML code. You’ll use these HTML files, (templates) to build all of your application pages, such as the main page where you’ll display the current blog posts, the page of the blog post, the page where the user can add a new post, and so on.
In this step, you’ll create your main Flask application in a new file.
First, in your flask_blog directory, use nano or your favorite editor to create and edit your app.py file. This will hold all the code you’ll use to create the blogging application:
- nano app.py
In this new file, you’ll import the Flask object to create a Flask application instance as you previously did. You’ll also import the render_template() helper function that lets you render HTML template files that exist in the templates folder you’re about to create. The file will have a single view function that will be responsible for handling requests to the main / route. Add the following content:
from flask import Flask, render_template

app = Flask(__name__)

@app.route('/')
def index():
    return render_template('index.html')
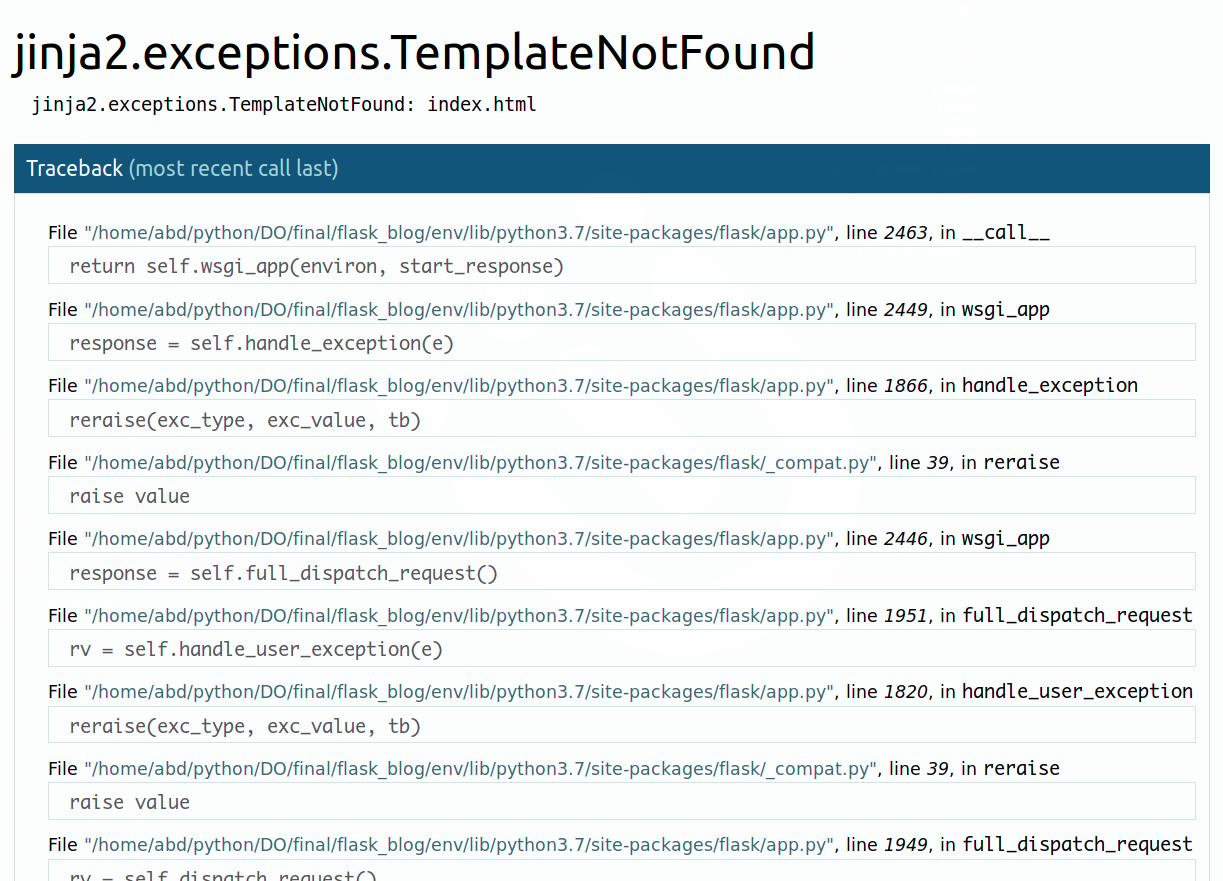
The index() view function returns the result of calling render_template() with index.html as an argument, this tells render_template() to look for a file called index.html in the templates folder. Both the folder and the file do not yet exist, you will get an error if you were to run the application at this point. You’ll run it nonetheless so you’re familiar with this commonly encountered exception. You’ll then fix it by creating the needed folder and file.
Save and exit the file.
Stop the development server in your other terminal that runs the hello application with CTRL+C.
Before you run the application, make sure you correctly specify the value for the FLASK_APP environment variable, since you’re no longer using the application hello:
- export FLASK_APP=app
- flask run
Opening the URL http://127.0.0.1:5000/ in your browser will result in the debugger page informing you that the index.html template was not found. The main line in the code that was responsible for this error will be highlighted. In this case, it is the line return render_template('index.html').
If you click this line, the debugger will reveal more code so that you have more context to help you solve the problem.
To fix this error, create a directory called templates inside your flask_blog directory. Then inside it, open a file called index.html for editing:
- mkdir templates
- nano templates/index.html
Next, add the following HTML code inside index.html:
<!DOCTYPE html>
<html lang="en">
<head>
<meta charset="UTF-8">
<title>FlaskBlog</title>
</head>
<body>
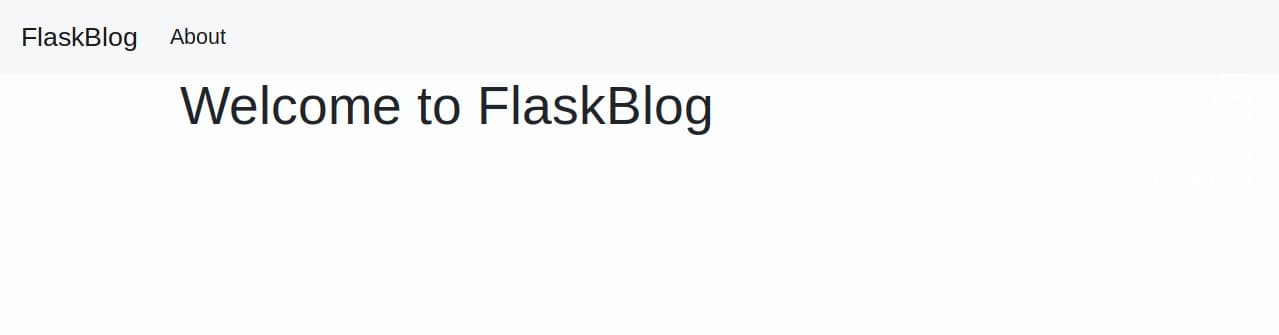
<h1>Welcome to FlaskBlog</h1>
</body>
</html>
Save the file and use your browser to navigate to http://127.0.0.1:5000/ again, or refresh the page. This time the browser should display the text Welcome to FlaskBlog in an <h1> tag.
In addition to the templates folder, Flask web applications also typically have a static folder for hosting static files, such as CSS files, JavaScript files, and images the application uses.
You can create a style.css style sheet file to add CSS to your application. First, create a directory called static inside your main flask_blog directory:
- mkdir static
Then create another directory called css inside the static directory to host .css files. This is typically done to organize static files in dedicated folders, as such, JavaScript files typically live inside a directory called js, images are put in a directory called images (or img), and so on. The following command will create the css directory inside the static directory:
- mkdir static/css
Then open a style.css file inside the css directory for editing:
- nano static/css/style.css
Add the following CSS rule to your style.css file:
h1 {
border: 2px #eee solid;
color: brown;
text-align: center;
padding: 10px;
}
The CSS code will add a border, change the color to brown, center the text, and add a little padding to <h1> tags.
Save and close the file.
Next, open the index.html template file for editing:
- nano templates/index.html
You’ll add a link to the style.css file inside the <head> section of the index.html template file:
. . .
<head>
<meta charset="UTF-8">
<link rel="stylesheet" href="{{ url_for('static', filename= 'css/style.css') }}">
<title>FlaskBlog</title>
</head>
. . .
Here you use the url_for() helper function to generate the appropriate location of the file. The first argument specifies that you’re linking to a static file and the second argument is the path of the file inside the static directory.
Save and close the file.
Upon refreshing the index page of your application, you will notice that the text Welcome to FlaskBlog is now in brown, centered, and enclosed inside a border.
You can use the CSS language to style the application and make it more appealing using your own design. However, if you’re not a web designer, or if you aren’t familiar with CSS, then you can use the Bootstrap toolkit, which provides easy-to-use components for styling your application. In this project, we’ll use Bootstrap.
You might have guessed that making another HTML template would mean repeating most of the HTML code you already wrote in the index.html template. You can avoid unnecessary code repetition with the help of a base template file, which all of your HTML files will inherit from. See Template Inheritance in Jinja for more information.
To make a base template, first create a file called base.html inside your templates directory:
- nano templates/base.html
Type the following code in your base.html template:
<!doctype html>
<html lang="en">
<head>
<!-- Required meta tags -->
<meta charset="utf-8">
<meta name="viewport" content="width=device-width, initial-scale=1, shrink-to-fit=no">
<!-- Bootstrap CSS -->
<link rel="stylesheet" href="https://stackpath.bootstrapcdn.com/bootstrap/4.3.1/css/bootstrap.min.css" integrity="sha384-ggOyR0iXCbMQv3Xipma34MD+dH/1fQ784/j6cY/iJTQUOhcWr7x9JvoRxT2MZw1T" crossorigin="anonymous">
<title>{% block title %} {% endblock %}</title>
</head>
<body>
<nav class="navbar navbar-expand-md navbar-light bg-light">
<a class="navbar-brand" href="{{ url_for('index')}}">FlaskBlog</a>
<button class="navbar-toggler" type="button" data-toggle="collapse" data-target="#navbarNav" aria-controls="navbarNav" aria-expanded="false" aria-label="Toggle navigation">
<span class="navbar-toggler-icon"></span>
</button>
<div class="collapse navbar-collapse" id="navbarNav">
<ul class="navbar-nav">
<li class="nav-item active">
<a class="nav-link" href="#">About</a>
</li>
</ul>
</div>
</nav>
<div class="container">
{% block content %} {% endblock %}
</div>
<!-- Optional JavaScript -->
<!-- jQuery first, then Popper.js, then Bootstrap JS -->
<script src="https://code.jquery.com/jquery-3.3.1.slim.min.js" integrity="sha384-q8i/X+965DzO0rT7abK41JStQIAqVgRVzpbzo5smXKp4YfRvH+8abtTE1Pi6jizo" crossorigin="anonymous"></script>
<script src="https://cdnjs.cloudflare.com/ajax/libs/popper.js/1.14.7/umd/popper.min.js" integrity="sha384-UO2eT0CpHqdSJQ6hJty5KVphtPhzWj9WO1clHTMGa3JDZwrnQq4sF86dIHNDz0W1" crossorigin="anonymous"></script>
<script src="https://stackpath.bootstrapcdn.com/bootstrap/4.3.1/js/bootstrap.min.js" integrity="sha384-JjSmVgyd0p3pXB1rRibZUAYoIIy6OrQ6VrjIEaFf/nJGzIxFDsf4x0xIM+B07jRM" crossorigin="anonymous"></script>
</body>
</html>
Save and close the file once you’re done editing it.
Most of the code in the preceding block is standard HTML and code required for Bootstrap. The <meta> tags provide information for the web browser, the <link> tag links the Bootstrap CSS files, and the <script> tags are links to JavaScript code that allows some additional Bootstrap features, check out the Bootstrap documentation for more.
However, the following highlighted parts are specific to the Jinja template engine:
{% block title %} {% endblock %}: A block that serves as a placeholder for a title, you’ll later use it in other templates to give a custom title for each page in your application without rewriting the entire<head>section each time.{{ url_for('index')}}: A function call that will return the URL for theindex()view function. This is different from the pasturl_for()call you used to link a static CSS file, because it only takes one argument, which is the view function’s name, and links to the route associated with the function instead of a static file.{% block content %} {% endblock %}: Another block that will be replaced by content depending on the child template (templates that inherit frombase.html) that will override it.
Now that you have a base template, you can take advantage of it using inheritance. Open the index.html file:
- nano templates/index.html
Then replace its contents with the following:
{% extends 'base.html' %}
{% block content %}
<h1>{% block title %} Welcome to FlaskBlog {% endblock %}</h1>
{% endblock %}
In this new version of the index.html template, you use the {% extends %} tag to inherit from the base.html template. You then extend it via replacing the content block in the base template with what is inside the content block in the preceding code block.
This content block contains an <h1> tag with the text Welcome to FlaskBlog inside a title block, which in turn replaces the original title block in the base.html template with the text Welcome to FlaskBlog. This way, you can avoid repeating the same text twice, as it works both as a title for the page and a heading that appears below the navigation bar inherited from the base template.
Template inheritance also gives you the ability to reuse the HTML code you have in other templates (base.html in this case) without having to repeat it each time it is needed.
Save and close the file and refresh the index page on your browser. You’ll see your page with a navigation bar and styled title.
You’ve used HTML templates and static files in Flask. You also used Bootstrap to start refining the look of your page and a base template to avoid code repetition. In the next step, you’ll set up a database that will store your application data.
Step 4 — Setting up the Database
In this step, you’ll set up a database to store data, that is, the blog posts for your application. You’ll also populate the database with a few example entries.
You’ll use a SQLite database file to store your data because the sqlite3 module, which we will use to interact with the database, is readily available in the standard Python library. For more information about SQLite, check out this tutorial.
First, because data in SQLite is stored in tables and columns, and since your data mainly consists of blog posts, you first need to create a table called posts with the necessary columns. You’ll create a .sql file that contains SQL commands to create the posts table with a few columns. You’ll then use this file to create the database.
Open a file called schema.sql inside your flask_blog directory:
- nano schema.sql
Type the following SQL commands inside this file:
DROP TABLE IF EXISTS posts;
CREATE TABLE posts (
id INTEGER PRIMARY KEY AUTOINCREMENT,
created TIMESTAMP NOT NULL DEFAULT CURRENT_TIMESTAMP,
title TEXT NOT NULL,
content TEXT NOT NULL
);
Save and close the file.
The first SQL command is DROP TABLE IF EXISTS posts;, this deletes any already existing tables named posts so you don’t get confusing behavior. Note that this will delete all of the content you have in the database whenever you use these SQL commands, so ensure you don’t write any important content in the web application until you finish this tutorial and experiment with the final result. Next, CREATE TABLE posts is used to create the posts table with the following columns:
id: An integer that represents a primary key, this will get assigned a unique value by the database for each entry (that is a blog post).created: The time the blog post was created at.NOT NULLsignifies that this column should not be empty and theDEFAULTvalue is theCURRENT_TIMESTAMPvalue, which is the time at which the post was added to the database. Just likeid, you don’t need to specify a value for this column, as it will be automatically filled in.title: The post title.content: The post content.
Now that you have a SQL schema in the schema.sql file, you’ll use it to create the database using a Python file that will generate an SQLite .db database file. Open a file named init_db.py inside the flask_blog directory using your preferred editor:
- nano init_db.py
And then add the following code.
import sqlite3
connection = sqlite3.connect('database.db')
with open('schema.sql') as f:
connection.executescript(f.read())
cur = connection.cursor()
cur.execute("INSERT INTO posts (title, content) VALUES (?, ?)",
('First Post', 'Content for the first post')
)
cur.execute("INSERT INTO posts (title, content) VALUES (?, ?)",
('Second Post', 'Content for the second post')
)
connection.commit()
connection.close()
You first import the sqlite3 module and then open a connection to a database file named database.db, which will be created once you run the Python file. Then you use the open() function to open the schema.sql file. Next you execute its contents using the executescript() method that executes multiple SQL statements at once, which will create the posts table. You create a Cursor object that allows you to use its execute() method to execute two INSERT SQL statements to add two blog posts to your posts table. Finally, you commit the changes and close the connection.
Save and close the file and then run it in the terminal using the python command:
- python init_db.py
Once the file finishes execution, a new file called database.db will appear in your flask_blog directory. This means you’ve successfully set up your database.
In the next step, you’ll retrieve the posts you inserted into your database and display them in your application’s homepage.
Step 5 — Displaying All Posts
Now that you’ve set up your database, you can now modify the index() view function to display all the posts you have in your database.
Open the app.py file to make the following modifications:
- nano app.py
For your first modification, you’ll import the sqlite3 module at the top of the file:
import sqlite3
from flask import Flask, render_template
. . .
Next, you’ll create a function that creates a database connection and return it. Add it directly after the imports:
. . .
from flask import Flask, render_template
def get_db_connection():
conn = sqlite3.connect('database.db')
conn.row_factory = sqlite3.Row
return conn
. . .
This get_db_connection() function opens a connection to the database.db database file, and then sets the row_factory attribute to sqlite3.Row so you can have name-based access to columns. This means that the database connection will return rows that behave like regular Python dictionaries. Lastly, the function returns the conn connection object you’ll be using to access the database.
After defining the get_db_connection() function, modify the index() function to look like the following:
. . .
@app.route('/')
def index():
conn = get_db_connection()
posts = conn.execute('SELECT * FROM posts').fetchall()
conn.close()
return render_template('index.html', posts=posts)
In this new version of the index() function, you first open a database connection using the get_db_connection() function you defined earlier. Then you execute an SQL query to select all entries from the posts table. You implement the fetchall() method to fetch all the rows of the query result, this will return a list of the posts you inserted into the database in the previous step.
You close the database connection using the close() method and return the result of rendering the index.html template. You also pass the posts object as an argument, which contains the results you got from the database, this will allow you to access the blog posts in the index.html template.
With these modifications in place, save and close the app.py file.
Now that you’ve passed the posts you fetched from the database to the index.html template, you can use a for loop to display each post on your index page.
Open the index.html file:
- nano templates/index.html
Then, modify it to look as follows:
{% extends 'base.html' %}
{% block content %}
<h1>{% block title %} Welcome to FlaskBlog {% endblock %}</h1>
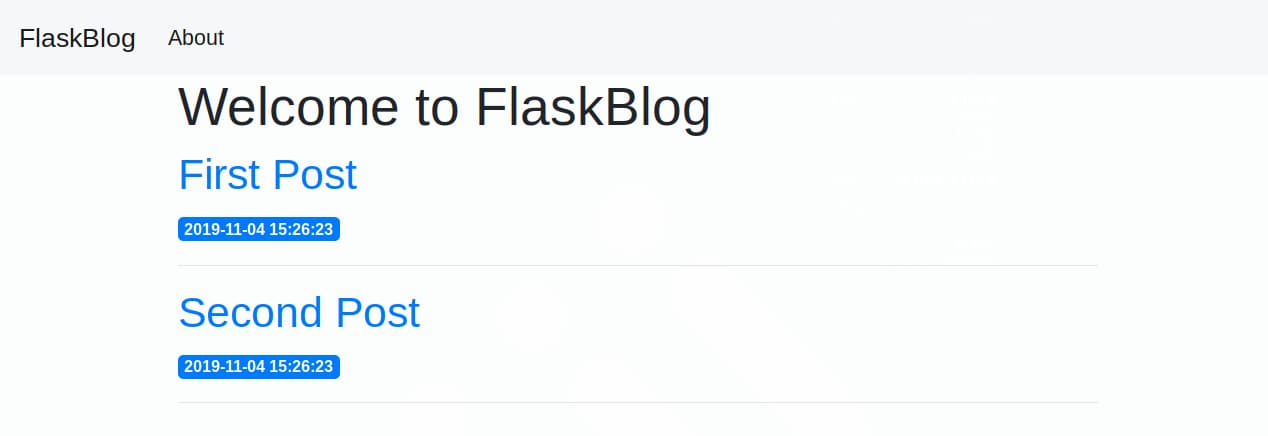
{% for post in posts %}
<a href="#">
<h2>{{ post['title'] }}</h2>
</a>
<span class="badge badge-primary">{{ post['created'] }}</span>
<hr>
{% endfor %}
{% endblock %}
Here, the syntax {% for post in posts %} is a Jinja for loop, which is similar to a Python for loop except that it has to be later closed with the {% endfor %} syntax. You use this syntax to loop over each item in the posts list that was passed by the index() function in the line return render_template('index.html', posts=posts). Inside this for loop, you display the post title in an <h2> heading inside an <a> tag (you’ll later use this tag to link to each post individually).
You display the title using a literal variable delimiter ({{ ... }}). Remember that post will be a dictionary-like object, so you can access the post title with post['title']. You also display the post creation date using the same method.
Once you are done editing the file, save and close it. Then navigate to the index page in your browser. You’ll see the two posts you added to the database on your page.
Now that you’ve modified the index() view function to display all the posts you have in the database on your application’s homepage, you’ll move on to display each post in a single page and allow users to link to each individual post.
Step 6 — Displaying a Single Post
In this step, you’ll create a new Flask route with a view function and a new HTML template to display an individual blog post by its ID.
By the end of this step, the URL http://127.0.0.1:5000/1 will be a page that displays the first post (because it has the ID 1). The http://127.0.0.1:5000/ID URL will display the post with the associated ID number if it exists.
Open app.py for editing:
- nano app.py
Since you’ll need to get a blog post by its ID from the database in multiple locations later in this project, you’ll create a standalone function called get_post(). You can call it by passing it an ID and receive back the blog post associated with the provided ID, or make Flask respond with a 404 Not Found message if the blog post does not exist.
To respond with a 404 page, you need to import the abort() function from the Werkzeug library, which was installed along with Flask, at the top of the file:
import sqlite3
from flask import Flask, render_template
from werkzeug.exceptions import abort
. . .
Then, add the get_post() function right after the get_db_connection() function you created in the previous step:
. . .
def get_db_connection():
conn = sqlite3.connect('database.db')
conn.row_factory = sqlite3.Row
return conn
def get_post(post_id):
conn = get_db_connection()
post = conn.execute('SELECT * FROM posts WHERE id = ?',
(post_id,)).fetchone()
conn.close()
if post is None:
abort(404)
return post
. . .
This new function has a post_id argument that determines what blog post to return.
Inside the function, you use the get_db_connection() function to open a database connection and execute a SQL query to get the blog post associated with the given post_id value. You add the fetchone() method to get the result and store it in the post variable then close the connection. If the post variable has the value None, meaning no result was found in the database, you use the abort() function you imported earlier to respond with a 404 error code and the function will finish execution. If however, a post was found, you return the value of the post variable.
Next, add the following view function at the end of the app.py file:
. . .
@app.route('/<int:post_id>')
def post(post_id):
post = get_post(post_id)
return render_template('post.html', post=post)
In this new view function, you add a variable rule <int:post_id> to specify that the part after the slash (/) is a positive integer (marked with the int converter) that you need to access in your view function. Flask recognizes this and passes its value to the post_id keyword argument of your post() view function. You then use the get_post() function to get the blog post associated with the specified ID and store the result in the post variable, which you pass to a post.html template that you’ll soon create.
Save the app.py file and open a new post.html template file for editing:
- nano templates/post.html
Type the following code in this new post.html file. This will be similar to the index.html file, except that it will only display a single post, in addition to also displaying the contents of the post:
{% extends 'base.html' %}
{% block content %}
<h2>{% block title %} {{ post['title'] }} {% endblock %}</h2>
<span class="badge badge-primary">{{ post['created'] }}</span>
<p>{{ post['content'] }}</p>
{% endblock %}
You add the title block that you defined in the base.html template to make the title of the page reflect the post title that is displayed in an <h2> heading at the same time.
Save and close the file.
You can now navigate to the following URLs to see the two posts you have in your database, along with a page that tells the user that the requested blog post was not found (since there is no post with an ID number of 3 so far):
http://127.0.0.1:5000/1
http://127.0.0.1:5000/2
http://127.0.0.1:5000/3
Going back to the index page, you’ll make each post title link to its respective page. You’ll do this using the url_for() function. First, open the index.html template for editing:
- nano templates/index.html
Then change the value of the href attribute from # to {{ url_for('post', post_id=post['id']) }} so that the for loop will look exactly as follows:
{% for post in posts %}
<a href="{{ url_for('post', post_id=post['id']) }}">
<h2>{{ post['title'] }}</h2>
</a>
<span class="badge badge-primary">{{ post['created'] }}</span>
<hr>
{% endfor %}
Here, you pass 'post' to the url_for() function as a first argument. This is the name of the post() view function and since it accepts a post_id argument, you give it the value post['id']. The url_for() function will return the proper URL for each post based on its ID.
Save and close the file.
The links on the index page will now function as expected. With this, you’ve now finished building the part of the application responsible for displaying the blog posts in your database. Next, you’ll add the ability to create, edit, and delete blog posts to your application.
Step 7 — Modifying Posts
Now that you’ve finished displaying the blog posts that are present in the database on the web application, you need to allow the users of your application to write new blog posts and add them to the database, edit the existing ones, and delete unnecessary blog posts.
Creating a New Post
Up to this point, you have an application that displays the posts in your database but provides no way of adding a new post unless you directly connect to the SQLite database and add one manually. In this section, you’ll create a page on which you will be able to create a post by providing its title and content.
Open the app.py file for editing:
- nano app.py
First, you’ll import the following from the Flask framework:
- The global
requestobject to access incoming request data that will be submitted via an HTML form. - The
url_for()function to generate URLs. - The
flash()function to flash a message when a request is processed. - The
redirect()function to redirect the client to a different location.
Add the imports to your file like the following:
import sqlite3
from flask import Flask, render_template, request, url_for, flash, redirect
from werkzeug.exceptions import abort
. . .
The flash() function stores flashed messages in the client’s browser session, which requires setting a secret key. This secret key is used to secure sessions, which allow Flask to remember information from one request to another, such as moving from the new post page to the index page. The user can access the information stored in the session, but cannot modify it unless they have the secret key, so you must never allow anyone to access your secret key. See the Flask documentation for sessions for more information.
To set a secret key, you’ll add a SECRET_KEY configuration to your application via the app.config object. Add it directly following the app definition before defining the index() view function:
. . .
app = Flask(__name__)
app.config['SECRET_KEY'] = 'your secret key'
@app.route('/')
def index():
conn = get_db_connection()
posts = conn.execute('SELECT * FROM posts').fetchall()
conn.close()
return render_template('index.html', posts=posts)
. . .
Remember that the secret key should be a long random string.
After setting a secret key, you’ll create a view function that will render a template that displays a form you can fill in to create a new blog post. Add this new function at the bottom of the file:
. . .
@app.route('/create', methods=('GET', 'POST'))
def create():
return render_template('create.html')
This creates a /create route that accepts both GET and POST requests. GET requests are accepted by default. To also accept POST requests, which are sent by the browser when submitting forms, you’ll pass a tuple with the accepted types of requests to the methods argument of the @app.route() decorator.
Save and close the file.
To create the template, open a file called create.html inside your templates folder:
- nano templates/create.html
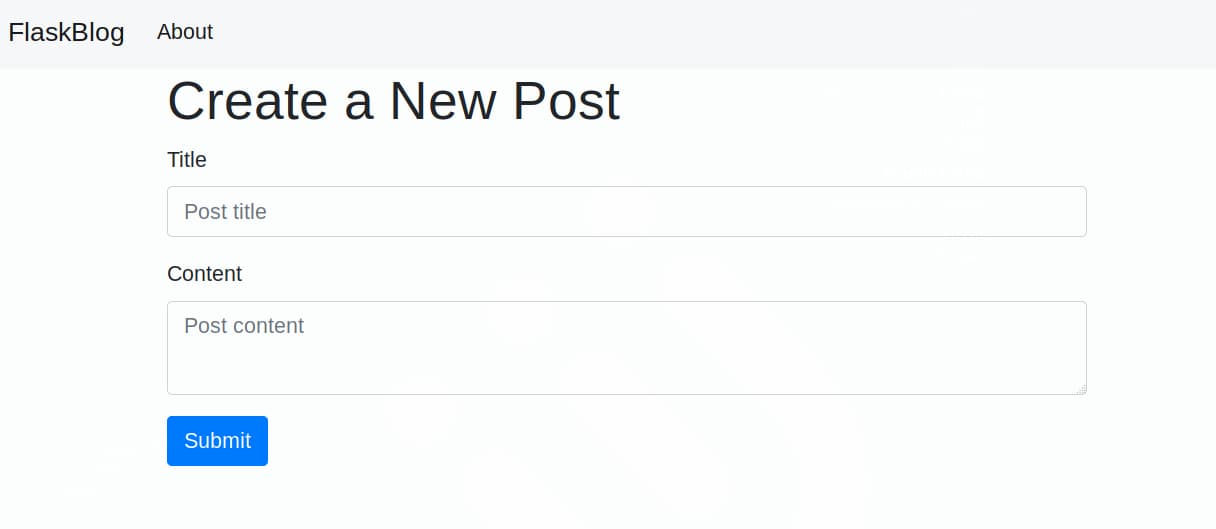
Add the following code inside this new file:
{% extends 'base.html' %}
{% block content %}
<h1>{% block title %} Create a New Post {% endblock %}</h1>
<form method="post">
<div class="form-group">
<label for="title">Title</label>
<input type="text" name="title"
placeholder="Post title" class="form-control"
value="{{ request.form['title'] }}"></input>
</div>
<div class="form-group">
<label for="content">Content</label>
<textarea name="content" placeholder="Post content"
class="form-control">{{ request.form['content'] }}</textarea>
</div>
<div class="form-group">
<button type="submit" class="btn btn-primary">Submit</button>
</div>
</form>
{% endblock %}
Most of this code is standard HTML. It will display an input box for the post title, a text area for the post content, and a button to submit the form.
The value of the post title input is {{ request.form['title'] }} and the text area has the value {{ request.form['content'] }}, this is done so that the data you enter does not get lost if something goes wrong. For example, if you write a long post and you forget to give it a title, a message will be displayed informing you that the title is required. This will happen without losing the post you wrote since it will be stored in the request global object that you have access to in your templates.
Now, with the development server running, use your browser to navigate to the /create route:
http://127.0.0.1:5000/create
You will see a Create a New Post page with a box for a title and content.
This form submits a POST request to your create() view function. However, there is no code to handle a POST request in the function yet, so nothing happens after filling in the form and submitting it.
You’ll handle the incoming POST request when a form is submitted. You’ll do this inside the create() view function. You can separately handle the POST request by checking the value of request.method. When its value is set to 'POST' it means the request is a POST request, you’ll then proceed to extract submitted data, validate it, and insert it into your database.
Open the app.py file for editing:
- nano app.py
Modify the create() view function to look exactly as follows:
. . .
@app.route('/create', methods=('GET', 'POST'))
def create():
if request.method == 'POST':
title = request.form['title']
content = request.form['content']
if not title:
flash('Title is required!')
else:
conn = get_db_connection()
conn.execute('INSERT INTO posts (title, content) VALUES (?, ?)',
(title, content))
conn.commit()
conn.close()
return redirect(url_for('index'))
return render_template('create.html')
In the if statement you ensure that the code following it is only executed when the request is a POST request via the comparison request.method == 'POST'.
You then extract the submitted title and content from the request.form object that gives you access to the form data in the request. If the title is not provided, the condition if not title would be fulfilled, displaying a message to the user informing them that the title is required. If, on the other hand, the title is provided, you open a connection with the get_db_connection() function and insert the title and the content you received into the posts table.
You then commit the changes to the database and close the connection. After adding the blog post to the database, you redirect the client to the index page using the redirect() function passing it the URL generated by the url_for() function with the value 'index' as an argument.
Save and close the file.
Now, navigate to the /create route using your web browser:
http://127.0.0.1:5000/create
Fill in the form with a title of your choice and some content. Once you submit the form, you will see the new post listed on the index page.
Lastly, you’ll display flashed messages and add a link to the navigation bar in the base.html template to have easy access to this new page. Open the template file:
- nano templates/base.html
Edit the file by adding a new <li> tag following the About link inside the <nav> tag. Then add a new for loop directly above the content block to display the flashed messages below the navigation bar. These messages are available in the special get_flashed_messages() function Flask provides:
<nav class="navbar navbar-expand-md navbar-light bg-light">
<a class="navbar-brand" href="{{ url_for('index')}}">FlaskBlog</a>
<button class="navbar-toggler" type="button" data-toggle="collapse" data-target="#navbarNav" aria-controls="navbarNav" aria-expanded="false" aria-label="Toggle navigation">
<span class="navbar-toggler-icon"></span>
</button>
<div class="collapse navbar-collapse" id="navbarNav">
<ul class="navbar-nav">
<li class="nav-item">
<a class="nav-link" href="#">About</a>
</li>
<li class="nav-item">
<a class="nav-link" href="{{url_for('create')}}">New Post</a>
</li>
</ul>
</div>
</nav>
<div class="container">
{% for message in get_flashed_messages() %}
<div class="alert alert-danger">{{ message }}</div>
{% endfor %}
{% block content %} {% endblock %}
</div>
Save and close the file. The navigation bar will now have a New Post item that links to the /create route.
Editing a Post
For a blog to be up to date, you’ll need to be able to edit your existing posts. This section will guide you through creating a new page in your application to simplify the process of editing a post.
First, you’ll add a new route to the app.py file. Its view function will receive the ID of the post that needs to be edited, the URL will be in the format /post_id/edit with the post_id variable being the ID of the post. Open the app.py file for editing:
- nano app.py
Next, add the following edit() view function at the end of the file. Editing an existing post is similar to creating a new one, so this view function will be similar to the create() view function:
. . .
@app.route('/<int:id>/edit', methods=('GET', 'POST'))
def edit(id):
post = get_post(id)
if request.method == 'POST':
title = request.form['title']
content = request.form['content']
if not title:
flash('Title is required!')
else:
conn = get_db_connection()
conn.execute('UPDATE posts SET title = ?, content = ?'
' WHERE id = ?',
(title, content, id))
conn.commit()
conn.close()
return redirect(url_for('index'))
return render_template('edit.html', post=post)
The post you edit is determined by the URL and Flask will pass the ID number to the edit() function via the id argument. You add this value to the get_post() function to fetch the post associated with the provided ID from the database. The new data will come in a POST request, which is handled inside the if request.method == 'POST' condition.
Just like when you create a new post, you first extract the data from the request.form object then flash a message if the title has an empty value, otherwise, you open a database connection. Then you update the posts table by setting a new title and new content where the ID of the post in the database is equal to the ID that was in the URL.
In the case of a GET request, you render an edit.html template passing in the post variable that holds the returned value of the get_post() function. You’ll use this to display the existing title and content on the edit page.
Save and close the file, then create a new edit.html template:
- nano templates/edit.html
Write the following code inside this new file:
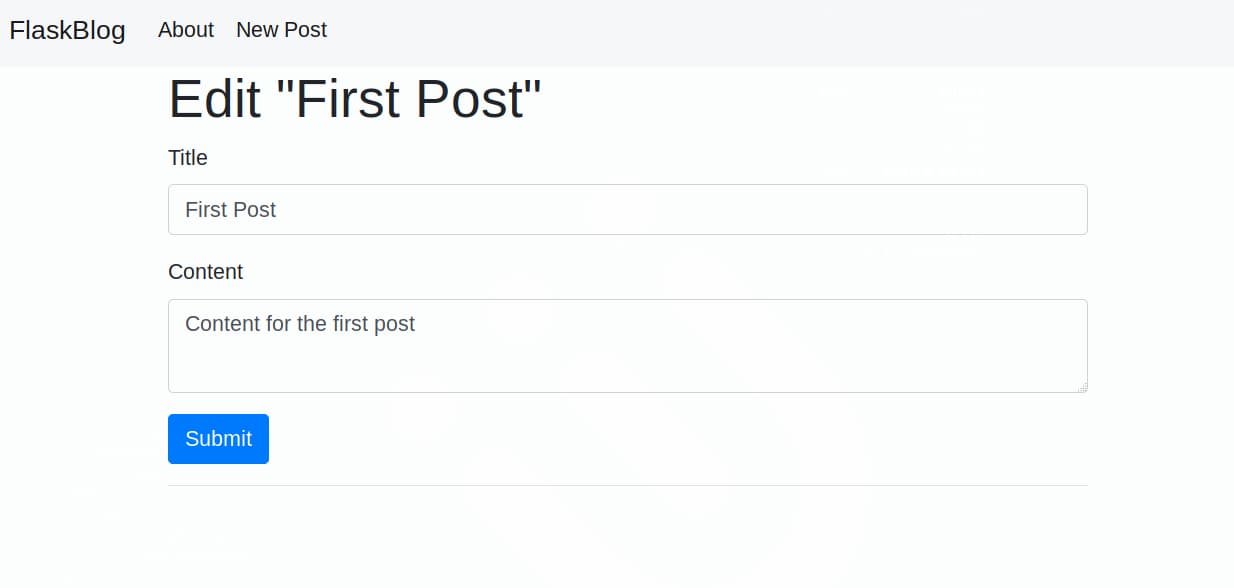
{% extends 'base.html' %}
{% block content %}
<h1>{% block title %} Edit "{{ post['title'] }}" {% endblock %}</h1>
<form method="post">
<div class="form-group">
<label for="title">Title</label>
<input type="text" name="title" placeholder="Post title"
class="form-control"
value="{{ request.form['title'] or post['title'] }}">
</input>
</div>
<div class="form-group">
<label for="content">Content</label>
<textarea name="content" placeholder="Post content"
class="form-control">{{ request.form['content'] or post['content'] }}</textarea>
</div>
<div class="form-group">
<button type="submit" class="btn btn-primary">Submit</button>
</div>
</form>
<hr>
{% endblock %}
Save and close the file.
This code follows the same pattern except for the {{ request.form['title'] or post['title'] }} and {{ request.form['content'] or post['content'] }} syntax. This displays the data stored in the request if it exists, otherwise it displays the data from the post variable that was passed to the template containing current database data.
Now, navigate to the following URL to edit the first post:
http://127.0.0.1:5000/1/edit
You will see an Edit “First Post” page.
Edit the post and submit the form, then make sure the post was updated.
You now need to add a link that points to the edit page for each post on the index page. Open the index.html template file:
- nano templates/index.html
Edit the file to look exactly like the following:
{% extends 'base.html' %}
{% block content %}
<h1>{% block title %} Welcome to FlaskBlog {% endblock %}</h1>
{% for post in posts %}
<a href="{{ url_for('post', post_id=post['id']) }}">
<h2>{{ post['title'] }}</h2>
</a>
<span class="badge badge-primary">{{ post['created'] }}</span>
<a href="{{ url_for('edit', id=post['id']) }}">
<span class="badge badge-warning">Edit</span>
</a>
<hr>
{% endfor %}
{% endblock %}
Save and close the file.
Here you add an <a> tag to link to the edit() view function, passing in the post['id'] value to link to the edit page of each post with the Edit link.
Deleting a Post
Sometimes a post no longer needs to be publicly available, which is why the functionality of deleting a post is crucial. In this step you will add the delete functionality to your application.
First, you’ll add a new /ID/delete route that accepts POST requests, similar to the edit() view function. Your new delete() view function will receive the ID of the post to be deleted from the URL. Open the app.py file:
- nano app.py
Add the following view function at the bottom of the file:
# ....
@app.route('/<int:id>/delete', methods=('POST',))
def delete(id):
post = get_post(id)
conn = get_db_connection()
conn.execute('DELETE FROM posts WHERE id = ?', (id,))
conn.commit()
conn.close()
flash('"{}" was successfully deleted!'.format(post['title']))
return redirect(url_for('index'))
This view function only accepts POST requests. This means that navigating to the /ID/delete route on your browser will return an error because web browsers default to GET requests.
However you can access this route via a form that sends a POST request passing in the ID of the post you want to delete. The function will receive the ID value and use it to get the post from the database with the get_post() function.
Then you open a database connection and execute a DELETE FROM SQL command to delete the post. You commit the change to the database and close the connection while flashing a message to inform the user that the post was successfully deleted and redirect them to the index page.
Note that you don’t render a template file, this is because you’ll just add a Delete button to the edit page.
Open the edit.html template file:
- nano templates/edit.html
Then add the following <form> tag after the <hr> tag and directly before the {% endblock %} line:
<hr>
<form action="{{ url_for('delete', id=post['id']) }}" method="POST">
<input type="submit" value="Delete Post"
class="btn btn-danger btn-sm"
onclick="return confirm('Are you sure you want to delete this post?')">
</form>
{% endblock %}
You use the confirm() method to display a confirmation message before submitting the request.
Now navigate again to the edit page of a blog post and try deleting it:
http://127.0.0.1:5000/1/edit
At the end of this step, the source code of your project will look like the code on this page.
With this, the users of your application can now write new blog posts and add them to the database, edit, and delete existing posts.
FAQs
1. What is Flask used for in Python?
Flask is a lightweight web framework for building server‑side applications and APIs in Python. It provides routing, request/response handling, templating (Jinja), sessions, and extensibility via extensions, making it ideal for small to medium apps, prototypes, and microservices where you want flexibility over components.
2. How do I run a Flask app locally?
-
Activate your virtual environment.
source flask_blogenv/bin/activate
To start your Flask application locally:
export FLASK_APP=app: Tells Flask which file (or module) should be considered your main application. In this case,app.pyor theappmodule.--debug: (Optional) Passes the debug flag directly toflask run, enabling the debugger and automatic reloading when your code changes. This replaces the deprecatedFLASK_ENV=developmentapproach removed in Flask 2.3.flask run: Launches the Flask development server, serving your app athttp://127.0.0.1:5000.
Example:
export FLASK_APP=app
flask run --debug # optional --debug enables debugger and auto-reload
# starts server at http://127.0.0.1:5000
Alternatively, you can use the Python module form (which does the same thing as flask run):
python -m flask run
This will start your Flask application using your current environment variables.
3. What’s the difference between Flask and Django?
| Feature | Flask | Django |
|---|---|---|
| Type | Microframework | Full-stack (“batteries-included”) framework |
| Project Size | Ideal for small to medium apps, microservices | Suited for medium to large apps and rapid enterprise development |
| Structure | Minimal, flexible, user-defined | Enforced, highly-structured project layout |
| ORM | Optional (choose your own or none) | Built-in ORM (mandatory by default) |
| Admin Panel | Optional (add yourself) | Built-in admin interface |
| Authentication | Add your own preferred solution | Built-in authentication system |
| Migrations | Choose tools (e.g. Flask-Migrate) | Built-in migrations system |
| Extensibility | Highly extensible, pick your own libraries | Extensible, but includes many features out-of-the-box |
| Learning Curve | Gentle, learn as you go | Steeper, more conventions, but faster for large projects |
- Choose Flask for control, simplicity, and custom setups, which acts as a great fit for flexibility and small codebases.
- Choose Django for speed with built-in features, strong conventions, and consistency at scale, making it great for larger apps and teams.
You can check out the following tutorials for more information on Flask and Django:
How to Create Your First Web Application Using Flask and Python 3 and How to Set Up Django with Postgres, Nginx, and Gunicorn on Ubuntu
4. How can I deploy a Flask app to production?
The easiest and most reliable way to deploy a Flask app to production is by using a Platform-as-a-Service (PaaS) like DigitalOcean App Platform. App Platform fully manages your app deployment and scaling. Just connect your GitHub repo and go live in minutes. See Deploying a Python App on DigitalOcean App Platform for a step-by-step guide.
To deploy to App Platform:
- Push your Flask app to a GitHub repository.
- In the App Platform dashboard, click Create App and connect your repo.
- Set the run command to
gunicorn app:app(or your entrypoint). - Configure environment variables and any buildpacks.
- Click Deploy—your app will be live, with HTTPS, auto-scaling, and automatic redeploys!
Alternatively, you can deploy Flask manually by:
- Using a production WSGI server like
gunicornand a reverse proxy like Nginx:
pip install gunicorn
gunicorn app:app --bind 0.0.0.0:8000
- Containerizing your app with Docker and deploying behind a managed load balancer.
For most developers, DigitalOcean App Platform is the simplest and most scalable solution for Flask deployments in production.
Conclusion
This tutorial introduced essential concepts of the Flask Python framework. You learned how to make a small web application, run it in a development server, and allow the user to provide custom data via URL parameters and web forms. You also used the Jinja template engine to reuse HTML files and use logic in them.
By the end of this tutorial, you now have a fully functioning web blog that interacts with an SQLite database to create, display, edit, and delete blog posts using the Python language and SQL queries.
You can learn more about working with Flask and SQLite by checking out this tutorial on How To Use One-to-Many Database Relationships with Flask and SQLite.
You can further develop this application by adding user authentication so that only registered users can create and modify blog posts, you may also add comments and tags for each blog post, and add file uploads to give users the ability to include images in the post. See the Flask documentation for more information.
To continue building robust Flask applications, explore these tutorials:
Thanks for learning with the DigitalOcean Community. Check out our offerings for compute, storage, networking, and managed databases.
About the author
Anish is a Sr Technical Content Strategist and Team Lead at DigitalOcean with 7+ years of experience as an DevOps SRE at Nutanix and Cloud consultant at AMEX, and technical writing at DOCN, and shipping deep infra and AI inference tutorials that help developers deploy production‑ready applications on DigitalOcean.
Still looking for an answer?
This textbox defaults to using Markdown to format your answer.
You can type !ref in this text area to quickly search our full set of tutorials, documentation & marketplace offerings and insert the link!
This is a great tutorial! This as definitely helped me understand the basics of web development using Flask!Do you have anymore articles/ resources that you would recommend a beginner?
Excellent tutorial! It isn’t common that a posted tutorial runs exactly as staged as the instructions suggest, but everything went according to plan (with the exception of running this under Windows 10 as opposed to Linux).
Made sure to sign up just to leave this comment, but this guide deserves it. Thank you very much!
This comment has been deleted
thank you for such an easy to follow tutorial and all your brilliant explanations.
This tutorial is GREAT! Everything works as it should and is well explained (with the exception of how to use ‘set’ instead of ‘export’ to set environment variables in Windows).
There’s a slight part that the tutorial didn’t cover. The blog posts don’t render newlines
I have come across many tutorials across web but yours is OUTSTANDING. Thanks a lot for your hard work in preparing this tutorial. Explaining the purpose and reason of particular code makes your tutorial EXCELLENT.
signed up just so i could comment on how fluid, yet informative this tutorial is. i’m just starting out but there’s a wealth of information here for anyone interested in learning the fundamentals of flask and sql. thank you for putting this together.
Hi Abdelhadi! I am completely new to python and flask, and found this a super informative tutorial. It gave me a really deep insight into current web development. Many thanks! In terms of next steps, how would it be possible to make a (blog post) list on the left of the screen, and only load the post result/edit screens on the right (similar to selecting something in apps like outlook or whatsapp web)?
This comment has been deleted
 This work is licensed under a Creative Commons Attribution-NonCommercial- ShareAlike 4.0 International License.
Become a contributor for community
Get paid to write technical tutorials and select a tech-focused charity to receive a matching donation.

DigitalOcean Documentation
Full documentation for every DigitalOcean product.

Resources for startups and AI-native businesses
The Wave has everything you need to know about building a business, from raising funding to marketing your product.
The developer cloud
Scale up as you grow — whether you're running one virtual machine or ten thousand.

Start building today
From GPU-powered inference and Kubernetes to managed databases and storage, get everything you need to build, scale, and deploy intelligent applications.
