By Sergey Zhukaev and Tammy Fox
Not using Ubuntu 16.04?
Choose a different version or distribution.
Introduction
NGINX is a fast and reliable open-source web server. It gained its popularity due to its low memory footprint, high scalability, ease of configuration, and support for the vast majority of different protocols.
One of the protocols supported is the relatively new HTTP/2, which was published in May 2015. The main advantage of HTTP/2 is its high transfer speed for content-rich websites.
This tutorial will help you set up a fast and secure Nginx server with HTTP/2 support.
Prerequisites
Before we get started, we will need a few things:
- Ubuntu 16.04 Droplet
- Non-root user with sudo privileges (Check out Initial Server Setup with Ubuntu 16.04 for details.)
- Fully registered domain. You can purchase one on Namecheap or get one for free on Freenom.
- Make sure your domain name is configured to point to your Droplet. Check out this tutorial if you need help.
- An SSL certificate. Generate a self-signed certificate, obtain a free one from Let’s Encrypt, or buy one from another provider.
That is all. If you have everything listed above, you are ready to go.
Differences Between HTTP 1.1 and HTTP/2
HTTP/2 is a new version of the Hypertext Transport Protocol, which is used on the Web to deliver pages from server to browser. HTTP/2 is the first major update of HTTP in almost two decades: HTTP1.1 was introduced to the public back in 1999 when webpages were usually just a single HTML file with inline CSS stylesheet. The Internet has dramatically changed since then, and now we are facing the limitations of HTTP 1.1 — the protocol limits potential transfer speeds for most modern websites because it downloads parts of a page in a queue (the previous part must download completely before the download of the next part begins), and an average modern webpage requires about 100 request to be downloaded (each request is a picture, js file, css file, etc).
HTTP/2 solves this problem because it brings a few fundamental changes:
- All requests are downloaded in parallel, not in a queue
- HTTP headers are compressed
- Pages transfer as a binary, not as a text file, which is more efficient
- Servers can “push” data even without the user’s request, which improves speed for users with high latency
Even though HTTP/2 does not require encryption, developers of two most popular browsers, Google Chrome and Mozilla Firefox, stated that for the security reasons they will support HTTP/2 only for HTTPS connections. Hence, if you decide to set up servers with HTTP/2 support, you must also secure them with HTTPS.
Step 1 — Installing the Latest Version of Nginx
Support of the HTTP/2 protocol was introduced in Nginx 1.9.5. Fortunately, the default repository in Ubuntu 16.04 contains a version higher than this, so we don’t have to add a third party repository.
First, update the list of available packages in the apt packaging system:
- sudo apt-get update
Then, install Nginx:
- sudo apt-get install nginx
After the installation process finishes, you can check the version of Nginx by typing:
- sudo nginx -v
The output should be similar to the following:
nginx version: nginx/1.10.0 (Ubuntu)
In the next several steps, we will modify the Nginx configuration files. Each step will change an Nginx configuration option. We will test the syntax of the configuration file along the way. Finally, we will verify that Nginx supports HTTP/2 and make a few changes to optimize performance.
Step 2 — Changing the Listening Port and Enabling HTTP/2
The first change we will make will be to change the listening port from 80 to 443.
Let’s open the configuration file:
- sudo nano /etc/nginx/sites-available/default
By default, Nginx is set to listen to port 80, which is the standard HTTP port:
listen 80 default_server;
listen [::]:80 default_server;
As you can see, we have two different listen variables. The first one is for all IPv4 connections. The second one is for IPv6 connections. We will enable encryption for both.
Modify the listening port to 443, which is used by the HTTPS protocol:
listen 443 ssl http2 default_server;
listen [::]:443 ssl http2 default_server;
Notice that in addition to ssl, we also added http2 to the line. This variable tells Nginx to use HTTP/2 with supported browsers.
Step 3 — Changing the Server Name
We use the server_name entry to specify which domain should be associated with the configuration file. Locate the server_name entry in the configuration file.
By default, server_name is set to _ (underscore), which means the config file is responsible for all incoming requests. Change _ to your actual domain, like this:
server_name example.com;
Save the configuration file and edit the text editor.
Whenever you make changes to Nginx configuration files, you should check the configuration for syntax errors, like this:
- sudo nginx -t
If the syntax is error-free, you will see the following output:
nginx: the configuration file /etc/nginx/nginx.conf syntax is ok
nginx: configuration file /etc/nginx/nginx.conf test is successful
Step 4 — Adding the SSL Certificates
Next, you need to configure Nginx to use your SSL certificate. If you don’t know what an SSL certificate is or currently don’t have any, please follow one of the tutorials in the Prerequisites section of this article.
Create a directory to store your SSL certificates inside the Nginx configuration directory:
- sudo mkdir /etc/nginx/ssl
Copy your certificate and the private key to this location. We will also rename the files to show which domain they are associated. This will come in handy in the future, when you have more than one domain associated with this server. Replace example.com with your actual hostname:
- sudo cp /path/to/your/certificate.crt /etc/nginx/ssl/example.com.crt
- sudo cp /path/to/your/private.key /etc/nginx/ssl/example.com.key
Now, let’s open our configuration file one again and configure SSL.
- sudo nano /etc/nginx/sites-available/default
On new lines inside the server block, define the location of your certificates:
ssl_certificate /etc/nginx/ssl/example.com.crt;
ssl_certificate_key /etc/nginx/ssl/example.com.key;
Save the file, and exit the text editor.
Step 5 — Avoiding Old Cipher Suites
HTTP/2 has a huge blacklist of old and insecure ciphers, so we must avoid them. Cipher suites are a bunch of cryptographic algorithms, which describe how the transferring data should be encrypted.
We will use a really popular cipher set, whose security was approved by Internet giants like CloudFlare. It does not allow the usage of MD5 encryption (which was known as insecure since 1996, but despite this fact, its use is widespread even to this day).
Open the following configuration file:
- sudo nano /etc/nginx/nginx.conf
Add this line after ssl_prefer_server_ciphers on;.
ssl_ciphers EECDH+CHACHA20:EECDH+AES128:RSA+AES128:EECDH+AES256:RSA+AES256:EECDH+3DES:RSA+3DES:!MD5;
Save the file, and exit the text editor.
Once again, check the configuration for syntax errors:
- sudo nginx -t
Step 6 — Increasing Key Exchange Security
The first step in the establishment of a secure connection is the exchange of the private keys between server and client. The problem is that, up to this point, the connection between them is not encrypted — which means the transferring of data is visible to any third party. That is why we need the Diffie–Hellman–Merkle algorithm. The technical details about how does it work is a complicated matter that cannot be explained in a nutshell, but if you are really interested in details, you can watch this YouTube video.
By default, Nginx uses a 1028-bit DHE (Ephemeral Diffie-Hellman) key, which is relatively easy to decrypt. To provide maximum security, we should build our own, more secure DHE key.
To do it, issue the following command:
- sudo openssl dhparam -out /etc/nginx/ssl/dhparam.pem 2048
Keep in mind that we should generate DH parameters in the same folder as our SSL certificates. In this tutorial, the certificates are located in /etc/nginx/ssl/. The reason for this is that Nginx always looks for user-provided DHE key in the certificates folder and uses it if exists.
The variable after the file path (in our case it is 2048) specifies the length of the key. A key with a 2048-bit length is secure enough and recommended by the Mozilla Foundation, but if you are looking for even more encryption, you can change it to 4096.
The generation process will take about 5 minutes.
Once it is complete, open the default Nginx configuration file again:
- sudo nano /etc/nginx/sites-available/default
On a new line inside server block, define the location of your custom DHE key:
ssl_dhparam /etc/nginx/ssl/dhparam.pem;
Step 7 — Redirecting all HTTP Request to HTTPS
Since we are interested in serving the content through HTTPS only, we should tell Nginx what it should do if the server receives an HTTP request.
At the bottom of our file, we will create a new server block for redirecting all HTTP requests to HTTPS (be sure to replace the server name with your actual domain name):
server {
       listen         80;
       listen    [::]:80;
	   server_name    example.com;
       return         301 https://$server_name$request_uri;
}
Save the file, and exit the configuration file.
Check the configuration for syntax errors:
- sudo nginx -t
Step 8 — Reloading Nginx
That’s it for all the Nginx configuration changes. Since we checked for syntax errors with each change, you should be ready to restart Nginx and test your changes.
To summarize, ignoring commented out lines, your configuration file should now look similar to this:
server {
        listen 443 ssl http2 default_server;
        listen [::]:443 ssl http2 default_server;

        root /var/www/html;

        index index.html index.htm index.nginx-debian.html;

        server_name example.com;

        location / {
                try_files $uri $uri/ =404;
        }

        ssl_certificate /etc/nginx/ssl/example.com.crt;
        ssl_certificate_key /etc/nginx/ssl/example.com.key;
        ssl_dhparam /etc/nginx/ssl/dhparam.pem;
}


server {
       listen         80;
       listen    [::]:80;
       server_name    example.com;
       return         301 https://$server_name$request_uri;
}
To apply the changes, restart the Nginx server.
- sudo systemctl restart nginx
Step 9 — Verifying the Changes
Let’s check that our server is up and running. Open your web browser and navigate to your domain (replace example.com with your actual domain name):
example.com
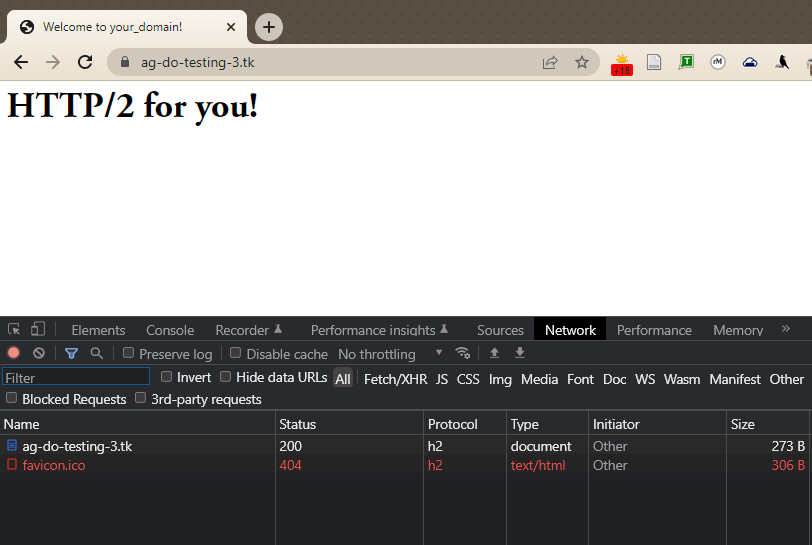
If everything was configured properly, you should be automatically redirected to HTTPS. Now, let’s check that HTTP/2 is working: open the Chrome Developer Tools (View -> Developer -> Developer Tools) and reload the page (View -> Reload This Page). Then navigate to the Network tab, click on table header row that starts with Name, right-click on it, and select the Protocol option.
Now you should see h2 (which stands for HTTP/2) in a new column for your website serving HTTP/2 content.
At this point, our server is ready to serve content through HTTP/2 protocol, but there are still some things we should do to prepare the server to be used in production.
Step 10 — Optimizing Nginx for Best Performance
In this step we will tune the main Nginx configuration file for best performance and security.
First of all, let’s open nginx.conf by typing the following in the console:
- sudo nano /etc/nginx/nginx.conf
Enabling Connection Credentials Caching
Compared to HTTP, HTTPS takes a relatively longer time to establish initial connection between server and user. To minimize this difference in page load speed, we will enable caching of the connection credentials. That means instead of creating a new session on every page requested, the server will use a cached version of the credentials instead.
To enable session caching, add these lines at the end of http block of your nginx.conf file:
ssl_session_cache shared:SSL:5m;
ssl_session_timeout 1h;
ssl_session_cache specifies the size of cache that will contain session information. 1 MB of it can store information for about 4000 sessions. The default value of 5 MB will be more than enough for most users, but if you expect really heavy traffic, you can increase this value accordingly.
ssl_session_timeout limits the time particular sessions are stored in the cache. This value shouldn’t be too big (more than an hour), but setting the value too low is pointless as well.
Enabling HTTP Strict Transport Security (HSTS)
Even though we have already made all regular HTTP requests redirect to HTTPS in our Nginx configuration file, we also should enable HTTP Strict Transport Security to avoid having to do those redirects in the first place.
If the browser finds an HSTS header, it will not try to connect to the server via regular HTTP again for the given time period. No matter what, it will exchange data using only encrypted HTTPS connection. This header should also protect us from protocol downgrade attacks.
Add this line in nginx.conf:
add_header Strict-Transport-Security "max-age=15768000" always;
The max-age is set in seconds. 15768000 seconds is equivalent to 6 months.
By default, this header is not added to subdomain requests. If you have subdomains and want HSTS to apply to all of them, you should add the includeSubDomains variable at the end of the line, like this:
add_header Strict-Transport-Security "max-age=15768000; includeSubDomains" always;
Save the file, and exit the text editor.
Once again, check the configuration for syntax errors:
- sudo nginx -t
Finally, restart the Nginx server to apply the changes.
- sudo systemctl restart nginx
Conclusion
Your Nginx server is now serving HTTP/2 pages. If you want to test the strength of your SSL connection, please visit Qualys SSL Lab and run a test against your server. If everything is configured properly, you should get an A+ mark for security.
Thanks for learning with the DigitalOcean Community. Check out our offerings for compute, storage, networking, and managed databases.
About the author(s)
Technical Editor, DigitalOcean
Still looking for an answer?
This textbox defaults to using Markdown to format your answer.
You can type !ref in this text area to quickly search our full set of tutorials, documentation & marketplace offerings and insert the link!
Correct me if I’m wrong, but since this version of nginx is built using Openssl 1.0.1, it doesn’t have support for ALPN, right? I did exactly this a few months ago, and only realized this afterwards. To get ALPN working on Ubuntu 14.04, you apparently have to build nginx from source. And while it’s not a problem now, Chrome is ending support for NPN on May 15th. At which point I imagine this configuration will simply stop working. There’s a test website here that let’s you check whether or not ALPN is supported by your server:
thanks for this great tutorial.
i have one questions regarding Connection Credentials Caching though, is it possible to store ssl credentials for all my subdomains? or simply by following these 2 lines enable caching for subdomains automatically?
ssl_session_cache shared:SSL:5m; ssl_session_timeout 1h;
add_header Strict-Transport-Security "max-age=15768000; includeSubDomains: always;
should be
add_header Strict-Transport-Security “max-age=15768000; includeSubDomains: always;”;
I do not own a domain but i want to test HTTP-2 server push feature so the option i have is to use localhost as server_name. Can i generate ssl certificate for localhost? or can I connect the client and server using HTTP/2 connection without HTTPS?
my site isnt working on microsoft edge and ie 11… pressing f12, i noticed that protocol type is “pending”… any thoughts? https://estiloasmeninas.com tnkss
SOLVED: just used that code for ssl.
I used this setup, and went to the page refeenced in this article to enable support for winxp, and testing my website here: https://tools.keycdn.com/http2-test says that i have http2, but when i go there on a browser it does not use it.
As far as I know Nginx doesn’t support Server Push yet - but maybe someone can enlighten me on this one? ✨
Is there an update for the article showing how we enable ALPN support? 😅 Thanks in advance.
Always love tutorial from you guys, but there is a small mistake. According to nginx’s document, HSTS config should be:
add_header Strict-Transport-Security "max-age=31536000; includeSubDomains" always;
I tried your config and tested with ssllab which gave me “Invalid Failed to parse header max-age=15768000; includeSubDomains: always;”
 This work is licensed under a Creative Commons Attribution-NonCommercial- ShareAlike 4.0 International License.
Become a contributor for community
Get paid to write technical tutorials and select a tech-focused charity to receive a matching donation.

DigitalOcean Documentation
Full documentation for every DigitalOcean product.

Resources for startups and AI-native businesses
The Wave has everything you need to know about building a business, from raising funding to marketing your product.
The developer cloud
Scale up as you grow — whether you're running one virtual machine or ten thousand.

Start building today
From GPU-powered inference and Kubernetes to managed databases and storage, get everything you need to build, scale, and deploy intelligent applications.
