By Abdelhadi Dyouri and Kathryn Hancox

The author selected the COVID-19 Relief Fund to receive a donation as part of the Write for DOnations program.
Introduction
Flask is a framework for building web applications using the Python language, and SQLite is a database engine that you can use with Python to store application data. In this tutorial, you’ll modify an application built using Flask and SQLite by adding a many-to-many relationship to it.
Although you can follow this tutorial independently, it is also a continuation of the How To Modify Items in a One-to-Many Database Relationships with Flask and SQLite tutorial in which we managed a multi-table database with a one-to-many relationship using a to-do application example. The application allows users to add new to-do items, categorize items under different lists, and modify items.
A many-to-many database relationship is a relationship between two tables where a record in each table can reference several records in the other table. For example, in a blog, a table for posts can have a many-to-many relationship with a table for storing authors. Each post can reference many authors, and each author can reference many posts. Each post can have many authors, and each author can write many posts. Therefore, there is a many-to-many relationship between posts and authors. For another example, in a social media application, each post may have many hashtags, and each hashtag may have many posts.
By the end of the tutorial, your application will have a new feature for assigning to-do items to different users. We will refer to the users that get assigned to-dos with the word assignees. For example, you can have a household to-do item for Cleaning the kitchen, which you can assign to both Sammy and Jo—each to-do can have many assignees (that is, Sammy and Jo). Also each user can have many to-dos assigned to them (that is, Sammy can be assigned multiple to-do items), this is a many-to-many relationship between to-do items and assignees.
At the end of this tutorial, the application will include an Assigned to tag with the names of the assignees listed.
Prerequisites
Before you start following this guide, you will need:
-
A local Python 3 programming environment, follow the tutorial for your distribution in How To Install and Set Up a Local Programming Environment for Python 3 series. In this tutorial we’ll call our project directory
flask_todo. -
(Optional) In Step 1 you’ll have the option of cloning the to-do application you’ll be working on in this tutorial. However, you can optionally work through How To Use One-to-Many Database Relationships with Flask and SQLite and How To Modify Items in a One-to-Many Database Relationships with Flask and SQLite. You can access the final code from this page.
-
(Optional) An understanding of basic Flask concepts such as creating routes, rendering HTML templates, and connecting to a SQLite database. Check out How To Make a Web Application Using Flask in Python 3 and How To Use the sqlite3 Module in Python 3, if you are not familiar with these concepts, but it’s not necessary.
Step 1 — Setting Up the Web Application
In this step, you will set up the to-do application ready for modification. You will also review the database schema to understand the structure of the database. If you followed the tutorial in the prerequisites section and still have the code and the virtual environment on your local machine, you can skip this step.
To demonstrate adding a many-to-many relationship to a Flask web application, you will use the previous tutorial’s application code, which is a to-do management web application built using Flask, SQLite, and the Bootstrap framework. With this application users can create new to-dos, modify and delete existing to-dos, and mark to-dos as complete.
Clone the repository and rename it from flask-todo-2 to flask_todo with the following command:
- git clone https://github.com/do-community/flask-todo-2 flask_todo
Navigate to flask_todo:
- cd flask_todo
Then create a new virtual environment:
- python -m venv env
Activate the environment:
- source env/bin/activate
Install Flask:
- pip install Flask
Then, initialize the database using the init_db.py program:
- python init_db.py
Next, set the following environment variables:
- export FLASK_APP=app
- export FLASK_ENV=development
FLASK_APP indicates the application you are currently developing, which is app.py in this case. FLASK_ENV specifies the mode—set it to development for development mode; this will allow you to debug the application. (Remember not to use this mode in a production environment.)
Then run the development server:
- flask run
If you go to your browser, you’ll have the application running at the following URL: http://127.0.0.1:5000/.
To stop the development server, use CTRL + C.
Next, you will go through the database schema to understand the current relationships between tables. If you are familiar with the contents of the schema.sql file, you can skip to the next step.
Open the schema.sql file:
- nano schema.sql
The file contents are as follows:
DROP TABLE IF EXISTS lists;
DROP TABLE IF EXISTS items;

CREATE TABLE lists (
    id INTEGER PRIMARY KEY AUTOINCREMENT,
    created TIMESTAMP NOT NULL DEFAULT CURRENT_TIMESTAMP,
    title TEXT NOT NULL
);

CREATE TABLE items (
    id INTEGER PRIMARY KEY AUTOINCREMENT,
    list_id INTEGER NOT NULL,
    created TIMESTAMP NOT NULL DEFAULT CURRENT_TIMESTAMP,
    content TEXT NOT NULL,
    done INTEGER NOT NULL DEFAULT 0,
    FOREIGN KEY (list_id) REFERENCES lists (id)
);
In the schema.sql file, you have two tables: lists for storing lists (such as Home or Study), and items for storing to-do items (such as Do the dishes or Learn Flask).
The lists table has the following columns:
id: The ID of the list.created: The list’s creation date.title: The list’s title.
The items table has the following columns:
id: The ID of the item.list_id: The ID of the list the item belongs to.created: The item’s creation date.content: The item’s content.done: The item’s state, the value0indicates the item has not been done yet, while1indicates item completion.
In the items table you have a foreign key constraint, in which the list_id column references the id column of the lists parent table. This is a one-to-many relationship between items and lists, indicating that a list can have multiple items, and items belong to a single list:
FOREIGN KEY (list_id) REFERENCES lists (id)
In the next step, you will use a many-to-many relationship to create a link between two tables.
Step 2 — Adding an Assignees Table
In this step, you will review how to implement a many-to-many relationship and joins table. Then you’ll add a new table for storing assignees.
A many-to-many relationship links two tables where each item in a table has many related items in the other table.
Let’s say you have a simple table for to-do items as follows:
Items
+----+-------------------+
| id | content           |
+----+-------------------+
| 1  | Buy eggs          |
| 2  | Fix lighting      |
| 3  | Paint the bedroom |
+----+-------------------+
And a table for assignees like so:
assignees
+----+------+
| id | name |
+----+------+
| 1  | Sammy|
| 2  | Jo   |
+----+------+
Let’s say you want to assign the to-do Fix lighting to both Sammy and Jo, you could do this by adding a new row in the items table like so:
items
+----+-------------------+-----------+
| id | content           | assignees |
+----+-------------------+-----------+
| 1  | Buy eggs          |           |
| 2  | Fix lighting      | 1, 2      |
| 3  | Paint the bedroom |           |
+----+-------------------+-----------+
This is the wrong approach because each column should only have one value; if you have multiple values, basic operations such as adding and updating data become cumbersome and slow. Instead, there should be a third table that references primary keys of related tables—this table is often called a join table, and it stores IDs of each item from each table.
Here is an example of a join table that links between items and assignees:
item_assignees
+----+---------+-------------+
| id | item_id | assignee_id |
+----+---------+-------------+
| 1  | 2       | 1           |
| 2  | 2       | 2           |
+----+---------+-------------+
In the first row, the item with the ID 2 (that is, Fix lighting) relates to the assignee with the ID 1 (Sammy). In the second row, the same item also relates to the assignee with the ID 2 (Jo). This means that the to-do item is assigned to both Sammy and Jo. Similarly, you can assign each assignee to multiple items.
Now, you will modify the to-do application’s database to add a table for storing assignees.
First, open schema.sql to add a new table named assignees:
- nano schema.sql
Add a line to delete the assignees table if it already exists. This is to avoid potential future issues when reinitiating the database, such as an already existing assignees table with different columns, which might break the code unexpectedly if it does not follow the same schema. You also add the SQL code for the table:
DROP TABLE IF EXISTS assignees;
DROP TABLE IF EXISTS lists;
DROP TABLE IF EXISTS items;

CREATE TABLE lists (
    id INTEGER PRIMARY KEY AUTOINCREMENT,
    created TIMESTAMP NOT NULL DEFAULT CURRENT_TIMESTAMP,
    title TEXT NOT NULL
);

CREATE TABLE items (
    id INTEGER PRIMARY KEY AUTOINCREMENT,
    list_id INTEGER NOT NULL,
    created TIMESTAMP NOT NULL DEFAULT CURRENT_TIMESTAMP,
    content TEXT NOT NULL,
    done INTEGER NOT NULL DEFAULT 0,
    FOREIGN KEY (list_id) REFERENCES lists (id)
);

CREATE TABLE assignees (
    id INTEGER PRIMARY KEY AUTOINCREMENT,
    name TEXT NOT NULL
);
Save and close the file.
This new assignees table has the following columns:
id: The ID of the assignee.name: The name of the assignee.
Edit the init_db.py program to add a few assignees to the database. You use this program to initialize the database:
- nano init_db.py
Modify the file to look as follows:
import sqlite3

connection = sqlite3.connect('database.db')

with open('schema.sql') as f:
    connection.executescript(f.read())

cur = connection.cursor()

cur.execute("INSERT INTO lists (title) VALUES (?)", ('Work',))
cur.execute("INSERT INTO lists (title) VALUES (?)", ('Home',))
cur.execute("INSERT INTO lists (title) VALUES (?)", ('Study',))

cur.execute("INSERT INTO items (list_id, content) VALUES (?, ?)",
            (1, 'Morning meeting')
            )

cur.execute("INSERT INTO items (list_id, content) VALUES (?, ?)",
            (2, 'Buy fruit')
            )

cur.execute("INSERT INTO items (list_id, content) VALUES (?, ?)",
            (2, 'Cook dinner')
            )

cur.execute("INSERT INTO items (list_id, content) VALUES (?, ?)",
            (3, 'Learn Flask')
            )

cur.execute("INSERT INTO items (list_id, content) VALUES (?, ?)",
            (3, 'Learn SQLite')
            )

cur.execute("INSERT INTO assignees (name) VALUES (?)", ('Sammy',))
cur.execute("INSERT INTO assignees (name) VALUES (?)", ('Jo',))
cur.execute("INSERT INTO assignees (name) VALUES (?)", ('Charlie',))
cur.execute("INSERT INTO assignees (name) VALUES (?)", ('Ashley',))

connection.commit()
connection.close()
Save and close the file.
In the highlighted lines, you use the cursor object to execute an INSERT SQL statement to insert four names into the assignees table. You use the ? placeholder in the execute() method and pass a tuple containing the name of the assignee to safely insert data into the database. Then you commit the transaction with connection.commit() and close the connection using connection.close().
This will add four assignees to the database, with the names Sammy, Jo, Charlie, and Ashley.
Run the init_db.py program to reinitialize the database:
- python init_db.py
You now have a table for storing assignees in the database. Next you will add a join table to create a many-to-many relationship between items and assignees.
Step 3 — Adding a Many-to-Many Join Table
In this step, you will use a join table to link to-do items with assignees. First you’ll edit your database schema file to add the new join table, edit the database initialization program to add a few assignments, then use a demonstration program to display the assignees of each to-do.
Open schema.sql to add a new table:
- nano schema.sql
Because the table joins items and assignees, you will call it item_assignees. Add a line to delete the table if it already exists, then add the SQL code for the table itself:
DROP TABLE IF EXISTS assignees;
DROP TABLE IF EXISTS lists;
DROP TABLE IF EXISTS items;
DROP TABLE IF EXISTS item_assignees;


CREATE TABLE lists (
    id INTEGER PRIMARY KEY AUTOINCREMENT,
    created TIMESTAMP NOT NULL DEFAULT CURRENT_TIMESTAMP,
    title TEXT NOT NULL
);

CREATE TABLE items (
    id INTEGER PRIMARY KEY AUTOINCREMENT,
    list_id INTEGER NOT NULL,
    created TIMESTAMP NOT NULL DEFAULT CURRENT_TIMESTAMP,
    content TEXT NOT NULL,
    done INTEGER NOT NULL DEFAULT 0,
    FOREIGN KEY (list_id) REFERENCES lists (id)
);

CREATE TABLE assignees (
    id INTEGER PRIMARY KEY AUTOINCREMENT,
    name TEXT NOT NULL
);

CREATE TABLE item_assignees (
    id INTEGER PRIMARY KEY AUTOINCREMENT,
    item_id INTEGER,
    assignee_id INTEGER,
    FOREIGN KEY(item_id) REFERENCES items(id),
    FOREIGN KEY(assignee_id) REFERENCES assignees(id)
);
Save and close the file.
This new item_assignees table has the following columns:
id: The ID of the entry that establishes a relationship between to-dos and assignees; each row represents a relationship.item_id: The ID of the to-do item that will be assigned to the assignee with the correspondingassignee_id.assignee_id: The ID of the assignee who will get assigned the item with the correspondingitem_id.
The item_assignees table also has two foreign key constraints: one that links the item_id column with the id column of the items table, and another one linking between the assignee_id column with the id column of the assignees table.
Open init_db.py to add a few assignments:
- nano init_db.py
Modify the file to look as follows:
import sqlite3

connection = sqlite3.connect('database.db')


with open('schema.sql') as f:
    connection.executescript(f.read())

cur = connection.cursor()

cur.execute("INSERT INTO lists (title) VALUES (?)", ('Work',))
cur.execute("INSERT INTO lists (title) VALUES (?)", ('Home',))
cur.execute("INSERT INTO lists (title) VALUES (?)", ('Study',))

cur.execute("INSERT INTO items (list_id, content) VALUES (?, ?)",
            (1, 'Morning meeting')
            )

cur.execute("INSERT INTO items (list_id, content) VALUES (?, ?)",
            (2, 'Buy fruit')
            )

cur.execute("INSERT INTO items (list_id, content) VALUES (?, ?)",
            (2, 'Cook dinner')
            )

cur.execute("INSERT INTO items (list_id, content) VALUES (?, ?)",
            (3, 'Learn Flask')
            )

cur.execute("INSERT INTO items (list_id, content) VALUES (?, ?)",
            (3, 'Learn SQLite')
            )

cur.execute("INSERT INTO assignees (name) VALUES (?)", ('Sammy',))
cur.execute("INSERT INTO assignees (name) VALUES (?)", ('Jo',))
cur.execute("INSERT INTO assignees (name) VALUES (?)", ('Charlie',))
cur.execute("INSERT INTO assignees (name) VALUES (?)", ('Ashley',))

# Assign "Morning meeting" to "Sammy"
cur.execute("INSERT INTO item_assignees (item_id, assignee_id) VALUES (?, ?)",
            (1, 1))

# Assign "Morning meeting" to "Jo"
cur.execute("INSERT INTO item_assignees (item_id, assignee_id) VALUES (?, ?)",
            (1, 2))

# Assign "Morning meeting" to "Ashley"
cur.execute("INSERT INTO item_assignees (item_id, assignee_id) VALUES (?, ?)",
            (1, 4))

# Assign "Buy fruit" to "Sammy"
cur.execute("INSERT INTO item_assignees (item_id, assignee_id) VALUES (?, ?)",
            (2, 1))

connection.commit()
connection.close()
In the highlighted code, you assign to-do items to assignees by inserting into the item_assignees join table. You insert the item_id of the to-do item you want to assign to the assignee with the ID corresponding to the assignee_id value. In the first highlighted line, you assign the to-do item Morning meeting, which has an ID of 1, to the assignee Sammy, who has an ID of 1. The rest of the lines follow the same pattern. Once again, you use the ? placeholders to safely pass the values you want to insert in a tuple to the cur.execute() method.
Save and close the file.
Run the init_db.py program to reinitialize the database:
- python init_db.py
Run the list_example.py program that displays the to-do items you have on the database:
- python list_example.py
Here is the output:
OutputHome
     Buy fruit | id: 2 | done: 0
     Cook dinner | id: 3 | done: 0
Study
     Learn Flask | id: 4 | done: 0
     Learn SQLite | id: 5 | done: 0
Work
     Morning meeting | id: 1 | done: 0
This displays the to-do items under the lists they belong to. You have each item’s content, its ID, and whether it’s completed or not (0 means the item is not completed yet, and 1 means it’s completed). You now need to display the assignees of each to-do.
Open list_example.py to modify it to display item assignees:
- nano list_example.py
Modify the file to look as follows:
from itertools import groupby
from app import get_db_connection

conn = get_db_connection()
todos = conn.execute('SELECT i.id, i.done, i.content, l.title \
                      FROM items i JOIN lists l \
                      ON i.list_id = l.id ORDER BY l.title;').fetchall()

lists = {}

for k, g in groupby(todos, key=lambda t: t['title']):
    # Create an empty list for items
    items = []
    # Go through each to-do item row in the groupby() grouper object
    for item in g:
        # Get the assignees of the current to-do item
        assignees = conn.execute('SELECT a.id, a.name FROM assignees a \
                                  JOIN item_assignees i_a \
                                  ON a.id = i_a.assignee_id \
                                  WHERE i_a.item_id = ?',
                                  (item['id'],)).fetchall()
        # Convert the item row into a dictionary to add assignees
        item = dict(item)
        item['assignees'] = assignees

        items.append(item)

    # Build the list of dictionaries
    # the list's name (ex: Home/Study/Work) as the key

    # and a list of dictionaries of to-do items
    # belonging to that list as the value
    lists[k] = list(items)


for list_, items in lists.items():
    print(list_)
    for item in items:
        assignee_names = ', '.join(a['name'] for a in item['assignees'])

        print('    ', item['content'], '| id:',
              item['id'], '| done:', item['done'],
              '| assignees:', assignee_names)
Save and close the file.
You use the groupby() function to group to-do items by the title of the list they belong to. (See Step 2 of How To Use One-to-Many Database Relationships with Flask and SQLite for more information.) While going through the grouping process, you create an empty list called items, which will hold all of the to-do item data, such as the item’s ID, content, and assignees. Next, in the for item in g loop, you go through each to-do item, get the assignees of the item, and save it in the assignees variable.
The assignees variable holds the result of a SELECT SQL query. This query gets the assignee’s id (a.id) and the assignee’s name (a.name) from the assignees table (which is aliased to a to shorten the query). The query joings the id and name with the item_assignees join table (aliased to i_a) on the condition a.id = i_a.assignee_id where the i_a.item_id value equals that of the current item’s ID (item['id']). Then you use the fetchall() method to get the results as a list.
With the line item = dict(item), you convert the item into a dictionary because a regular sqlite3.Row object does not support assignment, which you will need to add assignees to the item. Next, with the line item['assignees'] = assignees, you add a new key 'assignees' to the item dictionary to access the item’s assignees directly from the item’s dictionary. Then you append the modified item to the items list. You build the list of dictionaries that will hold all of the data; each dictionary key is the to-do list’s title, and its value is a list of all the items that belong to it.
To print the results, you use the for list_, items in lists.items() loop to go through each to-do list title and the to-do items that belong to it, you print the list’s title (list_), then loop through the to-do items of the list. You added a variable named assignee_names, the value of which uses the join() method to join between the items of the generator expression a['name'] for a in item['assignees'], which extracts the assignee’s name (a['name']), from the data of each assignee in the item['assignees'] list. This joined list of assignee names, you then print with the rest of the to-do item’s data in the print() function.
Run the list_example.py program:
- python list_example.py
Here is the output (with assignees highlighted):
OutputHome
     Buy fruit | id: 2 | done: 0 | assignees: Sammy
     Cook dinner | id: 3 | done: 0 | assignees:
Study
     Learn Flask | id: 4 | done: 0 | assignees:
     Learn SQLite | id: 5 | done: 0 | assignees:
Work
     Morning meeting | id: 1 | done: 0 | assignees: Sammy, Jo, Ashley
You can now display the assignees of each to-do item with the rest of the data.
You have now displayed the assignee names of each to-do item. Next, you will use this to display the names below each to-do item in the web application’s index page.
Step 4 — Displaying Assignees in the Index Page
In this step, you’ll modify the index page of the to-do management application to show the assignees of each to-do item. You will first edit the app.py file, which contains the code for the Flask application, then edit the index.html template file to display the assignees below each to-do item on the index page.
First, open app.py to edit the index() view function:
- nano app.py
Modify the function to look as follows:
@app.route('/')
def index():
    conn = get_db_connection()
    todos = conn.execute('SELECT i.id, i.done, i.content, l.title \
                          FROM items i JOIN lists l \
                          ON i.list_id = l.id ORDER BY l.title;').fetchall()

    lists = {}

    for k, g in groupby(todos, key=lambda t: t['title']):
        # Create an empty list for items
        items = []
        # Go through each to-do item row in the groupby() grouper object
        for item in g:
            # Get the assignees of the current to-do item
            assignees = conn.execute('SELECT a.id, a.name FROM assignees a \
                                    JOIN item_assignees i_a \
                                    ON a.id = i_a.assignee_id \
                                    WHERE i_a.item_id = ?',
                                    (item['id'],)).fetchall()
            # Convert the item row into a dictionary to add assignees
            item = dict(item)
            item['assignees'] = assignees

            items.append(item)

        # Build the list of dictionaries
        # the list's name (ex: Home/Study/Work) as the key

        # and a list of dictionaries of to-do items
        # belonging to that list as the value
        lists[k] = list(items)

    conn.close()
    return render_template('index.html', lists=lists)
Save and close the file.
This is the same code you used in the list_example.py demonstration program in Step 3. With this, the lists variable will contain all the data you need, including assignee data, which you will use to access assignee names in the index.html template file.
Open the index.html file to add assignee names following each item:
- nano templates/index.html
Modify the file to look as follows:
{% extends 'base.html' %}

{% block content %}
    <h1>{% block title %} Welcome to FlaskTodo {% endblock %}</h1>
    {% for list, items in lists.items() %}
        <div class="card" style="width: 18rem; margin-bottom: 50px;">
            <div class="card-header">
                <h3>{{ list }}</h3>
            </div>
            <ul class="list-group list-group-flush">
                {% for item in items %}
                    <li class="list-group-item"
                    {% if item['done'] %}
                    style="text-decoration: line-through;"
                    {% endif %}
                    >{{ item['content'] }}
                    {% if not item ['done'] %}
                        {% set URL = 'do' %}
                        {% set BUTTON = 'Do' %}
                    {% else %}
                        {% set URL = 'undo' %}
                        {% set BUTTON = 'Undo' %}
                    {% endif %}
                    <div class="row">
                        <div class="col-12 col-md-3">
                            <form action="{{ url_for(URL, id=item['id']) }}"
                                method="POST">
                                <input type="submit" value="{{ BUTTON }}"
                                    class="btn btn-success btn-sm">
                            </form>
                        </div>

                        <div class="col-12 col-md-3">
                            <a class="btn btn-warning btn-sm"
                            href="{{ url_for('edit', id=item['id']) }}">Edit</a>
                        </div>

                        <div class="col-12 col-md-3">
                            <form action="{{ url_for('delete', id=item['id']) }}"
                                method="POST">
                                <input type="submit" value="Delete"
                                    class="btn btn-danger btn-sm">
                            </form>
                        </div>
                    </div>

                    <hr>
                    {% if item['assignees'] %}
                        <span style="color: #6a6a6a">Assigned to</span>
                        {% for assignee in item['assignees'] %}
                            <span class="badge badge-primary">
                                {{ assignee['name'] }}
                            </span>
                        {% endfor %}
                    {% endif %}

                    </li>
                {% endfor %}
            </ul>
        </div>
    {% endfor %}
{% endblock %}
Save and close the file.
With this modification, you added a line break below each item using the <hr> tag. If the item has any assignees (which you know via the statement if item['assignees']), you display a gray Assigned to text and loop through the item assignees (that is, the item['assignees'] list), and display the assignee name (assignee['name']) in a badge.
Finally, run the development server:
- flask run
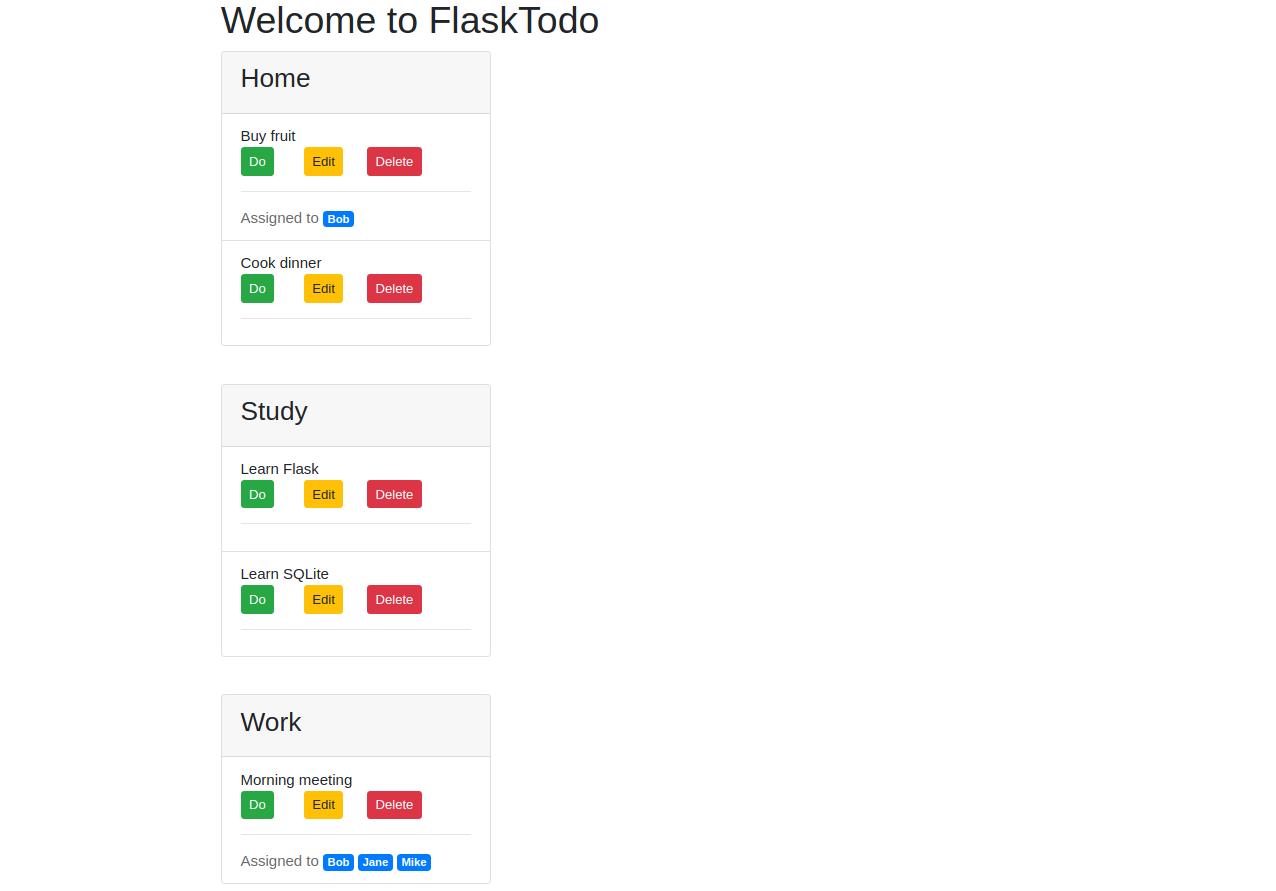
Then visit the index page: http://127.0.0.1:5000/.
Each to-do item can now have many assignees, and you can assign each assignee multiple to-dos. The index page displays all of the items and the assignees of each item.
You can access the final code from this repository.
Conclusion
In this tutorial, you have learned what a many-to-many relationship is, how to use it in a Flask and SQLite web application, how to join between tables, and how to group relational data in Python.
You now have a complete to-do application in which users can create new to-do items, mark an item as complete, edit or delete existing items, and create new lists. And each item can be assigned to different assignees.
To learn more about web development with Python and Flask see these Flask tutorials.
Thanks for learning with the DigitalOcean Community. Check out our offerings for compute, storage, networking, and managed databases.
About the author(s)
Web developer. I mostly use Python & JavaScript. I like Flask and I am currently learning React. You can say hi on Twitter :)
Former Senior Technical Editor at DigitalOcean, with a strong focus on DevOps and System Administration content. Areas of expertise include Terraform, PyTorch, Python, and Django.
Still looking for an answer?
This textbox defaults to using Markdown to format your answer.
You can type !ref in this text area to quickly search our full set of tutorials, documentation & marketplace offerings and insert the link!
 This work is licensed under a Creative Commons Attribution-NonCommercial- ShareAlike 4.0 International License.
Become a contributor for community
Get paid to write technical tutorials and select a tech-focused charity to receive a matching donation.

DigitalOcean Documentation
Full documentation for every DigitalOcean product.

Resources for startups and AI-native businesses
The Wave has everything you need to know about building a business, from raising funding to marketing your product.
The developer cloud
Scale up as you grow — whether you're running one virtual machine or ten thousand.

Start building today
From GPU-powered inference and Kubernetes to managed databases and storage, get everything you need to build, scale, and deploy intelligent applications.
