By Abdelhadi Dyouri and Kathryn Hancox

The author selected the COVID-19 Relief Fund to receive a donation as part of the Write for DOnations program.
Introduction
Flask is a framework for building web applications using the Python language, and SQLite is a database engine that can be used with Python to store application data. In this tutorial, you’ll modify items in an application built using Flask and SQLite with a One-to-Many relationship.
This tutorial is a continuation of How To Use One-to-Many Database Relationships with Flask and SQLite. After having followed it, you’ve successfully created a Flask application to manage to-do items, organize items in lists, and add new items to the database. In this tutorial, you will add the functionality to mark to-do items as complete, to edit and delete items, and to add new lists to the database. By the end of the tutorial, your application will include edit and delete buttons and strikethroughs for completed to-dos.
Prerequisites
Before you start following this guide, you will need:
-
A local Python 3 programming environment, follow the tutorial for your distribution in How To Install and Set Up a Local Programming Environment for Python 3 series. In this tutorial we’ll call our project directory
flask_todo. -
(Optional) In Step 1 you’ll have the option of cloning the to-do application we’ll be working on in this tutorial. However, you can optionally work through How To Use One-to-Many Database Relationships with Flask and SQLite. You can access the final code from this page.
-
An understanding of basic Flask concepts such as creating routes, rendering HTML templates, and connecting to a SQLite database. Check out How To Make a Web Application Using Flask in Python 3, and How To Use the sqlite3 Module in Python 3 if you are not familiar with these concepts, but it’s not necessary.
Step 1 — Setting Up the Web Application
In this step, you will set up the to-do application to be ready for modification. If you followed the tutorial in the prerequisites section and still have the code and the virtual environment in your local machine, you can skip this step.
First use Git to clone the repository of the previous tutorial’s code:
- git clone https://github.com/do-community/flask-todo
Navigate to flask-todo:
- cd flask-todo
Then create a new virtual environment:
- python -m venv env
Activate the environment:
- source env/bin/activate
Install Flask:
- pip install Flask
Then, initialize the database using the init_db.py program:
- python init_db.py
Next, set the following environment variables:
- export FLASK_APP=app
- export FLASK_ENV=development
FLASK_APP indicates the application you are currently developing, which is app.py in this case. FLASK_ENV specifies the mode—set it to development for development mode, this will allow you to debug the application. (Remember not to use this mode in a production environment.)
Then run the development server:
- flask run
If you go to your browser, you’ll have the application running on the following URL at http://127.0.0.1:5000/.
To close the development server, use the CTRL + C key combination.
Next, you will modify the application to add the ability to mark items as complete.
Step 2 — Marking To-Do Items as Complete
In this step, you’ll add a button to mark each to-do item as complete.
To be able to mark items as complete, you’ll add a new column to the items table in your database to have a marker for each item so you know whether it is completed or not, then you will create a new route in your app.py file to change the value of this column depending on the user’s action.
As a reminder the columns in the items table are currently the following:
id: The ID of the item.list_id: The ID of the list the item belongs to.created: The item’s creation date.content: The item’s content.
First, open schema.sql to modify the items table:
- nano schema.sql
Add a new column named done to the items table:
DROP TABLE IF EXISTS lists;
DROP TABLE IF EXISTS items;

CREATE TABLE lists (
    id INTEGER PRIMARY KEY AUTOINCREMENT,
    created TIMESTAMP NOT NULL DEFAULT CURRENT_TIMESTAMP,
    title TEXT NOT NULL
);

CREATE TABLE items (
    id INTEGER PRIMARY KEY AUTOINCREMENT,
    list_id INTEGER NOT NULL,
    created TIMESTAMP NOT NULL DEFAULT CURRENT_TIMESTAMP,
    content TEXT NOT NULL,
    done INTEGER NOT NULL DEFAULT 0,
    FOREIGN KEY (list_id) REFERENCES lists (id)
);
Save and close the file.
This new column will hold the integer values 0 or 1; the value 0 represents the Boolean value false and 1 represents the value true. The default is 0, which means any new items you add will automatically be unfinished until the user marks the item as complete, in which case the value of the done column will change to 1.
Then, initialize the database again using the init_db.py program to apply the modifications you have performed on schema.sql:
- python init_db.py
Next, open app.py for modification:
- nano app.py
You’ll fetch the id of the item and the value of the done column in the index() function, which fetches the lists and items from the database and sends them to the index.html file for display. The necessary changes to the SQL statement are highlighted in the following file:
@app.route('/')
def index():
    conn = get_db_connection()
    todos = conn.execute('SELECT i.id, i.done, i.content, l.title \
                          FROM items i JOIN lists l \
                          ON i.list_id = l.id ORDER BY l.title;').fetchall()

    lists = {}

    for k, g in groupby(todos, key=lambda t: t['title']):
        lists[k] = list(g)

    conn.close()
    return render_template('index.html', lists=lists)
Save and close the file.
With this modification, you get the IDs of the to-do items using i.id and the values of the done column using i.done.
To understand this change, open list_example.py, which is a small, example program you can use to understand the contents of the database:
- nano list_example.py
Perform the same modification to the SQL statement as before, then change the last print() function to display the item ID and the value of done:
from itertools import groupby
from app import get_db_connection

conn = get_db_connection()

todos = conn.execute('SELECT i.id, i.done, i.content, l.title \
                      FROM items i JOIN lists l \
                      ON i.list_id = l.id ORDER BY l.title;').fetchall()

lists = {}

for k, g in groupby(todos, key=lambda t: t['title']):
    lists[k] = list(g)

for list_, items in lists.items():
    print(list_)
    for item in items:
        print('    ', item['content'], '| id:',
              item['id'], '| done:', item['done'])
Save and exit the file.
Run the example program:
- python list_example.py
Here is the output:
OutputHome
     Buy fruit | id: 2 | done: 0
     Cook dinner | id: 3 | done: 0
Study
     Learn Flask | id: 4 | done: 0
     Learn SQLite | id: 5 | done: 0
Work
     Morning meeting | id: 1 | done: 0
None of the items has been marked as completed so the value of done for each item is 0, which means false. To allow users to change this value and mark items as completed, you will add a new route to the app.py file.
Open app.py:
- nano app.py
Add a route /do/ at the end of the file:
. . .
@app.route('/<int:id>/do/', methods=('POST',))
def do(id):
    conn = get_db_connection()
    conn.execute('UPDATE items SET done = 1 WHERE id = ?', (id,))
    conn.commit()
    conn.close()
    return redirect(url_for('index'))
This new route accepts only POST requests. The do() view function takes an id argument—this is the ID of the item you want to mark as completed. Inside the function, you open a database connection, then you use an UPDATE SQL statement to set the value of the done column to 1 for the item to be marked as completed.
You use the ? placeholder in the execute() method and pass a tuple containing the ID to safely insert data into the database. Then you commit the transaction and close the connection and redirect to the index page.
After adding a route to mark items as completed, you need another route to undo this action and return the item to a non-completed status. Add the following route at the end of the file:
. . .
@app.route('/<int:id>/undo/', methods=('POST',))
def undo(id):
    conn = get_db_connection()
    conn.execute('UPDATE items SET done = 0 WHERE id = ?', (id,))
    conn.commit()
    conn.close()
    return redirect(url_for('index'))
This route is similar to the /do/ route, and the undo() view function is exactly the same as the do() function except that you set the value of done to 0 instead of 1.
Save and close the app.py file.
You now need a button to mark to-do items as completed or uncompleted depending on the state of the item, open the index.html template file:
- nano templates/index.html
Change the contents of the inner for loop inside the <ul> element to look as follows:
{% block content %}
    <h1>{% block title %} Welcome to FlaskTodo {% endblock %}</h1>
    {% for list, items in lists.items() %}
        <div class="card" style="width: 18rem; margin-bottom: 50px;">
            <div class="card-header">
                <h3>{{ list }}</h3>
            </div>
            <ul class="list-group list-group-flush">
                {% for item in items %}
                    <li class="list-group-item"
                    {% if item['done'] %}
                    style="text-decoration: line-through;"
                    {% endif %}
                    >{{ item['content'] }}
                    {% if not item ['done'] %}
                        {% set URL = 'do' %}
                        {% set BUTTON = 'Do' %}
                    {% else %}
                        {% set URL = 'undo' %}
                        {% set BUTTON = 'Undo' %}
                    {% endif %}


                  <div class="row">
                        <div class="col-12 col-md-3">
                            <form action="{{ url_for(URL, id=item['id']) }}"
                                method="POST">
                                <input type="submit" value="{{ BUTTON }}"
                                    class="btn btn-success btn-sm">
                            </form>
                        </div>
                    </div>
                    </li>
                {% endfor %}
            </ul>
        </div>
    {% endfor %}
{% endblock %}
In this for loop, you use a line-through CSS value for the text-decoration property if the item is marked as completed, which you know from the value of item['done']. You then use the Jinja syntax set to declare two variables, URL and BUTTON. If the item is not marked as completed the button will have the value Do and the URL will direct to the /do/ route, and if the item was marked as completed, the button will have a value of Undo and will point to /undo/. After, you use both these variables in an input form that submits the proper request depending on the state of the item.
Run the server:
- flask run
You can now mark items as completed on the index page http://127.0.0.1:5000/. Next you will add the ability to edit to-do items.
Step 3 — Editing To-Do Items
In this step, you will add a new page for editing items so you can modify the contents of each item and assign items to different lists.
You will add a new /edit/ route to the app.py file, which will render a new edit.html page in which a user can modify existing items. You will also update the index.html file to add an Edit button to each item.
First, open the app.py file:
- nano app.py
Then add the following route at the end of the file:
. . .
@app.route('/<int:id>/edit/', methods=('GET', 'POST'))
def edit(id):
    conn = get_db_connection()

    todo = conn.execute('SELECT i.id, i.list_id, i.done, i.content, l.title \
                         FROM items i JOIN lists l \
                         ON i.list_id = l.id WHERE i.id = ?', (id,)).fetchone()

    lists = conn.execute('SELECT title FROM lists;').fetchall()

    if request.method == 'POST':
        content = request.form['content']
        list_title = request.form['list']

        if not content:
            flash('Content is required!')
            return redirect(url_for('edit', id=id))

        list_id = conn.execute('SELECT id FROM lists WHERE title = (?);',
                                 (list_title,)).fetchone()['id']

        conn.execute('UPDATE items SET content = ?, list_id = ?\
                      WHERE id = ?',
                     (content, list_id, id))
        conn.commit()
        conn.close()
        return redirect(url_for('index'))

    return render_template('edit.html', todo=todo, lists=lists)
In this new view function, you use the id argument to fetch the ID of the to-do item you want to edit, the ID of the list it belongs to, the value of the done column, the content of the item, and the list title using a SQL JOIN. You save this data in the todo variable. Then you get all of the to-do lists from the database and save them in the lists variable.
If the request is a normal GET request, the condition if request.method == 'POST' does not run, so the application executes the last render_template() function, passing both todo and lists to an edit.html file.
If however, a form was submitted, the condition request.method == 'POST' becomes true, in which case you extract the content and the list title the user submitted. If no content was submitted, you flash the message Content is required! and redirect to the same edit page. Otherwise, you fetch the ID of the list the user submitted; this allows the user to move a to-do item from one list to another. Then, you use an UPDATE SQL statement to set the content of the to-do item to the new content the user submitted. You do the same for the list ID. Finally, you commit the changes and close the connection, and redirect the user to the index page.
Save and close the file.
To use this new route, you need a new template file called edit.html:
- nano templates/edit.html
Add the following contents to this new file:
{% extends 'base.html' %}

{% block content %}

<h1>{% block title %} Edit an Item {% endblock %}</h1>

<form method="post">
    <div class="form-group">
        <label for="content">Content</label>
        <input type="text" name="content"
               placeholder="Todo content" class="form-control"
               value="{{ todo['content'] or request.form['content'] }}"></input>
    </div>

    <div class="form-group">
        <label for="list">List</label>
        <select class="form-control" name="list">
            {% for list in lists %}
                {% if list['title'] == request.form['list'] %}
                    <option value="{{ request.form['list'] }}" selected>
                        {{ request.form['list'] }}
                    </option>

                {% elif list['title'] == todo['title'] %}
                    <option value="{{ todo['title'] }}" selected>
                        {{ todo['title'] }}
                    </option>

                {% else %}
                    <option value="{{ list['title'] }}">
                        {{ list['title'] }}
                    </option>
                {% endif %}
            {% endfor %}
        </select>
    </div>
    <div class="form-group">
        <button type="submit" class="btn btn-primary">Submit</button>
    </div>
</form>
{% endblock %}
You use the value {{ todo['content'] or request.form['content'] }} for the content input. This signifies that the value will be either the current content of the to-do item or what the user has submitted in a failed attempt to submit the form.
For the list selection form, you loop through the lists variable, and if the list title is the same as the one stored in the request.form object (from a failed attempt), then set that list title as the selected value. Otherwise if the list title equals the one stored in the todo variable, then set it as the selected value. This is the current list title of the to-do item before any modification; the rest of the options are then displayed without the selected attribute.
Save and close the file.
Then, open index.html to add an Edit button:
- nano templates/index.html
Change the contents of the div tag with the "row" class to add another column as follows:
. . .
<div class="row">
    <div class="col-12 col-md-3">
        <form action="{{ url_for(URL, id=item['id']) }}"
            method="POST">
            <input type="submit" value="{{ BUTTON }}"
                class="btn btn-success btn-sm">
        </form>
    </div>
    <div class="col-12 col-md-3">
        <a class="btn btn-warning btn-sm"
        href="{{ url_for('edit', id=item['id']) }}">Edit</a>
    </div>
</div>
Save and close the file.
This is a standard <a> link tag that points to the relevant /edit/ route for each item.
Run the server if you haven’t already:
- flask run
You can now go to the index page http://127.0.0.1:5000/ and experiment with modifying to-do items. In the next step, you will add a button to delete items.
Step 4 — Deleting To-Do Items
In this step, you will add the ability to delete specific to-do items.
You will first need to add a new /delete/ route, open app.py:
- nano app.py
Then add the following route at the end of the file:
. . .
@app.route('/<int:id>/delete/', methods=('POST',))
def delete(id):
    conn = get_db_connection()
    conn.execute('DELETE FROM items WHERE id = ?', (id,))
    conn.commit()
    conn.close()
    return redirect(url_for('index'))
Save and close the file.
The delete() view function accepts an id argument. When a POST request gets sent, you use the DELETE SQL statement to delete the item with the matching id value, then you commit the transaction and close the database connection, and return to the index page.
Next, open templates/index.html to add a Delete button:
- nano templates/index.html
Add the following highlighted div tag below the Edit button:
<div class="row">
    <div class="col-12 col-md-3">
        <form action="{{ url_for(URL, id=item['id']) }}"
            method="POST">
            <input type="submit" value="{{ BUTTON }}"
                class="btn btn-success btn-sm">
        </form>
    </div>

    <div class="col-12 col-md-3">
        <a class="btn btn-warning btn-sm"
        href="{{ url_for('edit', id=item['id']) }}">Edit</a>
    </div>

    <div class="col-12 col-md-3">
        <form action="{{ url_for('delete', id=item['id']) }}"
            method="POST">
            <input type="submit" value="Delete"
                class="btn btn-danger btn-sm">
        </form>
    </div>
</div>
This new submit button sends a POST request to the /delete/ route for each item.
Save and close the file.
Then run the development server:
- flask run
Go to the index page and try out the new Delete button—you can now delete any item you want.
Now that you have added the ability to delete existing to-do items, you will move on to add the ability to add new lists in the next step.
Step 5 — Adding New Lists
So far, lists can only be added directly from the database. In this step, you will add the ability to create new lists when the user adds a new item, instead of only choosing between the existing lists. You will incorporate a new option called New List, which when chosen, the user can input the name of the new list they wish to create.
First, open app.py:
- nano app.py
Then, modify the create() view function by adding the following highlighted lines to the if request.method == 'POST' condition:
. . .
@app.route('/create/', methods=('GET', 'POST'))
def create():
    conn = get_db_connection()

    if request.method == 'POST':
        content = request.form['content']
        list_title = request.form['list']

        new_list = request.form['new_list']

        # If a new list title is submitted, add it to the database
        if list_title == 'New List' and new_list:
            conn.execute('INSERT INTO lists (title) VALUES (?)',
                         (new_list,))
            conn.commit()
            # Update list_title to refer to the newly added list
            list_title = new_list

        if not content:
            flash('Content is required!')
            return redirect(url_for('index'))

        list_id = conn.execute('SELECT id FROM lists WHERE title = (?);',
                                 (list_title,)).fetchone()['id']
        conn.execute('INSERT INTO items (content, list_id) VALUES (?, ?)',
                     (content, list_id))
        conn.commit()
        conn.close()
        return redirect(url_for('index'))

    lists = conn.execute('SELECT title FROM lists;').fetchall()

    conn.close()
    return render_template('create.html', lists=lists)
Save and close the file.
Here you save the value of a new form field called new_list in a variable. You will add this field later to the create.html file. Next, in the list_title == 'New List' and new_list condition, you check whether the list_title has the value 'New List', which indicates that the user wishes to create a new list. You also check that the value of the new_list variable is not None, if this condition is met, you use an INSERT INTO SQL statement to add the newly submitted list title to the lists table. You commit the transaction, then you update the value of the list_title variable to match that of the newly added list for later use.
Next, open create.html to add a new <option> tag to let the user add a new list:
- nano templates/create.html
Modify the file by adding the highlighted tags in the following code:
    <div class="form-group">
        <label for="list">List</label>
        <select class="form-control" name="list">
            <option value="New List" selected>New List</option>
            {% for list in lists %}
                {% if list['title'] == request.form['list'] %}
                    <option value="{{ request.form['list'] }}" selected>
                        {{ request.form['list'] }}
                    </option>
                {% else %}
                    <option value="{{ list['title'] }}">
                        {{ list['title'] }}
                    </option>
                {% endif %}
            {% endfor %}
        </select>
    </div>

    <div class="form-group">
        <label for="new_list">New List</label>
        <input type="text" name="new_list"
                placeholder="New list name" class="form-control"
                value="{{ request.form['new_list'] }}"></input>
    </div>

    <div class="form-group">
        <button type="submit" class="btn btn-primary">Submit</button>
    </div>
Save and close the file.
You have added a new <option> tag to refer to the New List option, this will allow the user to specify that they want to create a new list. Then you add another <div> with an input field named new_list, this field is where the user will input the title of the new list they wish to create.
Finally, run the development server:
- flask run
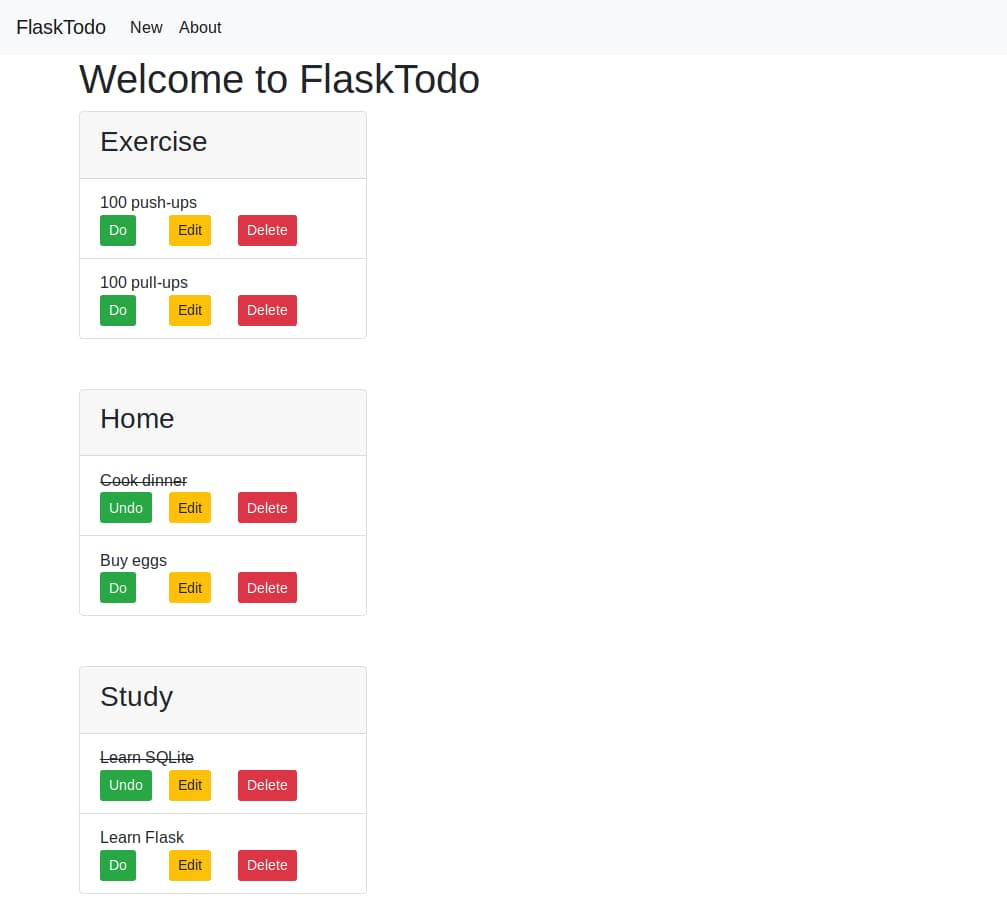
Then visit the index page:
http://127.0.0.1:5000/
The application will now look as follows:
With the new additions to your application, users can now mark to-do items as complete or restore completed items to a non-completion state, edit and delete existing items, and create new lists for different kinds of to-do tasks.
You can browse the full source code of the application in the DigitalOcean Community Repository.
Conclusion
You now have a complete to-do application in which users can create new to-do items, mark an item as complete, and edit or delete existing items, in addition to the ability to create new lists. You have modified a Flask web application, added new features to it, and modified database items specifically in a One-to-Many relationship. You may develop this application further by learning How To Add Authentication to Your App with Flask-Login to add security to your Flask application.
Thanks for learning with the DigitalOcean Community. Check out our offerings for compute, storage, networking, and managed databases.
About the author(s)
Web developer. I mostly use Python & JavaScript. I like Flask and I am currently learning React. You can say hi on Twitter :)
Former Senior Technical Editor at DigitalOcean, with a strong focus on DevOps and System Administration content. Areas of expertise include Terraform, PyTorch, Python, and Django.
Still looking for an answer?
This textbox defaults to using Markdown to format your answer.
You can type !ref in this text area to quickly search our full set of tutorials, documentation & marketplace offerings and insert the link!
One of the best tutorial on Flask with database. Instead of just a simplistic single table you have shown a practical example using a more “real world” usage of 1-to-many data repository. Well done!
Would be wonderful if you could add a small chapter (part 3?) on edit and delete for the Lists item. Thanks
 This work is licensed under a Creative Commons Attribution-NonCommercial- ShareAlike 4.0 International License.
Become a contributor for community
Get paid to write technical tutorials and select a tech-focused charity to receive a matching donation.

DigitalOcean Documentation
Full documentation for every DigitalOcean product.

Resources for startups and AI-native businesses
The Wave has everything you need to know about building a business, from raising funding to marketing your product.
The developer cloud
Scale up as you grow — whether you're running one virtual machine or ten thousand.

Start building today
From GPU-powered inference and Kubernetes to managed databases and storage, get everything you need to build, scale, and deploy intelligent applications.
