By Anthony Herbert and Vinayak Baranwal

Introduction
Flask-Login is the most popular authentication library for Flask applications, handling user sessions, login state, and route protection with minimal configuration. This tutorial shows you how to implement secure user authentication in Flask using Flask-Login, Flask-SQLAlchemy, and Werkzeug’s password hashing utilities.
What You’ll Build
In this guide, you will set up a robust authentication system featuring:
- Registration and login forms protected with CSRF
- Password security using Werkzeug’s hash utilities
- Session handling via Flask-Login’s
current_user - Route protection using the
@login_requireddecorator - User data storage powered by Flask-SQLAlchemy
- Friendly error handling with informative flash messages
Key Takeaways
Simplified Session Management: Flask-Login eliminates the hassle of handling session cookies and user tracking manually. It manages authentication state for you, providing a seamless experience whether users are logging in, logging out, or returning after a break. This lets you focus on building application features rather than low-level session logic.
Powerful Decorator-Based Security: You can easily secure sensitive routes with the @login_required decorator. This means you only need to add a single line above a view function to restrict access to authenticated users, dramatically reducing the risk of accidental exposure of private pages and simplifying your codebase.
Convenient User Access: With the built-in current_user proxy, you always have access to the currently logged-in user’s information throughout your app. This makes it simple to personalize content, display user-specific data, or implement user-based permissions without cluttering functions with session-checking code.
Persistent Login Support: Flask-Login enables “remember me” functionality out of the box, making it convenient for users to stay logged in across browser sessions. This persistent login state enhances user experience and reduces friction, especially for repeat visitors to your application.
Robust Extension Integration: Flask-Login is designed to work harmoniously with popular Flask tools like Flask-SQLAlchemy. Its integration-ready design ensures you can build on top of a stable foundation, combine multiple extensions, and scale your app’s authentication system as your project grows.
Prerequisites
Before starting, ensure you have:
- Python 3.8+ installed on your system.
- Basic understanding of Flask and web development.
- Familiarity with HTML templates and forms.
- Basic familiarity with Python programming.
- Understanding of Flask basics.
- Knowledge of HTML forms and templates.
- Basic understanding of database concepts.
Note: This tutorial is limited in scope and does not cover advanced persisting of sessions. Furthermore, modifying the data type for the primary key or considerations for migrating to different database systems are also outside of the scope of this introductory tutorial.
Project Setup
Before diving into the code, let’s understand the project structure you’ll build:
flask_auth_app/
└── project/
    ├── __init__.py          # Flask app factory and configuration
    ├── auth.py              # Authentication routes (login, signup, logout)
    ├── main.py              # Main application routes (home, profile)
    ├── models.py            # User model and database schema
    ├── db.sqlite            # SQLite database (created automatically)
    └── templates/
        ├── base.html        # Base template with navigation
        ├── index.html       # Home page
        ├── login.html       # Login form
        ├── signup.html      # Registration form
        └── profile.html     # Protected user profile page
Project Architecture
This tutorial uses Flask’s blueprint pattern to organize code:
main.py: Handles public routes (home, profile)auth.py: Manages authentication (login, signup, logout)models.py: Defines the User database model__init__.py: App factory that ties everything together
Technology Stack
- Flask 3.x: Web framework
- Flask-Login 0.6.x: User session management
- Flask-SQLAlchemy 3.x: Database ORM
- Werkzeug: Password hashing utilities
- SQLite: Database (no additional setup required)
This tutorial has been tested with Python 3.12+, Flask 3.x, Flask-Login 0.6.x, and Flask-SQLAlchemy 3.x.
Installing Packages
Flask-Login requires several packages to work properly. You’ll install Flask-Login along with Flask-SQLAlchemy for database management and Werkzeug for password hashing.
Required Packages
- Flask: The web framework
- Flask-Login: Handles user sessions and authentication state
- Flask-SQLAlchemy: Database ORM for user model management
- Werkzeug: Provides password hashing utilities (included with Flask)
Why These Packages?
- Flask-Login abstracts session management, eliminating the need to manually handle user state
- Flask-SQLAlchemy provides a clean interface between your User model and the database
- Werkzeug offers secure password hashing with
generate_password_hash()andcheck_password_hash() - SQLite requires no additional setup, making it perfect for development and small applications
Setting Up the Project
Create a new directory for your Flask authentication project:
- mkdir flask_auth_app
- cd flask_auth_app
Creating a Virtual Environment
Always use a virtual environment to isolate your project dependencies:
- python3 -m venv auth
- source auth/bin/activate
Note: On Windows, use auth\Scripts\activate instead of source auth/bin/activate. For detailed virtual environment setup, see How to Install and Set Up a Local Programming Environment for Python 3.
Installing Dependencies
Install the required packages using pip:
- pip install flask flask-sqlalchemy flask-login
Verifying Installation
Confirm all packages are installed correctly:
- pip list | grep -E "(Flask|flask)"
You should see output similar to:
Flask                3.0.0
Flask-Login         0.6.3
Flask-SQLAlchemy    3.1.1
Production Note: For production deployments, create a requirements.txt file with pip freeze > requirements.txt to lock dependency versions.
Creating the Main App File
The Flask app factory pattern allows for better organization and testing. You’ll create a project directory to house your application code.
Setting Up the Project Structure
Create the project directory:
- mkdir project
Understanding the App Factory Pattern
The app factory pattern separates app creation from configuration, making your code more modular and testable. This approach:
- Separates concerns: Configuration, database setup, and blueprint registration are isolated
- Enables testing: You can create multiple app instances with different configurations
- Improves maintainability: Changes to one component don’t affect others
Creating the App Factory
Create the main __init__.py file:
- nano project/__init__.py
This file will contain the create_app() function that initializes Flask, configures the database, and registers blueprints.
from flask import Flask
from flask_sqlalchemy import SQLAlchemy
from flask_login import LoginManager

# Initialize SQLAlchemy instance (outside create_app for import access)
db = SQLAlchemy()

def create_app():
    app = Flask(__name__)

    # Configuration
    app.config['SECRET_KEY'] = 'your-secret-key-change-in-production'
    app.config['SQLALCHEMY_DATABASE_URI'] = 'sqlite:///db.sqlite'
    app.config['SQLALCHEMY_TRACK_MODIFICATIONS'] = False

    # Initialize extensions with app
    db.init_app(app)

    # Configure Flask-Login
    login_manager = LoginManager()
    login_manager.login_view = 'auth.login'
    login_manager.init_app(app)

    # User loader function for Flask-Login
    from .models import User
    @login_manager.user_loader
    def load_user(user_id):
        return User.query.get(int(user_id))

    # Register blueprints
    from .auth import auth as auth_blueprint
    app.register_blueprint(auth_blueprint)

    from .main import main as main_blueprint
    app.register_blueprint(main_blueprint)

    return app
Key Configuration Explained
SECRET_KEY: Used to sign session cookies and CSRF tokens (change in production!)SQLALCHEMY_DATABASE_URI: Points to SQLite database fileSQLALCHEMY_TRACK_MODIFICATIONS: Disabled to prevent unnecessary overheadlogin_manager.login_view: Redirects unauthenticated users to login page@login_manager.user_loader: Tells Flask-Login how to load users from the database
Security Warning: Never use the default secret key in production. Generate a secure random key using secrets.token_hex(32).
Adding Routes
Flask blueprints help organize your application into logical modules. You’ll create two blueprints: one for main application routes and another for authentication.
Understanding Blueprints
Blueprints are Flask’s way of organizing related routes and functionality:
mainblueprint: Handles public pages (home, profile)authblueprint: Manages authentication (login, signup, logout)- Separation of concerns: Each blueprint focuses on specific functionality
- Modularity: Easy to add, remove, or modify features
Creating the Main Blueprint
Create the main routes file:
- nano project/main.py
Add the main blueprint with basic routes:
from flask import Blueprint, render_template
from flask_login import login_required, current_user

main = Blueprint('main', __name__)

@main.route('/')
def index():
    return render_template('index.html')

@main.route('/profile')
@login_required
def profile():
    return render_template('profile.html', name=current_user.name)
Creating the Auth Blueprint
Create the authentication routes:
- nano project/auth.py
Add the auth blueprint with login, signup, and logout routes:
from flask import Blueprint, render_template, request, redirect, url_for, flash
from flask_login import login_user, logout_user, login_required
from werkzeug.security import generate_password_hash, check_password_hash
from .models import User
from . import db

auth = Blueprint('auth', __name__)

@auth.route('/login')
def login():
    return render_template('login.html')

@auth.route('/login', methods=['POST'])
def login_post():
    email = request.form.get('email')
    password = request.form.get('password')
    remember = True if request.form.get('remember') else False

    user = User.query.filter_by(email=email).first()

    if not user or not check_password_hash(user.password, password):
        flash('Please check your login details and try again.')
        return redirect(url_for('auth.login'))

    login_user(user, remember=remember)
    return redirect(url_for('main.profile'))

@auth.route('/signup')
def signup():
    return render_template('signup.html')

@auth.route('/signup', methods=['POST'])
def signup_post():
    email = request.form.get('email')
    name = request.form.get('name')
    password = request.form.get('password')

    user = User.query.filter_by(email=email).first()

    if user:
        flash('Email address already exists')
        return redirect(url_for('auth.signup'))

    new_user = User(email=email, name=name, password=generate_password_hash(password))
    db.session.add(new_user)
    db.session.commit()

    return redirect(url_for('auth.login'))

@auth.route('/logout')
@login_required
def logout():
    logout_user()
    return redirect(url_for('main.index'))
Route Organization: Notice how we handle both GET and POST requests for the same URL. Flask routes can accept multiple HTTP methods in a single function.
In a terminal, you can set the FLASK_APP and FLASK_DEBUG values:
- export FLASK_APP=project
- export FLASK_DEBUG=1
The FLASK_APP environment variable instructs Flask on how to load the app. You would want this to point to where create_app is located. For this tutorial, you will be pointing to the project directory.
The FLASK_DEBUG environment variable is enabled by setting it to 1. This will enable a debugger that will display application errors in the browser.
Ensure that you are in the flask_auth_app directory and then run the project:
- flask run
Now, in a web browser, you can navigate to the five possible URLs and see the text returned that was defined in auth.py and main.py.
For example, visiting localhost:5000/profile displays: Profile:
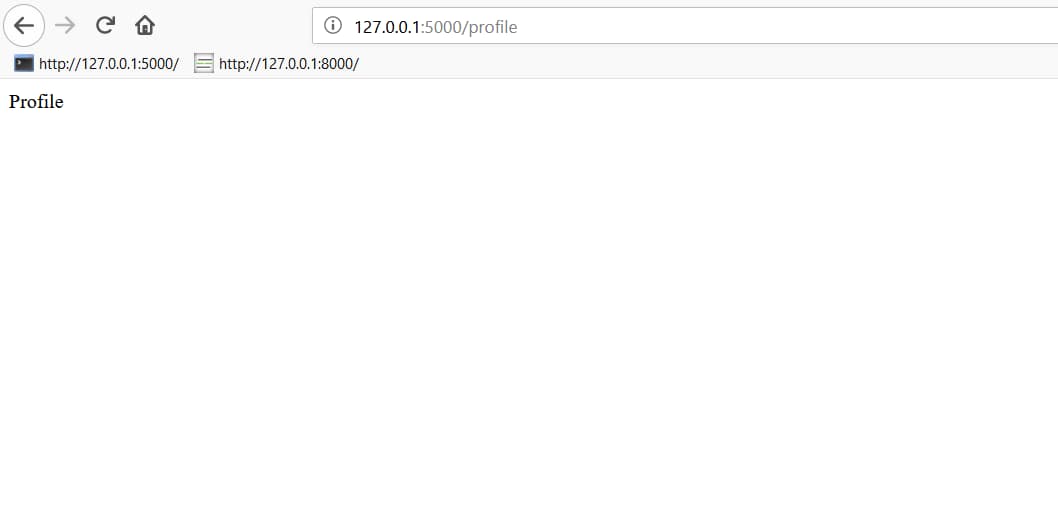
Once you have verified that the routes are behaving as expected, you can create the templates.
Step 4 — Creating Templates
Next, create the templates that are used in the app. This is the first step before you can implement the actual login functionality.
The app will use four templates:
- index.html
- profile.html
- login.html
- signup.html
You will also have a base template that will have code common to each of the pages. In this case, the base template will have navigation links and the general layout of the page.
First, create a templates directory under the project directory:
- mkdir -p project/templates
Then create base.html:
- nano project/templates/base.html
Next, add the following code to the base.html file:
<!DOCTYPE html>
<html>

<head>
    <meta charset="utf-8">
    <meta http-equiv="X-UA-Compatible" content="IE=edge">
    <meta name="viewport" content="width=device-width, initial-scale=1">
    <title>Flask Auth Example</title>
    <link rel="stylesheet" href="https://cdnjs.cloudflare.com/ajax/libs/bulma/0.7.2/css/bulma.min.css" />
</head>

<body>
    <section class="hero is-primary is-fullheight">

        <div class="hero-head">
            <nav class="navbar">
                <div class="container">
                    <div id="navbarMenuHeroA" class="navbar-menu">
                        <div class="navbar-end">
                            <a href="{{ url_for('main.index') }}" class="navbar-item">
                                Home
                            </a>
                            <a href="{{ url_for('main.profile') }}" class="navbar-item">
                                Profile
                            </a>
                            <a href="{{ url_for('auth.login') }}" class="navbar-item">
                                Login
                            </a>
                            <a href="{{ url_for('auth.signup') }}" class="navbar-item">
                                Sign Up
                            </a>
                            <a href="{{ url_for('auth.logout') }}" class="navbar-item">
                                Logout
                            </a>
                        </div>
                    </div>
                </div>
            </nav>
        </div>

        <div class="hero-body">
            <div class="container has-text-centered">
               {% block content %}
               {% endblock %}
            </div>
        </div>
    </section>
</body>

</html>
This code will create a series of menu links to each page of the application. It also establishes a block for content that can be overwritten by child templates.
Note: This tutorial uses Bulma to handle styling and layout. For a deeper dive into Bulma, consider reading the official Bulma documentation.
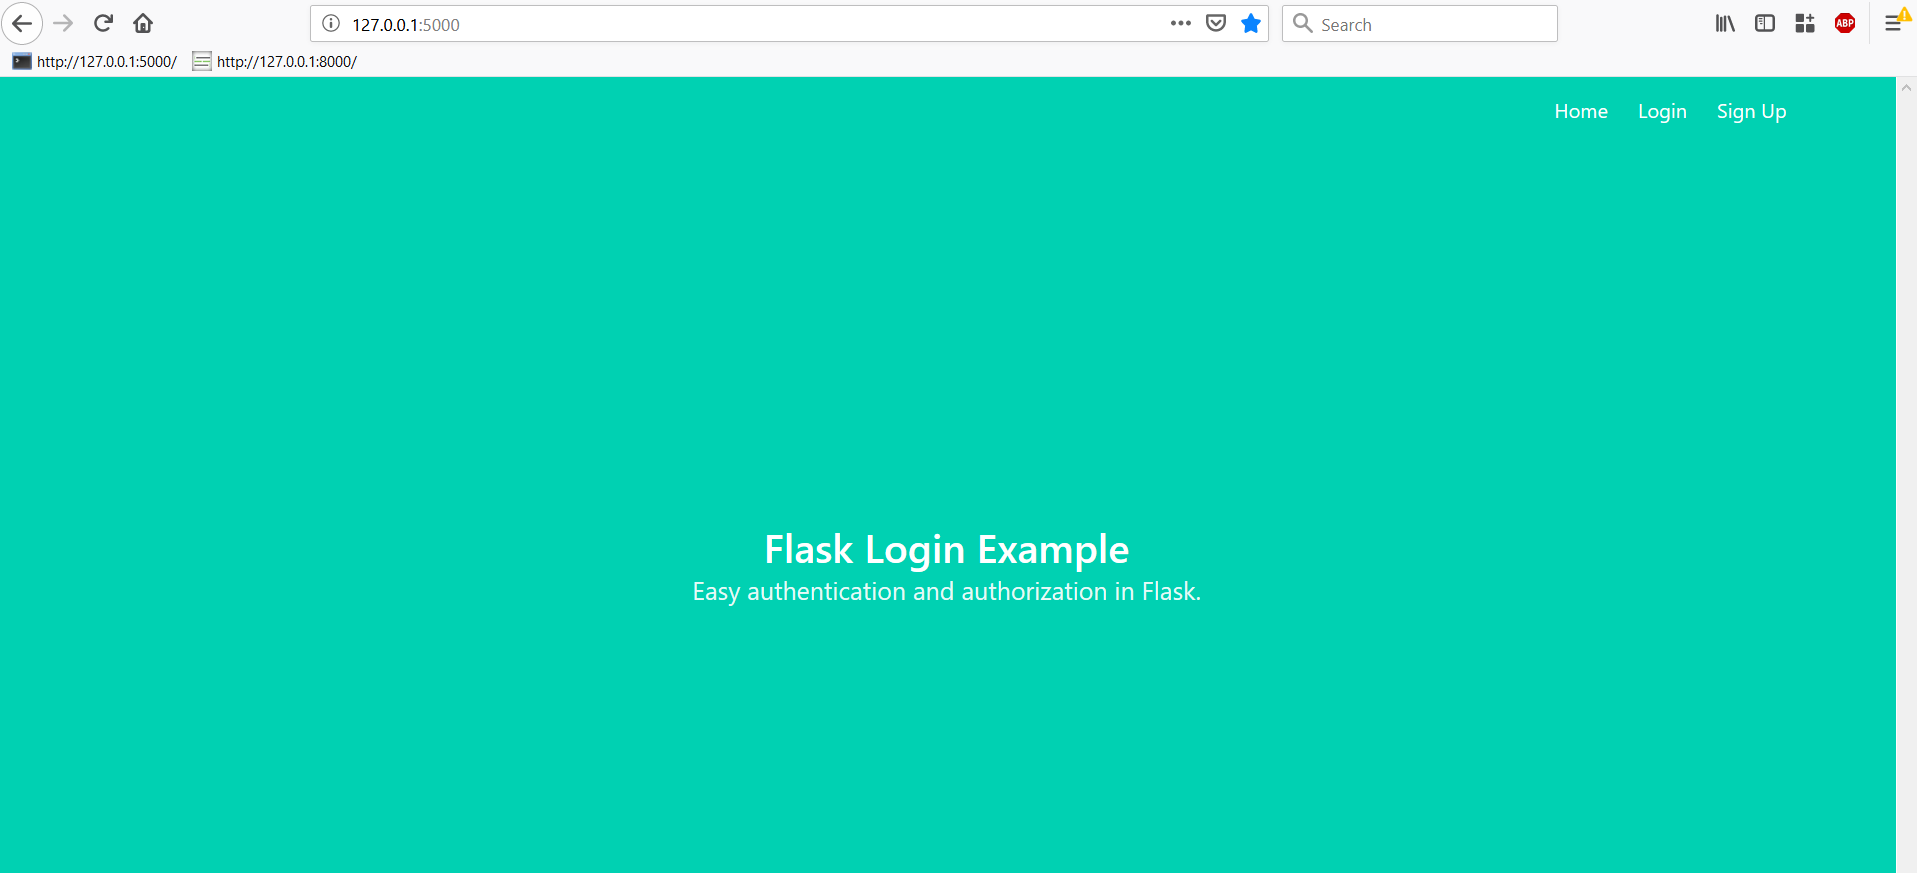
Next, create templates/index.html:
- nano project/templates/index.html
Add the following code to the newly created file to add content to the page:
{% extends "base.html" %}

{% block content %}
<h1 class="title">
  Flask Login Example
</h1>
<h2 class="subtitle">
  Easy authentication and authorization in Flask.
</h2>
{% endblock %}
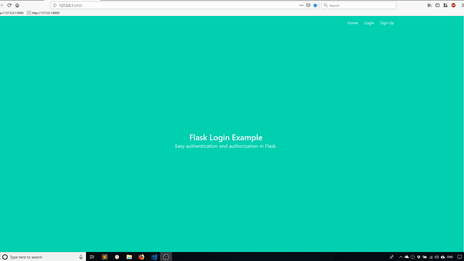
This code will create a basic index page with a title and subtitle.
Next, create templates/login.html:
- nano project/templates/login.html
This code generates a login page with fields for Email and Password. There is also a checkbox to “remember” a logged in session.
{% extends "base.html" %}

{% block content %}
<div class="column is-4 is-offset-4">
    <h3 class="title">Login</h3>
    <div class="box">
        <form method="POST" action="/login">
            <div class="field">
                <div class="control">
                    <input class="input is-large" type="email" name="email" placeholder="Your Email" autofocus="">
                </div>
            </div>

            <div class="field">
                <div class="control">
                    <input class="input is-large" type="password" name="password" placeholder="Your Password">
                </div>
            </div>
            <div class="field">
                <label class="checkbox">
                    <input type="checkbox" name="remember">
                    Remember me
                </label>
            </div>
            <button class="button is-block is-info is-large is-fullwidth">Login</button>
        </form>
    </div>
</div>
{% endblock %}
Next, create templates/signup.html:
- nano project/templates/signup.html
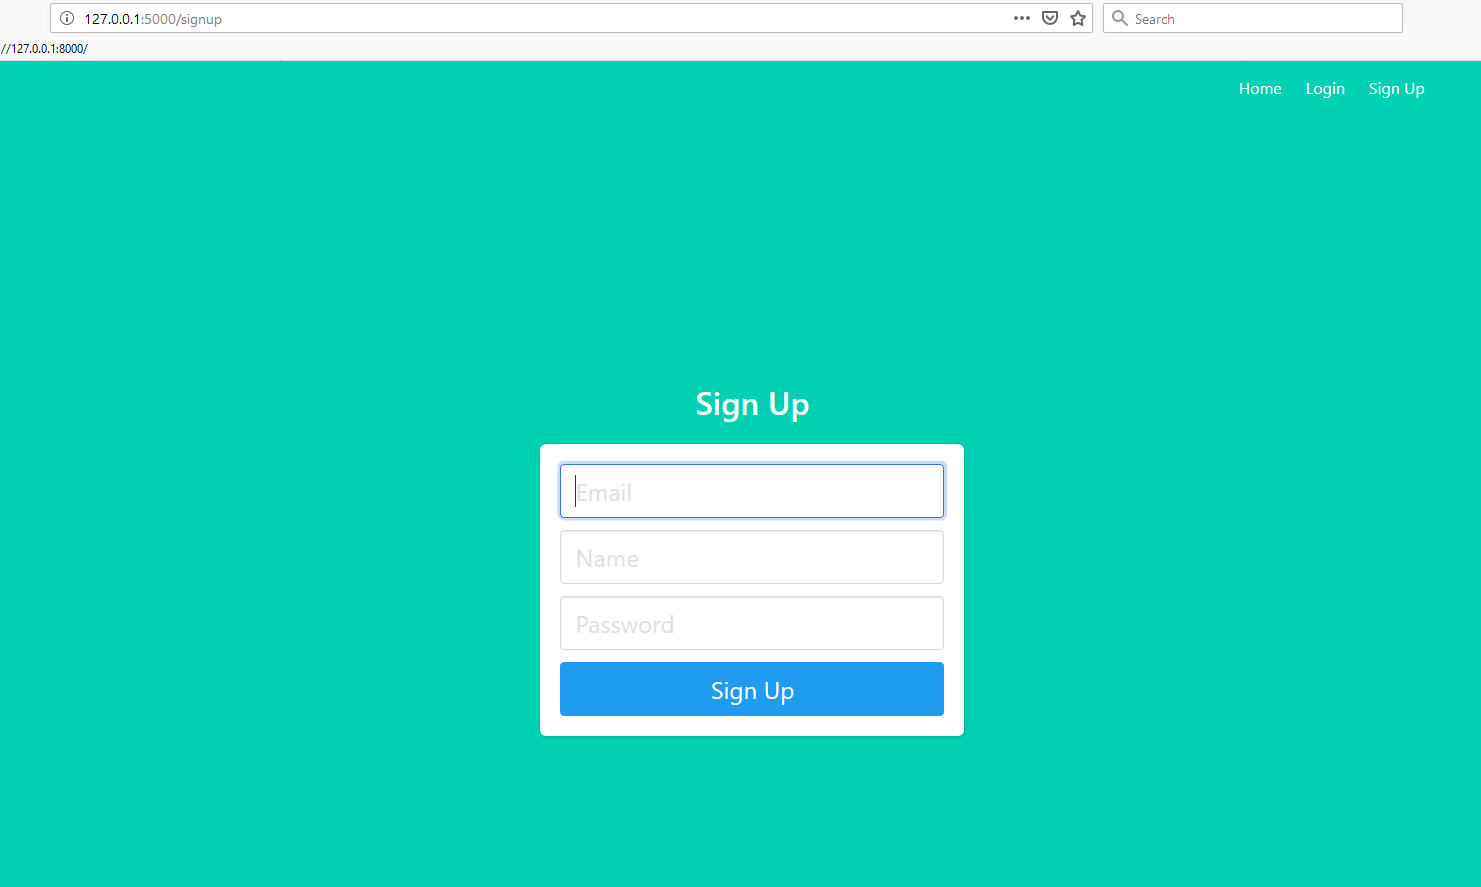
Add the following code to create a sign-up page with fields for email, name, and password:
{% extends "base.html" %}

{% block content %}
<div class="column is-4 is-offset-4">
    <h3 class="title">Sign Up</h3>
    <div class="box">
        <form method="POST" action="/signup">
            <div class="field">
                <div class="control">
                    <input class="input is-large" type="email" name="email" placeholder="Email" autofocus="">
                </div>
            </div>

            <div class="field">
                <div class="control">
                    <input class="input is-large" type="text" name="name" placeholder="Name" autofocus="">
                </div>
            </div>

            <div class="field">
                <div class="control">
                    <input class="input is-large" type="password" name="password" placeholder="Password">
                </div>
            </div>

            <button class="button is-block is-info is-large is-fullwidth">Sign Up</button>
        </form>
    </div>
</div>
{% endblock %}
Next, create templates/profile.html:
- nano project/templates/profile.html
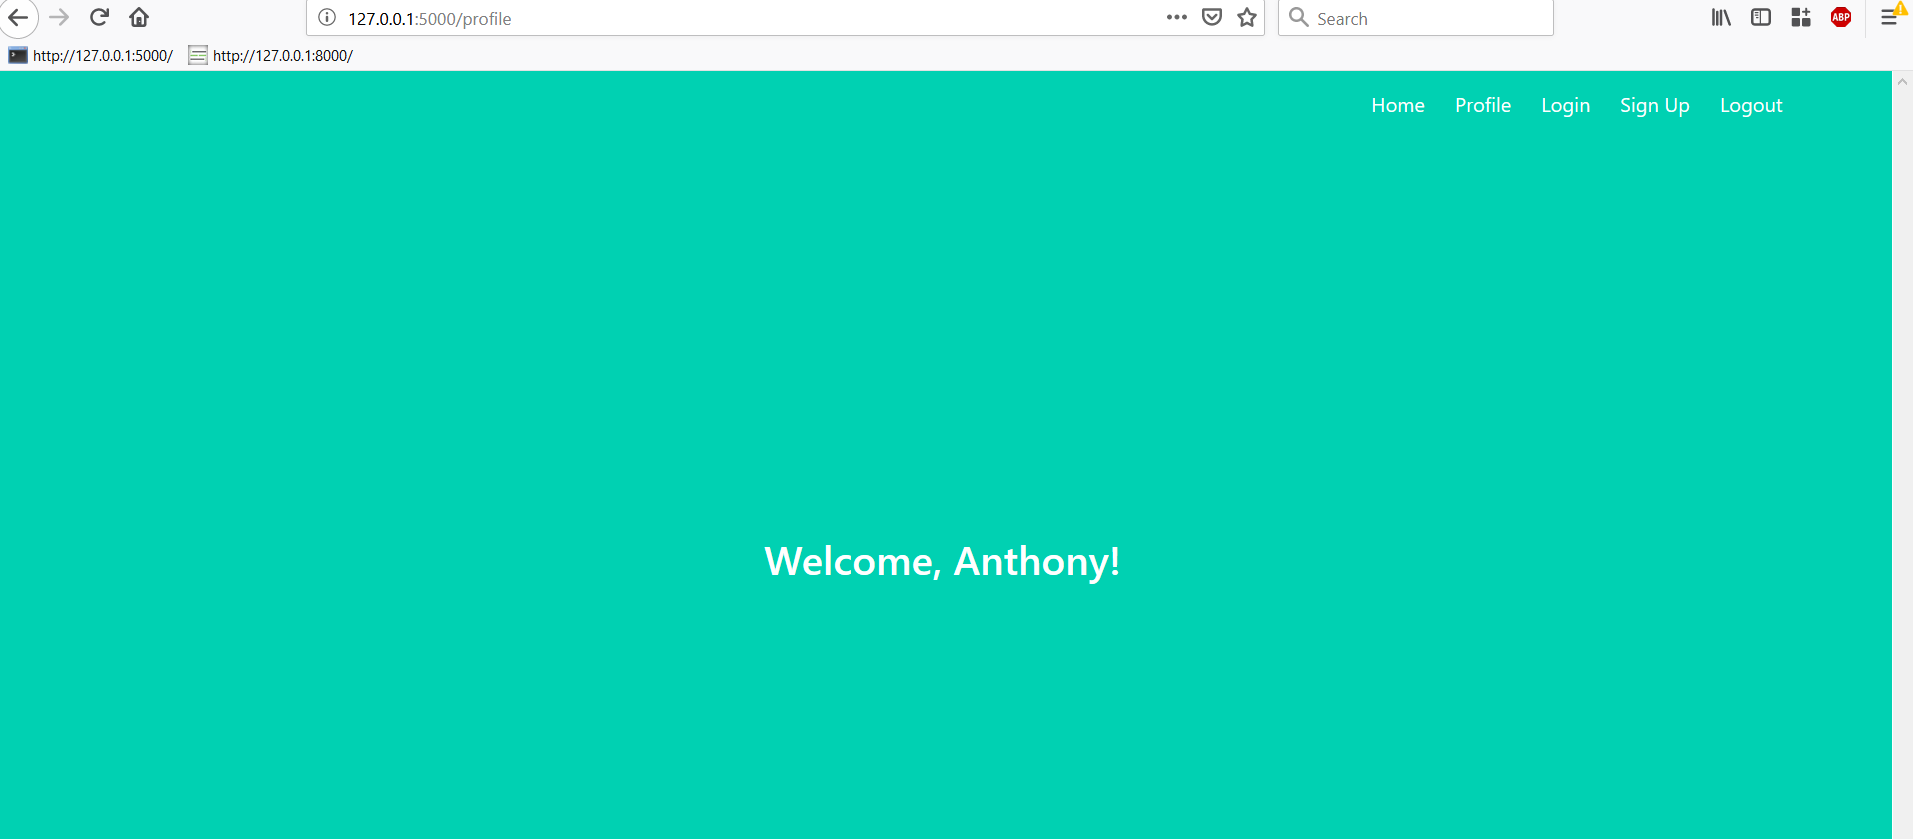
Add this code to create a page with a title that is hardcoded to welcome Anthony:
{% extends "base.html" %}

{% block content %}
<h1 class="title">
  Welcome, Anthony!
</h1>
{% endblock %}
You will revisit this code later to dynamically greet any user.
Once you have added the templates, you can update the return statements in each of the routes to return the templates instead of the text.
Next, update main.py by modifying the import line and the routes for index and profile:
from flask import Blueprint, render_template
...
@main.route('/')
def index():
    return render_template('index.html')

@main.route('/profile')
def profile():
    return render_template('profile.html')
Now you will update auth.py by modifying the import line and routes for login and signup:
from flask import Blueprint, render_template
...
@auth.route('/login')
def login():
    return render_template('login.html')

@auth.route('/signup')
def signup():
    return render_template('signup.html')
Once you’ve made these changes, here is what the sign-up page looks like if you navigate to /signup:
You can navigate to the pages for /, /login, and /profile as well.
Leave /logout alone for now because it will not display a template later.
Step 5 — Creating User Models
The user model represents what it means for the app to have a user. This tutorial will require fields for an email address, password, and name. In future applications, you may decide you want much more information to be stored per user. You can add things like birthdays, profile pictures, locations, or any user preferences.
Models created in Flask-SQLAlchemy are represented by classes that then translate to tables in a database. The attributes of those classes then turn into columns for those tables.
Create the User model:
- nano project/models.py
Define the User model:
from . import db

class User(db.Model):
    id = db.Column(db.Integer, primary_key=True) # primary keys are required by SQLAlchemy
    email = db.Column(db.String(100), unique=True)
    password = db.Column(db.String(100))
    name = db.Column(db.String(1000))
This code defines a User with columns for an id, email, password, and name.
Now that you’ve created a User model, you can move on to configuring your database.
Step 6 — Configuring the Database
You will be using an SQLite database. You could create an SQLite database on your own, but let’s have Flask-SQLAlchemy do it for you. You already have the path of the database specified in the __init__.py file, so you will need to tell Flask-SQLAlchemy to create the database in the Python REPL.
Ensure that you are still in the virtual environment and in the flask_auth_app directory.
If you stop your app and open up a Python REPL, you can create the database using the create_all method on the db object:
- from project import db, create_app, models
- db.create_all(app=create_app()) # pass the create_app result so Flask-SQLAlchemy gets the configuration.
Note: If using the Python interpreter is new to you, you can consult the official documentation.
You will now see a db.sqlite file in your project directory. This database will have the user table in it.
Step 7 — Setting Up the Authorization Function
For the sign-up function, you will take the data the user submits to the form and add it to the database. You will need to make sure a user with the same email address does not already exist in the database. If it does not exist, then you need to make sure you hash the password before placing it into the database.
Note: Storing passwords in plaintext is considered a poor security practice. You will generally want a complex hashing algorithm and salt to keep passwords secure.
Let’s start by adding a second function to handle the POST form data. Gather the data passed from the user.
Update auth.py by modifying the import line and implementing signup_post:
from flask import Blueprint, render_template, redirect, url_for
...
@auth.route('/signup')
def signup():
    return render_template('signup.html')

@auth.route('/signup', methods=['POST'])
def signup_post():
    # code to validate and add user to database goes here
    return redirect(url_for('auth.login'))
Create the function and add a redirect. This will provide a user experience of a successful sign-up and being directed to the Login Page.
Now, let’s add the rest of the code necessary for signing up a user. Use the request object to get the form data.
Continue to update auth.py by adding imports and implementing signup_post:
from flask import Blueprint, render_template, redirect, url_for, request
from werkzeug.security import generate_password_hash, check_password_hash
from .models import User
from . import db
...
@auth.route('/signup', methods=['POST'])
def signup_post():
    # code to validate and add user to database goes here
    email = request.form.get('email')
    name = request.form.get('name')
    password = request.form.get('password')

    user = User.query.filter_by(email=email).first() # if this returns a user, then the email already exists in database

    if user: # if a user is found, we want to redirect back to signup page so user can try again
        return redirect(url_for('auth.signup'))

    # create a new user with the form data. Hash the password so the plaintext version isn't saved.
    new_user = User(email=email, name=name, password=generate_password_hash(password, method='sha256'))

    # add the new user to the database
    db.session.add(new_user)
    db.session.commit()

    return redirect(url_for('auth.login'))
This code will check to see if a user with the same email address exists in the database.
Step 8 — Testing the Sign Up Method
Now that you have the sign-up method completed, you will be able to create a new user. Let’s test the form to create a user.
There are two ways you can verify if the sign-up was successful:
- You can use a database viewer to look at the row that was added to your table.
- Or you can try signing up with the same email address again, and if you get an error, you know the first email was saved properly.
Let’s add code to let the user know the email already exists and direct them to go to the login page. By calling the flash function, you can send a message to the next request, which in this case, is the redirect. The page the user is redirected to will then have access to that message in the template.
First, add the flash before you redirect to the sign-up page.
from flask import Blueprint, render_template, redirect, url_for, request, flash
...
@auth.route('/signup', methods=['POST'])
def signup_post():
    ...
    if user: # if a user is found, we want to redirect back to signup page so user can try again
        flash('Email address already exists')
        return redirect(url_for('auth.signup'))
To get the flashed message in the template, you can add this code before the form.
...
{% with messages = get_flashed_messages() %}
{% if messages %}
    <div class="notification is-danger">
        {{ messages[0] }}. Go to <a href="{{ url_for('auth.login') }}">login page</a>.
    </div>
{% endif %}
{% endwith %}
<form method="POST" action="/signup">
This code will display the message "Email address already exists. Go to login page." if the email address is already in the database.
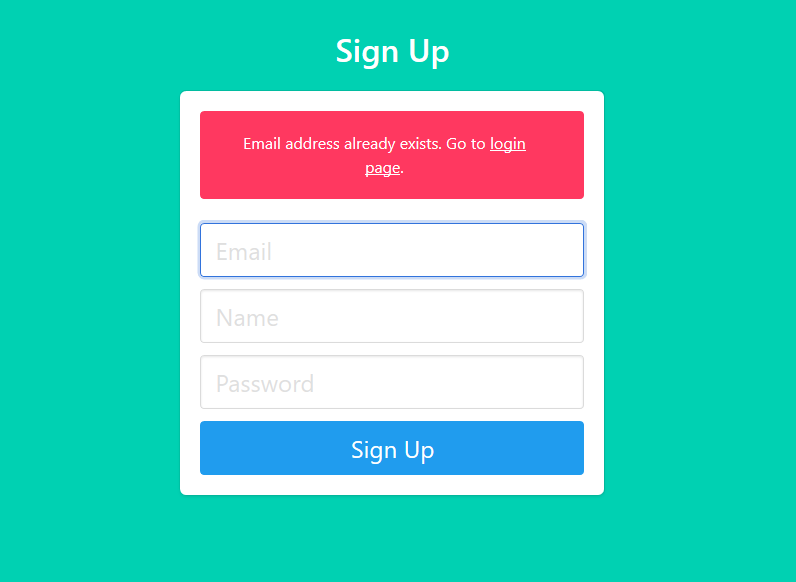
At this point, you can run the application and attempt to sign up with an email address that already exists.
Step 9 — Adding the Login Method
The login method is similar to the sign-up function. In this case, you will compare the email address entered to see if it is in the database. If so, you will test the password the user provided by hashing the password the user passes in and comparing it to the hashed password in the database. You will know the user has entered the correct password when both hashed passwords match.
Once the user has passed the password check, you will know that they have the correct credentials and you can log them in using Flask-Login. By calling login_user, Flask-Login will create a session for that user that will persist as the user stays logged in, which will allow the user to view protected pages.
You can start with a new route for handling the data submitted with POST. And redirect to the profile page when the user successfully logs in:
...
@auth.route('/login')
def login():
    return render_template('login.html')

@auth.route('/login', methods=['POST'])
def login_post():
    # login code goes here
    return redirect(url_for('main.profile'))
Now, you need to verify if the user has the correct credentials:
...
@auth.route('/login', methods=['POST'])
def login_post():
    # login code goes here
    email = request.form.get('email')
    password = request.form.get('password')
    remember = True if request.form.get('remember') else False

    user = User.query.filter_by(email=email).first()

    # check if the user actually exists
    # take the user-supplied password, hash it, and compare it to the hashed password in the database
    if not user or not check_password_hash(user.password, password):
        flash('Please check your login details and try again.')
        return redirect(url_for('auth.login')) # if the user doesn't exist or password is wrong, reload the page

    # if the above check passes, then we know the user has the right credentials
    return redirect(url_for('main.profile'))
Let’s add in the block in the template so the user can see the flashed message:
...
{% with messages = get_flashed_messages() %}
{% if messages %}
    <div class="notification is-danger">
        {{ messages[0] }}
    </div>
{% endif %}
{% endwith %}
<form method="POST" action="/login">
You now have the ability to say a user has been logged in successfully, but there is nothing to log the user into.
Flask-Login can manage user sessions. Start by adding the UserMixin to your User model. The UserMixin will add Flask-Login attributes to the model so that Flask-Login will be able to work with it.
from flask_login import UserMixin
from . import db

class User(UserMixin, db.Model):
    id = db.Column(db.Integer, primary_key=True) # primary keys are required by SQLAlchemy
    email = db.Column(db.String(100), unique=True)
    password = db.Column(db.String(100))
    name = db.Column(db.String(1000))
Then, you need to specify the user loader. A user loader tells Flask-Login how to find a specific user from the ID that is stored in their session cookie. Add this in the create_app function along with init code for Flask-Login:
from flask import Flask
from flask_sqlalchemy import SQLAlchemy
from flask_login import LoginManager
...
def create_app():
    ...
    db.init_app(app)

    login_manager = LoginManager()
    login_manager.login_view = 'auth.login'
    login_manager.init_app(app)

    from .models import User

    @login_manager.user_loader
    def load_user(user_id):
        # since the user_id is just the primary key of our user table, use it in the query for the user
        return User.query.get(int(user_id))
Finally, add the login_user function before redirecting to the profile page to create the session:
from flask_login import login_user
from .models import User
from . import db
...
@auth.route('/login', methods=['POST'])
def login_post():
    ...
    # if the above check passes, then we know the user has the right credentials
    login_user(user, remember=remember)
    return redirect(url_for('main.profile'))
With Flask-Login setup, use the /login route. When everything is in place, you will see the profile page.
At this point, you can run the application and attempt to log in.
Step 10 — Protecting Pages
If your name is not Anthony, then you will see that your name is wrong on the profile page. The goal is for the profile to display the name in the database. You will need to protect the page and then access the user’s data to get the name.
To protect a page when using Flask-Login, add the @login_requried decorator between the route and the function. This will prevent a user that is not logged in from seeing the route. If the user is not logged in, the user will get redirected to the login page, per the Flask-Login configuration.
With routes that are decorated with the @login_required decorator, you can use the current_user object inside of the function. This current_user represents the user from the database and provides access all of the attributes of that user with dot notation. For example, current_user.email, current_user.password, and current_user.name, and current_user.id will return the actual values stored in the database for the logged-in user.
Let’s use the name of the current_user and send it to the template:
from flask import Blueprint, render_template
from flask_login import login_required, current_user
from . import db
...
@main.route('/profile')
@login_required
def profile():
    return render_template('profile.html', name=current_user.name)
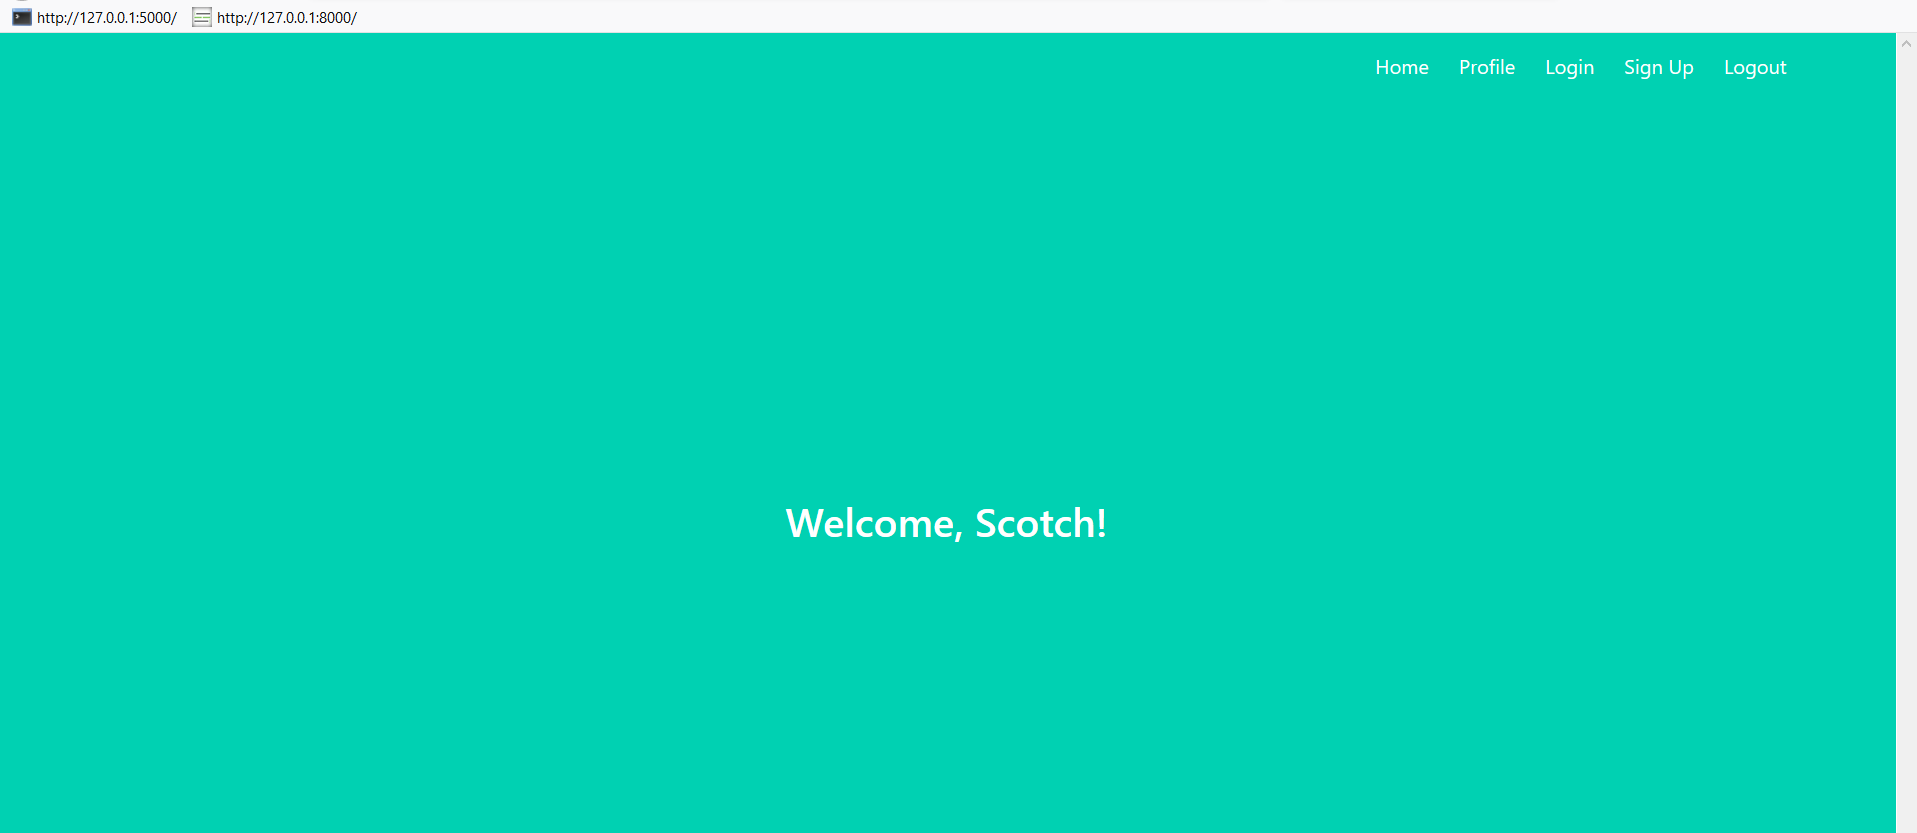
Then in the profile.html file, update the page to display the name value:
...
<h1 class="title">
  Welcome, {{ name }}!
</h1>
Once a user visits the profile page, they will be greeted by their name.
Now to update the logout view, call the logout_user function in a route for logging out:
from flask_login import login_user, login_required, logout_user
...
@auth.route('/logout')
@login_required
def logout():
    logout_user()
    return redirect(url_for('main.index'))
Use the @login_required decorator because it does not make sense to log out a user that is not logged in to begin with.
After a user logs out and tries to view the profile page again, they will be presented with an error message:
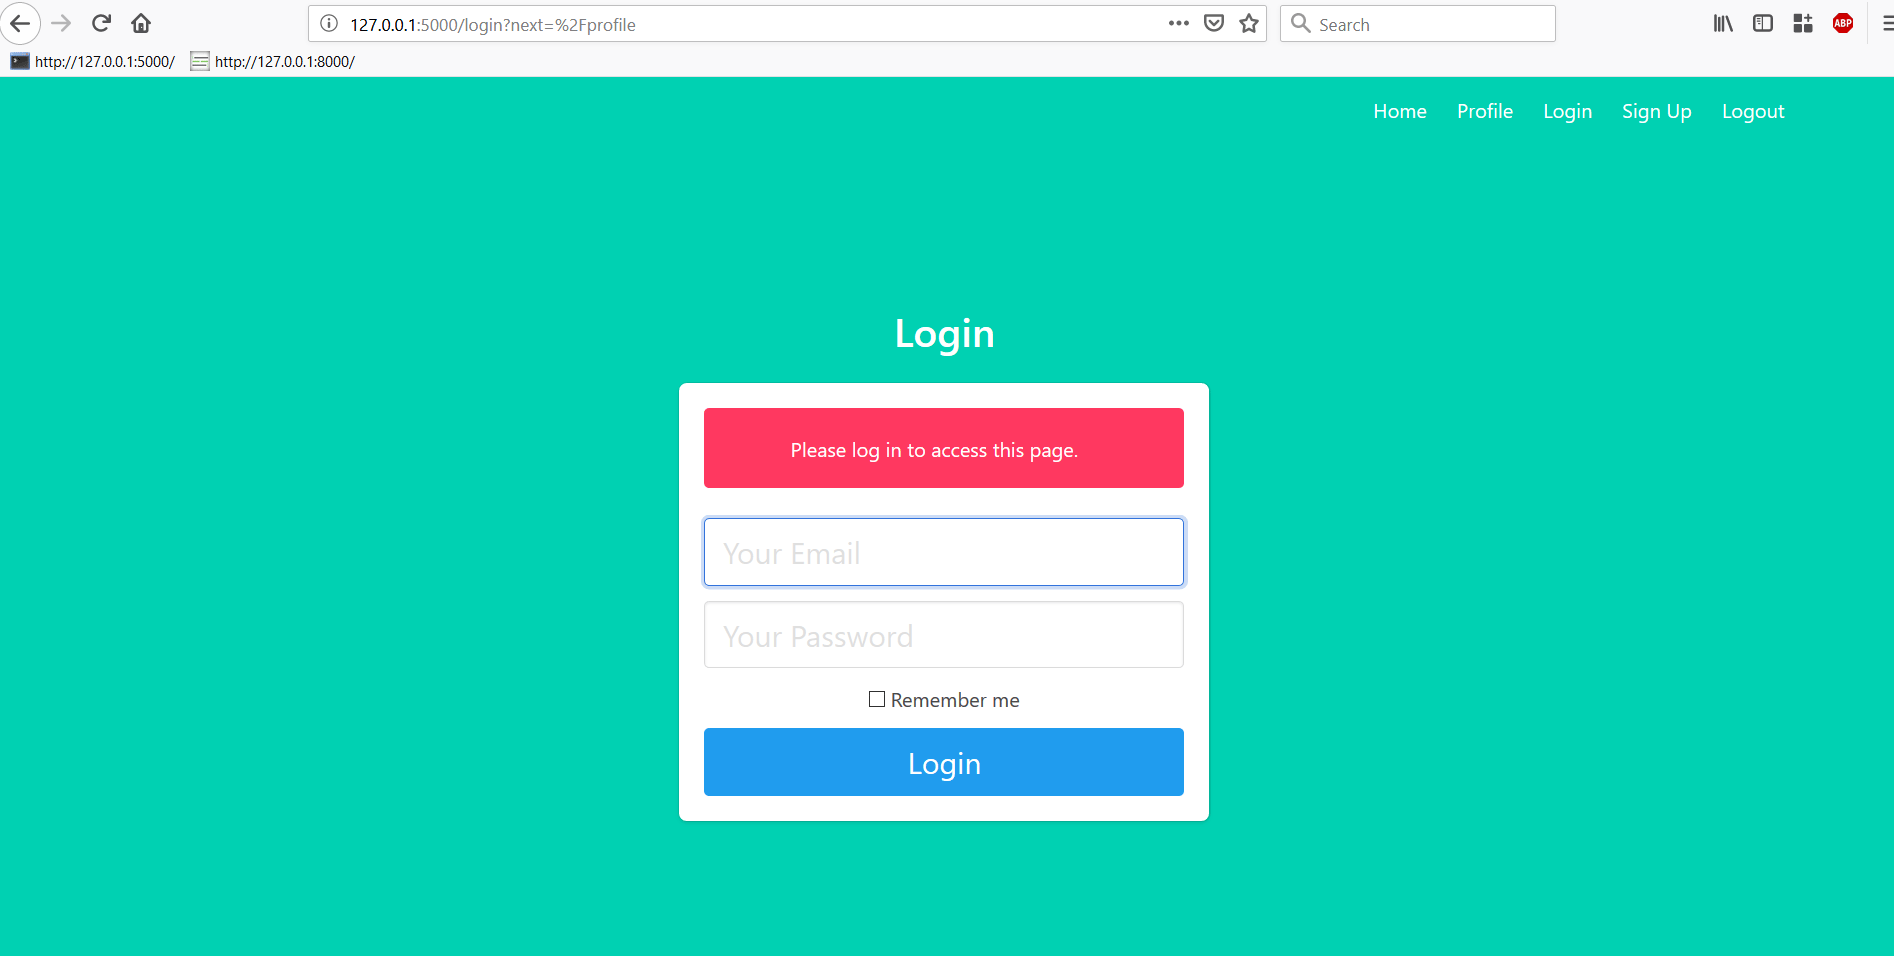
This is because Flask-Login flashes a message when the user is not allowed to access a page.
One last thing to do is put if statements in the templates to display only the links relevant to the user:
...
<div class="navbar-end">
    <a href="{{ url_for('main.index') }}" class="navbar-item">
        Home
    </a>
    {% if current_user.is_authenticated %}
    <a href="{{ url_for('main.profile') }}" class="navbar-item">
        Profile
    </a>
    {% endif %}
    {% if not current_user.is_authenticated %}
    <a href="{{ url_for('auth.login') }}" class="navbar-item">
        Login
    </a>
    <a href="{{ url_for('auth.signup') }}" class="navbar-item">
        Sign Up
    </a>
    {% endif %}
    {% if current_user.is_authenticated %}
    <a href="{{ url_for('auth.logout') }}" class="navbar-item">
        Logout
    </a>
    {% endif %}
</div>
Before the user logs in, they will have the option to log in or sign-up. After they have logged in, they can go to their profile or log out.
With that, you have successfully built your app with authentication.
Advanced Features
Password Reset Functionality
Add password reset capabilities using email tokens.
This feature allows users to regain access to their accounts if they forget their passwords.
import secrets
from datetime import datetime, timedelta

@auth.route('/forgot-password')
def forgot_password():
    return render_template('forgot_password.html')

@auth.route('/forgot-password', methods=['POST'])
def forgot_password_post():
    email = request.form.get('email')
    user = User.query.filter_by(email=email).first()

    if user:
        # Generate reset token
        user.reset_token = secrets.token_urlsafe(32)
        user.reset_token_expires = datetime.utcnow() + timedelta(hours=1)
        db.session.commit()

        # Send email with reset link (implement email sending)
        flash('Password reset link sent to your email')

    return redirect(url_for('auth.login'))

@auth.route('/reset-password/<token>')
def reset_password(token):
    user = User.query.filter_by(reset_token=token).first()

    if not user or user.reset_token_expires < datetime.utcnow():
        flash('Invalid or expired reset token')
        return redirect(url_for('auth.login'))

    return render_template('reset_password.html', token=token)
User Roles and Permissions
Implement role-based access control.
Assigning roles to users enables you to restrict access to certain parts of your application for improved security and organization.
class User(UserMixin, db.Model):
    # ... existing fields ...
    role = db.Column(db.String(20), default='user')

    def has_role(self, role):
        return self.role == role

    def is_admin(self):
        return self.role == 'admin'

# Custom decorator for role-based access
def role_required(role):
    def decorator(f):
        @wraps(f)
        def decorated_function(*args, **kwargs):
            if not current_user.is_authenticated or not current_user.has_role(role):
                flash('Access denied. Insufficient permissions.')
                return redirect(url_for('main.index'))
            return f(*args, **kwargs)
        return decorated_function
    return decorator
Session Management
Configure advanced session settings.
Proper session management is essential for maintaining user security and a seamless experience across visits.
def create_app():
    app = Flask(__name__)

    # Session configuration
    app.config['PERMANENT_SESSION_LIFETIME'] = timedelta(hours=24)
    app.config['SESSION_COOKIE_SECURE'] = True  # HTTPS only
    app.config['SESSION_COOKIE_HTTPONLY'] = True  # Prevent XSS
    app.config['SESSION_COOKIE_SAMESITE'] = 'Lax'  # CSRF protection

    # ... rest of configuration
Troubleshooting
Common Issues and Solutions
1. “User is not authenticated” Error
Problem: current_user.is_authenticated returns False unexpectedly.
This usually means the user loader or session setup is not configured or working correctly.
Solution: Ensure Flask-Login is properly configured:
Verifying your user loader function and model implementation helps prevent unauthorized access and session errors.
# Check that user_loader is defined
@login_manager.user_loader
def load_user(user_id):
    return User.query.get(int(user_id))

# Verify User model implements UserMixin
class User(UserMixin, db.Model):
    # ... model definition
2. Session Not Persisting
Problem: Users get logged out after page refresh.
This often points to misconfiguration of your secret key or database.
Solution: Check session configuration and database:
Double-checking your app configuration and ensuring the database is initialized are common ways to address this issue.
# Ensure SECRET_KEY is set
app.config['SECRET_KEY'] = 'your-secret-key'

# Verify database is created
with app.app_context():
    db.create_all()
3. Password Hashing Issues
Problem: Passwords not being hashed correctly.
A mismatch between hashing and checking algorithms can prevent users from logging in.
Solution: Use consistent hashing method:
Maintaining consistency in password hashing across your app guarantees that password validation will work as expected.
# Always use the same method for hashing and checking
password_hash = generate_password_hash(password)  # Uses Werkzeug's secure default (pbkdf2:sha256)
is_valid = check_password_hash(password_hash, password)
4. Import Errors
Problem: Circular import errors with blueprints.
These errors generally arise from improper import order or structure in multi-file Flask projects.
Solution: Import models inside functions:
Moving model imports into function scope can resolve circular import issues and make blueprint organization more robust.
# In auth.py
@auth.route('/login', methods=['POST'])
def login_post():
    from .models import User  # Import here, not at top
    # ... rest of function
Debugging Tips
-
Enable Flask debug mode:
Turning on debug mode will provide detailed error messages and automatic reloading for easier troubleshooting while developing.export FLASK_DEBUG=1 flask run -
Check Flask-Login configuration:
Printing these values in your code helps you confirm that Flask-Login is wired up to the right views and user loader as you expect.print(f"Login view: {login_manager.login_view}") print(f"User loader: {login_manager.user_loader}") -
Verify user session:
Creating a simple debug route allows you to quickly check in the browser if the current user is recognized and authenticated as expected.@app.route('/debug') def debug_session(): return f"User: {current_user}, Authenticated: {current_user.is_authenticated}"
Security Best Practices
Password Security
- Use strong hashing: Always apply
generate_password_hash()(without specifying a method, to use the secure default) or explicitly use secure password hashing algorithms like'pbkdf2:sha256','scrypt', or'argon2'to store user passwords. These algorithms are designed for password storage and provide key stretching and salt management. Relying on proper password hashing ensures that even if your database is compromised, original passwords can’t be easily retrieved by attackers due to the one-way nature of secure hashes. - Salt passwords: Password salting adds a unique, random value to each password before it’s hashed, making precomputed dictionary attacks (like rainbow tables) ineffective. Werkzeug’s password utilities perform this salt generation automatically, providing an extra layer of security with no work required from the developer.
- Minimum length: To reduce the risk of trivial password guesses or brute-force attacks, always enforce that user passwords have a minimum length—at least 8 characters, but ideally more. This requirement makes it computationally harder for attackers to guess or crack user passwords through automated means.
- Password complexity: Mandate that passwords include combinations of uppercase and lowercase letters, numbers, and special symbols. Complex passwords greatly expand the search space, making them far less susceptible to brute-force or dictionary attacks, and help ensure only the legitimate user can guess or recall their password.
Session Security
- Secure cookies: In production deployments, always set
SESSION_COOKIE_SECURE=True, which ensures session cookies are only transmitted over HTTPS connections. This protects session data from interception via man-in-the-middle attacks on insecure networks or public Wi-Fi. - HTTP-only cookies: Enable
SESSION_COOKIE_HTTPONLY=Trueto prevent JavaScript running in the client browser from accessing your session cookies. This setting is critical for mitigating the risk of cross-site scripting (XSS) attacks that might attempt to steal session tokens. - SameSite protection: Set
SESSION_COOKIE_SAMESITE='Lax'or'Strict'to defend against Cross-Site Request Forgery (CSRF) attacks. This restricts browsers from sending cookies during cross-site requests, ensuring that authentication credentials are not leaked during interactions with other websites. - Session timeout: Implement a reasonable session timeout policy so that user sessions are invalidated after a set period of inactivity. This reduces the risk that compromised or abandoned sessions could be hijacked by attackers, especially on shared or public computers.
CSRF Protection
Add CSRF protection with Flask-WTF to guard against cross-site request forgery in your forms. This ensures that every form submission is accompanied by a secure, randomly generated token, which helps prevent unauthorized or malicious requests from being processed.
from flask_wtf.csrf import CSRFProtect

def create_app():
    app = Flask(__name__)
    csrf = CSRFProtect()
    csrf.init_app(app)
    # ... rest of configuration
Input Validation
Validate all user inputs to ensure that the data your application processes is both expected and safe.
By implementing input validation, you reduce the risk of accepting malformed or malicious user data that could cause security vulnerabilities or application errors.
from wtforms import Form, StringField, PasswordField, validators

class LoginForm(Form):
    email = StringField('Email', [validators.Email(), validators.Required()])
    password = PasswordField('Password', [validators.Required()])
FAQ
What is Flask-Login used for?
Flask-Login handles user session management in Flask applications. It provides:
- User authentication state tracking
- Session management with secure cookies
- Route protection with decorators
- User object access via
current_user
How do I protect routes with Flask-Login?
Use the @login_required decorator:
from flask_login import login_required

@app.route('/protected')
@login_required
def protected_route():
    return "This page requires login"
Can I use Flask-Login with SQLAlchemy?
Yes! Flask-Login works seamlessly with Flask-SQLAlchemy. Just ensure your User model inherits from UserMixin:
from flask_login import UserMixin

class User(UserMixin, db.Model):
    id = db.Column(db.Integer, primary_key=True)
    # ... other fields
How do I store passwords securely in Flask?
Use Werkzeug’s password hashing utilities:
from werkzeug.security import generate_password_hash, check_password_hash

# When creating user
password_hash = generate_password_hash(password)

# When verifying login
is_valid = check_password_hash(user.password, password)
What’s the difference between Flask-Login and JWT authentication?
- Flask-Login: Server-side sessions, simpler setup, built for traditional web apps
- JWT: Stateless tokens, better for APIs and microservices, requires more configuration
Choose Flask-Login for traditional web applications and JWT for API-based architectures.
How do I implement “Remember Me” functionality?
Flask-Login handles this automatically:
login_user(user, remember=True)  # Persistent session
login_user(user, remember=False)  # Session expires when browser closes
Can I use Flask-Login with multiple user types?
Yes, implement role-based access:
class User(UserMixin, db.Model):
    role = db.Column(db.String(20))

    def has_role(self, role):
        return self.role == role

# In routes
if current_user.has_role('admin'):
    # Admin-only functionality
Conclusion
In this tutorial, you learned how to use Flask-Login to implement secure authentication in a Flask app. You set up user models with Flask-SQLAlchemy, securely hashed passwords using Werkzeug, and protected routes with the @login_required decorator. You also saw how to use Flask’s flash system for error messages and added features like password reset and role-based access.
By following these steps and best practices, you now have a solid foundation for building robust, user-friendly authentication in your Flask applications.
To deploy your Flask authentication app in production, consider hosting it on DigitalOcean App Platform or a Droplet for full control and scalability.
Next Steps
For production applications, consider:
- Flask-Security: Provides additional features like email confirmation and password reset
- OAuth integration: Add social login with Google, GitHub, etc.
- Two-factor authentication: Implement 2FA for enhanced security
- Rate limiting: Prevent brute force attacks with Flask-Limiter
- Audit logging: Track user actions for security monitoring
The authentication system you’ve built provides a solid foundation for most Flask applications. For more complex requirements, explore Flask-Security or Flask-User, which are built on top of Flask-Login and offer additional features out of the box.
Thanks for learning with the DigitalOcean Community. Check out our offerings for compute, storage, networking, and managed databases.
About the author(s)
Building future-ready infrastructure with Linux, Cloud, and DevOps. Full Stack Developer & System Administrator. Technical Writer @ DigitalOcean | GitHub Contributor | Passionate about Docker, PostgreSQL, and Open Source | Exploring NLP & AI-TensorFlow | Nailed over 50+ deployments across production environments.
Still looking for an answer?
This textbox defaults to using Markdown to format your answer.
You can type !ref in this text area to quickly search our full set of tutorials, documentation & marketplace offerings and insert the link!
Hello,
Very nice tutorial.
However, I cannot figure out how to listen on to another IP than 127.0.0.1
I tried this:
export FLASK_APP=“myAppName”; export FLASK_DEBUG=1; flask run --host=0.0.0.0:8080
and that
if name == “main”: app.run(host=‘0.0.0.0’, port=8080, debug=True)
Unfortunately, I was not successful.
Note that the app is running fine on 127.0.0.1
Any idea?
Thanks.
P.
Could you provide more details about the db table, name and column parameters? I would like to create the table in postgres db manually.
Please this did not work for me. From the login section, I got this error AttributeError: ‘User’ object has no attribute ‘is_active’
Why? I followed every step but I’m getting that error. Any idea please?
Place the “login_user” function call after “check_password_hash” if block in auth.py.
The reason behind your error is, cannot login the user if the user is none.
Hey, thank you for this tutorial.
I’m running into an issue when every time I’m trying to login the user it won’t pass the hash check and flashes an error. What could be the problem?
Thank you for your tutorial!
I created a repo for it and I’m going to further combine it with my project. It’s fully functioning right now (after fixing some bugs) and I’d like you to check it out :)
Hi, thank you for the tutorial. However, as I followed through, I encountered this error ImportError: cannot import name ‘LoginManager’ from ‘flask_login’. May I know how to solve it?
I am getting a flask.cli.NoAppException: Could not import “flask_auth.flask-apps”. when I access the signup page, after Adding Routes section.
This is the best article about flask_login I have ever found! Thanks for your sharing.
 This work is licensed under a Creative Commons Attribution-NonCommercial- ShareAlike 4.0 International License.
Become a contributor for community
Get paid to write technical tutorials and select a tech-focused charity to receive a matching donation.

DigitalOcean Documentation
Full documentation for every DigitalOcean product.

Resources for startups and AI-native businesses
The Wave has everything you need to know about building a business, from raising funding to marketing your product.
The developer cloud
Scale up as you grow — whether you're running one virtual machine or ten thousand.

Start building today
From GPU-powered inference and Kubernetes to managed databases and storage, get everything you need to build, scale, and deploy intelligent applications.
