By Edwin Khoo and Brian Hogan

Introduction
Slack is a communication platform for teams. Slack has numerous add-ons that let teams extend Slack, and integrate it with other programs. Slack slash commands are a quick and easy way to perform actions in the message input box. For example, typing /who lists all users in the current channel. You can find a complete list of built-in slash commands at https://get.slack.help/hc/en-us/articles/201259356-Slash-commands.
You can create your own slash commands that members of your Slack workspace find useful. When you install the command to your workspace and invoke the command, you can direct Slack to make a request to a program you’ve written. This program receives the information from Slack and returns a response, which is displayed in Slack. You can learn more about Slack slash commands by reading the API documentation.
In this tutorial, you’ll create a Slack slash command called /slash, powered by a Flask app running on an Ubuntu 16.04 server and install this command to your Slack workspace. Once you’re done, typing /slash in the message input box will send information to the Flask app which will process the request and return a short message to Slack letting you know it worked.
You’ll serve this Flask app using a uWSGI application server and use Nginx as a reverse proxy.
Prerequisites
To complete this tutorial, you will need:
- One Ubuntu 16.04 server set up by following the Ubuntu 16.04 initial server setup guide, including a sudo non-root user and a firewall.
- An existing Flask application served with uWSGI running behind Nginx. Complete the tutorial How To Serve Flask Applications with uWSGI and Nginx on Ubuntu 16.04 to configure this on your server.
- A development Slack workspace with permission to install apps, If you don’t have one, create one at https://slack.com/create.
Step 1 — Creating and Installing the Slack App
Before we write our code, we will first create a Slack app, which provides additional functionality to Slack, and install it in a development Slack workspace. Then we’ll define the command and specify the URL that the command should request when we invoke the command.
To create a Slack app, visit https://api.slack.com/apps and click on the green Create New App button. In the form that appears, enter the following details:
- For App Name, enter
DigitalOcean Slack slash command. - For Development Slack Workspace, select your development workspace.
Then click on the green Create App button.
Once the app is created, click on Slash Commands and then click the Create New Command button. You’ll see the following page:
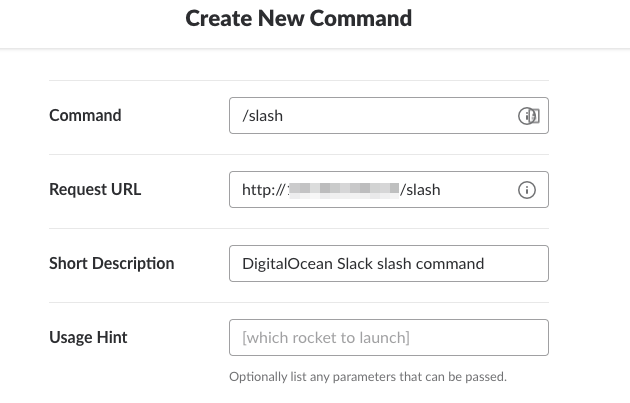
For this tutorial, you’ll create a command called /slash, which will send data via HTTP POST to a request URL that is http://server_domain_or_IP/slash. Therefor, fill in the following information:
- Fill in the Command field with
/slash. - For Request URL, enter
http://your_server_ip_or_domain/slash. - For Short Description, enter
DigitalOcean Slack slash command.
Then on the green Save button to finish creating the slash command.
Now install the app to your workspace by clicking on the Install App link. Press the green Install App to Workspace button. Then press the green Authorize button.
We have now created and installed a Slack app in the development Slack workspace., but the command won’t work until we create a web app that processes the slash command. Before we can build the app, we need to configure our Python environment.
Step 2 — Configuring the Python Environment
After finishing the How To Serve Flask Applications with uWSGI and Nginx on Ubuntu 16.04 tutorial, you have a Flask app located in ~/myproject/. This directory contains the following files and directory:
myproject.inimyproject.pywsgi.pymyprojectenv/
We’ll modify the Flask app in myproject.py to act on the data sent by the Slack slash command and return a JSON response to Slack.
The API documentation for commands states that we should validate the slash command using the verification token associated with the commnd, provided by Slack.
This verification token should be kept secret, so we’ll save it in a new file called .env file that is not kept under version control. We’ll use the python-dotenv package to export the key-value pairs in .env as environment variables, and we’ll access those environment variables in myproject.py.
First, activate the Python virtual environment by running:
- source myprojectenv/bin/activate
To confirm that the virtualenv is activated, you should see (myprojectenv) on the left-hand side of the Bash prompt. Secrets such as the verification token should not be stored under version control. To achieve this, we use the python-dotenv package that exports the secrets as environment variables. Using pip, we install the python-dotenv package:
- pip install python-dotenv
Using nano or your favorite text editor, create the .env file:
- nano .env
Get the verification token by visiting https://api.slack.com/apps. Click on the DigitalOcean Slack slash command app then click on Basic Information. Then find Verification Token.
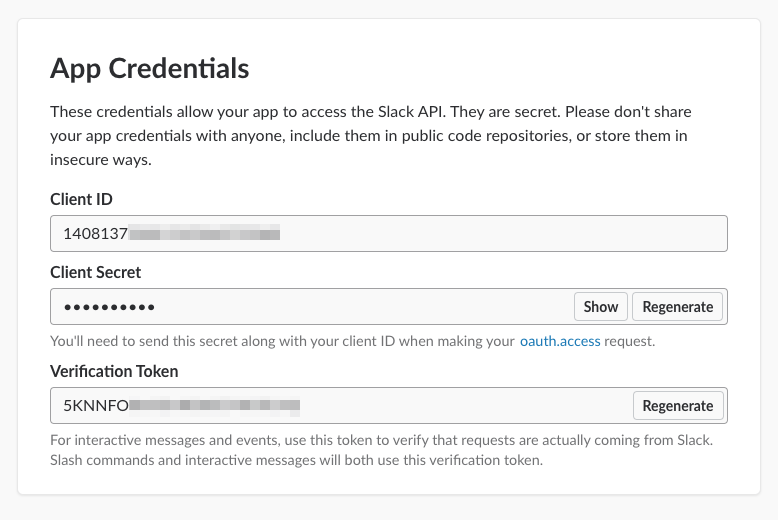
Copy the value for the token and place it in the .env file, assigning the value to an environment variable called VERIFICATION_TOKEN:
VERIFICATION_TOKEN=your_verification_token
Save the file and exit the editor.
When you’re developing a Flask app, you’ll want the uWSGI server to reload automatically when you make changes to the app. To do this, first open myproject.ini in your editor:
- nano myproject.ini
Add this line to the end of the file to ensure that uWSGI automatically reloads when you touch or modify the Flask app in myproject.py
...

touch-reload = myproject.py
Save the file and exit the editor.
Now we’ll create the Flask app that receives and processes the information sent by the slash command and returns an appropriate response to Slack.
Step 3 – Creating the Flask App
When we invoke the /slash command in Slack, Slack will make a request to our server. We configured the command to hit the url /slash, so we’ll alter the Flask app we created to respond to that endpoint.
Open myproject.py in your editor:
- nano myproject.py
Remove the contents of the file. We’ll create a new app from scratch.
Add this code which imports Flask and loads additional modules for handling JSON data and making web requests:
#!/usr/bin/env python

from flask import Flask, jsonify, request
Then add this code which loads the dotenv module. reads the contents of the .env file you created. loads its contents into environment variables, and then fetches the verification token from the environment, storing it in the variable verification_token:
...
import os
import dotenv


dotenv_path = os.path.join(os.path.dirname(__file__), '.env')
dotenv.load_dotenv(dotenv_path)
verification_token = os.environ['VERIFICATION_TOKEN']
Now add this code to configure the Flask app to respond to the Slack slash command by sending a text response that says “DigitalOcean Slack slash command is successful!”:
...

app = Flask(__name__)

@app.route('/slash', methods=['POST'])
def slash():
    if request.form['token'] == verification_token:
        payload = {'text': 'DigitalOcean Slack slash command is successful!'}
        return jsonify(payload)


if __name__ == '__main__':
    app.run()
Save the file and exit the editor.
Restart the myproject systemd service to ensure the latest version of your code is running:
- sudo systemctl restart myproject
Now let’s modify the Nginx configuration to support our slash command.
Step 4 – Configuring Nginx to Serve the Command
Because our request URL is http://server_domain_or_IP/slash, we need to change the location value in our Nginx server block from / to /slash.
Open the file /etc/nginx/sites-available/myproject in your editor:
- sudo nano /etc/nginx/sites-available/myproject
Change the value for location from / to /slash :
...

    location /slash {
        include uwsgi_params;
        uwsgi_pass unix:/home/sammy/myproject/myproject.sock;
    }
}
Save the file and exit the editor.
Then check the Nginx configuration file for syntax errors:
- sudo nginx -t
If there are no syntax errors with the Nginx configuration file, restart the Nginx service:
- sudo systemctl restart nginx
Visit your development Slack workspace and type /slash in any channel. You should see the following response:

If you receive a message stating that the command failed, double-check the code in myproject.py for any syntax errors or issues. Then try again.
Finally, once you’re done developing your command, deactivate the Python virtual environment so that future Python commands use the system Python interpreter:
- deactivate
You have now successfully created a Flask app that receives information from the /slash slash command and returns a response to Slack.
To ensure the communication between your server and Slack is secure, encrypt the connection for the slash command using HTTPS for the request URL. You can do so by installing a free SSL certificate issued by Let’s Encrypt on the Nginx server. When you’re done, be sure to modify the URL for your Slack app and change http:// to https://.
Conclusion
In this tutorial, you implemented a Slack slash command by setting up a Flask app that is served by a uWSGI application server and a Nginx reverse proxy server.
Now that you know the basics of creating slash commands, you can implement any slash command that your team needs. You could create commands that retrieve data from databases, interact with other APIs , or even create commands for deploying code.
Thanks for learning with the DigitalOcean Community. Check out our offerings for compute, storage, networking, and managed databases.
About the author(s)
PhD student in chemical engineering at MIT.
Managed the Write for DOnations program, wrote and edited community articles, and makes things on the Internet. Expertise in DevOps areas including Linux, Ubuntu, Debian, and more.
Still looking for an answer?
 This work is licensed under a Creative Commons Attribution-NonCommercial- ShareAlike 4.0 International License.
Become a contributor for community
Get paid to write technical tutorials and select a tech-focused charity to receive a matching donation.

DigitalOcean Documentation
Full documentation for every DigitalOcean product.

Resources for startups and AI-native businesses
The Wave has everything you need to know about building a business, from raising funding to marketing your product.
The developer cloud
Scale up as you grow — whether you're running one virtual machine or ten thousand.

Start building today
From GPU-powered inference and Kubernetes to managed databases and storage, get everything you need to build, scale, and deploy intelligent applications.
