Not using CentOS 6?
Choose a different version or distribution.
Status: Deprecated
This article covers a version of CentOS that is no longer supported. If you are currently operating a server running CentOS 6, we highly recommend upgrading or migrating to a supported version of CentOS.
Reason: CentOS 6 reached end of life (EOL) on November 30th, 2020 and no longer receives security patches or updates. For this reason, this guide is no longer maintained.
See Instead: This guide might still be useful as a reference, but may not work on other CentOS releases. If available, we strongly recommend using a guide written for the version of CentOS you are using.
The following DigitalOcean tutorial may be of interest, as it outlines installing PostgreSQL on a CentOS 7 server:
Introduction
PostgreSQL, commonly referenced as “postgres”, is a popular database management system that uses the SQL querying language to manipulate data.
In this guide, we will cover how to install and use postgres on a CentOS VPS.
How To Install PostgreSQL
Although CentOS contains postgres packages within its default repositories, we will use the packages available from the postgres project itself.
This will ensure that we have access to the latest version of the software without having to install from source.
Exclude CentOS Postgres Packages
Before we install postgres, we must exclude the CentOS version of postgres in order to get the most recent version from the project’s website.
Open the CentOS repository configuration file in a text editor:
nano /etc/yum.repos.d/CentOS-Base.repo
At the bottom of the [base] section, add a line that excludes the postgres packages:
<pre> [base] name=CentOS-$releasever - Base mirrorlist=http://mirrorlist.centos.org/?release=$releasever&arch=$basearch&repo=os #baseurl=http://mirror.centos.org/centos/$releasever/os/$basearch/ gpgcheck=1 gpgkey=file:///etc/pki/rpm-gpg/RPM-GPG-KEY-CentOS-6 <span class=“highlight”>exclude=postgresql*</span> </pre>
Add the same line to the bottom of the [updates] section to prevent yum from updating postgres from the default repositories:
<pre> [updates] name=CentOS-$releasever - Updates mirrorlist=http://mirrorlist.centos.org/?release=$releasever&arch=$basearch&repo=updates #baseurl=http://mirror.centos.org/centos/$releasever/updates/$basearch/ gpgcheck=1 gpgkey=file:///etc/pki/rpm-gpg/RPM-GPG-KEY-CentOS-6 <span class=“highlight”>exclude=postgresql*</span> </pre>
Add Postgres Repositories
Now, we’ve told yum to not bother with the default repositories for postgres package interactions.
We need to provide it with an alternative now. We will use the packages provided on the postgres project’s website.
Go to the site to find the latest version of postgres available for your CentOS version.
Control-click or right-click on the link that matches the most recent version of postgres and your version of CentOS. Choose “copy link address” or whatever similar option is available.
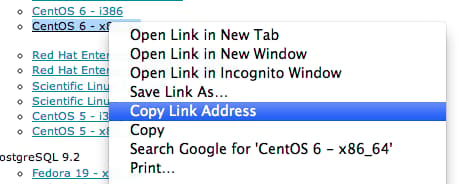
Back in your droplet session, change to your home directory. Type curl -O and then paste the download link:
<pre> cd ~ curl -O <span class=“highlight”>http://yum.postgresql.org/9.3/redhat/rhel-6-x86_64/pgdg-centos93-9.3-1.noarch.rpm</span> </pre>
Install the package you just downloaded by typing the following command:
rpm -ivh pgdg*
This will allow your system to pull the postgres package from the project’s website.
We can do that now to get the latest version. These packages contain version numbering, so you’ll need to search to see what version is being use:
yum list postgres*
Loaded plugins: fastestmirror
Loading mirror speeds from cached hostfile
 * base: mirror.linux.duke.edu
 * extras: mirror.linux.duke.edu
 * updates: mirrors.kernel.org
Installed Packages
postgresql93.x86_64                  9.3.1-1PGDG.rhel6        @pgdg93
postgresql93-libs.x86_64             9.3.1-1PGDG.rhel6        @pgdg93
postgresql93-server.x86_64           9.3.1-1PGDG.rhel6        @pgdg93
Available Packages
postgresql93-contrib.x86_64          9.3.1-1PGDG.rhel6        pgdg93
postgresql93-debuginfo.x86_64        9.3.1-1PGDG.rhel6        pgdg93
We can see that in this case, all of the packages have “93” for version 9.3. We want to download the “-server” packages:
yum install postgresql93-server
Change the “93” to whatever the current version of postgres is for your system throughout the rest of this guide.
Initialize the Database Environment
You can initialize the database environment by typing:
service postgresql-9.3 initdb
We will then configure it to start at boot up and we will start the software:
chkconfig postgresql-9.3 on
service postgresql-9.3 start
We are now ready to start using postgres.
How to Log Into the Postgres Database
By default, postgres creates a user and a database called postgres.
The default security scheme assumes that the postgres user will only be accessible to those who need access. This can be controlled by setting up sudo rules.
We interact with the postgres database software through an interface called psql. It provides a prompt where we can manipulate and query for data.
For now, log into the postgres user like this:
su - postgres
Your prompt will change. You can now connect to the database that matches your username by typing:
psql
Your prompt will change again, this time to indicate that you are interacting with the postgres database.
If you need to exit this interface, you can type this at any time:
\q
Afterwards, to get back to the root user shell, you can type:
exit
Some Helpful psql Commands
Here are a few commands that can help you get an idea of your current environment:
-
?: Get a full list of psql commands, including those not listed here.
-
\h: Get help on SQL commands. You can follow this with a specific command to get help with the syntax.
-
\q: Quit the psql program and exit to the Linux prompt.
-
\d: List available tables, views, and sequences in current database.
-
\du: List available roles
-
\dp: List access privileges
-
\dt: List tables
-
\l: List databases
-
\c: Connect to a different database. Follow this by the database name.
-
\password: Change the password for the username that follows.
-
\conninfo: Get information about the current database and connection.
Create a Postgres Table
We can create tables in postgres by using the following syntax:
<pre> CREATE TABLE <span class=“highlight”>new_table_name</span> ( <span class=“highlight”>table_column_title TYPE_OF_DATA column_constraints</span>, <span class=“highlight”>next_column_title TYPE_OF_DATA column_constraints</span>, <span class=“highlight”>table_constraint</span> <span class=“highlight”>table_constraint</span> ) INHERITS <span class=“highlight”>existing_table_to_inherit_from</span>; </pre>
We will make a table called “popsicles” to store our popsicle varieties and some information about them.
CREATE TABLE popsicles (
    pop_id serial PRIMARY KEY,
    flavor varchar (50) NOT NULL,
    amount int NOT NULL,
    size varchar (10) check (size in ('small', 'normal', 'large'))
);
Now we can use the \dt command to see the table:
\dt
           List of relations
 Schema |   Name    | Type  |  Owner
--------+-----------+-------+----------
 public | popsicles | table | postgres
(1 row)
To see the columns and data structure we just defined, we can type this command:
\d popsicles
                                  Table "public.popsicles"
 Column |         Type          |                         Modifiers

--------+-----------------------+------------------------------------
------------------------
 pop_id | integer               | not null default nextval('popsicles
_pop_id_seq'::regclass)
 flavor | character varying(50) | not null
 amount | integer               | not null
 size   | character varying(10) |
 . . .
Insert Data Into a Postgres Table
We now have a table in our database, but there’s no data in it yet. We can populate it by using the insert command.
We type INSERT INTO followed by the table name. Then, we type a comma-separated list of column names inside a set of parentheses. We then type VALUES, followed by a second set of parentheses containing a comma-separated list of values that correspond to the column names.
Let’s try it now. We will insert some grape popsicles into our table:
INSERT INTO popsicles (flavor, amount, size) VALUES ('grape', 10, 'normal');
INSERT 0 1
The INSERT 0 1 indicates that our command was accepted successfully. Some things to notice about this command is that the words in our value list are inside of single quotes ('), and that the command ends with a semicolon (;). Both of these points are important to remember.
Another thing to notice is that we didn’t set the pop_id column. That is because we defined it as a primary key. This column must have unique values for each entry, so postgres will automatically assign the next available value to each record we create.
Let’s fill in some more data so that we have a more useful table:
INSERT INTO popsicles (flavor, amount, size) VALUES ('orange', 8, 'small');
INSERT INTO popsicles (flavor, amount, size) VALUES ('fudge', 20, 'large');
INSERT INTO popsicles (flavor, amount, size) VALUES ('eclair', 14, 'normal');
INSERT INTO popsicles (flavor, amount, size) VALUES ('rainbow', 4, 'small');
If you recall, when we created the table, we defined the acceptable values for the “size” column. Postgres checks that the value is either “small”, “normal”, or “large”. What happens if we try to provide a different value?:
INSERT INTO popsicles (flavor, amount, size) VALUES ('lime', 6, 'huge');
ERROR:  new row for relation "popsicles" violates check constraint "popsicles_size_check"
DETAIL:  Failing row contains (6, lime, 6, huge).
As you can see, postgres has validated that we have entered the correct data. It has rejected our newest popsicle because it didn’t have one of the values that we defined for size.
Select Data From a Postgres Table
We can query our new table for data by using the select command. The select command returns data from a table that matches the criteria specified.
To return all of the info from our table, we can use the asterisk (*), which is a special symbol that means “match everything”:
SELECT * FROM popsicles;
 pop_id | flavor  | amount |  size
--------+---------+--------+--------
      1 | grape   |     10 | normal
      2 | orange  |      8 | small
      3 | fudge   |     20 | large
      4 | eclair  |     14 | normal
      5 | rainbow |      4 | small
(5 rows)
We can select by column by replacing asterisk with the columns we want:
SELECT flavor, amount FROM popsicles;
 flavor  | amount
---------+--------
 grape   |     10
 orange  |      8
 fudge   |     20
 eclair  |     14
 rainbow |      4
(5 rows)
If we want to filter to only show certain results, we can add a where filter on the end:
SELECT * FROM popsicles WHERE amount <= 10;
 pop_id | flavor  | amount |  size
--------+---------+--------+--------
      1 | grape   |     10 | normal
      2 | orange  |      8 | small
      5 | rainbow |      4 | small
(3 rows)
Conclusion
You should now have postgres installed on your system and have a good handle on its basic usage.
There are many other things to learn when dealing with postgres. You can explore our other articles to learn how to manage tables, how to create queries, how to manage permissions, how to back up postgres, and how to secure postgres.
<div class=“author”>By Justin Ellingwood</div>
Thanks for learning with the DigitalOcean Community. Check out our offerings for compute, storage, networking, and managed databases.
About the author
Former Senior Technical Writer at DigitalOcean, specializing in DevOps topics across multiple Linux distributions, including Ubuntu 18.04, 20.04, 22.04, as well as Debian 10 and 11.
Still looking for an answer?
This textbox defaults to using Markdown to format your answer.
You can type !ref in this text area to quickly search our full set of tutorials, documentation & marketplace offerings and insert the link!
Hi, Im getting stuck in this sentence
service postgresql-9.3 initdb
I got this
The service command supports only basic LSB actions (start, stop, restart, try-restart, reload, force-reload, status). For other actions, please try to use systemctl.
Do you have any idea?
Thanks
Pablo
This tutorial doesn’t work. It fails on service postgresql-9.3 initdb
Please update it…
While installing on CentOS 7, to initialize the database I had to specify path like this:
/usr/pgsql-9.3/bin/postgresql93-setup initdb
Followed by starting database and enabling it on boot up like this:
systemctl start postgresql-9.3.service
systemctl enable postgresql-9.3.service
Hello, thx. This works perfectly in Centos 6.5
Only have to change “su - postgres” for “sudo su - postgres”.
 This work is licensed under a Creative Commons Attribution-NonCommercial- ShareAlike 4.0 International License.
Become a contributor for community
Get paid to write technical tutorials and select a tech-focused charity to receive a matching donation.

DigitalOcean Documentation
Full documentation for every DigitalOcean product.

Resources for startups and AI-native businesses
The Wave has everything you need to know about building a business, from raising funding to marketing your product.
The developer cloud
Scale up as you grow — whether you're running one virtual machine or ten thousand.

Start building today
From GPU-powered inference and Kubernetes to managed databases and storage, get everything you need to build, scale, and deploy intelligent applications.
