By Mohd Amree Zaid
")
Introduction
Ruby on Rails is an open source web framework based on Ruby. It has been a popular choice among startups since it’s easier to build and ship the application. To start using Ruby on Rails, you need to have Ruby installed. However, due to the way Debian packaging system works, you’ll mostly end up with an old version of Ruby. So, this guide will show you a safe way for you to use the latest version of Ruby and Ruby on Rails.
Install rbenv
We need to install some packages so that Debian won’t complain about missing files or libraries. We’ll use Debian packaging system for that.
First we need to sure we have all the latest packages that can be installed:
sudo apt-get update
Next, we’ll install git package so that we can use git commands:
sudo apt-get install git-core
rbenv doesn’t provide any installer, so we have to get use the source from Github. So, we need to clone it in our home directory.
git clone https://github.com/sstephenson/rbenv.git ~/.rbenv
PATH is a variable used by Debian to search for executables whenever you run a command. So, we have to append path to rbenv executables in it. We have to do this every time we login as our user. So, we’ll use bashrc that will be run every time we login as a user:
echo 'export PATH="$HOME/.rbenv/bin:$PATH"' >> ~/.bashrc
Add another command in our bashrc for shims[1] and auto completion for rbenv:
echo 'eval "$(rbenv init -)"' >> ~/.bashrc
Restart your shell (opening a new terminal tab should suffice). To check if everything is working, run:
type rbenv
You should get an output like this:
rbenv is a function
That’s it. You’ve just successfully installed rbenv. But we’re not done yet. To simplify ruby installation, we need to install ruby-build which is one of the rbenv plugins, by cloning it from Github:
git clone https://github.com/sstephenson/ruby-build.git ~/.rbenv/plugins/ruby-build
Due to the way shims work, we need to run rbenv rehash every time we install or uninstall gem. To prevent it, we can use another rbenv plugin which will automatically do it for us. As usual, we’ll clone it for installation
git clone https://github.com/sstephenson/rbenv-gem-rehash.git ~/.rbenv/plugins/rbenv-gem-rehash
Install ruby
Alright, everything is done for our rbenv installation. Next, we will install a ruby. But before that, we need to install some required packages to ensure smooth installation.
apt-get install build-essential libssl-dev libcurl4-openssl-dev libreadline-dev -y
In order to list all available Ruby versions for you to choose, we can use:
rbenv install --list
I’ll just use version 2.1.0 for this guide. To install it, just run this command:
rbenv install 2.1.0 -k
-k will keep Ruby’s source. It will help building other gems in the future.
Right now, we need to set which version we want to use every time we run ruby command. Make sure you will remove any directory in your ~/.rbenv/sources if you encounter any problems for this command.
To set it for global usage, just run:
rbenv global 2.1.0
That’s it, now you have ruby 2.1.0 installed. You can verify it by running:
ruby -v
You should get something like this (depends on your version):
ruby 2.1.0p0 (2013-12-25 revision 44422) [x86_64-linux]
Ruby on Rails Installation
Ruby on Rails (RoR) provides a command for your initial application creation. The command will setup your directories, gem dependencies and so on. Before running it, we need to ensure every required packages are installed.
By default, RoR will use sqlite as its database. In order to use it without any error, we need sqlite packages for Debian:
sudo apt-get install sqlite3 libsqlite3-dev
RoR will also requires JavaScript runtime[2]. There are multiple ways to do this, but we’ll use nodejs from Debian Backports[3] to install it.
To use it, we need to add Debian Backports repositories:
Open the file where your Debian repositories are defined:
sudo nano /etc/apt/sources.list
Append these lines into the file:
deb http://ftp.us.debian.org/debian/ wheezy-backports main
deb-src http://ftp.us.debian.org/debian/ wheezy-backports main
As usual, run this command to make sure you’ll get all of the packages list:
sudo apt-get update
To install nodejs, just run this command:
sudo apt-get -t wheezy-backports install nodejs
Go ahead and install Ruby on Rails with this command:
gem install rails
Out First Ruby on Rails Application
We’re now ready to create our first RoR application. Run this command to create it (you can change mynewapplication to anything you want):
rails new mynewapplication
It will automatically install required gems. After it’s finished, go into its directory:
cd mynewapplication
Run this command to start your application
rails s
Fire up your browser and go to this address:
http://your_ip_or_domain:3000
You should be seeing a Welcome aboard page. Click “About your application’s environment” and you should see something like below.
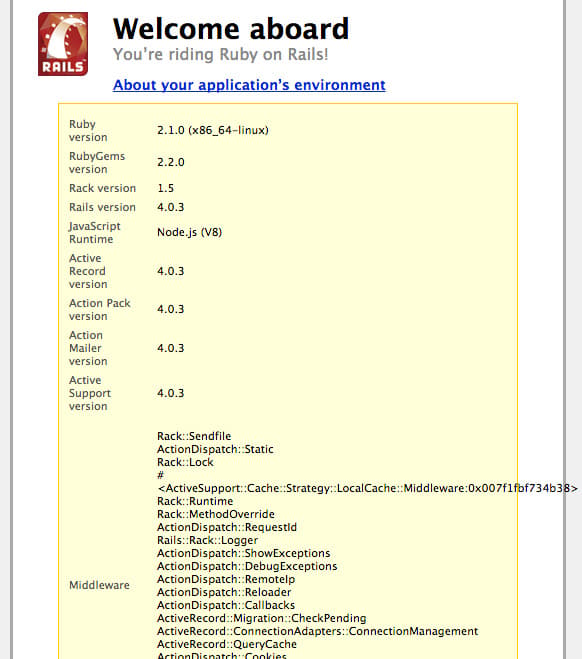
Congratulations! You’ve successfully installed and created your first RoR application.
[1]
https://assets.digitalocean.com/articles/Debian_Ruby_rbenv/WelcomeAboard.jpg
[2]
https://github.com/sstephenson/execjs#readme
[3]
Thanks for learning with the DigitalOcean Community. Check out our offerings for compute, storage, networking, and managed databases.
About the author
Still looking for an answer?
This textbox defaults to using Markdown to format your answer.
You can type !ref in this text area to quickly search our full set of tutorials, documentation & marketplace offerings and insert the link!
After I typed
rbenv install 2.1.0 -k
I got
rbenv-hooks: command not found
To the two posters above the problem is a missing install plugin which the poster seems to have forgotten to mention. You can install the plugin in fix your problems with:
git clone https://github.com/sstephenson/ruby-build.git ~/.rbenv/plugins/ruby-build
git clone https://github.com/sstephenson/ruby-build.git ~/.rbenv/plugins/ruby-build
Original author here. Instruction for installing ruby-build as rbenv plugin is already in the article. Maybe you guys missed it?
I have followed this tuto to the letter and cant get the final page as described here. Although I have Ruby server running and listening to port 3000 as far as I see:
root@k2b:~/mynewapplication# rails s
=> Booting WEBrick
=> Rails 4.2.0 application starting in development on http://localhost:3000
=> Run rails server -h for more startup options
=> Ctrl-C to shutdown server
[2015-03-11 13:18:32] INFO WEBrick 1.3.1
[2015-03-11 13:18:32] INFO ruby 2.3.0 (2015-03-11) [x86_64-linux]
[2015-03-11 13:18:32] INFO WEBrick::HTTPServer#start: pid=3758 port=3000
Any hint what is going wrong?
Hi!
I see this is some time ago this article was written but when i try to run “apt-get install build-essential libssl-dev libcurl4-openssl-dev libreadline-dev -y”
I get: Err http://ftp.se.debian.org/debian/ jessie/main cpp-4.9 amd64 4.9.2-10 403 Forbidden Err http://ftp.se.debian.org/debian/ jessie/main gcc-4.9 amd64 4.9.2-10 403 Forbidden Err http://ftp.se.debian.org/debian/ jessie/main g+±4.9 amd64 4.9.2-10 403 Forbidden Unable to correct missing packages.
Any idea what is wrong?
Guys, I LOVE your step by step tutorials! Many thanks for this one, it saved me a lots of time!
 This work is licensed under a Creative Commons Attribution-NonCommercial- ShareAlike 4.0 International License.
Become a contributor for community
Get paid to write technical tutorials and select a tech-focused charity to receive a matching donation.

DigitalOcean Documentation
Full documentation for every DigitalOcean product.

Resources for startups and AI-native businesses
The Wave has everything you need to know about building a business, from raising funding to marketing your product.
The developer cloud
Scale up as you grow — whether you're running one virtual machine or ten thousand.

Start building today
From GPU-powered inference and Kubernetes to managed databases and storage, get everything you need to build, scale, and deploy intelligent applications.
