By Bulat Khamitov

MongoDB is a NoSQL database with great features like replication and sharding built in. This allows you to scale your database to as many servers as you would like by distributing content among them.
Before anything MongoDB related is installed, we need to ensure our hardware is correctly chosen and software is fine tuned.
1. Hard Drives
If you have a choice of selecting which hard drives you will have, go with enterprise grade dual SSD drives in RAID1. As we have covered before, they are great on performance and actually save you money.
Edit your /etc/fstab file in Linux and make sure to disable access time logging on your mount that will be used with MongoDB. Add noatime in 4th column:

Re-mount the partition:
[root@mongodb1 ~]# mount -o remount /
Verify that the new settings took effect:
[root@mongodb1 ~]# mount
/dev/sda on / type ext4 (rw,noatime)
2. CPU and Memory
Setting MongoDB as a VM on a hypervisor would let you scale up RAM and CPU cores later on. Amount of CPU cores and RAM that should be assigned depends on your infrastructure needs and budget.
3. Optimization
The most useful tip is to optimize your database queries:
- Add indexes for commonly searched or sorted queries.
- Use MongoDB’s explain() command.
- Limit search results and limit fields that are being returned.
For testing purposes, we’ll spin up 3 droplets:

Installation
This procedure will be the same on mongodb1, mongodb2, and mongodb3. Installing MongoDB on CentOS is very simple. Add the following repository by editing
/etc/yum.repos.d/10gen.repo
[10gen]
name=10gen
baseurl=http://downloads-distro.mongodb.org/repo/redhat/os/x86_64
gpgcheck=0
enabled=1
Now install the packages:
[root@mongodb1 ~]# yum -y install mongo-10gen mongo-10gen-server
Enable MongoDB to start on reboot, and start the service:
[root@mongodb1 ~]# chkconfig mongod on && service mongod start
Starting mongod: forked process: 1387
all output going to: /var/log/mongo/mongod.log
child process started successfully, parent exiting
                                                           [  OK  ]
Now you should be able to see statistics on http://SERVER:28017/
Setting up Master-Slave replica set
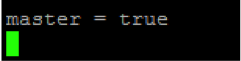
We’ll assign mongodb1 as a master server. Add “master = true” to /etc/mongod.conf and do
service mongod restart
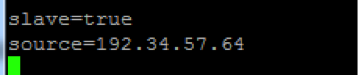
While mongodb2 and mongodb3 will be setup as slaves. Add “slave=true”, “source = mongodb1” to /etc/mongod.conf and do
service mongod restart
Now we should secure this database with a password or add iptables rules to ports 27017 (MongoDB) and 28017 (Web interface).
To create a user with password:
> use test
> db.addUser('admin', 'password');
{
        "user" : "admin",
        "readOnly" : false,
        "pwd" : "90f500568434c37b61c8c1ce05fdf3ae",
        "_id" : ObjectId("50eaae88790af41ffffdcc58")
}
We should also add firewall rules to restrict to other MongoDB servers, our IP, and save:
[root@mongodb1 ~]# iptables -N MongoDB
[root@mongodb1 ~]# iptables -I INPUT -s 0/0 -p tcp --dport 27017 -j MongoDB
[root@mongodb1 ~]# iptables -I INPUT -s 0/0 -p tcp --dport 28017 -j MongoDB
[root@mongodb1 ~]# iptables -I MongoDB -s 127.0.0.1 -j ACCEPT
[root@mongodb1 ~]# iptables -I MongoDB -s 192.34.57.64 -j ACCEPT
[root@mongodb1 ~]# iptables -I MongoDB -s 192.34.56.123 -j ACCEPT
[root@mongodb1 ~]# iptables -I MongoDB -s 192.34.57.162 -j ACCEPT
[root@mongodb1 ~]# iptables -A MongoDB -s 0/0 -j DROP
[root@mongodb1 ~]# /etc/init.d/iptables save
iptables: Saving firewall rules to /etc/sysconfig/iptables:[ OK ]
Repeat this procedure on your other MongoDB servers (mongodb2, mongodb3).
If you are using PHP for your frontend, you would need to install MongoDB module for PHP:
[root@webserver ~]# pecl install mongo
[root@webserver ~]# echo extension=mongo.so >> `php -i | grep /php.ini | awk '{print $5}'`
[root@webserver ~]# service httpd restart
Populate your database with data
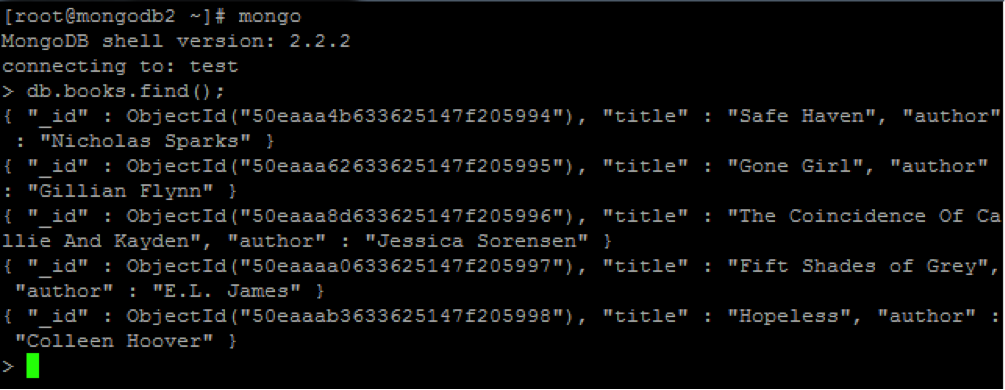
Now we can begin testing our new setup. You can access the database from command shell by typing mongo :
[root@mongodb1 ~]# mongo
MongoDB shell version: 2.2.2
connecting to: test
Lets enter New York Times Bestsellers list into the database for testing:
> db.books.save( { title: 'Safe Haven', author: 'Nicholas Sparks' } )
> db.books.save( { title: 'Gone Girl', author: 'Gillian Flynn' } )
> db.books.save( { title: 'The Coincidence Of Callie And Kayden', author: 'Jessica Sorensen' } )
> db.books.save( { title: 'Fifty Shades of Grey', author: 'E.L. James' } )
> db.books.save( { title: 'Hopeless', author: 'Colleen Hoover' } )
To display all results:
> db.books.find()
{ "_id" : ObjectId("50eaaa4b633625147f205994"), "title" : "Safe Haven", "author" : "Nicholas Sparks" }
{ "_id" : ObjectId("50eaaa62633625147f205995"), "title" : "Gone Girl", "author" : "Gillian Flynn" }
{ "_id" : ObjectId("50eaaa8d633625147f205996"), "title" : "The Coincidence Of Callie And Kayden", "author" : "Jessica Sorensen" }
{ "_id" : ObjectId("50eaaaa0633625147f205997"), "title" : "Fifty Shades of Grey", "author" : "E.L. James" }
{ "_id" : ObjectId("50eaaab3633625147f205998"), "title" : "Hopeless", "author" : "Colleen Hoover" }
You should be able to see the same entries on mongodb2 and mongodb3 since they are a replica sets:

You could’ve entered all kinds of values for these books, such as publisher’s name, ISBN number, average customer rating, written language, and so on. In order to optimize your queries, however, it is best to limit number of results, and number of fields being returned.
For example, to return only 2 results we would use limit() at the end:
> db.books.find( {}, { title : 1 , author: 1 } ).sort( { timestamp : -1 } ).limit(2)
{ "_id" : ObjectId("50eaaa4b633625147f205994"), "title" : "Safe Haven", "author" : "Nicholas Sparks" }
{ "_id" : ObjectId("50eaaa62633625147f205995"), "title" : "Gone Girl", "author" : "Gillian Flynn" }
Once you have reached maximum capacity for your current setup, you can begin sharding your database. We will cover this in a future post.
Thanks for learning with the DigitalOcean Community. Check out our offerings for compute, storage, networking, and managed databases.
About the author
Still looking for an answer?
This textbox defaults to using Markdown to format your answer.
You can type !ref in this text area to quickly search our full set of tutorials, documentation & marketplace offerings and insert the link!
I am going to publish my website soon, I am waiting for sharding post :), thank you by the way, this post is great, so after this if mongodb1 fails, mongodb2 and mongodb3 takes the traffic right ?
Good topic! But when will be continue about sharding? I am awaiting it And link below can be useful: http://stackoverflow.com/questions/8552187/mongodb-sharding-example
I have a problem when start mongod service:
service mongod start
output:
Starting mongod: /usr/bin/dirname: extra operand «2>&1.pid»
Pruebe `/usr/bin/dirname --help’ para más información. [FALLÓ]
Its in Centos 6.6 and mongo 2.6.5-1
Thank you for your help. Regards.
Nice & detailed explanation.
You can find http://dbversity.com/mongodb-as-pure-in-memory/ for MongoDB as Pure in-memory. http://dbversity.com/mongodb-shard-creation-script/ for Auto Shard creation script. http://dbversity.com/tag-aware/ MongoDB Tag aware sharding
It’s very annoying finding such out of date articles like this one. Waste of my time.
 This work is licensed under a Creative Commons Attribution-NonCommercial- ShareAlike 4.0 International License.
Become a contributor for community
Get paid to write technical tutorials and select a tech-focused charity to receive a matching donation.

DigitalOcean Documentation
Full documentation for every DigitalOcean product.

Resources for startups and AI-native businesses
The Wave has everything you need to know about building a business, from raising funding to marketing your product.
The developer cloud
Scale up as you grow — whether you're running one virtual machine or ten thousand.

Start building today
From GPU-powered inference and Kubernetes to managed databases and storage, get everything you need to build, scale, and deploy intelligent applications.
