
Overview
DigitalOcean provides a platform to easily deploy virtual machines called Droplets. You can spin up any number of machines with a variety of operating systems, and get going much more quickly than on other platforms like AWS or Azure. They also have a Marketplace of 1-click apps which make setup even easier.
Droplets and Apps are deployed into Regions, each of which has its own private network. This is great, because it allows Droplets to communicate over a secure network when you have an application that spans multiple machines.
However, sometimes your applications may span regions. In this case, your Droplets need to communicate across these different networks. This article shows how you can bridge DigitalOcean regions with an overlay private network using Netmaker.
The result is a virtual network that spans your droplets worldwide and acts as a sort of “super VPC.” Every machine can access every other machine securely, regardless of region, and it stays secure thanks to Netmaker’s virtual mesh network.
Prerequisites
- A DigitalOcean account. Sign up for free if you don’t already have one.
- Create a Netmaker account by logging into https://dashboard.license.netmaker.io. You will need this for a free Netmaker license.
- [Recommended] Prepare a dedicated subdomain for Netmaker, such as “nm.yourcompany.com.” We will use a wildcard from this subdomain for Netmaker.
Initial Setup
- Visit https://marketplace.digitalocean.com/apps/netmaker
- Create a Netmaker Droplet
- Recommended Settings: if desired, Netmaker can run with 1GB RAM, but we recommend 2GB or larger for production
- Setup DNS: point the wildcard domain from the prerequisites (e.g. *.nm.yourdomain.com) to the IP of the 1-Click Droplet.
- Log into your Netmaker Droplet
- Upon login, you will be prompted with a series of steps to install Netmaker. You can use either Community or Enterprise, but we recommend Enterprise, since it has extra features and a generous free tier.
- Once everything looks right and you’ve hit confirm, the install script will run. This will take about 5 minutes.
- Log into the Netmaker dashboard at http://dashboard.yourdomain.com and create a username and password for the Netmaker server.
Set Up Client Droplets
Netmaker requires the “netclient” to run on machines in order to set up the private networks. On each machine in DigitalOcean which you wish to make a part of the mesh, do the following:
-
Use the steps for installing Netclient. For instance, on Debian distros:
curl -sL 'https://apt.netmaker.org/gpg.key' | sudo tee /etc/apt/trusted.gpg.d/netclient.asc curl -sL 'https://apt.netmaker.org/debian.deb.txt' | sudo tee /etc/apt/sources.list.d/netclient.list sudo apt update sudo apt -y install netclient -
Next, join the network. In Netmaker, go to the “Access Keys” section, click on the access key, and copy the “Join” command. It should look like this:
netclient join -t anvkr48twsigahkguashleawjieg
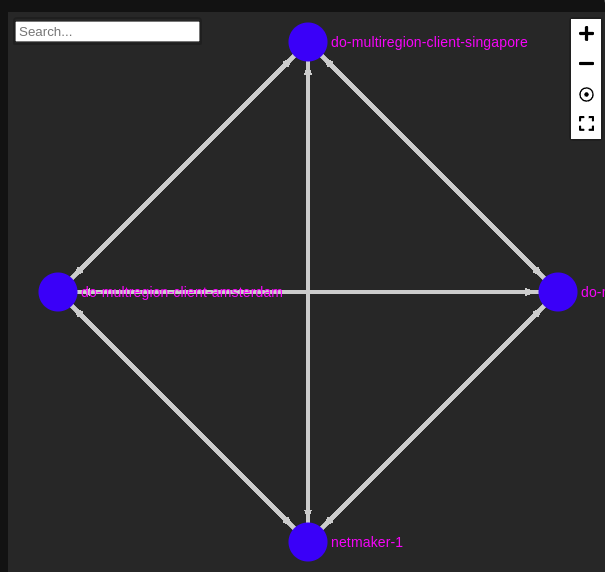
After completing these steps on all your machine you will see a mesh network, somewhat like this in the Graphs section on the left-hand menu:
Private DNS
Netmaker provides Private DNS for machines in Netmaker networks.
- Click DNS in the left-hand menu
- Note the current setup. It should something like the screenshot below:
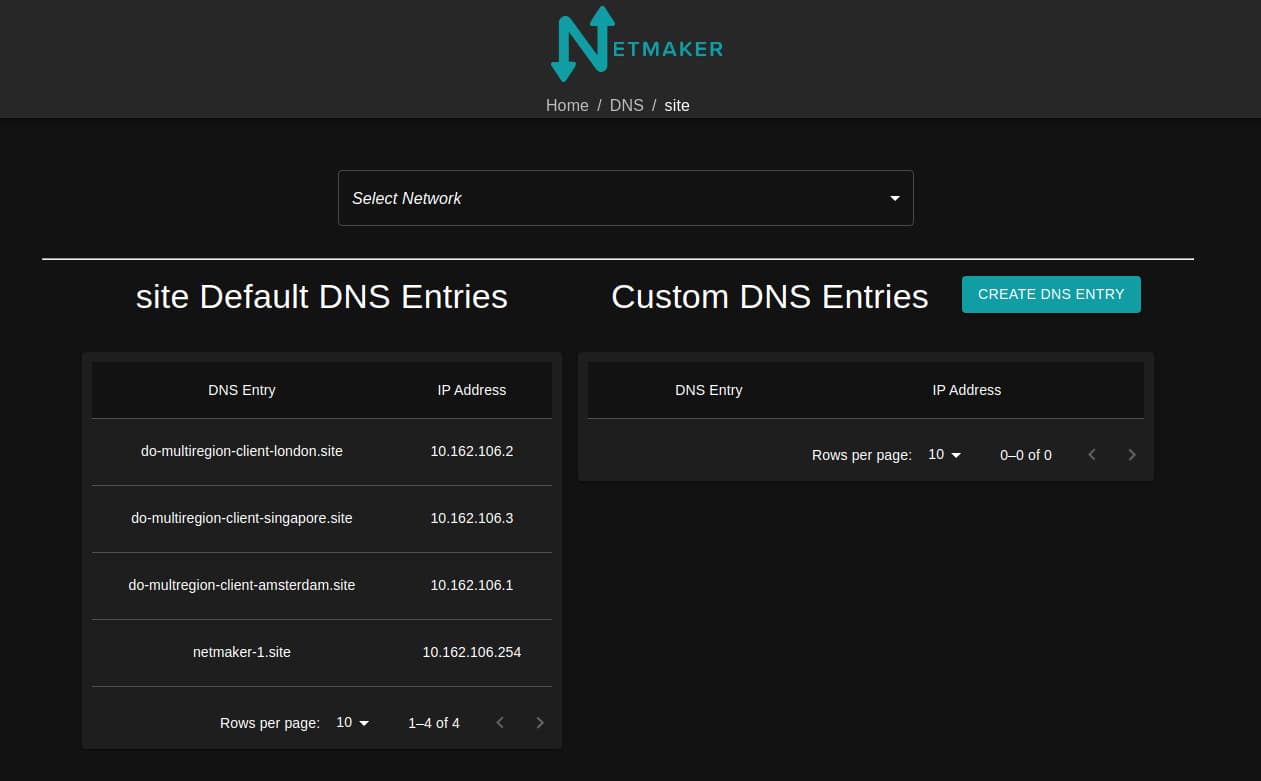
- If you’d like, add some custom DNS entries for your Droplets.
Test the Network
-
Have each droplet ping each other droplet by private IP address. If you need the IP address for a droplet, you can visit the Graph or Node section of the UI and view its private IP address. You can also get this from a Netclient by running the following:
sudo netclient list | jq -
Try pinging by using the private DNS 3. Assuming everything is reachable, your private network is now complete.
Conclusion
You’ve successfully set up a multi-region network with Netmaker! This network can now act as a foundation for cross-region traffic. There are many more advanced features of Netmaker that can enhance this network, which we’ll go over in future articles.
Thanks for learning with the DigitalOcean Community. Check out our offerings for compute, storage, networking, and managed databases.
About the author
Still looking for an answer?
This textbox defaults to using Markdown to format your answer.
You can type !ref in this text area to quickly search our full set of tutorials, documentation & marketplace offerings and insert the link!
 This work is licensed under a Creative Commons Attribution-NonCommercial- ShareAlike 4.0 International License.
Become a contributor for community
Get paid to write technical tutorials and select a tech-focused charity to receive a matching donation.

DigitalOcean Documentation
Full documentation for every DigitalOcean product.

Resources for startups and AI-native businesses
The Wave has everything you need to know about building a business, from raising funding to marketing your product.
The developer cloud
Scale up as you grow — whether you're running one virtual machine or ten thousand.

Start building today
From GPU-powered inference and Kubernetes to managed databases and storage, get everything you need to build, scale, and deploy intelligent applications.
