
In this tutorial, we’ll learn how to create a Button in Android apps using Kotlin programming.
Android Button Overview
Android Button class extends TextView. Button is a UI widget that is used to get click interactions from the user to trigger an action in the application. A button can be created in the XML layout as well as the Kotlin Activity class in the Android Studio Project.
Creating a Button in XML Layout
<Button
android:id="@+id/button"
android:layout_width="wrap_content"
android:layout_height="wrap_content"
android:text="Androidly Button"/>
- android:id is used to set the unique identifier on the Button.
- The
android:textis used to set the text inside the button. By default text is displayed in capital letters. android:onClickis used to define the Kotlin function to be invoked in the activity when the button is clicked. It is a click listener.- The
android:backgroundis used to set the background color/drawable on the Button.
Tip: To prevent displaying all letters in captial, use the attribute android:textAllCaps="false"
For more details on how to customize your Buttons in XML Layout refer to the Android Buttons Tutorial.
Button Click Listeners
We can set button listeners programmatically too. Following are the two major listeners:
setOnClickListener- triggers when a button is clicked.setOnLongClickListner- triggers when a button is pressed for a longer duration.
Following code snippets has the setOnClickListener set over a button.
button.setOnClickListener(object : View.OnClickListener {
            override fun onClick(v: View?) {
                //your implementation goes here
            }
        })
The above code can be converted in a lambda expression to make it short.
button.setOnClickListener {
      textView.text = "Androidly Buttons"
    }
Similarly, a setOnLongClickListener can be defined in the following manner.
button.setOnLongClickListener {
        textView.text = "Androidly Button Long click"
        true
    }

//or
button.setOnLongClickListener {
        textView.text = "Androidly Button Long click"
        false
    }
In the above code, the last statement in each of the expressions is the return statement.
- If the setOnLongClickListener returns true, it means that the setOnClickListener won’t be triggered.
- If the setOnLongClickListener returns false, it means that the setOnClickListener will be triggered.
This is known as consuming events. The first case consumes the event.
Android Button using Kotlin
We’ll be developing an application that increments the counter of the TextView on a Button click. We will use Kotlin to create the button. We’ll also learn about the different Button click handlers.
1. Project Structure
Create a new Android Studio Project. Ensure that in the initial setup, you enable Kotlin Support. Once you’re done, following is the Project Structure that you shall see. 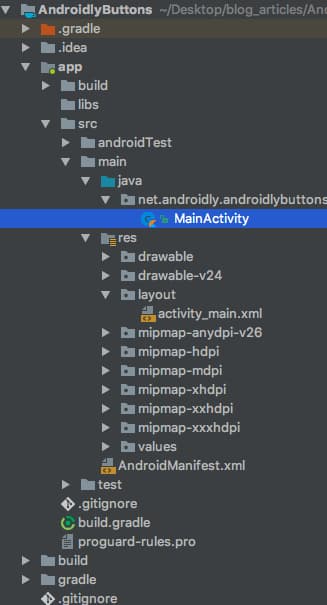
2. Kotlin Button Code
The activity_main.layout file looks like the following code.
<?xml version="1.0" encoding="utf-8"?>
<LinearLayout xmlns:android="http://schemas.android.com/apk/res/android"
    android:id="@+id/linearLayout"
    android:layout_width="match_parent"
    android:layout_height="match_parent"
    android:gravity="center"
    android:orientation="vertical">

    <TextView
        android:id="@+id/txtCounter"
        android:layout_width="wrap_content"
        android:layout_height="wrap_content"
        android:text="@string/number_zero"
        android:textAppearance="@style/TextAppearance.AppCompat.Display2"
        android:textColor="#000" />


    <Button
        android:id="@+id/btnIncrementByOne"
        android:layout_width="wrap_content"
        android:layout_height="wrap_content"
        android:onClick="addOne"
        android:text="@string/increment_by_one" />

</LinearLayout>
We’ve used LinearLayout that holds the views linearly (horizontally or vertically). It’s recommended to set the strings in the strings.xml file instead of hardcoding them. To fetch a string resource we use @string/name_of_string. 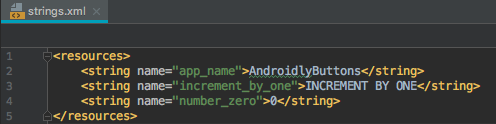 The function
 addOne(view: View) is defined in the MainActivity.kt Kotlin class. The code for the MainActivity.kt class is given below.
package net.androidly.androidlybuttons

import android.support.v7.app.AppCompatActivity
import android.os.Bundle
import android.support.v4.content.ContextCompat
import android.view.View
import android.view.ViewGroup
import android.widget.Button
import android.widget.LinearLayout
import kotlinx.android.synthetic.main.activity_main.*

class MainActivity : AppCompatActivity(), View.OnClickListener {

    override fun onCreate(savedInstanceState: Bundle?) {
        super.onCreate(savedInstanceState)
        setContentView(R.layout.activity_main)

        var androidlyButton = Button(this)
        androidlyButton.apply {
            layoutParams = LinearLayout.LayoutParams(LinearLayout.LayoutParams.MATCH_PARENT, ViewGroup.LayoutParams.WRAP_CONTENT)
            text = "Double the value"
            setAllCaps(false)
            textSize = 20f
            id = R.id.btnDouble
        }

        androidlyButton.setOnClickListener(this)
        linearLayout.addView(androidlyButton)

        androidlyButton = Button(this)
        androidlyButton.apply {
            layoutParams = LinearLayout.LayoutParams(LinearLayout.LayoutParams.WRAP_CONTENT, ViewGroup.LayoutParams.WRAP_CONTENT)
            text = "RESET"
            textSize = 20f
            setTextColor(ContextCompat.getColor(this@MainActivity, R.color.colorPrimaryDark))
            id = R.id.btnReset
            setOnLongClickListener {
                txtCounter.text = 0.toString()
                true
            }
        }
        androidlyButton.setOnClickListener(this)
        linearLayout.addView(androidlyButton)

    }

    override fun onClick(v: View?) {
        when (v?.id) {
            R.id.btnDouble -> {
                txtCounter.text = (txtCounter.text.toString().toInt() * 2).toString()
            }
            R.id.btnReset -> {
                txtCounter.text = (-100).toString()
            }
            else -> {
            }
        }
    }

    fun addOne(view: View) {
        txtCounter.text = (txtCounter.text.toString().toInt() + 1).toString()
    }
}
Important Points:
-
import kotlinx.android.synthetic.main.activity_main.*statement automatically gets the view IDs from the xml in our class. Hence saving us from using findViewById. -
The
fun addOne(view: View)is triggered when thebtnIncrementByOneis clicked. The(view: View)parameter must be defined in the function declaration. -
Create a Button programmatically and set it in the parent view(LinearLayout here) using the following code.
var androidlyButton = Button(this) linearLayout.addView(androidlyButton) -
Instead of calling member functions on the Button class, we can use
apply{}lambda expression. -
The
layoutParamsis used to define the width and height of the button. TheMATCH_PARENTsets the width/height equal to the linear layout.WRAP_CONTENTwraps the view to the size of the content. -
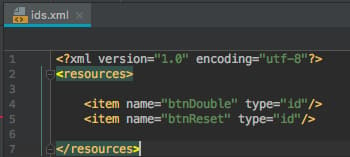
We can set the id programmatically under res | values | ids.xml.
-
We’ve defined the
View.OnClickListenerinterface in ourMainActivity.ktclass. Hence we need to override its onClick() function. -
Inside the
onClickfunction, we use the Kotlin when statement, which is equivalent to switch in other languages. -
For the
onClickfunction to be triggered, you must register thesetOnClickListenerover the button with the interface using the context(this).
Output: 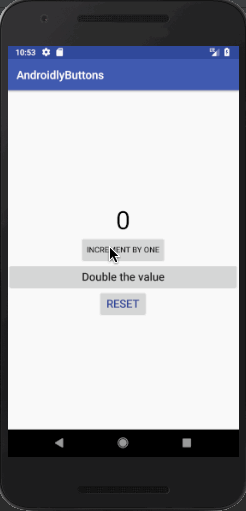
Download Project: AndroidlyButtons
Thanks for learning with the DigitalOcean Community. Check out our offerings for compute, storage, networking, and managed databases.
About the author
Still looking for an answer?
 This work is licensed under a Creative Commons Attribution-NonCommercial- ShareAlike 4.0 International License.
Become a contributor for community
Get paid to write technical tutorials and select a tech-focused charity to receive a matching donation.

DigitalOcean Documentation
Full documentation for every DigitalOcean product.

Resources for startups and AI-native businesses
The Wave has everything you need to know about building a business, from raising funding to marketing your product.
The developer cloud
Scale up as you grow — whether you're running one virtual machine or ten thousand.

Start building today
From GPU-powered inference and Kubernetes to managed databases and storage, get everything you need to build, scale, and deploy intelligent applications.
