- Log in to:
- Community
- DigitalOcean
- Sign up for:
- Community
- DigitalOcean
Senior Solutions Architect

Introduction
In today’s fast-paced development landscape, automating every possible step is key. This tutorial demonstrates how to harness the power of AI agents, specifically through the Claude Code CLI, to automate the entire application development lifecycle. By setting up MCP servers for GitHub, DigitalOcean App Platform, and DigitalOcean Managed PostgreSQL, your AI assistant can understand complex instructions and interact with real-world services to build and deploy a production-ready application.
In this tutorial, you’ll witness something extraordinary: An AI agent that takes natural language prompts and transforms it into a fully functional, production-ready task management application deployed on DigitalOcean App Platform.
No coding. No infrastructure scripting. Just conversation.
What You’ll Walk Away With
By the end of this tutorial, you’ll have:
- A production-ready task management app deployed on DigitalOcean
- Complete GitHub repo with proper branching and PR workflow
- Automated CI/CD pipeline
- Real-world experience with agentic development
Why This Matters
What if you could describe an app in plain English and watch it get built, tested, and deployed automatically?
That’s exactly what you’ll experience here. Instead of manually scripting and configuring infrastructure, you simply describe what you want — and the AI builds and deploys it for you using real tools like GitHub and DigitalOcean. No glue scripts. No hand-holding.
Now you can build a full, production-ready app on DigitalOcean App Platform using just simple natural language prompts in Claude Code, hooked up to MCP Servers.
🌐 Live Application Link: task-manager-app-production
📁 GitHub Repo for the Application created by Claude Code:digitalocean-labs/task-manager-app-autodev
MCP integrates flexibly with Anthropic, and an important part of the development process is refining prompts to guide the model effectively. Think of this as an opportunity to experiment, iterate, and shape the outputs so they align with your application’s goals.
Prerequisites
To follow this tutorial, you will need the following accounts and software installed:
Accounts and Tokens You’ll Need
- DigitalOcean Account
- An active DigitalOcean account.
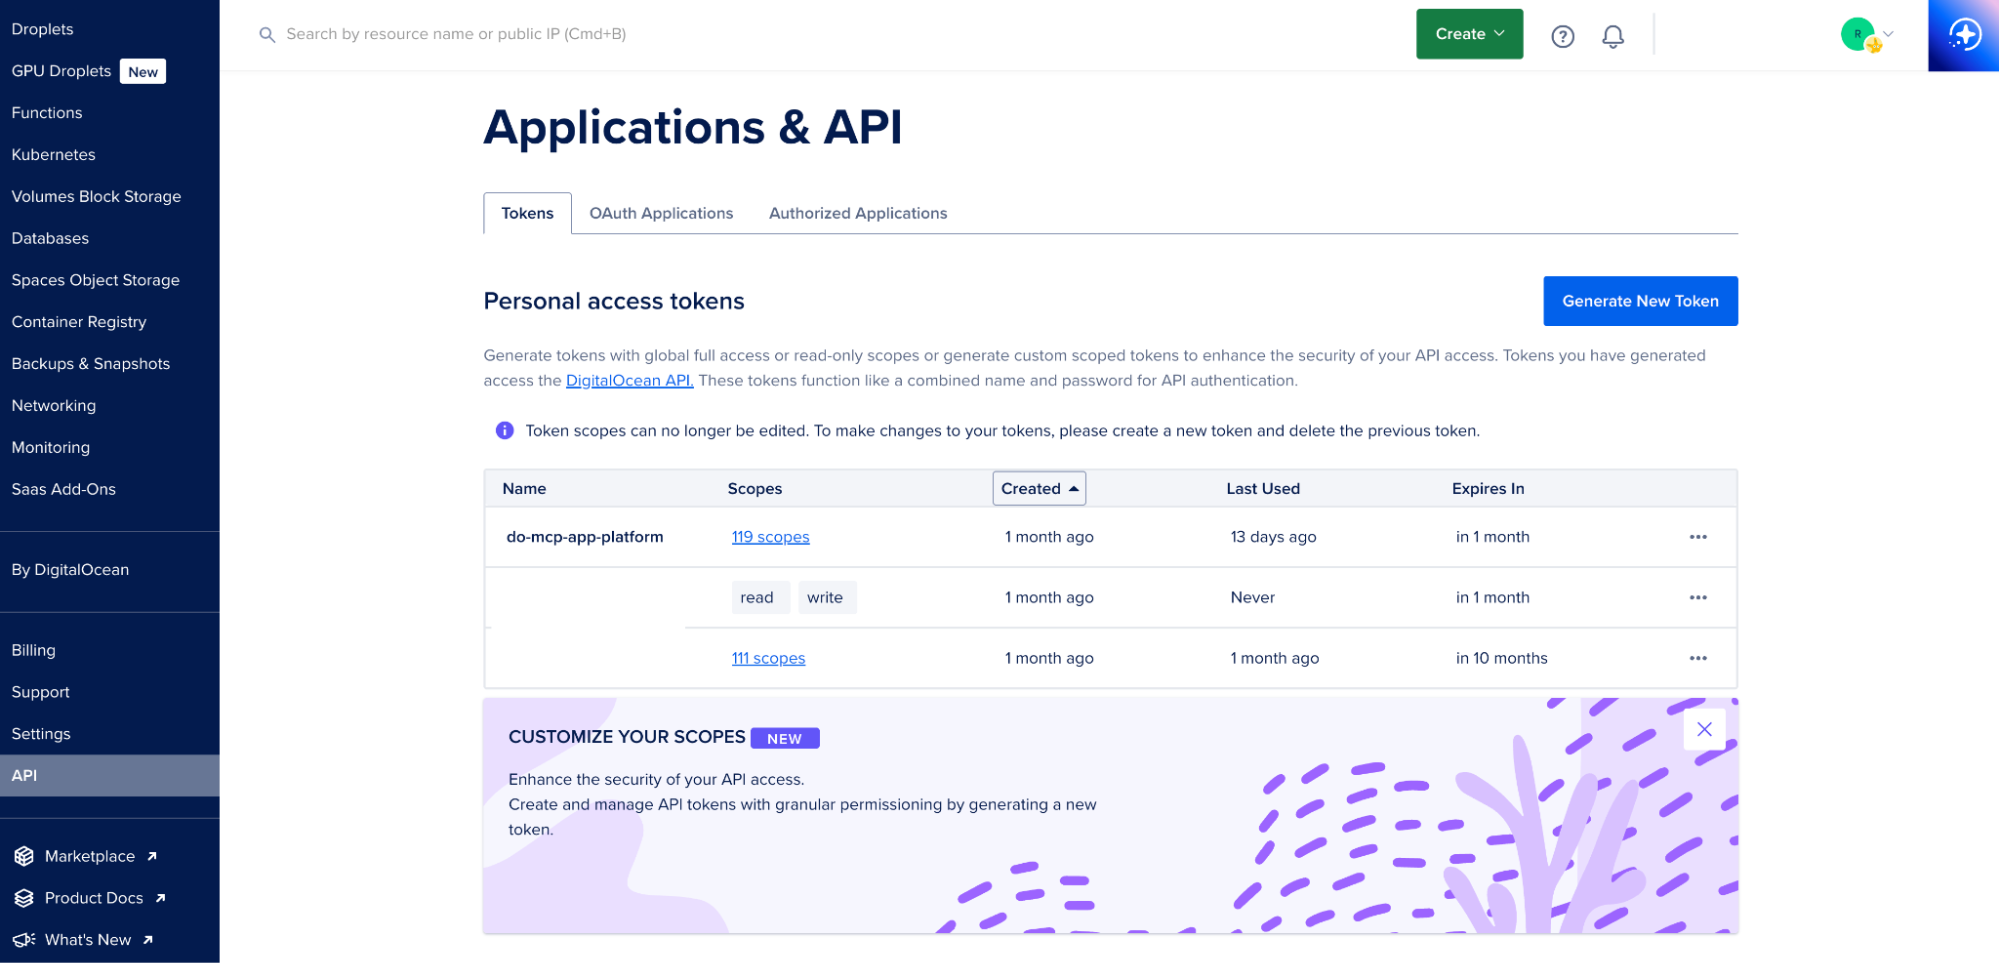
- A DigitalOcean Personal Access Token (PAT) with App Platform read/write scopes (Control Panel -> API -> Personal access tokens).
- GitHub Account
- An active GitHub account.
- A GitHub Personal Access Token (PAT) with repo (full control of private repositories) and workflow (access workflow runs) scopes (GitHub -> Settings -> Developer settings -> Personal access tokens).
- Anthropic Account
- Active Anthropic account with API access
- API Key for Claude Code CLI (Console → API Keys → Create Key)
Info: The Claude Pro subscription provides a 5 hour window with a token limit usage to Claude Code. Expect interruptions in the prompt context after the 5 hour limit. So provide previous context history to Claude Code for better results.
Software Requirements
- Node.js & npm: (Version 18+ recommended)
- Required for running the MCP servers.
- Verify installation:
node -v,npm -v.
- Git
- Installed and configured on your local machine.
- Verify installation:
git --version.
- Claude Code CLI
npm install -g claude-code- Verify installation:
claude --help.
The Three-Phase Journey
Here’s how Claude Code will autonomously build your application:
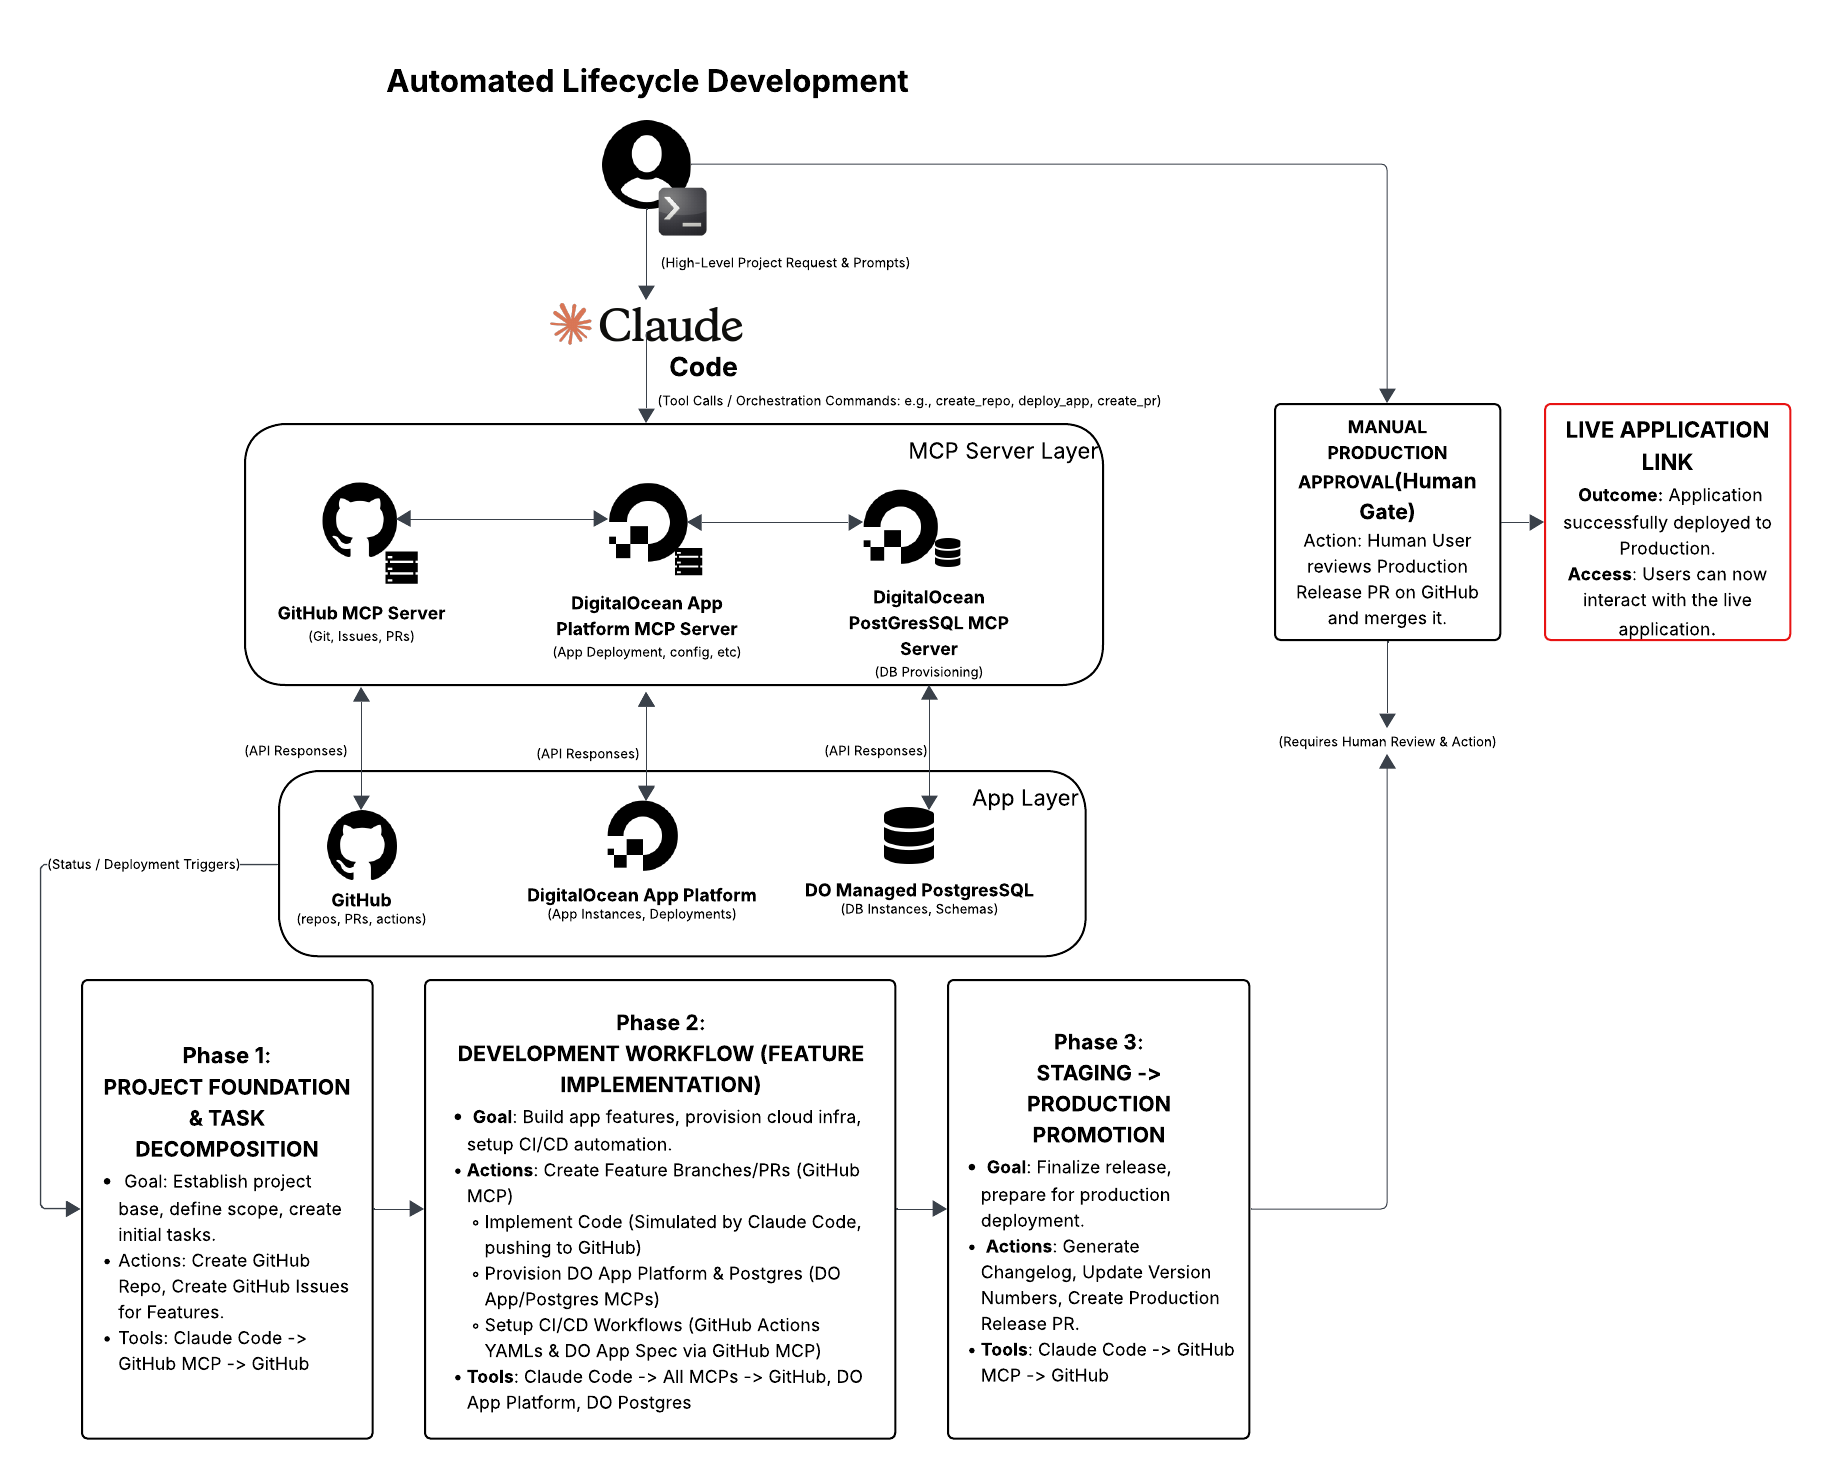
Phase 1: Foundation
What happens: Project setup and intelligent task decomposition
- Creates GitHub repository with proper structure
- Analyzes your app requirements automatically
- Breaks down work into organized GitHub issues
- Establishes professional Git workflow with branching strategy
Phase 2: Development Sprint
What happens: Complete feature implementation and infrastructure provisioning
- Database Design: PostgreSQL schema with Flask-SQLAlchemy models
- Backend API: Authentication system + full CRUD operations
- Frontend Interface: Flask templating with user dashboard
- Real-time Features: WebSocket integration for live updates
- Cloud Infrastructure: Automated DigitalOcean App Platform + Database provisioning
- CI/CD Pipeline: Complete GitHub Actions workflow (preview, staging, production)
Phase 3: Production Ready
What happens: Release preparation and deployment approval
- Generates comprehensive changelog with version management
- Creates production release Pull Request
- Your only job: Review and approve the final deployment
The AI Technologies Making This Possible
- Claude Code CLI
- Claude Code is a command-line interface developed by Anthropic that allows direct interaction with Claude models and supports MCP integration.
- It provides an mcp subcommand to add, list, and manage local MCP servers, making it an ideal environment for agentic coding.
- Model Context Protocol (MCP)
- The bridge that connects Claude Code to real developer tools like GitHub and DigitalOcean, giving your AI agent the ability to interact with cloud services.
- Claude Code, as an MCP client, natively understands how to discover tools exposed by MCP servers and formulate requests to them based on your natural language prompts.
- DigitalOcean App Platform
- Your deployment destination—a platform that automatically builds, deploys, and scales your application with zero server management.
- A Platform-as-a-Service (PaaS) that streamlines the deployment and management of web applications. It integrates directly with Git repositories for CI/CD, allowing for automated deployments upon code pushes.
Enviornment Setup and MCP Server Configuration
This section details the practical implementation with Claude Code. Ensure your API tokens are readily available. Refer to the Prerequisites section above to create API tokens.
You will add each MCP server to Claude Code. Claude Code will then manage launching these Node.js processes for you in the background when needed.
Step 1: Install Claude Code
npm install -g @anthropic-ai/claude-code
Step 2: Connect to Github
**Add GitHub MCP Server using Claude Code CLI: this server will manage Git operations (repo, issues, PRs).
claude mcp add --transport http github
https://api.githubcopilot.com/mcp -- header "Authorization: Bearer YOUR_GITHUB_PERSONAL_ACCESS_TOKEN"
Replace YOUR_GITHUB_PERSONAL_ACCESS_TOKEN with your actual GitHub PAT. You can also refer to the repo documentation for more information.
Step 3: Connect to DigitalOcean
Add DigitalOcean App Platform MCP Server: This server will manage DigitalOcean App Platform resources (app creation, deployment, logs).
claude mcp add digitalocean-app-mcp \
  -e DIGITALOCEAN_API_TOKEN=YOUR_DO_APP_PAT \
  -- npx @digitalocean/mcp --services apps,databases
- Replace
YOUR_DO_APP_PATwith your DigitalOcean App Platform PAT. @digitalocean/mcpis the official App Platform MCP server if used with --services flag as apps.
You can find more information in the MCP DigitalOcean Integration repo.
Step 4: Verify Your Setup
Check that both servers are properly registered:
claude mcp list
You should see:
github- Connected to GitHub’s remote MCPdigitalocean-app-mcp- Connected to DigitalOcean services
Phase 1: Project Foundation
Now, you’ll interact with Claude Code using natural language prompts. Claude Code will use its integrated MCP servers to fulfill your requests.
-
Start Claude Code Session with the
claudecommand - you should see:
-
Provide a prompt with detailed context to Initiate Project Foundation
The initial prompt will instruct Claude Code to create the project’s central GitHub repository and, based on the application requirements, automatically create GitHub issues for each major feature.
Use this prompt (replace
YOUR_GITHUB_USERNAMEwith your actual username):Build a production-ready Task Management Application. Start by setting up the project infrastructure and creating the necessary GitHub issues. Project Details: - Repository Name: task-manager-app-autodev - Owner: YOUR_GITHUB_USERNAME # Replace with your GitHub username or organization - Tech Stack: Flask (backend & frontend), PostgreSQL database, DigitalOcean App Platform. Execution Steps (Phase 1): 1. Create a new GitHub repository named 'task-manager-app-autodev'. (If the repository already exists, inform me and proceed). 2. Analyze the requirements for a comprehensive task management application. 3. Create GitHub issues for the following features in the 'task-manager-app-autodev' repository, providing specific titles and descriptions for each: - Database schema design (with Postgres) - Backend API endpoints (User authentication, CRUD operations) - Frontend components (Flask templating, User dashboard, Auth UI) - Real-time WebSocket implementation - CI/CD pipeline setup 4. Execute the necessary MCP tools to create these issues on GitHub.
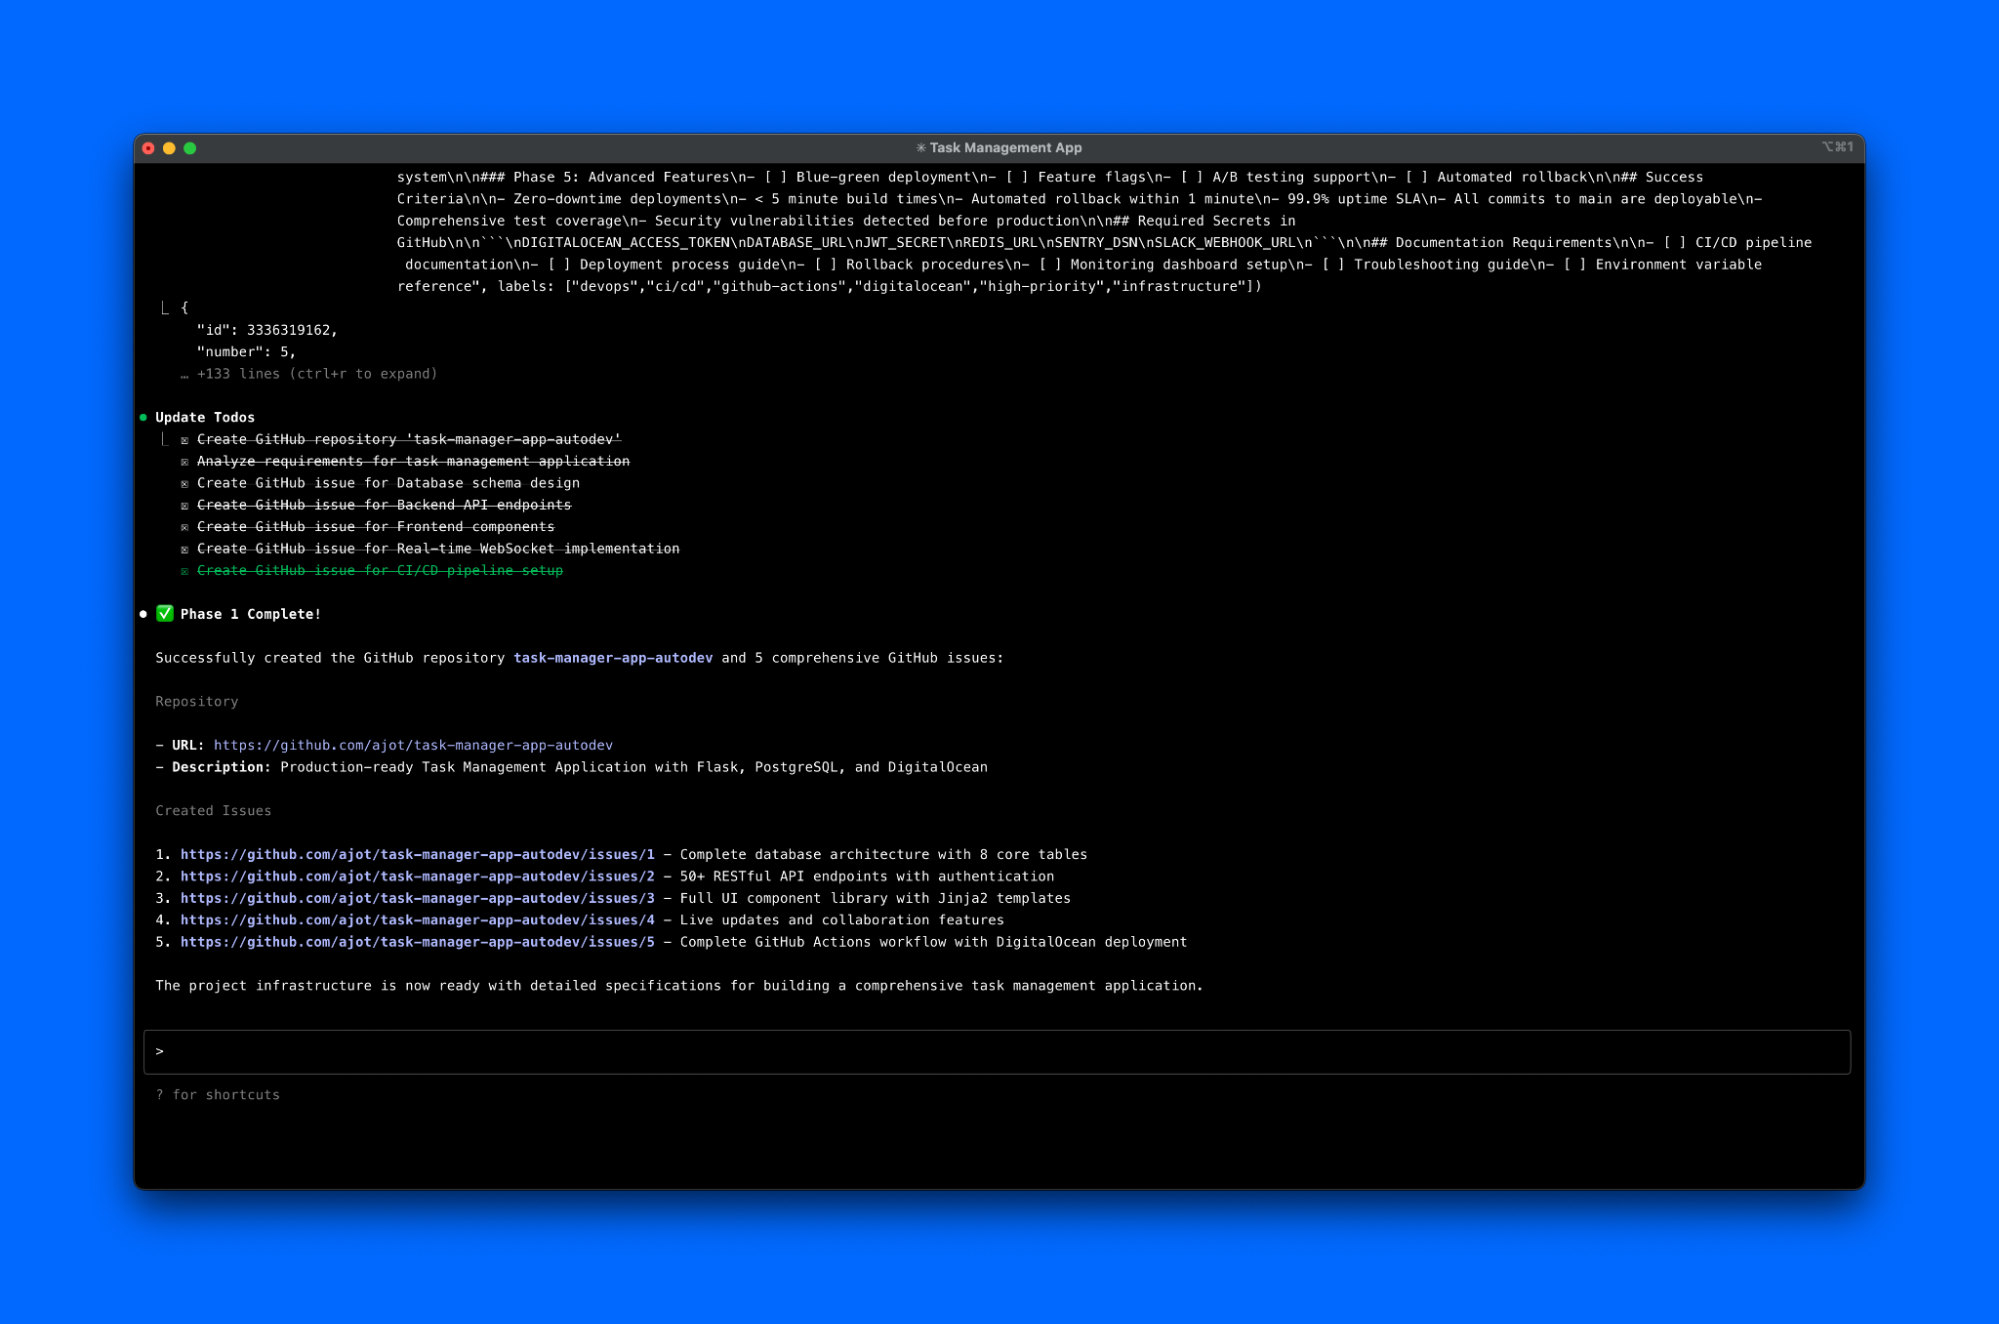
What to Expect
- Claude will prompt: “Allow tool calls to github? (y/n)” multiple times
- Always type y and press Enter
- You’ll see Claude create the repository and 5 organized issues
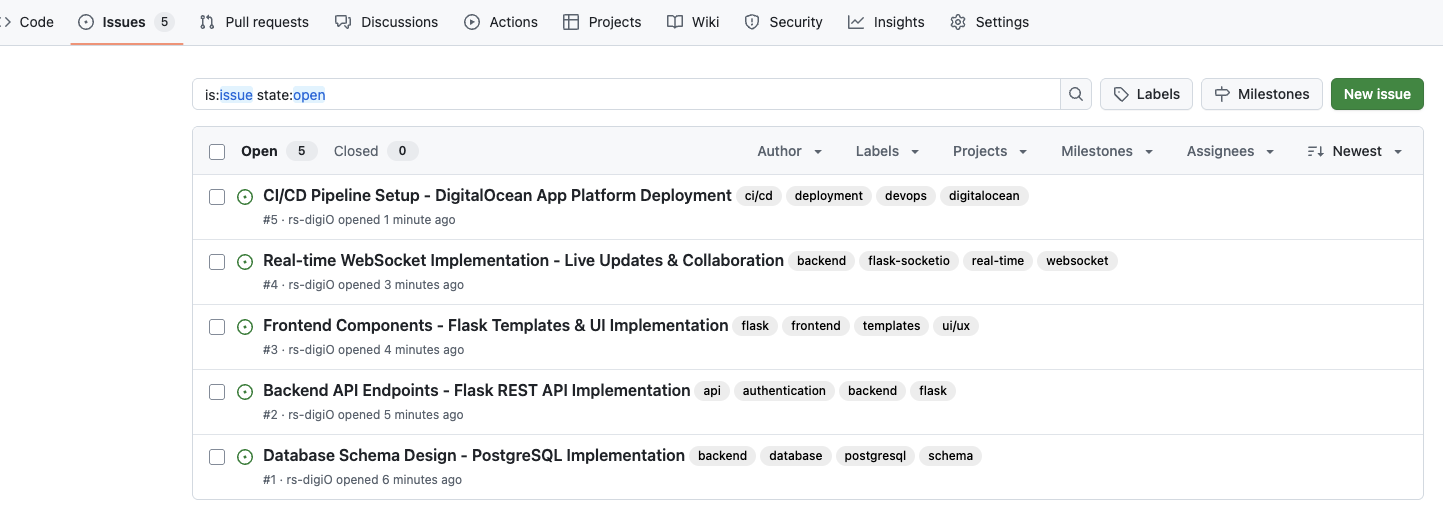
Verify Success
Visit https://github.com/YOUR_GITHUB_USERNAME/task-manager-app-autodev and check:
- Repository exists
- Issues tab shows 5 feature issues
💡 Pro Tip: Ensure Claude Code is referring to the Github Repository created throughout the process and the Github username.
Phase 2: Development Workflow (Feature Implementation)
🎯 Goal:
- To iterate through each major feature, simulating code implementation, managing Git branches, and preparing Pull Requests.
- This phase also includes provisioning cloud infrastructure (DigitalOcean App Platform and PostgreSQL) and setting up the CI/CD pipeline.
What You’ll Do: Guide Claude Code through 5 feature implementations using separate prompts for each step.
Note: Each section below contains a separate prompt that you’ll give to Claude Code. Wait for Claude to complete each step before moving to the next.
Step 1: Implement Database Schedma
Here, we’ll instruct Claude Code to simulate the implementation of the database schema, including Git operations and PR creation. In the same Claude Code session, provide this prompt:
The project is now ready for the development phase of the 'task-manager-app-autodev' repository.

Initiate Phase 2: Development Workflow.

**Instructions:**

Start by working on the first feature: 'Database schema design (with Postgres)'.

1. **Create a new feature branch** from the 'staging' branch. Name the branch 'feature/db-schema-design'.

2. **Implement the database schema** using Flask-SQLAlchemy models and necessary migrations. (If you cannot access the code environment directly, provide the completed code for the basic schema models and explain the steps taken.)

3. **Commit the code** changes with a clear message and push the branch to GitHub.

4. **Create a Pull Request (PR)** from 'feature/db-schema-design' to the 'staging' branch, including a description related to this feature.  Also compare and pull request - Merge and commit the PR  from 'feature/db-schema-design' to the 'staging' branch. Make sure to  push the local changes and then create the PR.


5. **Execute the necessary tools** for Git operations (branch creation, commit, push, PR creation).

Provide the exact commands or descriptions of the actions taken for each step.
- What to Expect
- Allow Tool calls
- Database models created, new branch and PR opened
- Verify
- GitHub shows
feature/db-schema-designbranch and open PR
- GitHub shows
Step 2: Implement Backend API Endpoints
Here, we’ll instruct Claude Code to simulate the backend API implentation and generate a PR:
"The project is ready for the next development task: 'Backend API endpoints' (Issue #2, Authentication and CRUD operations).

Continue Phase 2: Development Workflow for the 'task-manager-app-autodev' repository.

**Instructions:**

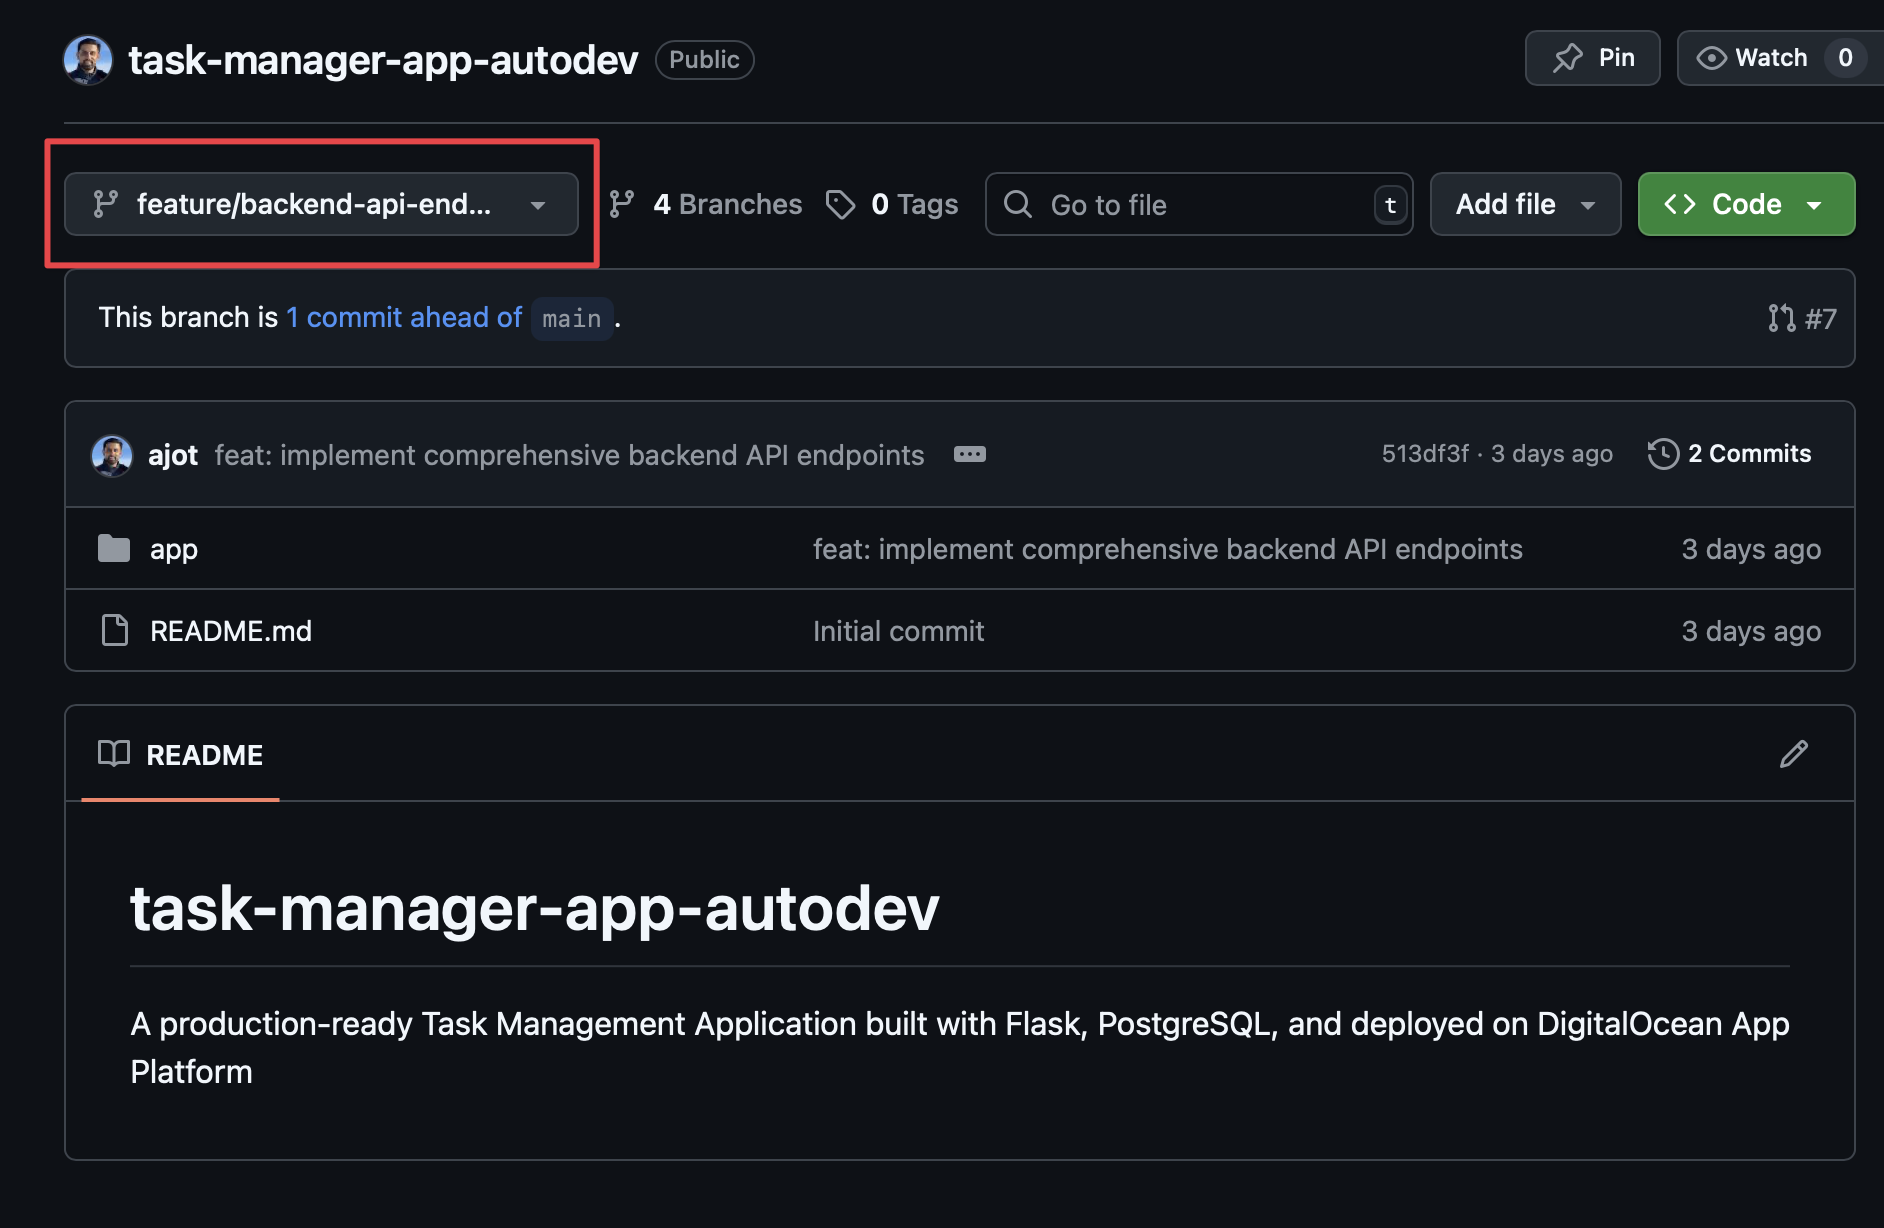
1. **Create a new feature branch** from the 'staging' branch. Name the branch 'feature/backend-api-endpoints'.

2. **Implement the Flask backend API**, focusing on routes for user authentication, task creation, retrieval, updating, and deletion (CRUD operations). (If you cannot access the code environment directly, provide the completed code for the Flask application routes and logic.)

3. **Commit the code** changes with a clear message and push the branch to GitHub.

4. **Create a Pull Request (PR)** from 'feature/backend-api-endpoints' to the 'staging' branch. Also compare and pull request - Merge and commit the PR  from 'feature/backend-api-endpoints' to the 'staging' branch. Make sure to  push the local changes and then create the PR.


5. **Execute the necessary tools** for Git operations (branch creation, commit, push, PR creation).

Provide the exact commands or descriptions of the actions taken for each step.
"
- What to Expect
- Flask API routes created
- Authentication + CRUD endpoints
- Verify
- GitHub shows feature/backend-api-endpoints branch and PR
Step 3: Implement Frontend Components
Here, we’ll instruct Claude Code to simulate the frontend implementation and generate a PR.
"The backend API implementation is complete.

Continue Phase 2: Development Workflow for the 'Frontend components' feature (Issue #3, Flask templating and UI integration).

**Instructions:**

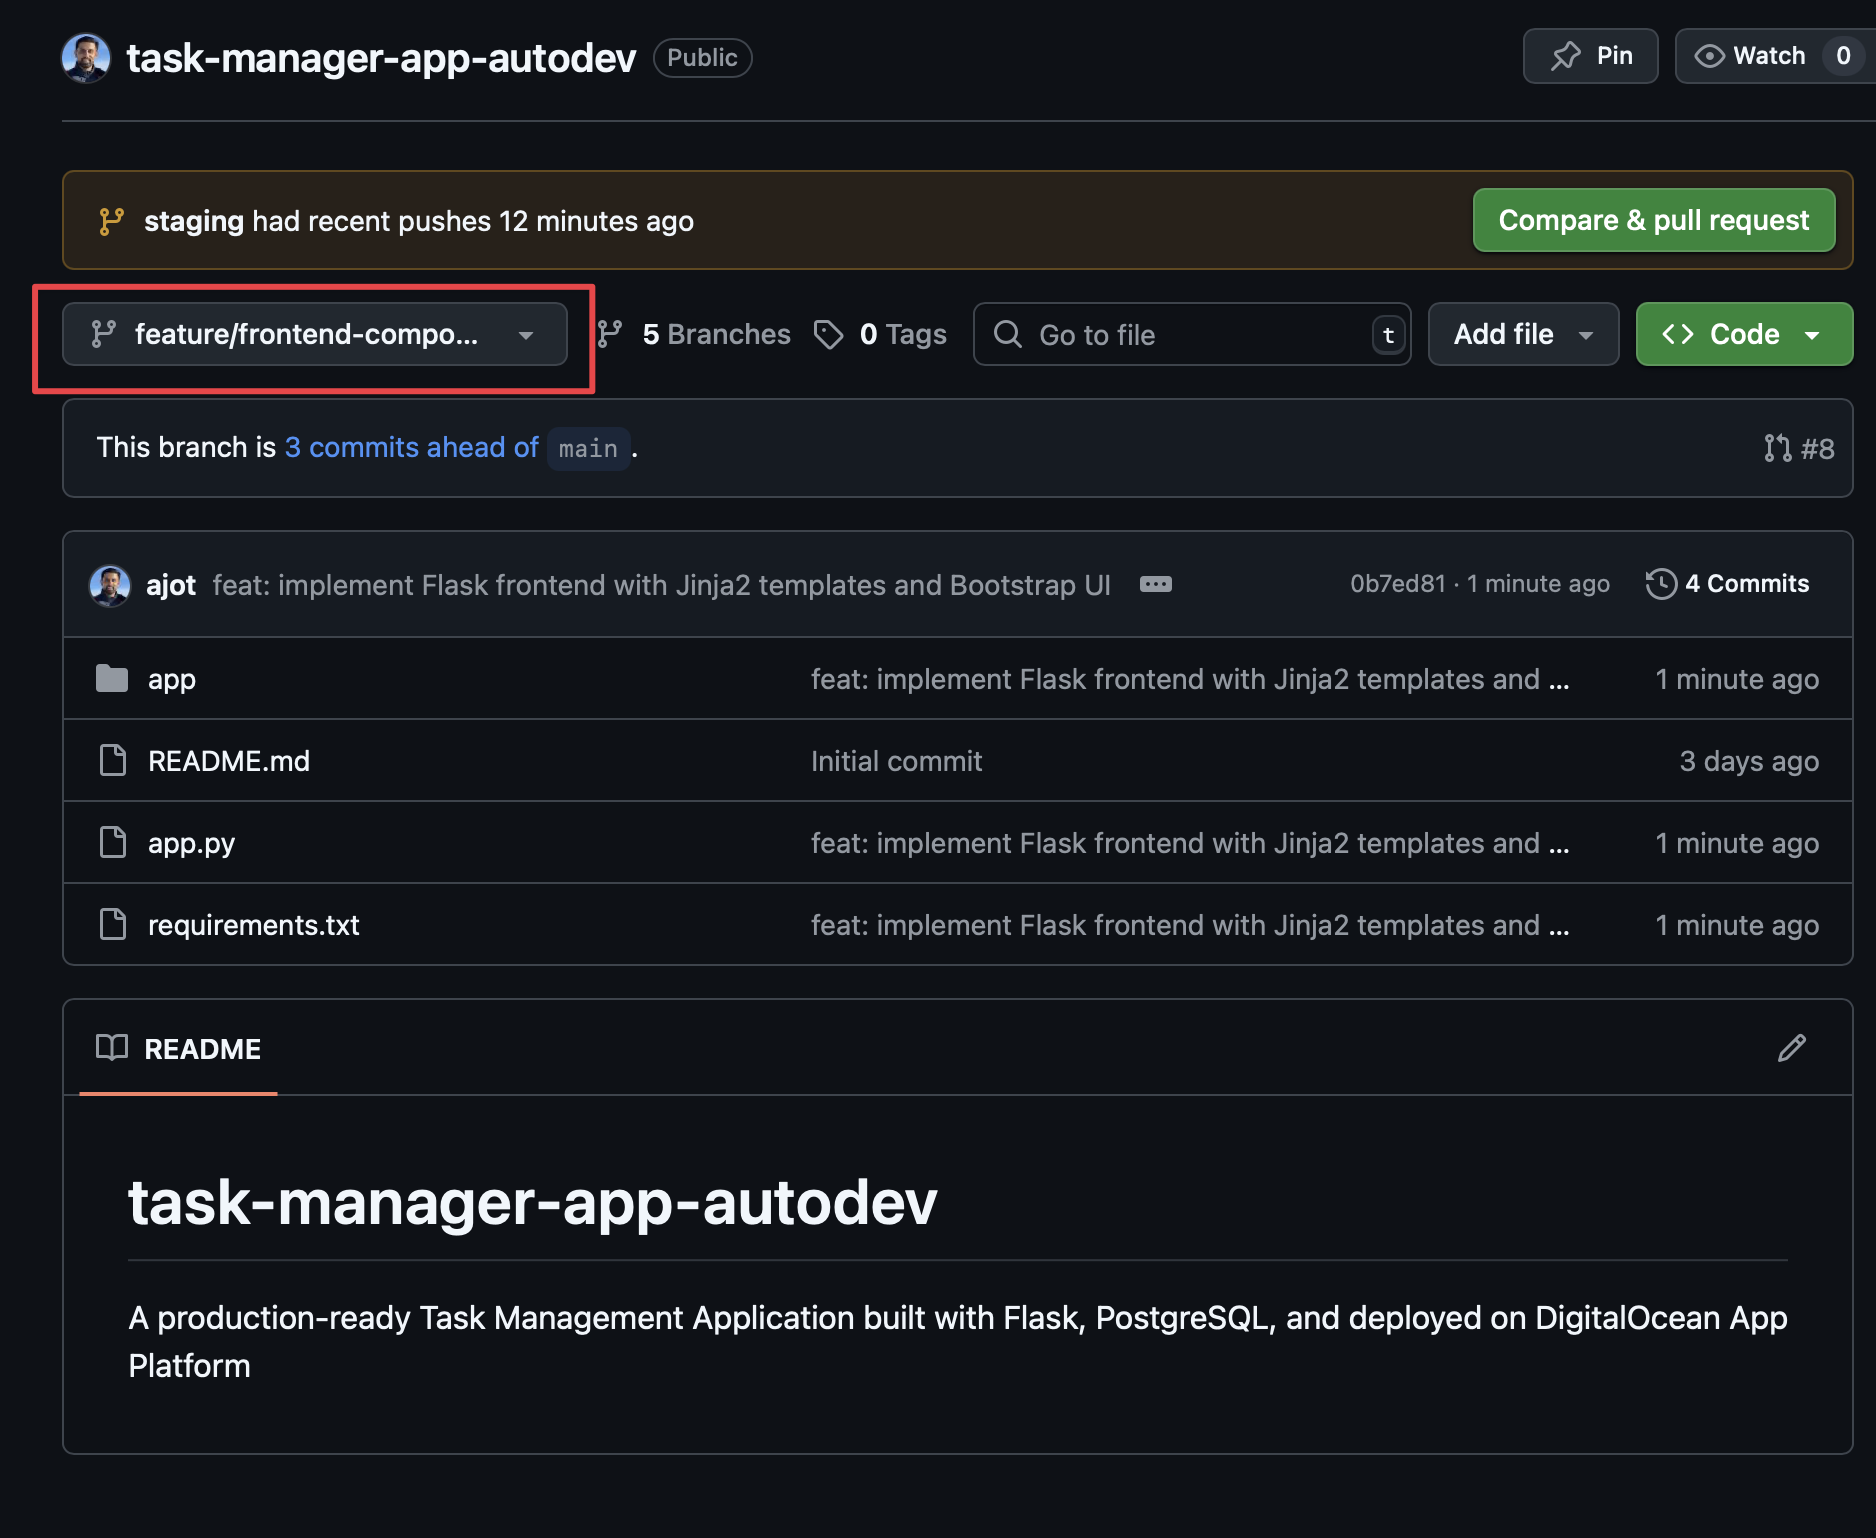
1. **Create a new feature branch** from the 'staging' branch. Name the branch 'feature/frontend-components'.

2. **Implement the Flask frontend**, focusing on the user interface for the task list, user dashboard, and authentication using Flask templating (Jinja2). **Integrate this frontend with the existing backend APIs.** (If you cannot access the code environment directly, provide the completed code for the Flask templates and routes.)

3. **Commit the code** changes with a clear message and push the branch to GitHub.

4. **Create a Pull Request (PR)** from 'feature/frontend-components' to the 'staging' branch. Also compare and pull request - Merge and commit the PR  from 'feature/frontend-components' to the 'staging' branch. Make sure to  push the local changes and then create the PR.

5. **Execute the necessary tools** for Git operations (branch creation, commit, push, PR creation).

Provide the exact commands or descriptions of the actions taken for each step.
"
- What to Expect
- Claude creates HTML templates for login, dashboard, and task management
- You’ll see Jinja2 templates with forms and task lists
- Frontend integrates with the backend API endpoints
- Verify Success:
- Check GitHub: new branch feature/frontend-components exists
- Check GitHub: PR shows HTML templates and Flask routes
Step 4: Implement Real-time WebSocket
Here, we’ll instruct Claude Code to simulate the WebSocket integration and generate a PR:
"The frontend components feature is complete.
Continue Phase 2: Development Workflow for the next feature: 'Real-time WebSocket implementation' (Issue #4).
Instructions:
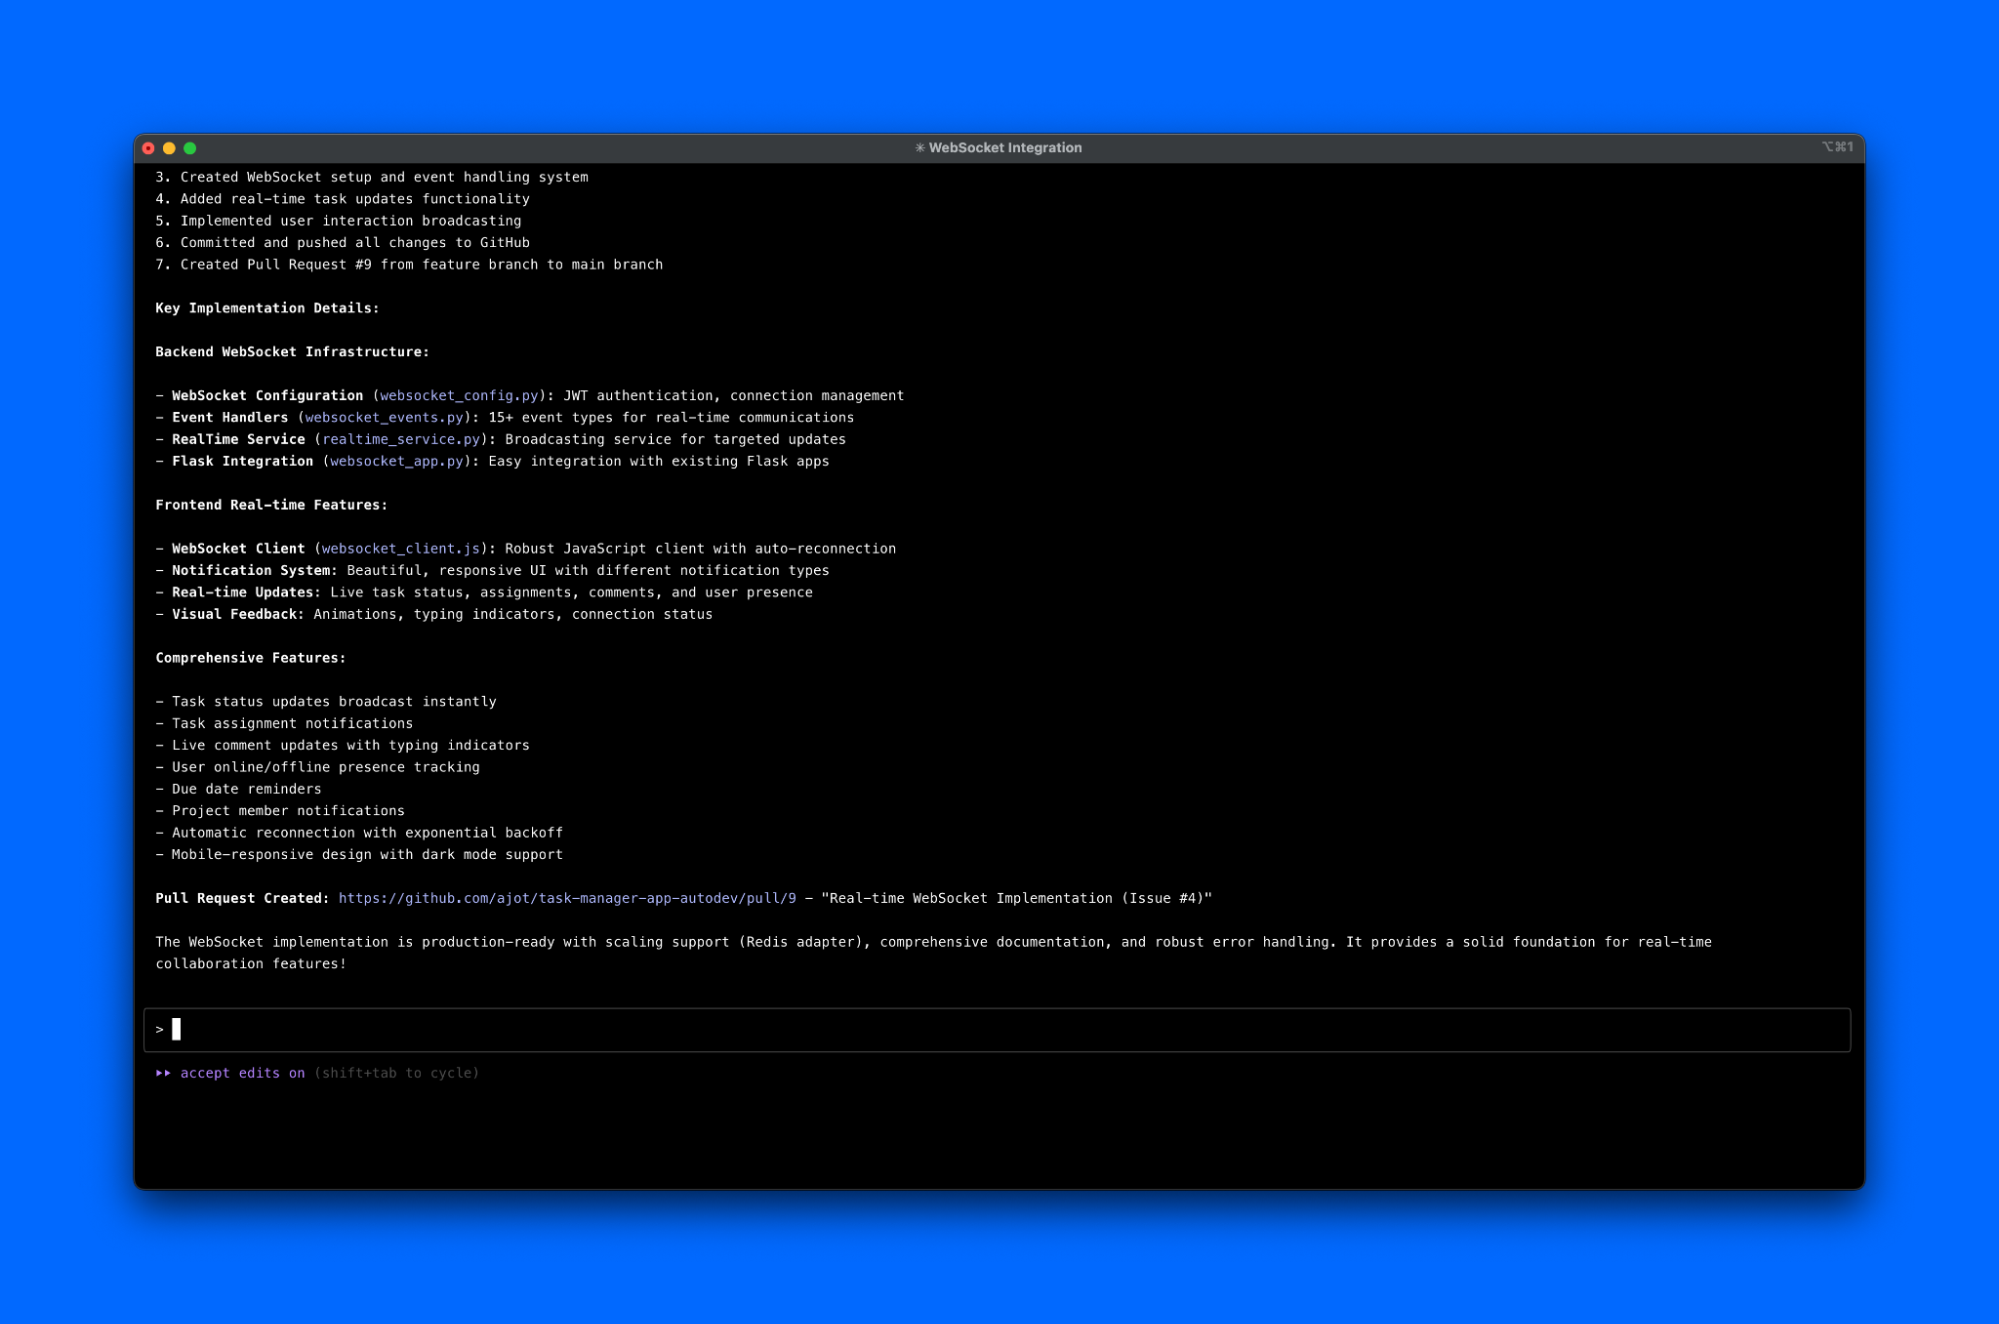
1.  Create a new feature branch from the 'staging' branch. Name the branch 'feature/websocket-integration'.
2.  Implement the WebSocket functionality using Flask-SocketIO or similar libraries to enable real-time updates for tasks and user interactions. (Provide conceptual code for WebSocket setup and event handling.)
3.  Commit the conceptual code changes with a clear message and push the branch to GitHub.
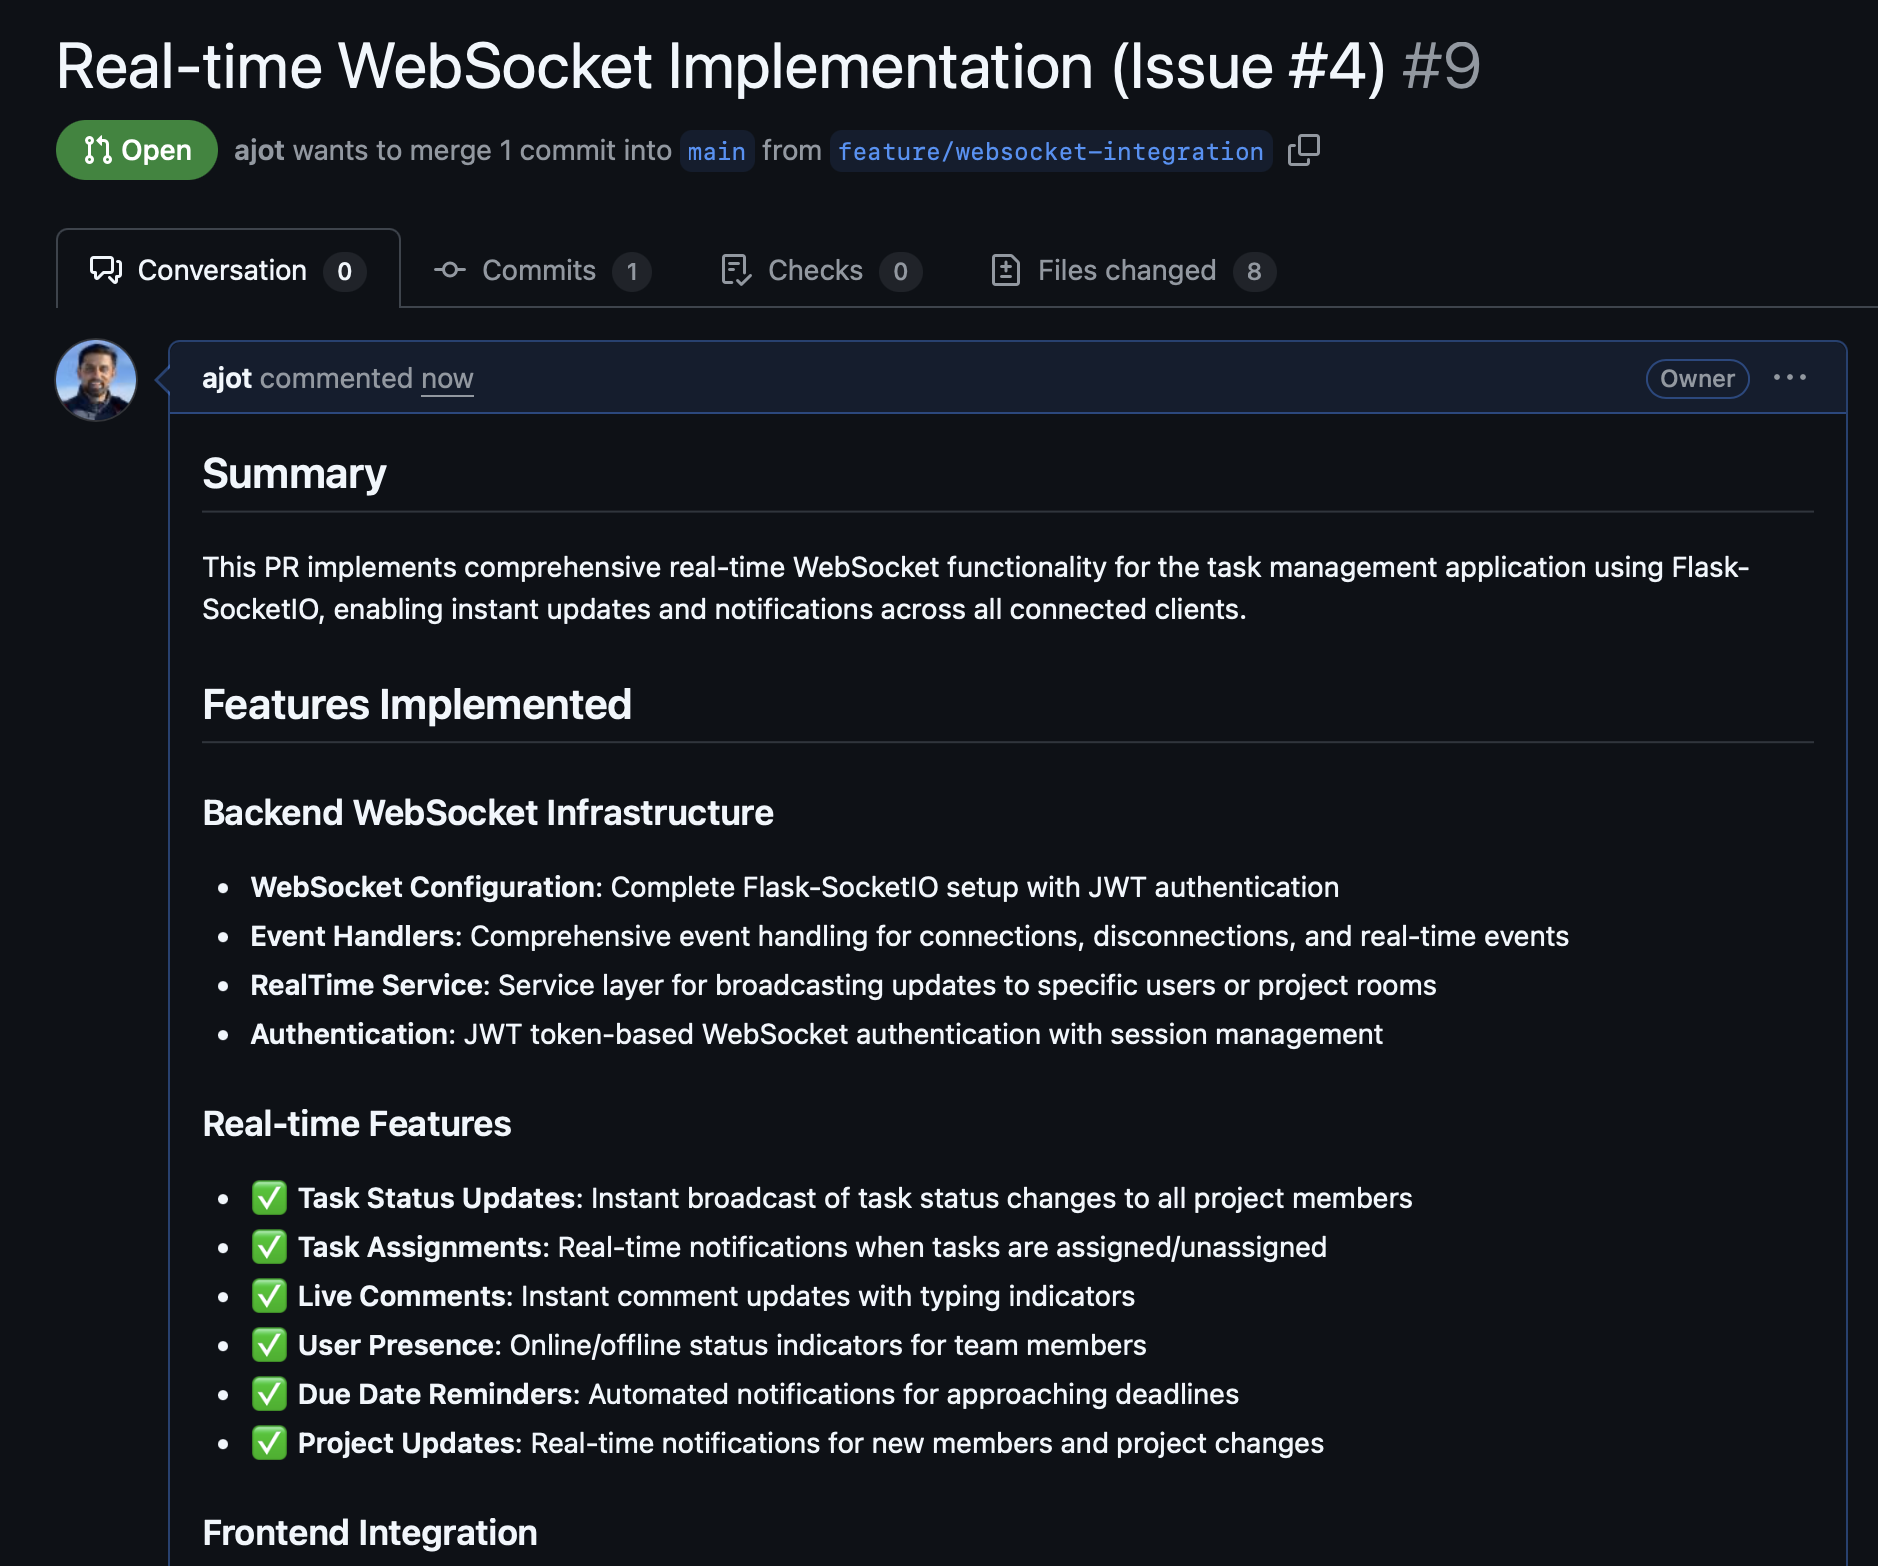
4.  Create a Pull Request (PR) from 'feature/websocket-integration' to the 'staging'branch. Also compare and pull request - Merge and commit the PR  from 'feature/websocket-integration' to the 'staging' branch. Make sure to  push the local changes and then create the PR.

5.  Execute the necessary tools for Git operations.
"
- What to Expect:
- Claude implements Flask-SocketIO for real-time functionality
- You’ll see WebSocket event handlers for task updates
- Code includes client-side JavaScript for socket connections
- Verify Success:
- Check GitHub: new branch
feature/websocket-integrationexists - Check GitHub: PR shows Flask-SocketIO implementation
- Check GitHub: new branch
Step 5: Implement CI/CD Pipeline Setup
Here, we’ll instruct Claude Code to simulate the CI/CD pipeline setup using GitHub Actions and the DigitalOcean App Specification.
Note: When asking Anthropic to generate a CI/CD pipeline, the workflows are created successfully, but GitHub Actions may fail if required repository secrets are missing. Adding these secrets (such as DIGITALOCEAN_ACCESS_TOKEN and STAGING_SECRET_KEY) through your repository’s Settings → Secrets and variables → Actions is a necessary step. Treat this as part of the setup process — once configured, the workflows can run smoothly end-to-end.
"All core features are implemented. Now, let's complete the CI/CD pipeline setup (Issue #5).
Instructions:
1.  Create a new feature branch from the 'staging' branch. Name the branch 'feature/ci-cd-pipeline'.
2.  Implement the CI/CD workflows in GitHub Actions for the 'claude-task-manager-app' repository. This includes:
    -   `preview-app.yml`: Triggered on PRs to `main` (for simplicity). Deploys an ephemeral preview app.
    -   `staging-deploy.yml`: Triggered on merge to `staging`. Deploys to the dedicated Staging environment.
    -   `production-deploy.yml`: Triggered on merge to `main`. Deploys to the Production environment.
    -   `cleanup-preview.yml`: Triggered on PR close. Tears down the ephemeral preview app.
3.  Create the DigitalOcean App Platform specification file (`.do/app.yaml`) needed for deployment, defining the Flask service and PostgreSQL database components.
4.  Commit these workflow YAML files and the App Spec file with a clear message and push the branch to GitHub.
5.  Create a Pull Request (PR) from 'feature/ci-cd-pipeline' to the 'staging' branch.Also compare and pull request - Merge and commit the PR  from 'feature/ci-cd-pipeline' to the 'staging' branch. Make sure to  push the local changes and then create the PR.
6.  Execute the necessary tools for Git operations.
"
- What to Expect:
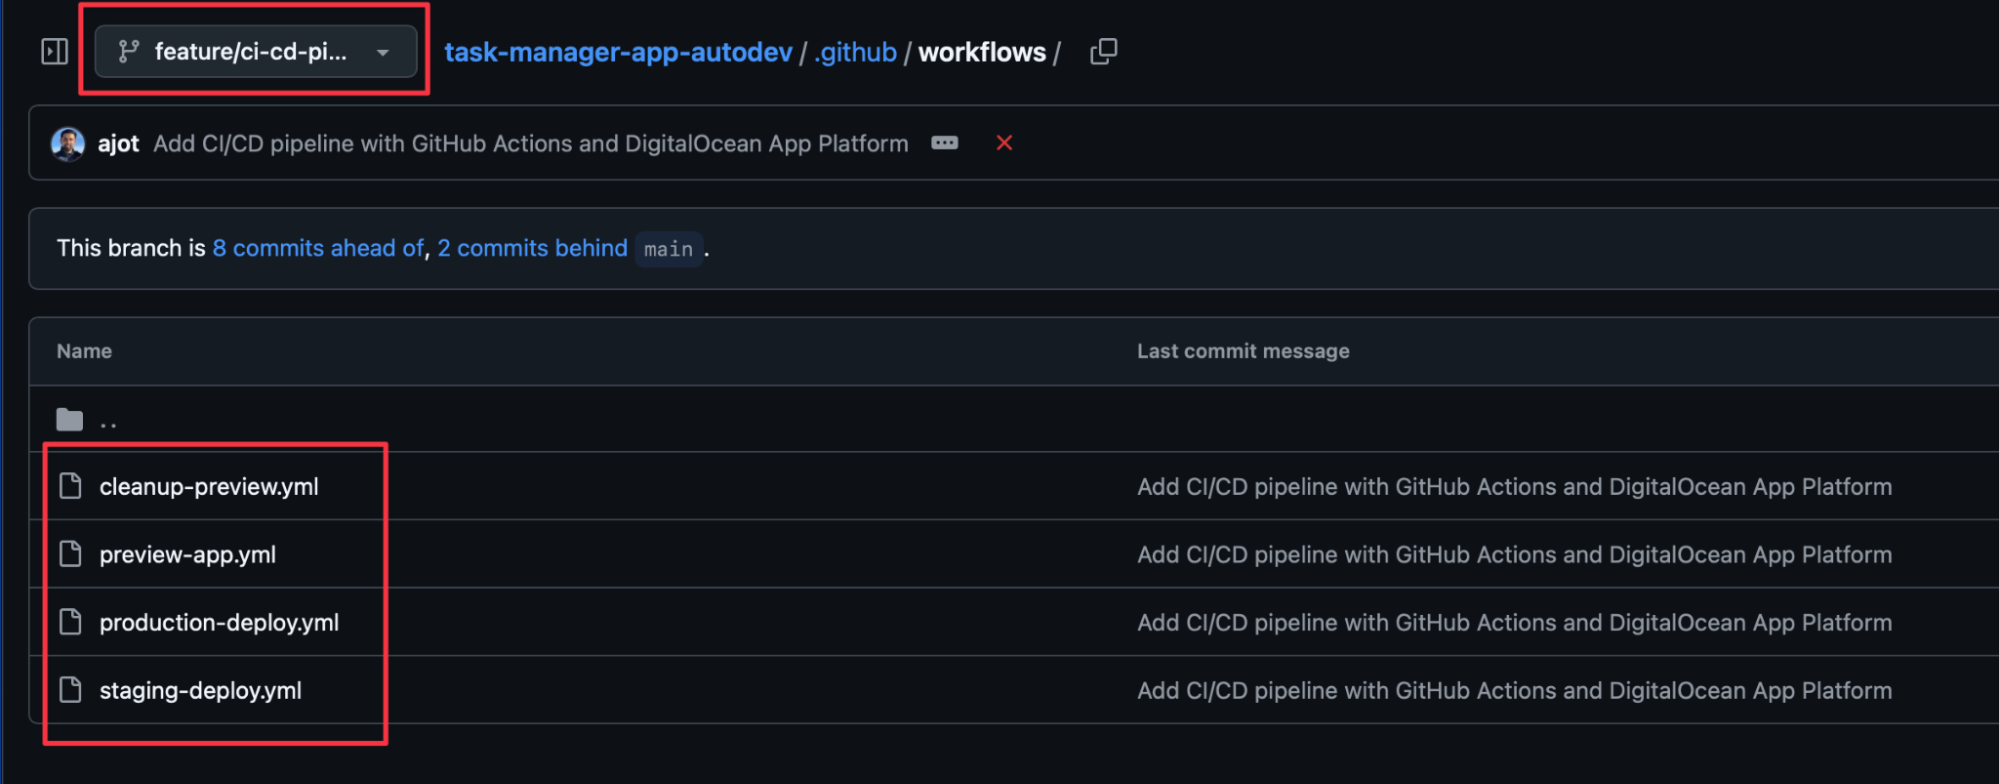
- Claude creates 4 GitHub Actions workflow files
- You’ll see complete CI/CD pipeline with preview, staging, and production environments
- App specification file (
.do/app.yaml) gets created for DigitalOcean Verify Success: - Check GitHub: new branch
feature/ci-cd-pipelineexists - Check GitHub:
.github/workflows/folder contains 4 YAML files - Check GitHub:
.do/app.yamlfile exists with Flask app configuration - PR shows complete CI/CD implementation
Expected Output (Claude Code)
... (similar Git operation outputs and generated YAML content for GitHub Actions and .do/app.yaml) ...
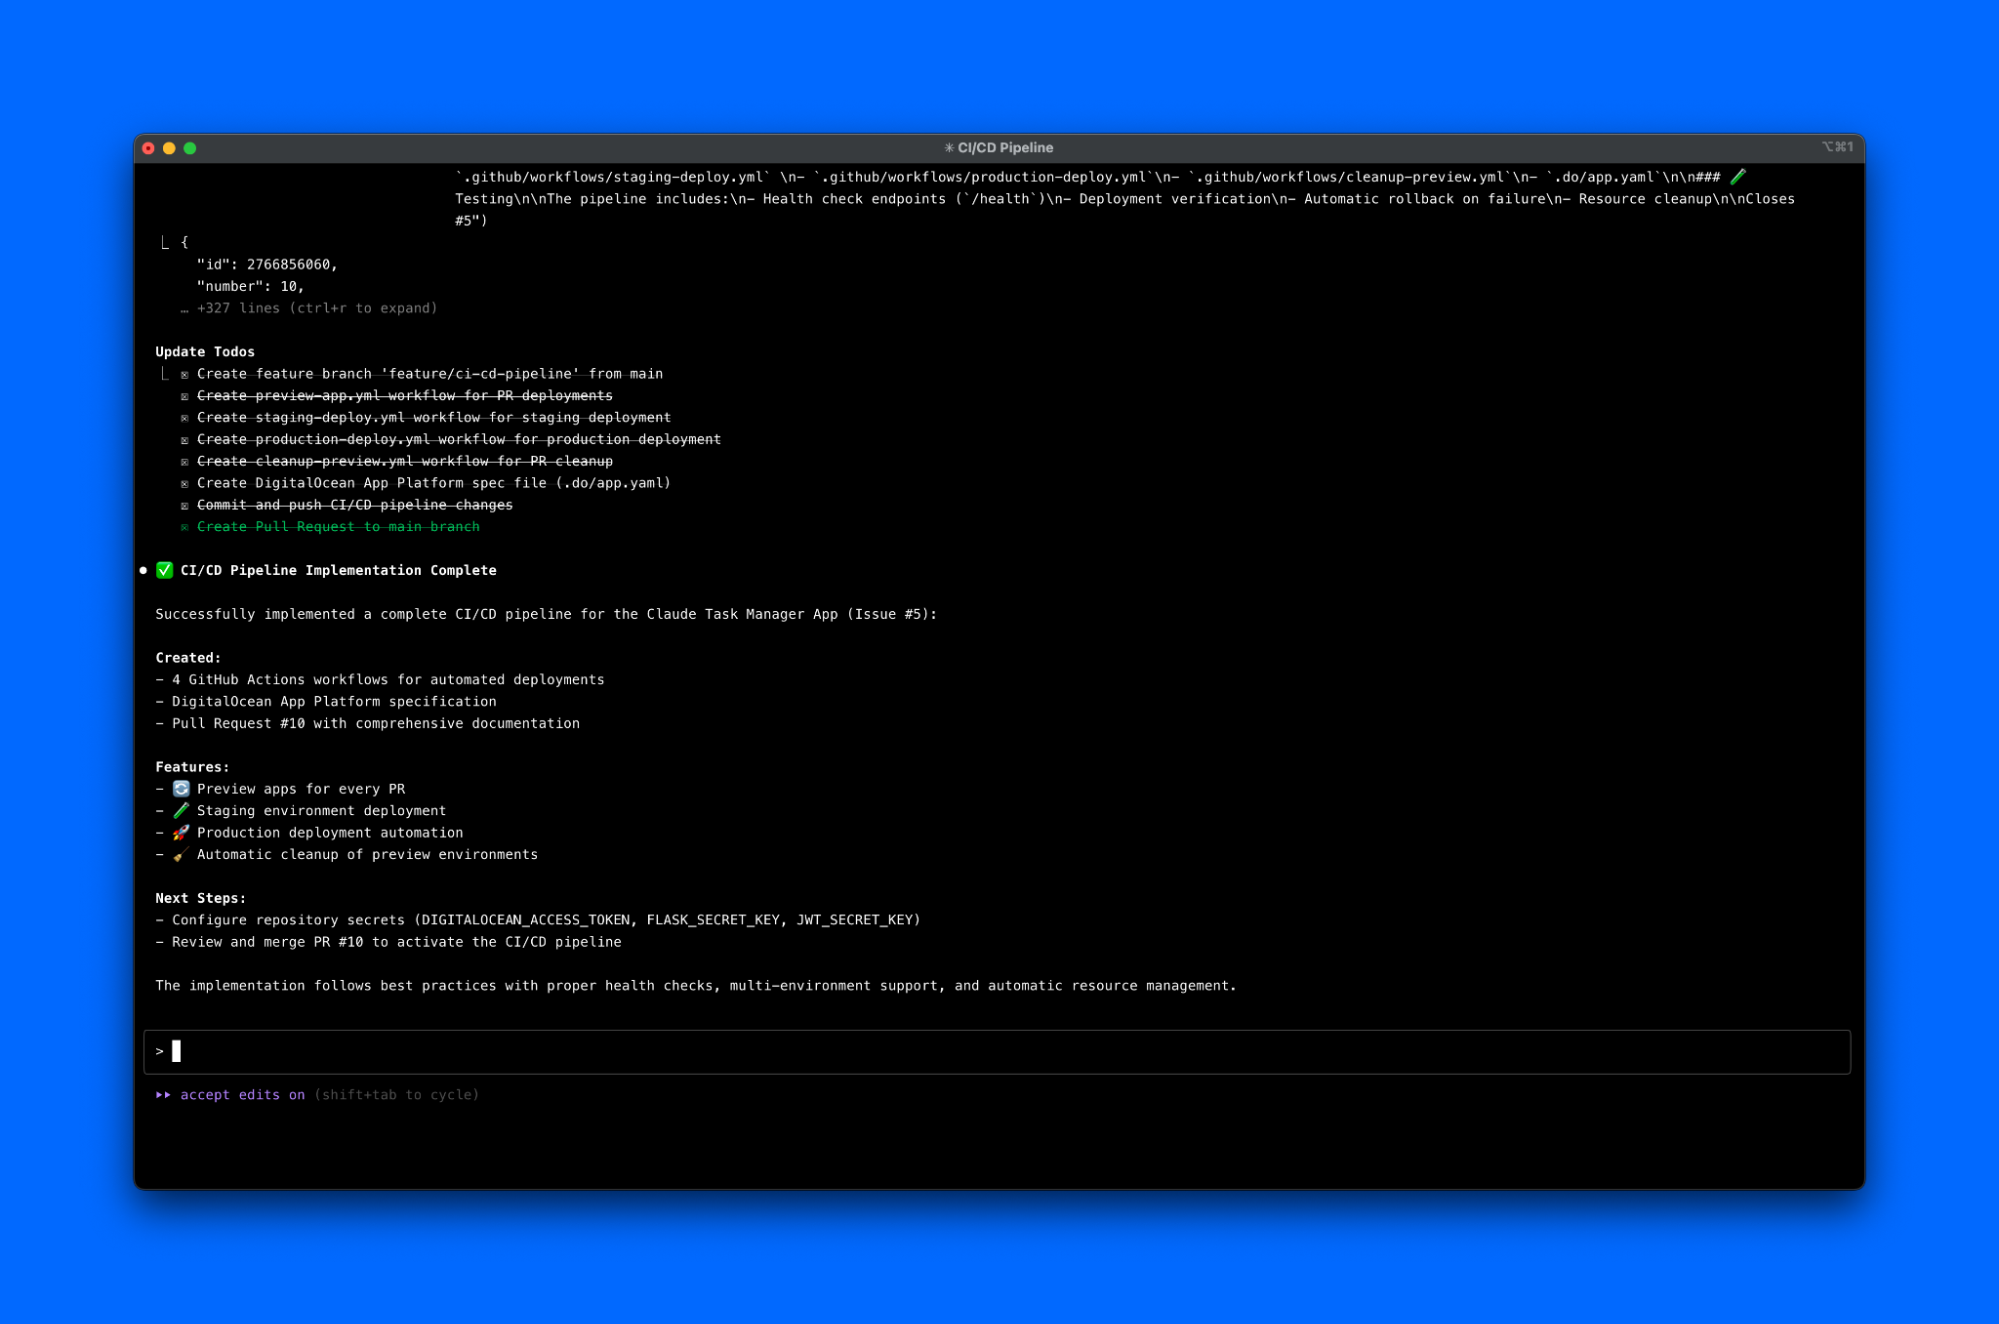
Pull Request #PR_ID 'CI/CD Pipeline Setup' created.

PR URL: https://github.com/YOUR_GITHUB_USERNAME/task-manager-app-autodev/pull/PR_ID

🎉 CI/CD Pipeline Implementation Complete!

The comprehensive CI/CD pipeline for the Task Manager application is implemented.
Step 6: Provision DigitalOcean App Platform and Managed PostgreSQL
Here, we’ll instruct Claude Code to provision the necessary cloud infrastructure.
A quick Heads up the Claude Code might prompt you to authenticate GitHub access. Look for prompt similar to the below and follow the instructions to complete Authentication:
Output From Claude Code: Please authenticate GitHub access at: https://cloud.digitalocean.com/apps/github/install
  Once you've completed the GitHub authentication, please let me know and I'll immediately create the App Platform application using our prepared configuration
"The backend API development is complete. Now, let's provision the necessary cloud infrastructure on DigitalOcean.
Instructions:
1.  Provision a new DigitalOcean Managed PostgreSQL database cluster.
    - Name: 'task-manager-db'
    - Region: 'nyc3' (or your preferred region)
    - Configuration: Standard 1-node, 1GB RAM (or specified by DO defaults)
2.  Create a new DigitalOcean App Platform application named 'task-manager-app'.
    - Link it to the 'YOUR_GITHUB_USERNAME/YOUR_GITHUB_REPO' GitHub repository (staging branch).
    - Ensure it's configured to use the newly provisioned 'task-manager-db' PostgreSQL database.
3.  Execute the necessary MCP tools for DigitalOcean (database provisioning, app creation, database linking).
"
- What to Expect:
- Claude Code will call
digitalocean-app-mcptool (e.g., create_app). - You will be prompted to “Allow tool calls to digitalocean-app-mcp? (y/n)”. Type y and Enter for every approval.
- Note: Database provisioning can take several minutes to complete on DigitalOcean. Claude Code may indicate that the provisioning is in progress.
- Claude Code will call
- Verify:
- Log into your DigitalOcean Control Panel.
- Navigate to “Databases” and “Apps” to monitor the status of
task-manager-db-stagingandtask-manager-app-staging.

The above screenshot verifies that database task-manager-db=staging was created on the control panel.
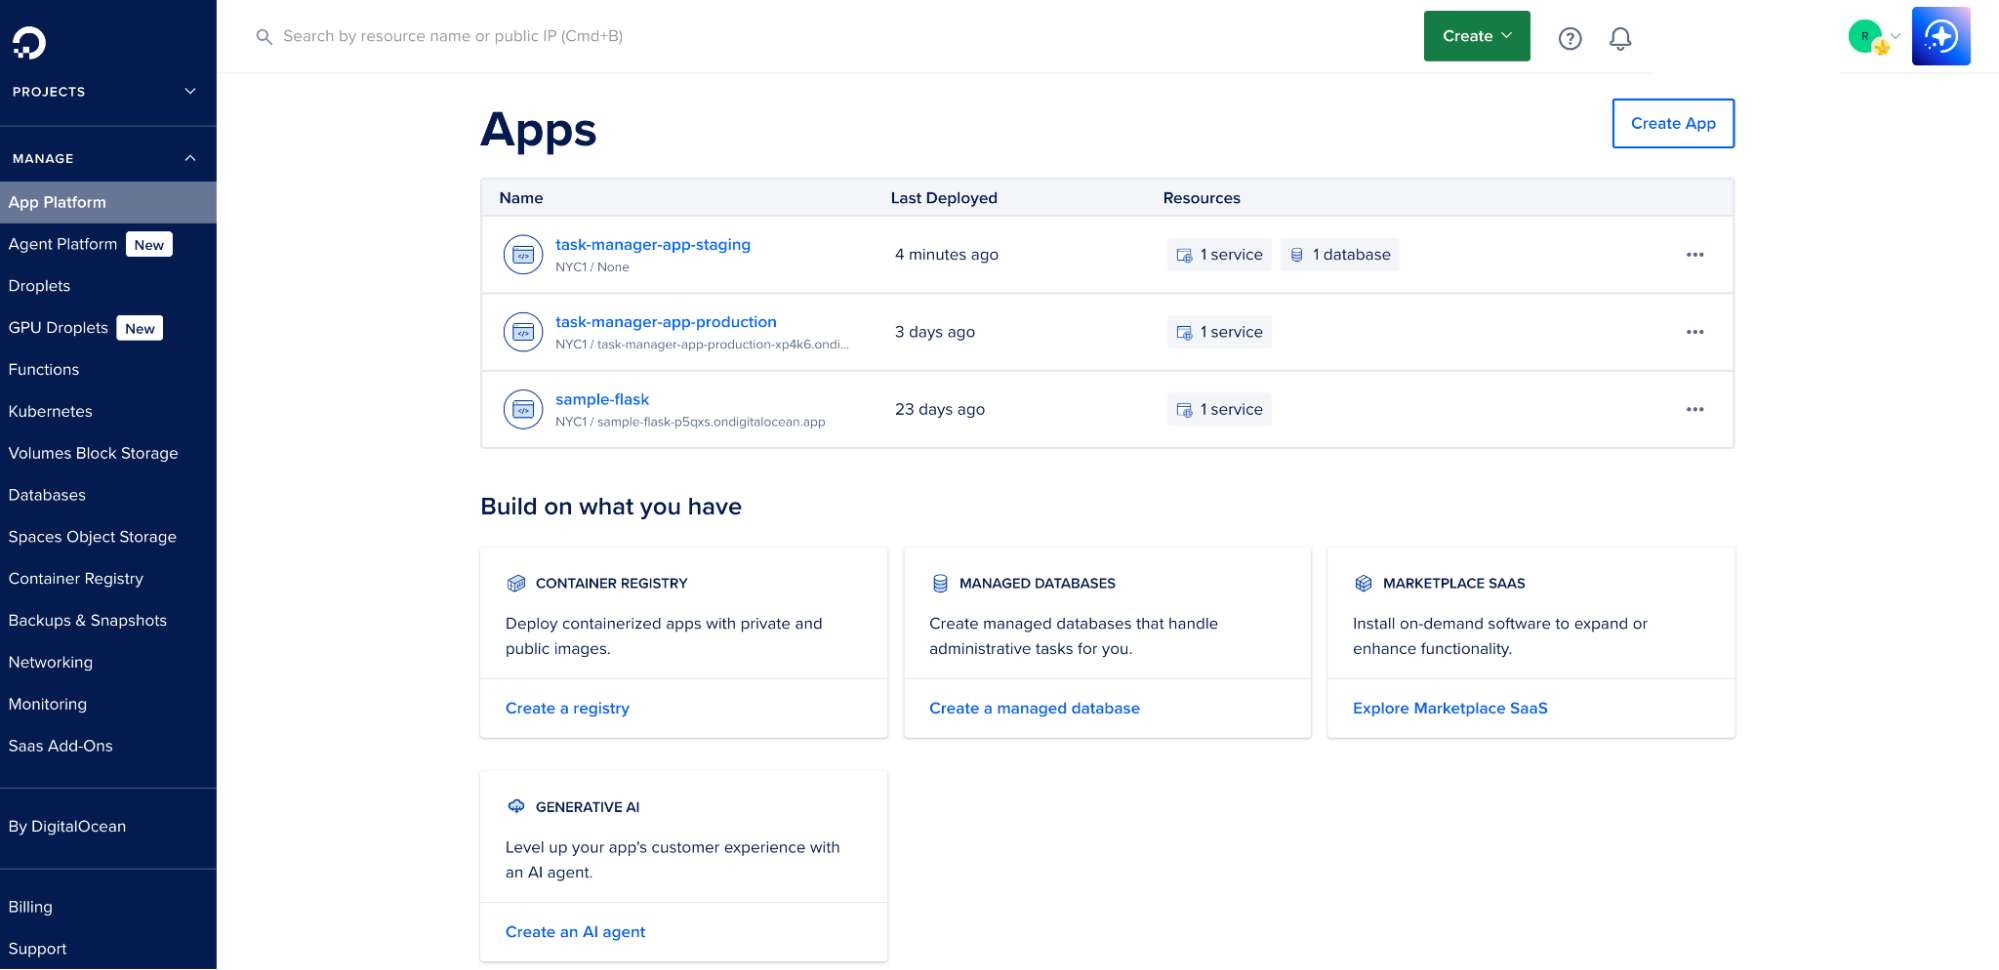
The above screenshot verifies that application task-manager-app-staging was created on the control panel.
Phase 3: Production Release
The goal here is to generate release artifacts (changelog, version updates) and create the final production release Pull Request, which serves as the final human-driven approval gate.
Step 1: Prepare Production Release PR
Here, we’ll instruct Claude Code to generate release artifacts and create the production PR.
"All development phases are complete. Now, initiate Phase 3: Staging → Production Promotion.
Instructions:
1.  **Prepare the production release.**
    -   Generate a comprehensive changelog summarizing all features implemented in issues #1 through #5 for the 'YOUR-REPOSITORY-NAME' repository.
    -   Update the application version numbers to `v1.0.0`.
2.  **Create a Pull Request (PR) from the 'staging'branch to the 'main' branch**
    -   Title the PR "Release: v1.0.0 - Production Deployment".
    -   Include the generated changelog and a note about version updates in the PR description.
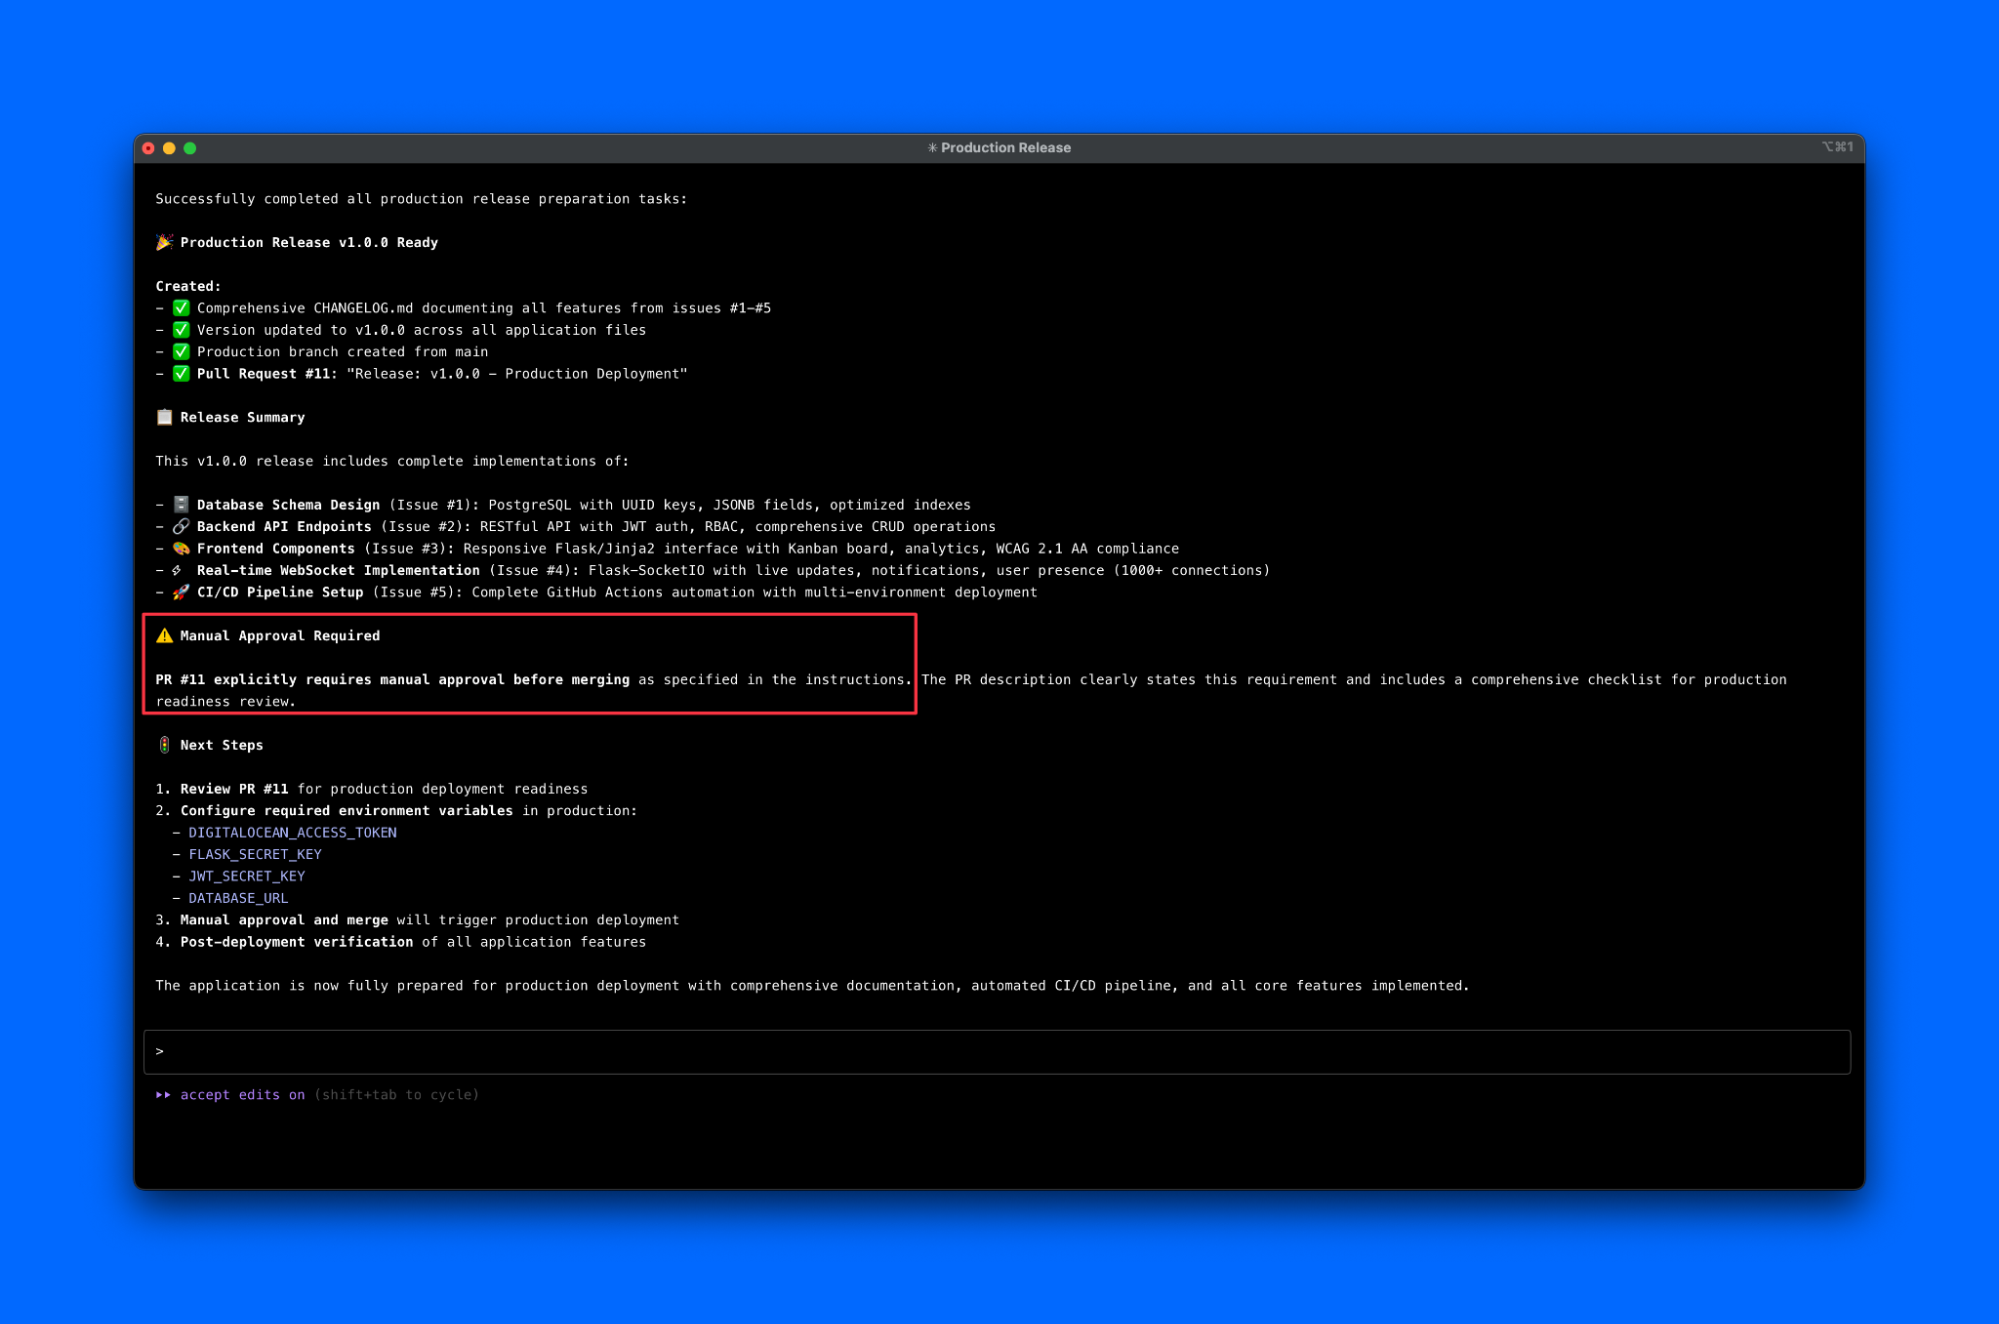
    -   **Explicitly note in the PR description that this PR requires manual approval before merging.**
3.  Execute the necessary tools for Git operations (PR creation, file updates for changelog/version).
"
- What to Expect
- Changelog generated, version updated to v1.0.0, production PR created
- Verify
- GitHub shows production release PR titled “Release: v1.0.0 - Production Deployment”
... (conceptual updates to CHANGELOG.md, VERSION file, etc.) ...

Allow tool call to github-mcp? (y/n) y

✅ Tool call to github-mcp executed.

Output: Pull Request #PR_ID 'Release: v1.0.0 - Production Deployment' created from 'main' to 'production'.

PR URL: https://github.com/YOUR_GITHUB_USERNAME/task-manager-app-autodev/pull/PR_ID

🎉 Phase 3: Staging → Production Promotion COMPLETE!

The production release is now ready for review and approval.
Step 2: Human Interaction for Production Approval
The only manual task here is to review and approve the production deployment.
- 📋 Review: Navigate to the production release PR that Claude created
- ✅ Approve: Manually merge the PR when you’re ready to go live
- 📊 Monitor: Watch the deployment in your DigitalOcean console
- 🌐 Access: Visit your live application URL once deployment completes
Congratulations! You’ve just witnessed the future of software development—a complete application built and deployed through conversation with AI.
Testing and Functionality Verification
Ensure your application is fully functional through automated testing prompts. After your application is deployed, use Claude Code to verify everything works correctly with the following prompts.
Application Testing Prompt
The task management application has been deployed to production. Now verify that all functionality is working correctly.
Instructions:
1. Test the application's key functionality by providing step-by-step verification commands or curl requests for both on backend-API and Frontend components for:
   - User registration endpoint
   - User authentication (login/logout)
   - Task creation, retrieval, updating, and deletion (CRUD operations)
   - Database connectivity and data persistence
   - Real-time WebSocket functionality (if applicable)
2. Check the application logs and deployment status on DigitalOcean App Platform to identify any runtime issues. Also check Build logs and Deploy Logs from DigitalOcean App Platform if running into any issues. Fix it.
3. Verify that the CI/CD pipeline is functioning correctly by checking the GitHub Actions workflow runs. Persist until the goal is achieved.
4. Provide a comprehensive health check report covering:
   - API endpoint responses
   - Database connection status
   - Application performance metrics
   - Any identified issues with suggested fixes
5. If any issues are found, resolve them.

If any changes made to the code. Push the changes both to'staging' and 'main' branch.
- What to Expect
- Comprehensive testing commands, health check report, issue identification
- Verify
- All endpoints return successful responses, application functions as expected
Database Connectivity Test Prompt
Verify that the PostgreSQL database is properly connected to the Flask application and all database operations are working correctly.
Instructions:
1. Check the database connection status and provide SQL queries to verify:
   - Tables were created correctly according to the schema
   - Sample data can be inserted and retrieved
   - User authentication table is properly configured
   - Task management tables have correct relationships
2. Test database migrations and ensure all Flask-SQLAlchemy models are properly mapped.
3. Verify database environment variables are correctly configured in the DigitalOcean App Platform.
4. Provide commands to check database logs for any connection errors or performance issues.
If any database issues are detected, provide the exact SQL commands or configuration changes needed to fix them.
- What to Expect
- Database schema verification, connection tests, SQL commands for validation
- Verify
- Database tables exist, relationships work, data persistence confirmed
Performance and Security Check Prompt
Perform a final security and performance audit of the deployed task management application.

Instructions:
1. Check for common security vulnerabilities:
   - SQL injection protection in API endpoints
   - Cross-site scripting (XSS) prevention
   - Authentication token security
   - Input validation on all forms and API endpoints

2. Verify performance metrics:
   - Application response times
   - Database query performance
   - Static file serving efficiency
   - WebSocket connection stability

3. Test error handling:
   - 404 error pages work correctly
   - API returns proper error codes
   - Database connection failure scenarios
   - Invalid input handling

4. Provide recommendations for any security improvements or performance optimizations found.
- What to Expect
- Security audit results, performance metrics, error handling verification
- Verify
- Security measures active, performance acceptable, error handling functional
Pro Tips
- Always approve tool calls - Type y when prompted
- Keep dashboards open - Watch GitHub and DigitalOcean in separate tabs
- Database provisioning takes time - 5-10 minutes is normal
- Each feature builds on the previous - Don’t skip steps
- Save the prompts - You can reuse this process for future projects
Conclusion
You’ve just experienced the cutting edge of software development. In under 90 minutes, you’ve:
- Built a production-ready application using only natural language
- Orchestrated complex cloud infrastructure without writing deployment scripts
- Implemented professional CI/CD workflows through conversation
- Witnessed autonomous AI development that makes architectural decisions independently
This tutorial successfully demonstrated how to leverage Claude Code and MCP servers to automate a complete application development lifecycle. From initial project setup and task decomposition to feature development, CI/CD pipeline creation, and production release preparation, the AI agent autonomously orchestrated complex operations across GitHub and DigitalOcean. This showcases the immense potential of agentic coding to streamline DevOps workflows and accelerate software delivery.
Thanks for learning with the DigitalOcean Community. Check out our offerings for compute, storage, networking, and managed databases.
About the author
Still looking for an answer?
This textbox defaults to using Markdown to format your answer.
You can type !ref in this text area to quickly search our full set of tutorials, documentation & marketplace offerings and insert the link!
- Table of contents
- Introduction
- Prerequisites
- The Three-Phase Journey
- Enviornment Setup and MCP Server Configuration
- Phase 1: Project Foundation
- Phase 2: Development Workflow (Feature Implementation)
- Phase 3: Production Release
- Testing and Functionality Verification
- Pro Tips
- Conclusion
Deploy on DigitalOcean
Click below to sign up for DigitalOcean's virtual machines, Databases, and AIML products.
Become a contributor for community
Get paid to write technical tutorials and select a tech-focused charity to receive a matching donation.
DigitalOcean Documentation
Full documentation for every DigitalOcean product.
Resources for startups and SMBs
The Wave has everything you need to know about building a business, from raising funding to marketing your product.
Get our newsletter
Stay up to date by signing up for DigitalOcean’s Infrastructure as a Newsletter.
New accounts only. By submitting your email you agree to our Privacy Policy
The developer cloud
Scale up as you grow — whether you're running one virtual machine or ten thousand.
Get started for free
Sign up and get $200 in credit for your first 60 days with DigitalOcean.*
*This promotional offer applies to new accounts only.
