AI/ML Technical Content Strategist

DigitalOcean is closely observing the increasing parity between open-source Large Language Models (LLMs) and proprietary alternatives. A crucial capability of these models is reasoning, which involves logical and sensible thinking.
For a long time, LLMs were very linear. When given a prompt, they provided an answer. There is no meta-logic involved, or any stage where the model might be able to self-correct if it is mistaken. This effectively hinders their ability to reason, question, or adjust to problems that may be inherent to the instruction they are responding to. For example, with low-reasoning models, complex language based mathematics problems may be too complicated to solve without explicit instructions and work on the user’s part.
Enter the latest generation of reasoning LLMs. Ushered in by OpenAI’s O1 model series, reasoning models have taken the community by storm as they have effectively closed the gap between human and machine learning capabilities on a variety of logic tasks. These include coding, mathematics, and even scientific reasoning.
Like with all previous steps forward in development, the open source community has been working hard to match the closed-source models capabilities. Recently, the first open-source models to achieve this level of abstract reasoning, the Deepseek R1 series of LLMs, was released to the public.
In the first part of this 2 part article series, we will show how to run these models on DigitalOcean’s GPU Droplets using Ollama. Readers can expect to learn how to set up the GPU Droplet, install Ollama, and begin reasoning with Deepseek R1.
Key takeaways:
- DeepSeek R1 is an open large language model known for being a cost-effective alternative to proprietary AI systems, and running it on a DigitalOcean GPU Droplet allows you to harness its capabilities (for tasks like coding assistance or Q&A) without needing to invest in high-end hardware on premises.
- This guide shows how to set up a DigitalOcean GPU Droplet and use Ollama (a local LLM runtime) to download and serve the DeepSeek R1 model, so you can interact with it via a chat interface or API on your own cloud instance.
- By deploying DeepSeek R1 on a GPU (instead of a CPU), you ensure the model runs efficiently and can handle complex queries, taking advantage of the droplet’s GPU acceleration to achieve faster responses and support larger model variants than would be feasible on a typical laptop or small server.
- Hosting an LLM like DeepSeek R1 on your own Droplet gives you full control over the model and data (since queries aren’t sent to an external API), and DigitalOcean’s platform even offers convenient deployment options like a one-click app to get the model running quickly for experimentation or production use.
Prerequisites
- DigitalOcean account: This tutorial will use DigitalOcean’s GPU droplets.
- Bash shell familiarity: We will be using the terminal to access, download, and use Ollama. The commands will be provided.
- Deepseek R1 models are large; ensure your Droplet has a good amount of storage and 40–80 GB RAM.
Setting up the GPU Droplet
The first thing we need to do is set up our machine. To begin, create a new GPU Droplet following the procedure shown in the official DigitalOcean documentation.
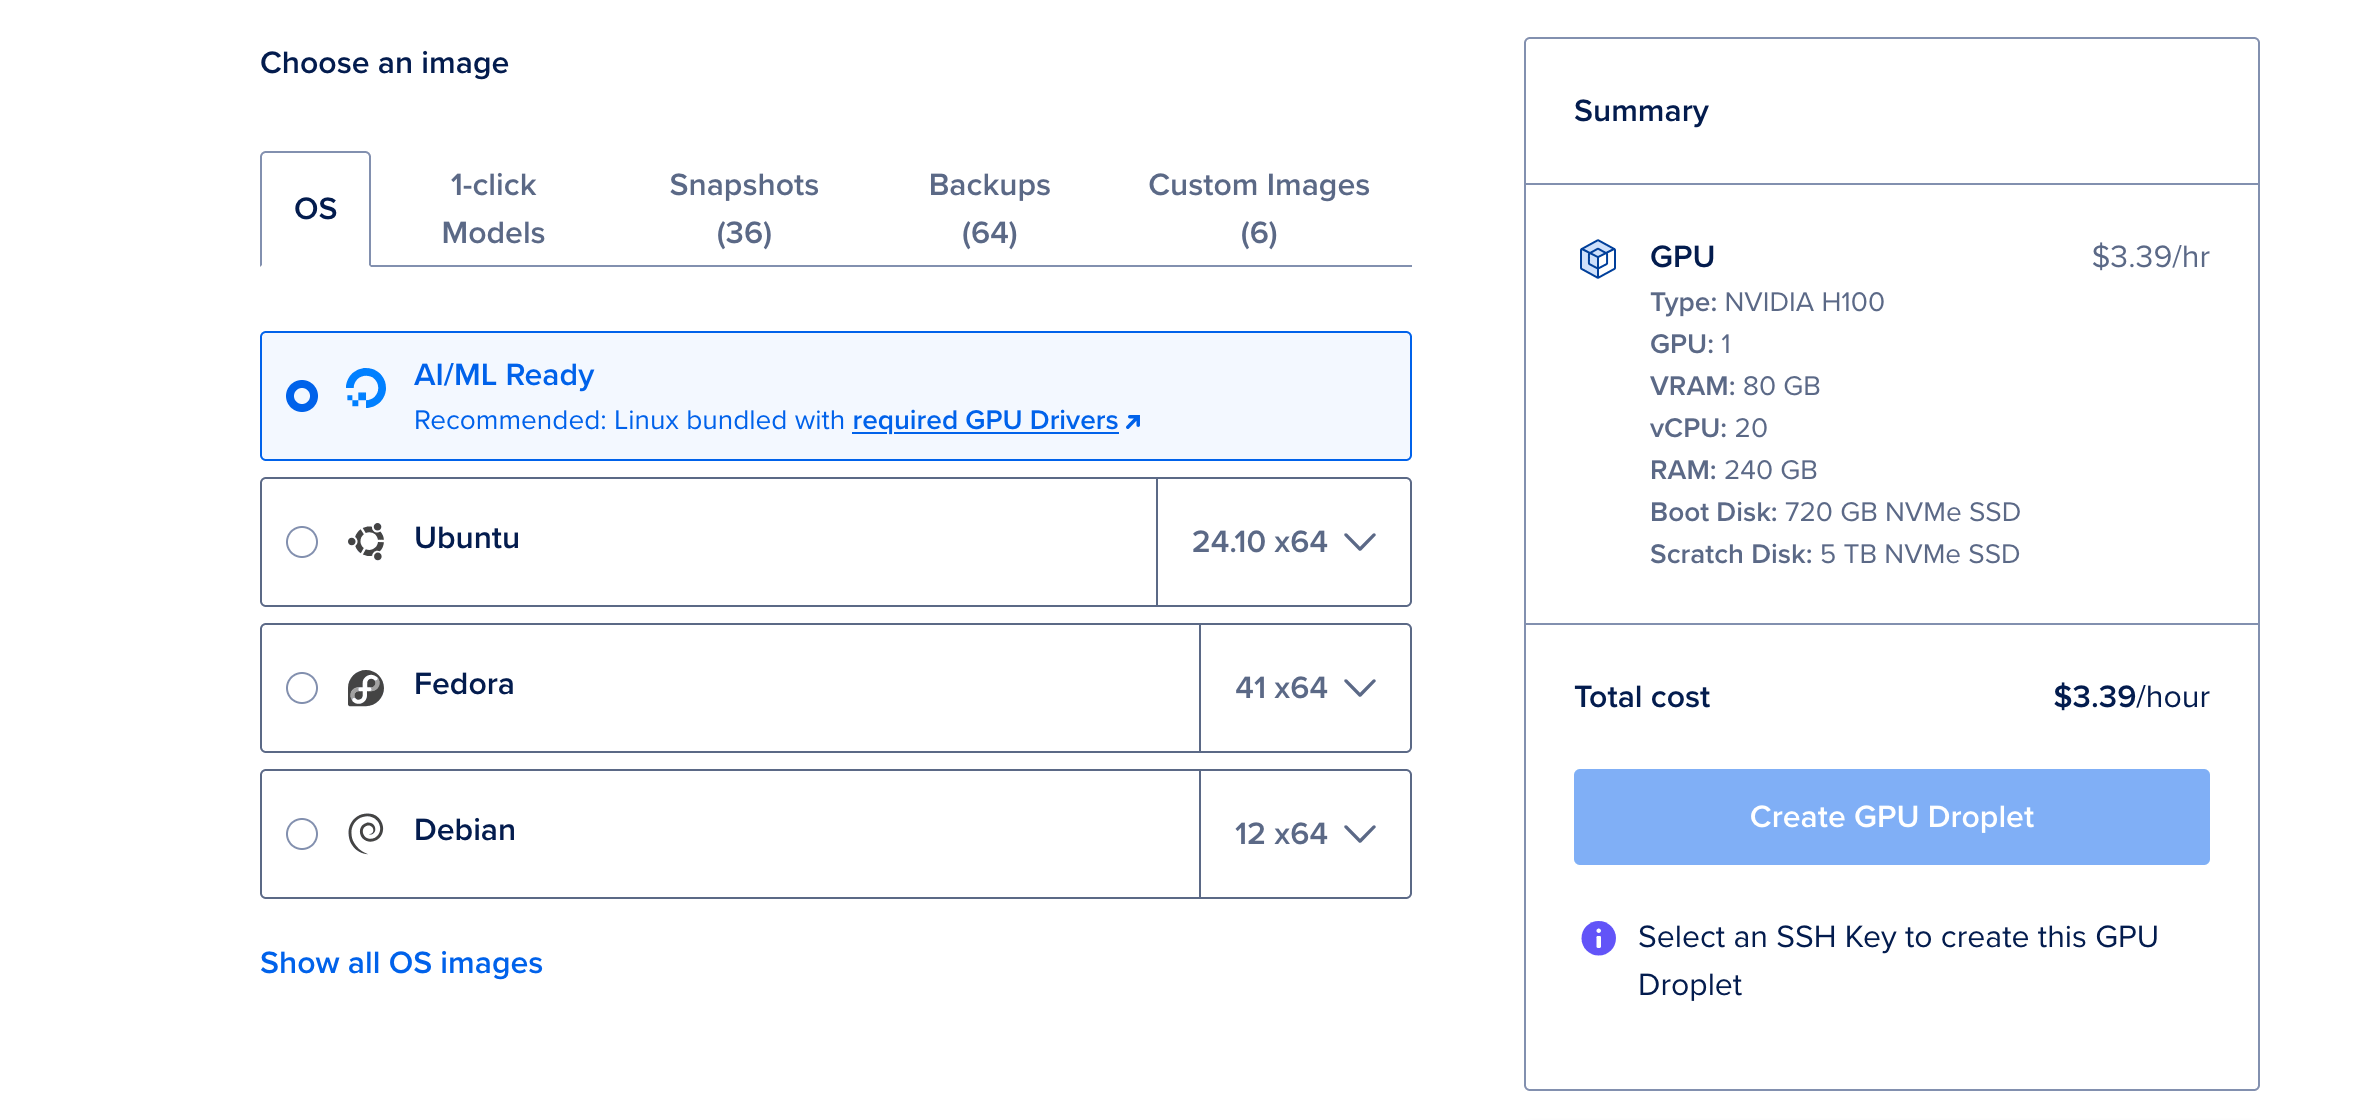
We recommend selecting the “AI/ML Ready” OS and using a single NVIDIA H100 GPU for this project, unless you intend to use the largest, 671B parameter model.
Once your machine has started up, proceed to the next section.
Installing Ollama & DeepSeek R1
For this demonstration, we will take advantage of the incredible work done by the Ollama developers to bring our model online at rapid speed. Open up a web console window using the button on the top right of your GPU Droplet details page, and navigate to the working directory of your choosing.
Once you are in the place you would like to work, paste the following command into the terminal:
curl -fsSL https://ollama.com/install.sh | sh
This will execute the installation of Ollama onto our machine. This process may take a few minutes as it installs. Once it has completed, everything is ready to go! Wasn’t that simple?
Now, all we need to do is execute the command that runs DeepSeek R1 on our machine. Ollama provides all of the available model sizes (1.5b, 7b, 8b, 14b, 32b, 70b and 671b parameters), so we recommend using the largest available to run on a single GPU, the 70b model.
ollama run deepseek-r1:70b
This will take a few minutes the first time it is run to download the roughly 40GB model onto our machine and load it, but from here, we will get an interactive window to chat with our open-source reasoning model.
Info: Deploy DeepSeek R1, the open-source advanced reasoning model that excels at text generation, summarization, and translation tasks. As one of the most computationally efficient open-source LLMs available, you’ll get high performance while keeping infrastructure costs low with DigitalOcean’s GPU Droplets.
Reasoning with DeepSeek R1
As we mentioned at the start of this article, R1 is capable of handling complex tasks related to mathematics, coding, and even scientific reasoning. A reasoning model is a framework or set of principles that guide how an AI system reasons, makes decisions, and solves problems. It outlines the algorithms, techniques, and heuristics that enable the AI to draw inferences, draw conclusions from available information, and generate solutions to complex tasks. It does this by using the iterative nature of GPT models with metalogic reasoning to better understand and infer solutions to the proposed problem.
Let’s try a sample math problem (source), and see how the model reasons the answer back to us:
## input
Answer this question: A package that is heavier than 11 lbs and 8 oz will have a label that says “heavy” on it. Gloria packed 6 flowerpots to send to her customers. Each of the flowerpots weighs 1 lb and 12 oz. The packing material weighs 5 oz. Will her package be labeled as “heavy”?
## output
<think>
First, I need to determine the total weight of Gloria's package to see if it exceeds the threshold for
being labeled as "heavy."

Gloria has packed 6 flowerpots, each weighing 1 pound and 12 ounces. Additionally, there is packing
material that weighs 5 ounces.

I'll start by calculating the total weight of all the flowerpots. Since each pot is 1 lb 12 oz, multiplying
this by 6 gives:
6 pots × (1 lb + 12 oz) = 6 lbs and 72 oz.

Next, I need to convert the 72 ounces into pounds because the threshold is given in pounds and ounces.
Knowing that 16 ounces make a pound, I divide 72 by 16:
72 oz ÷ 16 oz/lb = 4.5 lb.

So, the flowerpots weigh a total of 6 lbs + 4.5 lbs = 10.5 lbs.

Now, adding the weight of the packing material, which is 5 ounces. To maintain consistent units, I convert
5 ounces to pounds:
5 oz ÷ 16 oz/lb ≈ 0.3125 lb.

Adding this to the flowerpots' total weight:
10.5 lbs + 0.3125 lbs = 10.8125 lbs.

Finally, comparing the total package weight of approximately 10.81 lbs to the 11 lbs and 8 oz threshold,
which is equivalent to 11.5 lbs (since 8 oz = 0.5 lb). Since 10.81 lbs is less than 11.5 lbs, the package
will not be labeled as "heavy."
</think>

**Solution:**

To determine if Gloria's package will be labeled as “heavy,” we need to calculate its total weight and
compare it to the threshold of **11 lbs and 8 oz** (which is equivalent to **11.5 lbs**).

1. **Calculate the Weight of the Flowerpots:**

   - Each flowerpot weighs **1 lb and 12 oz**.
   - Convert **12 oz** to pounds:
\[
12\ \text{oz} = \frac{12}{16}\ \text{lbs} = 0.75\ \text{lbs}
\]

- So, each flowerpot weighs **1.75 lbs**.

- Gloria packed **6 flowerpots**, so:
\[
6 \times 1.75\ \text{lbs} = 10.5\ \text{lbs}
\]

2. **Add the Weight of Packing Material:**

- The packing material weighs **5 oz**.
- Convert **5 oz** to pounds:
\[
5\ \text{oz} = \frac{5}{16}\ \text{lbs} \approx 0.3125\ \text{lbs}
\]

- Total weight of the package:
\[
10.5\ \text{lbs} + 0.3125\ \text{lbs} = 10.8125\ \text{lbs}
\]

3. **Compare with the Threshold:**

- The threshold for a “heavy” label is **11 lbs and 8 oz**, which is **11.5 lbs**.

- Since **10.8125 lbs < 11.5 lbs**, the package does **not** meet the criteria for being labeled as
“heavy.”

**Final Answer:**

\[
\boxed{\text{No}}
\]
Look closely at the way the model reasoned out the response to this question. It first determined the parameters for solving the question: finding the total weight of the flower pots and packing material. It then reiterated the facts from the problem and showed its work, reasoning the total weight of the flower pots and packing materials individually. It then combined those values and compared the two values to get the correct answer: no.
Now, let’s look at a coding example:
## input
How can i write a Python function that converts wav files to mp3s?

## output
Okay, so I want to create a Python function that converts WAV files to MP3s. Hmm, where do I start? Well, I
know that WAV and MP3 are both audio formats, but they're different in terms of compression and quality.
WAV is uncompressed, which makes the files larger, while MP3 is compressed, making the files smaller but
with some loss in quality.

First, I need to figure out how to read a WAV file in Python. I've heard about libraries like `wave` or
`soundfile`, but I'm not sure if they can help me convert formats. Maybe those are more for manipulating
audio data rather than converting formats.

Then there's the conversion part. How do I actually convert a WAV file into an MP3? It seems like I might
need some external tool or library that handles the encoding. Oh, right! I think `ffmpeg` is a powerful
tool for audio and video processing. Maybe I can use it within Python.

So, perhaps I can write a function that uses `ffmpeg` to convert the WAV file to MP3. But how do I
interface with `ffmpeg` from Python? I recall there's a library called `subprocess` that allows you to run
shell commands from Python. That could work.

Wait, but is there a more direct way without using shell commands? Maybe there are pure Python libraries
for converting audio formats. I did some searching and found `pydub`. It seems like `pydub` can handle
format conversions and uses `ffmpeg` under the hood. That might be easier to use than dealing with
`subprocess` directly.

Alright, so I'll go with `pydub`. First, I need to install it using pip:

pip install pydub

But wait, does `pydub` require `ffmpeg` to be installed on my system? Yes, it does. So I need to make sure
that `ffmpeg` is installed and accessible from the command line.

Once that's set up, I can write a function that takes a WAV file path as input and outputs an MP3 file. Let
me sketch this out:

1. Import the necessary modules.
2. Define a function called `convert_wav_to_mp3`.
3. Use `pydub.AudioSegment` to read the WAV file.
4. Export the audio segment to MP3 format.

But I should also handle exceptions, like if the input file doesn't exist or if there's an error during
conversion. Maybe add some try-except blocks for better error handling.

Let me think about potential issues:
- What if the output path already exists? Should I overwrite it or raise an error?
- How do I handle different bitrates or quality settings in MP3?
- Are there any specific parameters I need to set for the conversion?

For now, I'll keep it simple and focus on a basic conversion. I can always add more features later.

So, putting it all together, here's what my function might look like:


from pydub import AudioSegment

def convert_wav_to_mp3(wav_file_path, mp3_file_path):
  try:
# Load the WAV file
    sound = AudioSegment.from_wav(wav_file_path)

# Export to MP3
   sound.export(mp3_file_path, format="mp3")

   print("Conversion successful!")
  except Exception as e:
    print(f"An error occurred: {e}")

I should test this function with a sample WAV file to see if it works. If it does, great! I can then think
about adding more features like handling multiple files or different quality settings.

Wait, but what if the user wants to convert all WAV files in a directory? Maybe I can modify the function
to accept a list of file paths or even search for WAV files recursively. That would make the function more
versatile.

Also, considering performance, converting large numbers of files might take some time. Maybe adding
progress indicators or parallel processing could improve the user experience, but that's probably beyond
the scope of this initial implementation.

In summary, to write a Python function that converts WAV files to MP3s:
1. Use `pydub` as it simplifies the conversion process using `ffmpeg`.
2. Ensure `ffmpeg` is installed and accessible.
3. Write a function that imports the WAV file and exports it in MP3 format.
4. Add error handling for potential issues like missing files or conversion errors.

I think this approach should work well for my needs, but I'll need to test it thoroughly to make sure there
are no unexpected issues.
</think>

To convert WAV files to MP3s using Python, you can utilize the `pydub` library, which simplifies audio
format conversions by leveraging `ffmpeg`. Below is a step-by-step guide and code implementation:

**Step 1: Install Required Libraries**

First, install `pydub` using pip. Note that `pydub` requires `ffmpeg` to be installed on your system.

pip install pydub

Ensure `ffmpeg` is accessible from the command line.

**Step 2: Implement the Conversion Function**

Here's a Python function that converts a WAV file to MP3:

from pydub import AudioSegment

def convert_wav_to_mp3(wav_file_path, mp3_file_path):
#Converts a WAV file to an MP3 file.

#Args:
#wav_file_path (str): Path to the input WAV file.
#mp3_file_path (str): Desired path for the output MP3 file.
#"""
  try:
# Load the WAV file
    sound = AudioSegment.from_wav(wav_file_path)

# Export to MP3 format
    sound.export(mp3_file_path, format="mp3")

print("Conversion successful!")
  except Exception as e:
    print(f"An error occurred during conversion: {e}")

**Step 3: Example Usage**

To use the function:
# Example usage
convert_wav_to_mp3("input.wav", "output.mp3")

This will convert `input.wav` to `output.mp3`.

**Additional Considerations:**

1. **Error Handling**: The function includes basic error handling. Depending on your needs, you can extend
it by handling specific exceptions.

2. **Multiple Files**: To process multiple WAV files, modify the function to accept a list of file paths or
iterate through a directory.

3. **Quality Settings**: `pydub` allows specifying parameters like bitrate. You can enhance the function to
accept such options.

4. **Performance**: For large-scale conversions, consider adding progress indicators or parallel processing
for efficiency.

This implementation provides a robust foundation for converting WAV files to MP3s using Python.
Again, this is a very telling example of the model’s reasoning skills. In the response, it first provided a sufficient answer. Continuing, it reasoned that the answer may not consider all possible edge cases for the user, such as converting all files in a directory. To ameliorate this, it provided another working solution that better solves every potential problem. It then expounded upon these considerations in detail to conclude the response. Overall, this is a very impressive and comprehensive solution that nearly mimics the reasoning of a human actor.
Based on these responses, we recommend trying all sorts of challenging questions with R1. The model is incredibly robust, especially at the 60b param level and up.
FAQ’s
-
Q: DeepSeek R1 vs GPT-4 vs Claude: performance comparison for coding tasks 2025 DeepSeek R1 excels at coding tasks with competitive performance to GPT-4 while being open-source and cost-effective. For code generation, DeepSeek R1 matches or exceeds GPT-4 on many programming benchmarks, particularly for mathematical reasoning and algorithm implementation. Unlike GPT-4 and Claude, DeepSeek R1 can be run locally for complete privacy and control. Performance varies by task: DeepSeek R1 shows strong results in competitive programming, mathematical problem solving, and technical documentation. However, GPT-4 and Claude may have advantages in natural language understanding and complex reasoning tasks. Choose DeepSeek R1 for privacy-sensitive coding projects, cost control, and when you need transparency in model behavior.
-
Q: What are the minimum GPU requirements for running DeepSeek R1 efficiently? DeepSeek R1 GPU requirements depend on model size: The 7B variant requires 8-12GB VRAM (RTX 4060 Ti/3080 minimum), 14B model needs 16-20GB VRAM (RTX 4080/4090), and 32B+ variants require 24GB+ VRAM (RTX 4090/professional cards). For optimal performance, use modern architectures (Ampere or newer) with high memory bandwidth. CPU requirements include 16GB+ system RAM and modern multi-core processors. SSD storage improves model loading times. Cloud GPU droplets like DigitalOcean’s H100 instances provide powerful alternatives without hardware investment, offering scalable performance for varying workloads and model sizes.
-
Q: How to fine-tune DeepSeek R1 for specific coding languages or frameworks? Fine-tuning DeepSeek R1 for specific coding tasks involves: Collecting high-quality code datasets in your target language/framework with proper documentation and examples. Preprocessing data with tokenization and formatting appropriate for the base model. Using parameter-efficient fine-tuning methods like LoRA or QLoRA to reduce computational requirements. Implementing appropriate training hyperparameters (learning rate 1e-4 to 1e-5, batch size based on GPU memory). Creating evaluation benchmarks specific to your use case. Using frameworks like Hugging Face Transformers or Axolotl for streamlined fine-tuning workflows. Monitor for overfitting and implement early stopping. Consider instruction tuning for better following of coding prompts and specifications.
-
Q: How to set up DeepSeek R1 API endpoints for team development workflows? Setting up DeepSeek R1 API endpoints involves: Installing Ollama on your GPU droplet and downloading the DeepSeek R1 model. Configuring Ollama to serve the model via REST API with appropriate authentication and rate limiting. Setting up reverse proxy (nginx) for SSL termination and load balancing. Implementing API key management for team access control. Creating Docker containers for consistent deployment across environments. Setting up monitoring and logging for usage tracking and debugging. Integrating with development tools like VS Code extensions, CI/CD pipelines, and code review systems. Implementing caching strategies for frequently requested code completions to improve response times and reduce costs.
-
Q: What are the cost advantages of running DeepSeek R1 locally vs cloud API services? Running DeepSeek R1 locally provides significant cost advantages for consistent usage: No per-token pricing eliminates variable costs for high-volume applications. One-time GPU droplet or hardware costs vs ongoing API fees that can reach thousands monthly for heavy users. Complete control over usage without rate limits or throttling. No data transfer costs for large codebases or frequent interactions. For teams with consistent AI coding needs, local deployment typically pays for itself within 3-6 months compared to commercial APIs. However, cloud APIs offer advantages for sporadic usage, easier scaling, and no infrastructure management. Calculate total cost of ownership including setup time, maintenance, and opportunity costs when making decisions.
Closing Thoughts
Running DeepSeek R1 models on DigitalOcean GPU Droplets is surprisingly straightforward. With just a few setup steps—you can start experimenting with powerful open-source LLMs in minutes.
DigitalOcean’s GPU Droplets offer scalable, high-performance infrastructure with minimal complexity, making them ideal for developers, researchers, and startups looking to explore models like DeepSeek R1 without managing their own hardware.
Whether you’re fine-tuning, deploying, or simply exploring LLM capabilities, DigitalOcean gives you the GPU power you need—with the simplicity you expect.
Thanks for learning with the DigitalOcean Community. Check out our offerings for compute, storage, networking, and managed databases.
About the author
Still looking for an answer?
This textbox defaults to using Markdown to format your answer.
You can type !ref in this text area to quickly search our full set of tutorials, documentation & marketplace offerings and insert the link!
Great article! I have a question about pricing. After you create the droplet, you are only charged for the time the GPU is being used. Is this correct? So the droplet can exist, but if you are not actively using it, you are not charged? Thank you.
Running DeepSeek R1 LLMs on GPU droplets (such as those provided by cloud services like Paperspace, AWS, or DigitalOcean) allows for efficient inference and fine-tuning of large language models at scale. Here’s how to get started:
-
Choose a Suitable GPU Droplet Ensure your droplet has enough VRAM—ideally 16GB or more (e.g., NVIDIA A100, V100, or L4 GPUs). LLMs like DeepSeek R1 require significant memory, especially for larger variants.
-
Set Up the Environment Install the necessary deep learning framework. DeepSeek R1 models are compatible with PyTorch and transformers libraries. Run:
nginx CopyEdit
pip install torch transformers accelerate -
Download the Model Visit Hugging Face or DeepSeek’s official release page. Use
transformersto load the model:python CopyEdit
from transformers import AutoModelForCausalLM, AutoTokenizer model = AutoModelForCausalLM.from_pretrained("deepseek-ai/deepseek-llm-7b", device_map="auto") tokenizer = AutoTokenizer.from_pretrained("deepseek-ai/deepseek-llm-7b") -
Optimize for GPU Use
device_map="auto"or manually assign the model to the GPU using.to("cuda"). Installacceleratefor seamless device handling and memory-efficient inference. -
Run Inference Once the model and tokenizer are loaded:
python CopyEdit
inputs = tokenizer("Hello, DeepSeek!", return_tensors="pt").to("cuda") outputs = model.generate(**inputs) print(tokenizer.decode(outputs[0])) -
Monitor GPU Usage Use
nvidia-smito monitor resource usage and avoid out-of-memory errors.
 This work is licensed under a Creative Commons Attribution-NonCommercial- ShareAlike 4.0 International License.
Become a contributor for community
Get paid to write technical tutorials and select a tech-focused charity to receive a matching donation.

DigitalOcean Documentation
Full documentation for every DigitalOcean product.

Resources for startups and AI-native businesses
The Wave has everything you need to know about building a business, from raising funding to marketing your product.
The developer cloud
Scale up as you grow — whether you're running one virtual machine or ten thousand.

Start building today
From GPU-powered inference and Kubernetes to managed databases and storage, get everything you need to build, scale, and deploy intelligent applications.
