
In this module, we will have a look at how we can host a web server on Android and port forward it using ngrok so that we can have a flexible webserver on the go.
Steps to host a web server on Android
Let’s get right into the steps to host a web server on our Android devices now.
1. Install Termux And Hacker’s Keyboard
First, we will need two Applications before we continue on : Termux (which will help us issue commands) and Hacker’s Keyboard (which will help us to use keys like Ctrl, Esc, Alt which are usually not available on standard Android Keyboards)
You can get Termux from their official website or from Google Playstore
You can install Hacker’s Keyboard as well for better navigation within the Termux window.
2. Install Packages On Termux
Now we need to install some of the packages we require on Termux. Open the app and type in the following commands :
$ pkg update && pkg upgrade
This should upgrade our current system. Next up we will need to install some necessary packages with :
$ pkg install apache2 git neovim wget curl
3. Connect To Android Device Via SSH
Note that this section is completely optional. Here we will install some additional packages just to aid us during the whole process:
$ pkg install openssh neofetch fish nmap
First let’s enable ssh so that we can connect to our phone via our PC by :
$ sshd
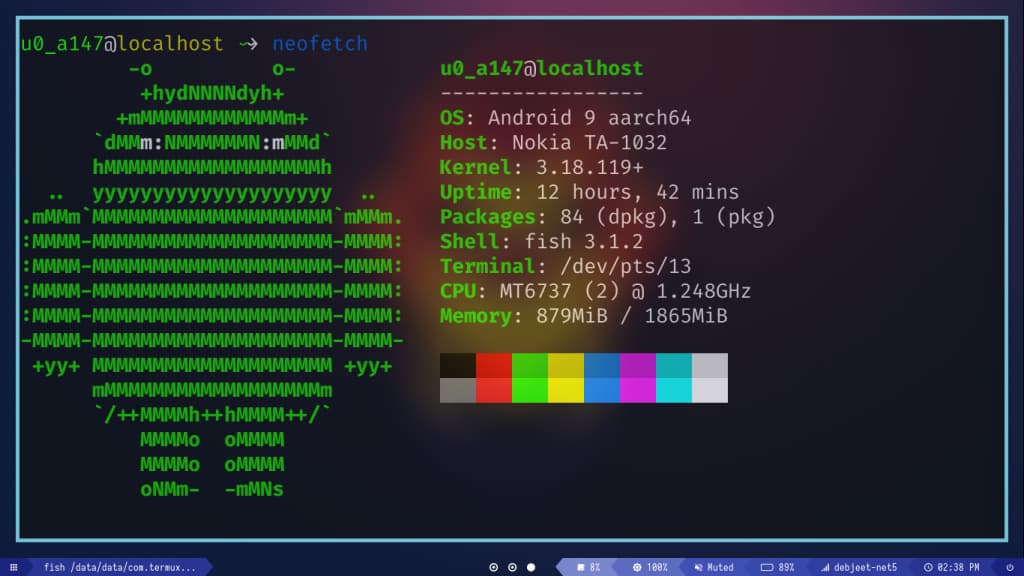
Next, check your username and IP with ifconfig:
$ whoami
u0_a147
$ ifconfig wlan0
wlan0: flags=4163<UP,BROADCAST,RUNNING,MULTICAST>  mtu 1500
        inet 192.168.0.105  netmask 255.255.255.0  broadcast 192.168.0.255
        inet6 fe80::ce9f:7aff:fe81:3115  prefixlen 64  scopeid 0x20<link>
        unspec 00-00-00-00-00-00-00-00-00-00-00-00-00-00-00-00
        txqueuelen 3000  (UNSPEC)
        RX packets 227165  bytes 311846650 (297.4 MiB)
        RX errors 0  dropped 0  overruns 0  frame 0
        TX packets 82264  bytes 7912862 (7.5 MiB)
        TX errors 0  dropped 0 overruns 0  carrier 0  collisions 0
Now we need to check which port the SSH service is running. You can check it with:
$ nmap -sV 127.0.0.1
Starting Nmap 7.91 ( https://nmap.org ) at 2021-03-12 14:44 IST
Nmap scan report for localhost (127.0.0.1)
Host is up (0.0075s latency).
Not shown: 999 closed ports
PORT     STATE SERVICE VERSION
8022/tcp open  ssh     OpenSSH 8.4 (protocol 2.0)

Service detection performed. Please report any incorrect results at https://nmap.org/submit/ .
Nmap done: 1 IP address (1 host up) scanned in 4.87 seconds
Once you have the Port Number, switch over to your PC and connect to your device with :
$ ssh -p <PORT> <USER>@<IP>
For example, for me, the complete command would be :
$ ssh -p 8022 u0_a147@192.168.0.105
Next up change the default shell with :
$ chsh /data/data/com.termux/files/usr/bin/fish
At this point, you can issue commands to your device from the terminal of your PC
4. Start the webserver on Android
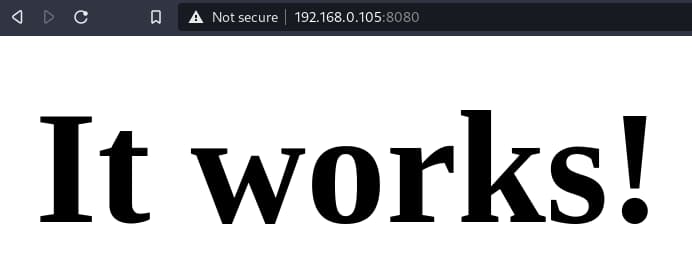
Now, we can start our server with:
$ apachectl
By default, the webpage is hosted on port 8080. Visiting the said port on our browser, we find the following message :
To edit the message we need to change the index.html file with the vi editor:
$ vi $PREFIX/share/apache2/default-site/htdocs/index.html
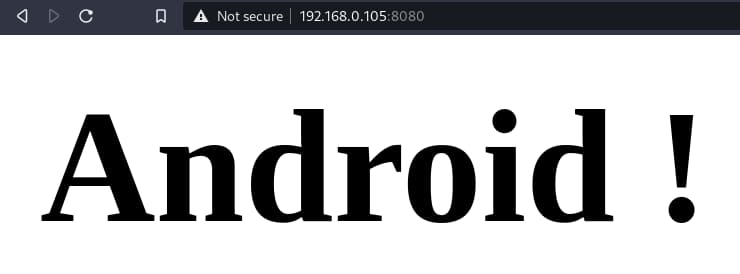
Let’s change the contents of index.html to :
<html><body><h1>Android !</h1></body></html>
Refreshing the page, we should now see our changes being reflected :
At this point, you can customize your page to look/do whatever you want it to do. However, to extend our functionality even further, we can enable port forwarding with ngrok !
5. Port Forwarding With Ngrok
First, we need to get the compressed file from the offical website with :
$ wget https://bin.equinox.io/c/4VmDzA7iaHb/ngrok-stable-linux-arm64.tgz
Unzip the file with :
$ tar -xvzf ngrok-stable-linux-arm64.tgz
Next up, you need to sign up on their website to get an authorization token.
Now, you should get an authorization toke. To add the token to the default config file, type in :
$ ./ngrok authtoken <token>
Now, we should have access more features and longer sessions. Finally with our webserver still running, type :
$ ./ngrok http 8080
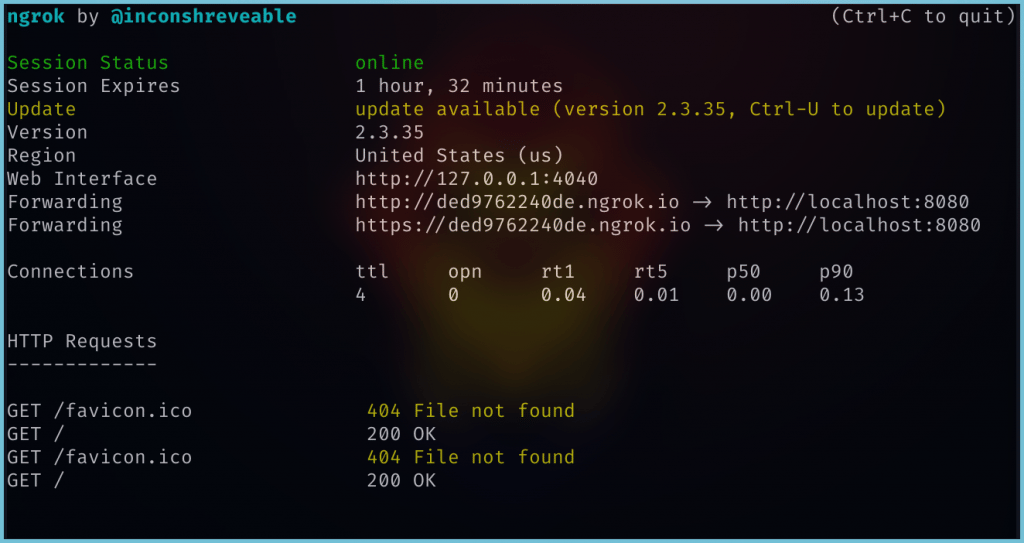
We get a ngrok link, where we would find our webserver’s homepage :
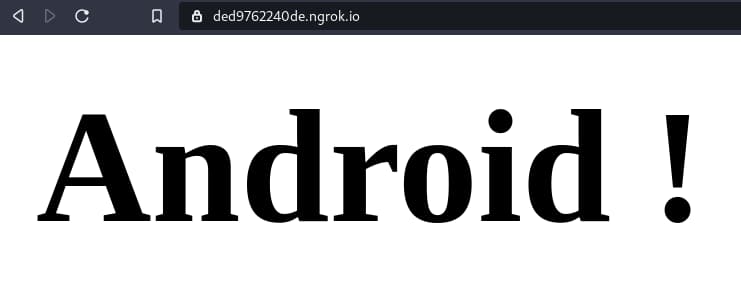
Now, we need can access our server from outside our local network using the ngrok link !
Conclusion
Thus in this way, we can use our Android phones as web servers. On non-rooted phones, you can host a webserver on any of the higher ports while on rooted phones you can use the default port 80.
Thanks for learning with the DigitalOcean Community. Check out our offerings for compute, storage, networking, and managed databases.
About the author
Still looking for an answer?
 This work is licensed under a Creative Commons Attribution-NonCommercial- ShareAlike 4.0 International License.
Become a contributor for community
Get paid to write technical tutorials and select a tech-focused charity to receive a matching donation.

DigitalOcean Documentation
Full documentation for every DigitalOcean product.

Resources for startups and AI-native businesses
The Wave has everything you need to know about building a business, from raising funding to marketing your product.
The developer cloud
Scale up as you grow — whether you're running one virtual machine or ten thousand.

Start building today
From GPU-powered inference and Kubernetes to managed databases and storage, get everything you need to build, scale, and deploy intelligent applications.
