
Introduction
DigitalOcean’s Private Networking feature gives your Droplets a network interface which is only accessible to other Droplets on the same team or account and located in the same datacenter.
The droplan utility can help secure private network interfaces on a Droplet by adding iptables firewall rules that only allow traffic from your other Droplets in the same datacenter. By installing and running the utility on each Droplet, you can ensure that your systems will only accept local traffic from one another.
This guide will cover installing droplan on an individual Droplet, scheduling a cron job to run it on a regular basis, and ensuring that firewall rules persist when the Droplet is rebooted or loses power.
Prerequisites
This guide assumes that you have two or more Linux Droplets in the same region, each configured with a non-root user with sudo privileges for administrative tasks. Specifically, it provides instructions for recent Debian, Ubuntu, and CentOS releases. On CentOS systems, it will disable firewalld, so you should be aware that it may override any existing firewall configuration.
Retrieving a Read-only Personal Access Token
The droplan utility In order to ask the API for a list of your Droplets, the droplan command needs access to a personal access token with read scope. You can retrieve a token by accessing the DigitalOcean Control Panel, clicking on API in the top menu, and clicking the Generate New Token button. Enter a descriptive name for the new token, in the Token Name field, such as “droplan readonly”, and uncheck the Write (Optional) box:
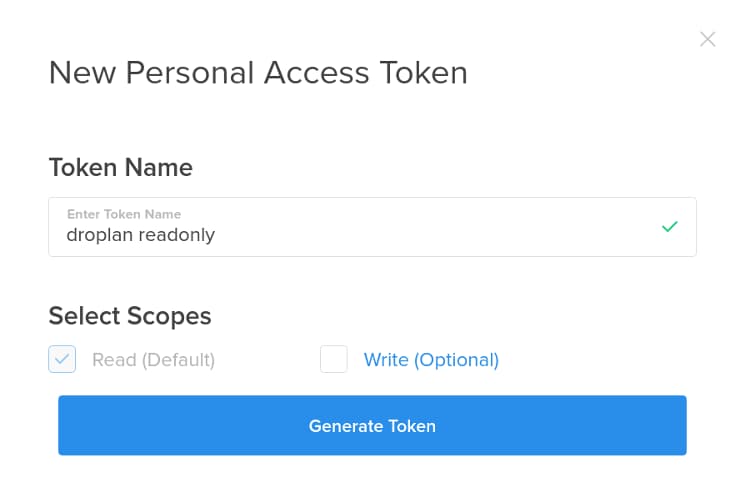
Click Generate Token, and copy the resulting token to your local machine:
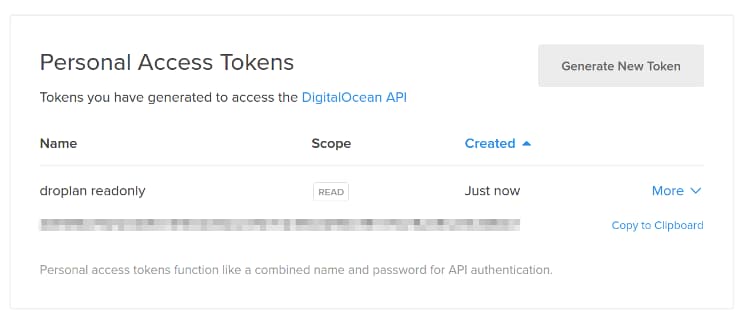
Note: Make sure you keep a copy of the token, or you’ll have to generate a new one. It can’t be retrieved from the Control Panel after the first time it’s shown.
For more details on this process, and the basics of API usage, see How To Use the DigitalOcean API v2.
Installing Droplan
Installing Debian and Ubuntu Prerequisites
If you are on Debian or a Debian-derived distribution such as Ubuntu, install the unzip package using apt-get:
- sudo apt-get install unzip iptables-persistent
We’ll need iptables-persistent in a moment when we configure persistent firewall rules. You’ll likely be asked by the installer whether you want to save current firewall rules at the time of installation. It shouldn’t do any harm if you say yes.
Installing CentOS Prerequisites
If you are using CentOS 7, install the unzip and iptables-services package using yum:
- sudo yum install unzip iptables-services
We’ll need iptables-services in a moment when we configure persistent firewall rules.
Retrieving and Extracting Archive
Visit the releases page on the droplan GitHub project, and find a URL for the latest release which supports your architecture. Copy the URL, log in to one of your Droplets, and retrieve the file with wget or curl:
- wget https://github.com/tam7t/droplan/releases/download/v1.0.0/droplan_1.0.0_linux_amd64.zip
Now, use the unzip command to extract the droplan binary from the release archive:
- unzip droplan_1.0.0_linux_amd64.zip
Create a directory in /opt for droplan, and move the binary there:
- sudo mkdir /opt/droplan
- sudo mv ./droplan /opt/droplan/
The /opt directory is a standard location for software installed from sources other than a distribution’s official package repositories.
Creating Iptables Rules
With the droplan binary in place, you can use it to create rules. Run the command under sudo, setting the DO_KEY environment variable to your token:
- sudo DO_KEY=personal_access_token /opt/droplan/droplan
Now, check your iptables rules:
- sudo iptables -L
Assuming that you have two other Droplets in the same region, you should see something like the following:
OutputChain INPUT (policy ACCEPT)
target     prot opt source               destination
droplan-peers  all  --  anywhere             anywhere
DROP       all  --  anywhere             anywhere

Chain FORWARD (policy ACCEPT)
target     prot opt source               destination

Chain OUTPUT (policy ACCEPT)
target     prot opt source               destination

Chain droplan-peers (1 references)
target     prot opt source               destination
ACCEPT     all  --  droplet_ip1       anywhere
ACCEPT     all  --  droplet_ip2        anywhere
To confirm that these rules are applied only to eth1, you can add the -v option for more verbose output, which will include interfaces:
- sudo iptables -L -v
Persisting Iptables Rules
For now, all of your other Droplets in the same region can connect to the current system, while traffic from systems you don’t control is blocked. If the system reboots, however, the iptables rules will disappear. It’s also likely that you will create new Droplets (or delete the existing ones) at some point in the future. In order to deal with these problems, we’ll make sure that rules persist on restart, and schedule droplan to run on a regular basis and make any necessary changes to the firewall.
Persisting Rules on Debian or Ubuntu
Firewall rules are kept in /etc/iptables/rules.v4 (and /etc/iptables/rules.v6 for ipv6 rules). You can generate a new version of this file using the iptables-save command:
- sudo iptables-save | sudo tee /etc/iptables/rules.v4
Persisting Rules on CentOS 7
By default, CentOS 7 uses the firewalld service in place of iptables. Since we already installed the iptables-services package above, we can use systemctl to stop this service and mask it, ensuring that it won’t be restarted:
- sudo systemctl stop firewalld
- sudo systemctl mask firewalld
Now enable the iptables service:
- systemctl enable iptables
With the iptables service in place, save the current firewall rules:
- sudo service iptables save
Testing Rule Persistence
You may wish to reboot the system, reconnect, and check that the rules have persisted. First, reboot:
- sudo reboot
Now, reconnect to your Droplet (this will take a few seconds), and check the rules:
- sudo iptables -L
Scheduling a Cron Job to Update Iptables Rules
As a final step, we’ll make sure that droplan runs periodically so that it catches changes in your collection of Droplets.
Begin by creating a new script called /opt/droplan/refresh.sh, using nano (or your editor of choice):
- sudo nano /opt/droplan/refresh.sh
Paste the following, uncommenting the appropriate line for your distribution by deleting the leading #:
#!/usr/bin/env bash

/opt/droplan/droplan

# Uncomment for Centos:
# service iptables save

# Uncomment for Debian or Ubuntu:
# iptables-save > /etc/iptables/rules.v4
Exit and save the file, then mark it executable:
- sudo chmod +x /opt/droplan/refresh.sh
Next, create a new file at /etc/cron.d/droplan:
- sudo nano /etc/cron.d/droplan
Add the following line to the file in order to run the script as root every 5 minutes:
*/5 * * * * root PATH=/sbin:/usr/bin:/bin DO_KEY=personal_access_token /opt/droplan/refresh.sh > /var/log/droplan.log 2>&1
This will run the refresh.sh script once every 5 minutes, as indicated by */5 in the first field, and log its most recent output to /var/log/droplan.log.
Exit and save the file. You can now use the watch command, which displays the output of another command every few seconds, to make sure that the script runs successfully:
- sudo watch cat /var/log/droplan.log
Once the script runs, you should see output something like the following:
Sample CentOS OutputEvery 2.0s: cat droplan.log                      Fri Mar 25 01:14:45 2016

2016/03/25 01:14:02 Added 2 peers to droplan-peers
iptables: Saving firewall rules to /etc/sysconfig/iptables: [  OK  ]
On Debian-derived systems, systemctl iptables save won’t display any output.
Press Ctrl-C to exit watch.
Note: Since the API is rate-limited, you may need to tune the frequency of updates if you have many Droplets. You can read more about cron or the API itself.
Conclusion and Next Steps
Now that you’ve configured the firewall on a single Droplet, you’ll want to repeat this process with the rest of your infrastructure. For more than a handful of Droplets, it would probably be easiest to automate this process. If you’re using Hashicorp’s Terraform for provisioning systems, you can find example templates on the Droplan GitHub project. For a broad overview of automating tasks like this one, see An Introduction to Configuration Management.
For more detail on firewalls, see What is a Firewall and How Does It Work?
Thanks for learning with the DigitalOcean Community. Check out our offerings for compute, storage, networking, and managed databases.
About the author
Still looking for an answer?
This textbox defaults to using Markdown to format your answer.
You can type !ref in this text area to quickly search our full set of tutorials, documentation & marketplace offerings and insert the link!
Unfortunately I get:
bad file descriptor
when I try to run
DO_KEY=personal_access_token /opt/droplan/droplan
However if I use wrong key I get:
GET https://api.digitalocean.com/v2/droplets: 401 Unable to authenticate you.
Exciting news!
DigitalOcean now has a native firewall option that integrates well with tagging. Please consider using that instead of droplan!
https://blog.digitalocean.com/cloud-firewalls-secure-droplets-by-default/
 This work is licensed under a Creative Commons Attribution-NonCommercial- ShareAlike 4.0 International License.
Become a contributor for community
Get paid to write technical tutorials and select a tech-focused charity to receive a matching donation.

DigitalOcean Documentation
Full documentation for every DigitalOcean product.

Resources for startups and AI-native businesses
The Wave has everything you need to know about building a business, from raising funding to marketing your product.
The developer cloud
Scale up as you grow — whether you're running one virtual machine or ten thousand.

Start building today
From GPU-powered inference and Kubernetes to managed databases and storage, get everything you need to build, scale, and deploy intelligent applications.
