By Andrew Dugan
Senior AI Technical Content Creator II

Introduction
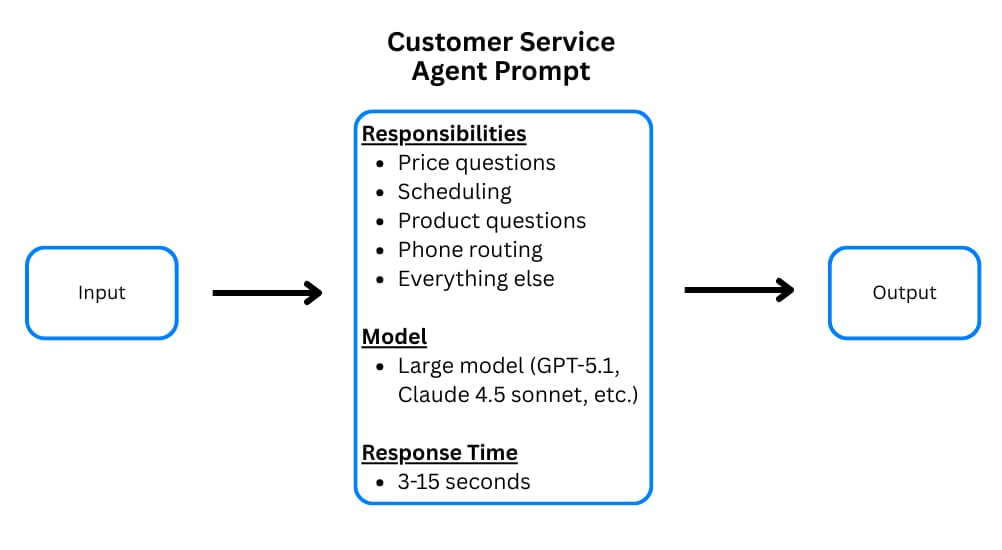
Large language models can be challenging to use in a production environment because they can suffer from inaccuracies, inconsistencies, and latency. As models get larger and more capable, it is tempting to include more context and more complex instructions in each prompt, with the hope that the model can handle it, but with a single system prompt using a relatively large model, latency can range anywhere from 3-15 seconds. If you’re building a time-sensitive agent, such as a phone conversation bot, this is too long for an agent to pause.
A lower-latency option is to break the task into smaller tasks and have your LLM workflows handle each piece in parallel, making it easier for smaller models to handle correctly. This will allow you to drastically improve your latency, and in many cases, your costs.
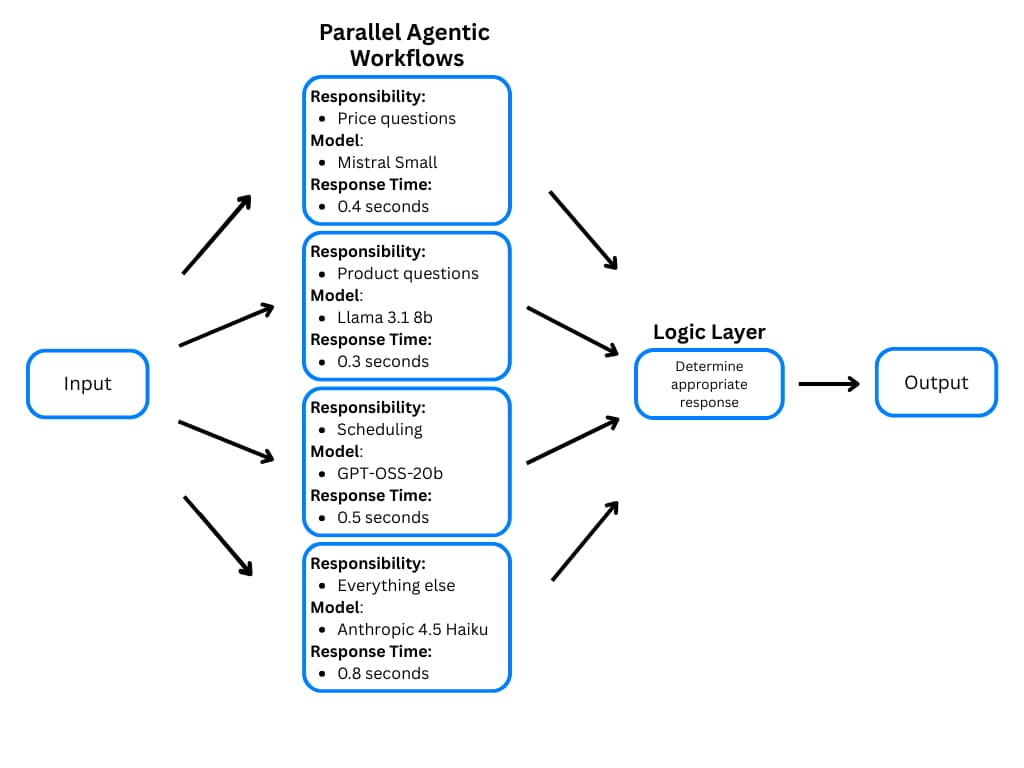
There are a few different ways to run agentic workflows in parallel, but in many agentic workflows, the main bottleneck is the call to the LLM. You can reduce this bottleneck by making multiple, simultaneous calls to LLM APIs using Python’s asyncio and aiohttp libraries.
In this tutorial, you will use Python to build agentic workflows that make multiple LLM calls asynchronously. This will allow you to build faster, more accurate LLM applications that can be deployed onto a Droplet or serverless instance as an API endpoint.
You will build a customer service workflow for a real estate agency’s phone system that can answer questions about listings, schedule appointments, and connect callers to human representatives. It will do this by making multiple asynchronous calls to different LLM endpoints, reducing LLM latency and allowing more flexibility in LLM choice for each task.
Key Takeaways
- Using asynchronous calls to small, fast models can help you create effective, low-latency agentic workflows for time-sensitive applications
- Multi-model workflows allow you to tailor each prompt for a different model, reducing your overall compute needs and lowering the cost of self-hosting LLM models and third-party API usage
Prerequisites
To complete this tutorial, you will need:
- A local development environment for Python 3.
- Access to an LLM API. In this tutorial, you will use the Mistral-Small-3.2-24B model deployed on a GPU Droplet using vLLM. You can set up a GPU Droplet using vLLM to serve a model by following How To Run GPT-OSS and vLLM on an AMD GPU Droplet with ROCm.
- Familiarity with Python async/await syntax (optional but helpful).
Step 1 — Setting Up Your Environment
First, set up your environment and install your dependencies. In this tutorial, calls will be made to a Mistral-Small-3.2-24B model that has been deployed on an H200 GPU Droplet, but you will either need to make calls to your own deployed model or a third-party LLM API. This tutorial only makes calls to one LLM, but you will be able to use a different model from different providers for each prompt if you would like.
Create a virtual environment and install the required dependencies:
python3 -m venv venv
source venv/bin/activate
pip install aiohttp
You will be making your model calls asynchronously, so you need to create some asynchronous functions that can manage these calls. You will use the asyncio and the aiohttp libraries in Python. If you are using a different LLM API, you will need to install their client to manage calls to their endpoint.
Create a new file called agentic_workflows.py and add the following code to import the necessary dependencies and define the API endpoint.
Replace your_server_ip with the IP address of your GPU Droplet deployment or define the client for your LLM API:
import asyncio
import aiohttp

# Your droplet's vLLM server URL
VLLM_SERVER_URL = "http://your_server_ip:8000/v1/chat/completions"
Step 2 — Writing the Asynchronous Call Logic
You want your asynchronous calls to be able to take a list of dictionaries that each have the model ID and prompt that you want to send the LLM, and send them all without waiting for each call’s individual response. The prompt will include the conversation history and system prompt for that specific call. You will add a synchronous call_models function that can be imported and called in your main script.
Add the following asynchronous functions to agentic_workflows.py:
async def _call_single_model(call_spec):
    """Make an async call to the Digital Ocean GPU droplet with a given model and messages"""
    model_id = call_spec["model_id"]
    messages = call_spec["messages"]

    payload = {
        "model": model_id,
        "messages": messages,
        "max_tokens": 100,
        "temperature": 0.1
    }

    async with aiohttp.ClientSession() as session:
        async with session.post(VLLM_SERVER_URL, json=payload) as response:
            result = await response.json()

            message = result["choices"][0]["message"]["content"]
            return message

async def _call_models_async(call_list):
    """Call multiple models asynchronously and return responses in the same order"""
    # Create tasks for all model calls
    tasks = [_call_single_model(call_spec) for call_spec in call_list]

    # Run all tasks concurrently and return responses in order
    responses = await asyncio.gather(*tasks)
    return responses

def call_models(call_list):
    return asyncio.run(_call_models_async(call_list))
The aiohttp.ClientSession() method creates an async client session that sends POST requests to the API endpoint and handles the HTTP response asynchronously. This allows multiple LLM API calls to be made concurrently rather than sequentially.
The _call_models_async() function gathers all the details of multiple requests that we provide and makes all the API calls without waiting for each response. Then, as the responses come back, it adds the responses to a list in the same order they were sent. The call_models() function is a synchronous function that makes the asynchronous calls easier to call.
Step 3 — Writing Your Prompts
Now that you have the basic functionality written to make asynchronous calls to an API endpoint, you need to write your prompts. You will have three separate system prompts. One will assist with pricing questions, one with scheduling, and one with identifying other listing questions and directing to a human representative. You can add more, including some with more autonomous decision-making power, but these three will work for now.
SYSTEM_PROMPT_CONFIGURATIONS = {
    "pricing_prompt": {
        "model_id": "mistralai/Mistral-Small-3.2-24B-Instruct-2506",
        "prompt": "You are a customer service agent. Determine if the user's most recent request is asking about the price of a listing. If they are asking about the price of a listing AND if they have included the listing_id, return only the listing_id of the item they are asking about in the following format: 'listing_id: XXXXXX'. \nIf they are asking about the pricing of a listing AND did NOT mention the specific listing_id number, ask them for the listing id number. If they are requesting something other than the price of a listing: return only the word 'false'."
    },
    "scheduling_prompt": {
        "model_id": "mistralai/Mistral-Small-3.2-24B-Instruct-2506",
        "prompt": "You are a customer service agent. Determine if the user's most recent request is asking to schedule a call with a real estate agent. If they are trying to schedule a call, return the date and time they would like to schedule the call in the following format: 'date: YYYY-MM-DD, time: HH:MM'. If they are trying to schedule a call but they did not mention the specific date and time they are available, ask them what day and time they are available. Do not provide any additional information, such as the agent's availability. If they are not asking to schedule a call, return only the word 'false'."
    },
    "listing_prompt": {
        "model_id": "mistralai/Mistral-Small-3.2-24B-Instruct-2506",
        "prompt": "You are a customer service agent. Determine if the user is asking a question about a listing. If they are asking a question about a listing, return only the word 'true'. Otherwise, return only the word 'false'."
    }
}
In these system prompt configurations, you include the title of the prompt for referencing later, the model ID you are sending that prompt to, and the wording of the system prompt itself that the conversation history will be attached to.
Step 4 — Processing User Input Through the Models
Now you need to create a function that can take the user’s conversation, add each of the system prompts to it, and make your asynchronous calls to the correct model for each prompt using the call_models() function that you wrote above. This example assumes that the conversation history is saved in the front-end in the same format that our API accepts and is sent along with the user’s most recent input.
Add the following function to agentic_workflows.py:
def run_agentic_workflow(conversation_history):
    model_calls_list = []
    prompt_names = []  # Keep track of prompt order for response mapping

    for prompt_name, config in SYSTEM_PROMPT_CONFIGURATIONS.items():
        model_id = config["model_id"]
        system_prompt = config["prompt"]

        # Construct the full message prompt: system prompt + conversation history
        full_messages = [{"role": "system", "content": system_prompt}] + conversation_history

        model_calls_list.append({
            "model_id": model_id,
            "messages": full_messages
        })
        prompt_names.append(prompt_name)

    prompt_responses = call_models(model_calls_list)
This function creates a list of dictionary objects for each system prompt that includes the model ID and the system prompt + conversation history. It then calls the asynchronous functions to call each model for each system prompt using the call_models() function.
After calling the models, the responses are received and saved in the prompt_responses variable in the same order they were sent, so you need to assign new variables with the actual responses from the models.
Continue adding to the run_agentic_workflow function:
    # Map responses to their respective prompts
    pricing_response = prompt_responses[prompt_names.index("pricing_prompt")]
    scheduling_response = prompt_responses[prompt_names.index("scheduling_prompt")]
    listing_response = prompt_responses[prompt_names.index("listing_prompt")]
Step 5 — Defining the Logic
Finally, you need to add a logic layer to this function that can look through your responses and determine what to do next. You can look up a listing price in your database, redirect the call to a human representative, schedule an appointment with one of your real estate agents, or send a follow-up question to the user asking for more details.
Continue adding to the run_agentic_workflow function in agentic_workflows.py:
    # Route 1: Handle pricing inquiries
    if pricing_response.lower() != "false":
        if pricing_response.startswith("listing_id:"):
            # Extract listing ID from response
            listing_id = pricing_response.split("listing_id: ")[1].strip()

            # Simulate database/API lookup
            # You can add database querying logic here to look for a target listing ID. For our example, we will use a simple Python dictionary
            example_price_database = {
                "123456": "$350,000",
                "654321": "$450,000",
                "112233": "$550,000"
            }

            found_price = example_price_database.get(listing_id)
            if found_price:
                final_response = f"The price for listing {listing_id} is {found_price}."
            else:
                final_response = "We are unable to find that listing ID in our records. Are you sure you have the correct listing ID?"
        else:
            final_response = pricing_response  # Response asking for listing ID

    # Route 2: Handle scheduling requests
    elif scheduling_response.lower() != "false":
        if scheduling_response.startswith("date:"):
            final_response = f"Perfect! I've scheduled a call for you on that date and time. A sales representative will reach out to you at that time."
            # In production: Add logic to actually book the appointment, and consider customizing the message to confirm the date and time selected.
        else:
            final_response = scheduling_response  # Response asking for specific time

    # Route 3: Handle general listing questions
    elif listing_response.lower() != "false":
        final_response = "Please hold while I transfer you to a specialist for further assistance."
        # In production: Add logic to transfer chat to human representative
        # You could alternatively add logic to access listing details and answer the user's specific question

    else:
        final_response = "I apologize, I'm not sure how I can help with that. Let me transfer you to a human representative who can better assist you."
        # In production: Add logic to transfer chat to human representative

    return final_response
Step 6 — Testing Your Workflow
Now that you have the code written for a basic agentic workflow to handle three categories of questions, you will test it with a conversation about the price of a listing. In this conversation, the user does not provide the listing ID in their initial question, and the model responds with a follow-up question requesting it. The user provides it, and the model responds with the correct price.
Create a new file called test_workflow.py and add the following test code:
from agentic_workflows import run_agentic_workflow

conversation_history = [
    {"role": "user", "content": "Hi, can you tell me the price of one of your listings?"},
]
final_response = run_agentic_workflow(conversation_history)
print(f"Response: {final_response}")
Run the test script:
python3 test_workflow.py
You’ll see output similar to this:
OutputResponse: Could you please provide the listing_id of the item you're asking about?
Now test with a complete conversation where the user provides the listing ID:
conversation_history = [
    {"role": "user", "content": "Hi, can you tell me the price of one of your listings?"},
    {"role": "assistant", "content": "Could you please provide the listing_id of the item you're asking about?"},
    {"role": "user", "content": "Yes, the listing ID is 123456"},
]
final_response = run_agentic_workflow(conversation_history)
print(f"Response: {final_response}")
Run the script again:
python3 test_workflow.py
You’ll see the pricing information:
OutputResponse: The price for listing 123456 is $350,000.
Conclusion
In this tutorial, you built a parallel agentic workflow from scratch in Python. You created asynchronous functions to make simultaneous LLM calls, configured multiple system prompts for different tasks, and implemented a routing logic layer to handle user requests.
In order to make this framework production-ready, you will need to test, rewrite prompts, change models, and test again with different conversations until you have a level of accuracy and speed that meets your requirements. With these kinds of workflows, you will need to test each prompt individually and continue to improve them over time. In our example, we chose the Mistral-Small-3.2-24B model due to its low latency (median response time of less than 0.5 seconds), its ability to follow these specific directions, and its ability to be deployed onto a single GPU. We also tested with GPT-OSS-120b, GPT-OSS-20b, and Llama 3.1 8b, and the Mistral model performed best for this particular use case. Choosing the correct model for each prompt or task is an iterative process.
If you are interested in using agents with more autonomy, the system prompts can be given more or less autonomy by giving them access to more context or more tools. You can even have follow-up calls to the LLM “chained” together for reasoning or other purposes. However, if a prompt requires multiple API calls in a chain, this will increase the latency of the workflow because you are no longer only waiting for one group of asynchronous calls to models.
We deployed the Mistral model with vLLM, so we didn’t need to change the format of our prompts to work for different models. However, OpenAI, Claude, and open-source models may have different requirements for the formatting of prompts that are sent to their APIs. If you use different model providers for each call, you will need to write Python functions that can convert the format of prompts to match the requirements of the model that you are calling. For example, you may need a function that can take a vLLM-formatted prompt and convert the syntax to a Claude-formatted prompt.
You will often find some models take much longer than others, causing you to wait for the slowest response in order to get all the responses back. With Python’s asyncio library, you can process model responses as they come in, using asyncio.as_completed() instead of asyncio.gather(). Then you can check the first responses to see if they are the route you want to proceed with and move forward without waiting for the rest of the responses. This would also require changes to the logic layer.
When adding more system prompts, the main bottleneck you will run into here is rate limiting with the LLM API or processing limits with your GPU. The best way to get around this is to host your own model on a GPU Droplet, but you can also mitigate these issues by increasing your API rate limit quotas, spreading your calls across APIs, and implementing retry logic, timeout handling, and error handling for when rate limits are hit.
Thanks for learning with the DigitalOcean Community. Check out our offerings for compute, storage, networking, and managed databases.
About the author
Andrew is an NLP Scientist with 8 years of experience designing and deploying enterprise AI applications and language processing systems.
Still looking for an answer?
This textbox defaults to using Markdown to format your answer.
You can type !ref in this text area to quickly search our full set of tutorials, documentation & marketplace offerings and insert the link!
 This work is licensed under a Creative Commons Attribution-NonCommercial- ShareAlike 4.0 International License.
Become a contributor for community
Get paid to write technical tutorials and select a tech-focused charity to receive a matching donation.

DigitalOcean Documentation
Full documentation for every DigitalOcean product.

Resources for startups and AI-native businesses
The Wave has everything you need to know about building a business, from raising funding to marketing your product.
The developer cloud
Scale up as you grow — whether you're running one virtual machine or ten thousand.

Start building today
From GPU-powered inference and Kubernetes to managed databases and storage, get everything you need to build, scale, and deploy intelligent applications.
