By Daniel Pellarini and Haley Mills

The author selected the Electronic Frontier Foundation to receive a donation as part of the Write for DOnations program.
Introduction
Two-factor authentication (2FA) is an authentication method that requires entering more than one piece of information to successfully log in to an account or device. In addition to entering a username and password combination, 2FA requires the user to enter an additional piece of information such as a one-time password (OTP), like a six-digit verification code.
In general, 2FA requires the user to enter information of different types:
- Something that the user knows, such as a password
- Something that the user has, such as the verification code generated from an authenticator application
2FA is a subset of multi-factor authentication (MFA), which, in addition to something that the user knows and something that they have, requires something that the user is. This is the case of biometrics, which use technologies such as fingerprint or voice recognition.
2FA helps strengthen the authentication process to a certain service or device: even if the password were compromised, an attacker would also need to have access to the user’s device which holds the authenticator app used to generate the security codes. For this reason, many online services (including DigitalOcean) offer the possibility to enable 2FA for user accounts to increase account security when it comes to the authentication phase.
In this guide, you will configure 2FA for a non-root sudoer user on an Ubuntu 18.04 installation with the Google PAM module. Since you’re configuring 2FA on the non-root user, you will still be able to access the machine from your root account in case of a lockout. The tutorial will be general enough to be applied both to server and to desktop installations, both local and remote.
Prerequisites
Before you begin this guide you’ll need the following:
-
One Ubuntu 18.04 server or desktop environment. If you are using an Ubuntu server, set it up by following the Ubuntu 18.04 initial server setup guide, including a non-root user with sudo privileges and a firewall.
-
An authenticator application installed on your mobile device, with which you can scan 2FA QR codes, such as Google Authenticator or Authy.
Step 1 — Installing the Google PAM Module
In order to configure 2FA on Ubuntu 18.04, you need to install Google’s PAM module for Linux. The Pluggable Authentication Module (PAM) is the authentication mechanism Linux uses. You will use Google’s PAM module to have your user authenticate over 2FA using Google-generated OTP codes.
First, log in as the non-root user that you configured in the prerequisites:
- ssh sammy@your_server_ip
Update the Ubuntu repositories to download the latest version of the authenticator:
- sudo apt-get update
Now that your repositories are up to date, install the latest version of the PAM module:
- sudo apt-get install libpam-google-authenticator
This is a very small package with no dependencies, so it will take a few seconds to install. In the next section, you will configure 2FA for the non-root user on the system.
Step 2 — Configuring 2FA for a User
Now that you’ve installed the PAM module, you will run it to generate a QR code for the logged in user. This will create the code, but the Ubuntu environment won’t require 2FA until you’ve enabled it later in this tutorial.
Run the google-authenticator command to start and configure the PAM module:
- google-authenticator
The command will present a prompt that will ask you several configuration questions. The first question will ask if you want tokens to be time based. Time-based authentication tokens will expire after a set amount of time, which defaults to 30 seconds on most systems. Time-based tokens are more secure than tokens that are not time-based, and most 2FA implementations use them. You can choose either option here, but this tutorial will choose Yes to use time-based authentication tokens:
OutputDo you want authentication tokens to be time-based (y/n) y
After answering y to this question, you will see several lines output to your console:
- A QR code: This is the code you need to scan using your authenticator app. Once you have scanned it, it will immediately turn into a code-generating device that will create a new OTP every 30 seconds.
- Your secret key: This is an alternative method to configure your authenticator app. If you are using an app that does not support QR scanning, you can enter the secret key to configure your authentication app.
- Your verification code: This is the first six-digit verification code that this specific QR code generates.
- Your emergency scratch codes: Also known as backup codes, these one-use tokens will allow you to pass 2FA authentication if you lose your authenticator device. Keep these codes in a safe place to avoid being locked out of the account.
After you’ve configured your authenticator app and saved your backup codes in a safe place, the prompt will ask if you’d like to update the configuration file. If you choose n, you will need to run the configuration program again. You will enter y to save your changes and move forward:
OutputDo you want me to update your "~/.google_authenticator" file (y/n) y
The next question will ask if you want to disallow authentication codes to be used more than once. By default, you can only use each code once, even if it remains valid for 30 seconds. This is the safest choice because it prevents replay attacks from an attacker who somehow managed to get a hold of your verification code after you have used it. For this reason, it’s more secure to disallow codes to be used more than once. Answer y to disallow multiple uses of the same token:
OutputDo you want to disallow multiple uses of the same authentication
token? This restricts you to one login about every 30s, but it increases
your chances to notice or even prevent man-in-the-middle attacks (y/n) y
The next question asks if you want authentication tokens to be accepted a short time before or after their normal validity time. Verification codes are very time-sensitive, which means that your tokens can be refused if your devices are not synchronized. This option allows you to work around this issue by extending the default validity time of verification codes so that, even if your devices were temporarily out of sync, your authentication codes would be accepted anyway. Making sure that the time is the same on all your devices is the best option, as choosing yes will decrease the security of your system. Answer n to this question to not allow a grace period:
OutputBy default, tokens are good for 30 seconds and in order to compensate for
possible time-skew between the client and the server, we allow an extra
token before and after the current time. If you experience problems with poor
time synchronization, you can increase the window from its default
size of 1:30min to about 4min. Do you want to do so (y/n) n
The last question asks if you want to enable rate limiting for log in attempts. This will not allow more than three failed log in attempts every 30 seconds, which is a good security strengthening technique. Enable it by answering y:
OutputIf the computer that you are logging into isn't hardened against brute-force
login attempts, you can enable rate-limiting for the authentication module.
By default, this limits attackers to no more than 3 login attempts every 30s.
Do you want to enable rate-limiting (y/n) y
You have now configured and generated 2FA codes for the non-root user with the PAM module. Now that your codes are generated, you need to enable 2FA in your environment.
Step 3 — Activating 2FA in Ubuntu
The Google PAM module is now generating 2FA codes your user, but Ubuntu doesn’t yet know that it needs to use the codes as part of the user’s authentication process. In this step, you will update Ubuntu’s configuration to require 2FA tokens in addition to the regular method of authentication.
You have two different options at this point:
- You can require 2FA every time a user logs in to the system and every time a user requests
sudoprivileges. - You can require 2FA only during log in, where subsequent
sudoauthentication attempts would only require the user password.
The first option will be ideal for a shared environment, where you may want to protect any actions that require sudo permissions. The second approach is more practical for a local desktop environment, where you are the only user on the system.
Note: If you are enabling 2FA on a remote machine that you access over SSH, like a DigitalOcean Droplet, you need to follow steps two and three from the How To Set Up Multi-Factor Authentication for SSH on Ubuntu 16.04 guide before proceeding with this tutorial. The remaining steps in this tutorial apply to all Ubuntu installations, but remote environments need additional updates to make the SSH service aware of 2FA.
If you are not using SSH to access your Ubuntu installation, you can immediately proceed with the remaining steps in the tutorial.
Requiring 2FA for Log In and sudo Requests
To be prompted for 2FA during log in and subsequent privilege escalation requests, you need to edit the /etc/pam.d/common-auth file by adding a line to the end of the existing file.
The common-auth file applies to all authentication mechanisms on the system, regardless of the desktop environment used. It also applies to authentication requests that happen after the user logs in to the system, such as during a sudo escalation request when installing a new package from the terminal.
Open this file with the following command:
- sudo nano /etc/pam.d/common-auth
Add the highlighted line at the end of the file:
...
# and here are more per-package modules (the "Additional" block)
session	required	pam_unix.so
session	optional	pam_systemd.so
# end of pam-auth-update config
auth required pam_google_authenticator.so nullok
This line tells the Ubuntu authentication system to require 2FA upon log in through the Google PAM module. The nullok option allows existing users to log into the system even if they haven’t configured 2FA authentication for their account. In other words, users who have configured 2FA will be required to enter an authentication code at the next log in, while users who haven’t run the google-authenticator command will be able to log in with only their username and password until they configure 2FA.
Save and close the file after adding the line.
Requiring 2FA for Log In Only
If you want to only be prompted for 2FA when you first log in to the system on a desktop environment, you need to edit the configuration file for the desktop manager you are using. The name of the configuration file usually matches the name of the desktop environment. For example, the configuration file for gdm, the default Ubuntu desktop environment starting after Ubuntu 16.04, is /etc/pam.d/gdm.
In the case of a headless server, such as a DigitalOcean Droplet, you will edit the /etc/pam.d/common-session file instead. Open the relevant file based on your environment:
- sudo nano /etc/pam.d/common-session
Add the highlighted line to the end of the file:
#
# /etc/pam.d/common-session - session-related modules common to all services
#
...
# # and here are more per-package modules (the "Additional" block)
session	required	pam_unix.so
session	optional	pam_systemd.so
# end of pam-auth-update config
auth required pam_google_authenticator.so nullok
This will tell Ubuntu to require 2FA when a user connects to the system via the command line (either locally or remotely through SSH), but not during subsequent authentication attempts, such as sudo requests.
You have now successfully configured Ubuntu to prompt you for 2FA either just during log in, or for every authenticated action performed on the system. You’re now ready to test the configuration and make sure that you are prompted for 2FA when you log in to your Ubuntu installation.
Step 4 — Testing 2FA
In the previous step, you’ve configured 2FA to generate codes every 30 seconds. In this step, you will test 2FA by logging into your Ubuntu environment.
First, log out and back in to your Ubuntu environment:
ssh sammy@your_server_ip
If you are using password-based authentication, you will be prompted for your user password:
OutputPassword:
Note: If you are testing this on a DigitalOcean Droplet or another remote server protected by certificate authentication, you won’t be prompted for a password, and your key will be passed and accepted automatically. You will therefore only be prompted for your verification code.
Enter your password and you will be prompted for the 2FA verification code:
OutputVerification code:
After entering your verification code, you will be logged in:
Outputsammy@your_server_ip: ~#
If 2FA was only enabled for logins, you won’t be prompted for your 2FA codes again until the session expires or you log out manually.
If you enabled 2FA through the common-auth file, you will be prompted for it on every login and request for sudo privileges:
Outputsammy@your_server_ip: ~# sudo -s

sudo password for sammy:

Verification code:

root@your_server_ip:
In this step you have confirmed that your 2FA configuration is working as expected. If you were not prompted for your verification codes in this phase, return to step three of the tutorial and confirm that you have edited the correct Ubuntu authentication file.
Step 5 — Preventing a 2FA Lockout
In the event of a lost or wiped phone, it is important to have proper backup methods in place to recover access to your 2FA-enabled account. When you configure 2FA for the first time, you have a few options to ensure that you can recover from a lock out:
- Save a backup copy of your secret configuration codes in a safe place. You can do this manually, but some authentication apps like Authy provide backup code features.
- Save your recovery codes in a safe place that can be accessed outside of your 2FA enabled environment.
If for any reason you don’t have access to your backup options, you can take additional steps to recover access to your 2FA enabled local environment or remote server.
Step 6 — Recovering from a 2FA Lockout on a Local Environment (Optional)
If you have physical access to the machine, you can boot into rescue mode to disable 2FA. Rescue mode is a target type (similar to a runlevel) in Linux that is used to preform administrative tasks. You will need to edit some settings in GRUB, which is the default boot loader in Ubuntu, to enter rescue mode.
To access GRUB, you will first reboot your machine:
- reboot
When the GRUB menu appears, make sure the Ubuntu entry is highlighted. This is the default name on a 18.04 installation, but may be different if you manually changed it after installation.
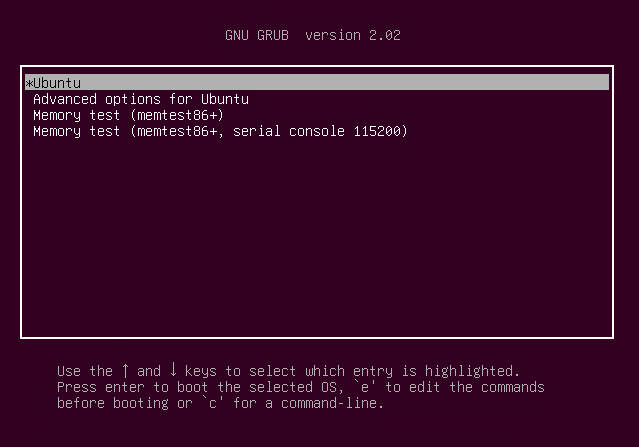
Next, press the e key on your keyboard to edit the GRUB configuration before booting into your system.
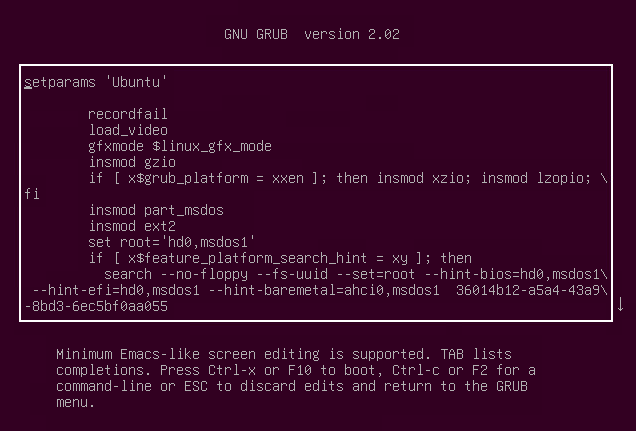
In the file that appears, scroll down until you see a line that starts with linux and ends with $vt_handoff. Go to the end of this line and append systemd.unit=rescue.target, making sure that you leave a space between $vt_handoff and systemd.unit=rescue.target. This will tell your Ubuntu machine to boot into rescue mode.
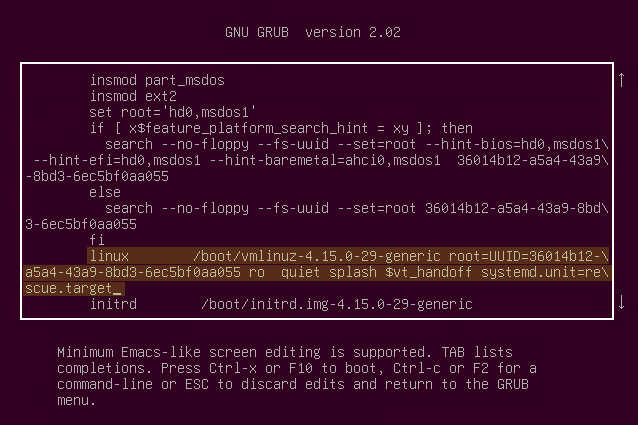
Once you have made the changes, save the file with the Ctrl+X keyboard combination. Your machine will reboot and you will find yourself at a command line. Press Enter to go into rescue mode.
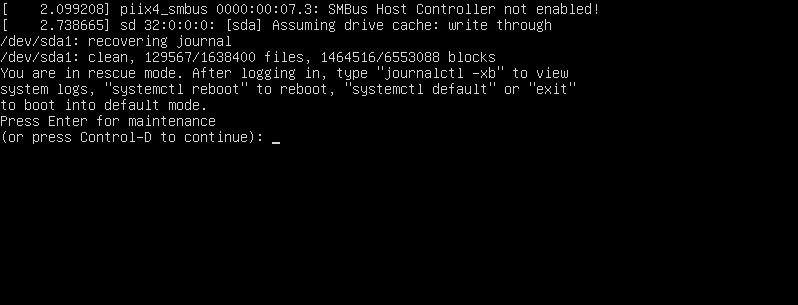
Once in rescue mode, open the Google Authenticator configuration file. This will be located inside the locked-out user’s home directory:
- nano /home/sammy/.google-authenticator
The first line in this file is the user’s secret key, which is used to configure an authenticator app.
You now have two choices:
- You can copy the secret key and configure your authenticator app.
- If you want to start from a clean slate, you can delete the
~/.google-authenticatorfile altogether to disable 2FA for this user. After logging in again as the non-root user, you can configure 2FA once again and get a brand new secret key.
With either choice, you are able to recover from a 2FA lockout on a local environment by using the GRUB boot loader. In the next step, you will recover from a 2FA lockout on a remote environment.
Step 7 — Recovering from a 2FA Lockout on a Remote Environment (Optional)
If your non-root sudoer account is locked out on a remote machine, you can use the root user to temporarily disable 2FA or reconfigure 2FA.
Start by logging in to your machine with the root user:
- ssh root@your_server_ip
Once logged in, open the Google Authenticator settings file that is located inside the locked-out user’s home directory:
- sudo nano /home/sammy/.google_authenticator
The first line in this file is the user’s secret key, which is what you need to configure an authenticator app.
You now have two choices:
- If you want to set up a new or wiped device, you can use the secret key to reconfigure your authenticator app.
- If you want to start from a clean slate, you can delete the
/home/sammy/.google_authenticatorfile altogether to disable 2FA for this user. After logging in as the non-root user, you can configure 2FA once again and get a brand new secret key.
With either choice, you were able to recover from a 2FA lockout on a local environment by using the root user.
Conclusion
In this tutorial, you configured 2FA on an Ubuntu 18.04 machine. With 2FA configured on your environment, you have added an extra layer of protection to your account and you have made your system more secure. In addition to your traditional authentication method, you will also have to enter an additional verification code to log in. This makes it impossible for an attacker who managed to acquire your login credentials to be able to log in to your account without this additional verification code.
Thanks for learning with the DigitalOcean Community. Check out our offerings for compute, storage, networking, and managed databases.
About the author(s)
Still looking for an answer?
 This work is licensed under a Creative Commons Attribution-NonCommercial- ShareAlike 4.0 International License.
Become a contributor for community
Get paid to write technical tutorials and select a tech-focused charity to receive a matching donation.

DigitalOcean Documentation
Full documentation for every DigitalOcean product.

Resources for startups and AI-native businesses
The Wave has everything you need to know about building a business, from raising funding to marketing your product.
The developer cloud
Scale up as you grow — whether you're running one virtual machine or ten thousand.

Start building today
From GPU-powered inference and Kubernetes to managed databases and storage, get everything you need to build, scale, and deploy intelligent applications.
