By Brian Boucheron and Hazel Virdó
Not using CentOS 7?
Choose a different version or distribution.
Introduction
MQTT is a machine-to-machine messaging protocol, designed to provide lightweight publish/subscribe communication to “Internet of Things” devices. It is commonly used for geo-tracking fleets of vehicles, home automation, environmental sensor networks, and utility-scale data collection.
Mosquitto is a popular MQTT server (or broker, in MQTT parlance) that has great community support and is easy to install and configure.
In this tutorial, we’ll install Mosquitto, retrieve SSL certificates from Let’s Encrypt, and set up our broker to use SSL to secure our password-protected MQTT communications.
Prerequisites
Before starting this tutorial, you will need:
- A CentOS 7 server with a non-root, sudo-enabled user, and a basic firewall set up. This (and more) is all covered in the New CentOS 7 Server Checklist.
- A domain name pointed at your server, as per How to Set Up a Host Name with DigitalOcean. This tutorial will use
mqtt.example.comthroughout. - Optionally, the
nanotext editor. This tutorial will usenanothroughout and you can install it at any time withsudo yum -y install nano, or substitute your favorite text editor.
Step 1 — Installing Mosquitto
CentOS 7 doesn’t have a mosquitto package by default. To install it, we’ll first install an extra software repository called Extra Packages for Enterprise Linux, or EPEL. This repository is full of additional software that installs well on CentOS, Red Hat, and other enterprise-oriented Linux distributions.
Log in with your non-root user and use the yum package manager to install the epel-release package.
- sudo yum -y install epel-release
This adds the EPEL repository information to our system. The -y option automatically answers yes to a few prompts throughout the process. Now we can install the mosquitto package.
- sudo yum -y install mosquitto
The package comes with a simple default configuration, so let’s run it to test our install.
- sudo systemctl start mosquitto
We also need to enable the service to make sure it starts up when we reboot the system:
- sudo systemctl enable mosquitto
Now let’s test the default configuration. The mosquitto package comes with some command line MQTT clients. We’ll use one of them to subscribe to a topic on our broker.
Topics are labels that you publish messages to and subscribe to. They are arranged as a hierarchy, so you could have sensors/outside/temp and sensors/outside/humidity, for example. How you arrange topics is up to you and your needs. Throughout this tutorial we will use a simple test topic to test our configuration changes.
Log in to your server a second time, so you have two terminals side-by-side. In the new terminal, use mosquitto_sub to subscribe to the test topic:
- mosquitto_sub -h localhost -t test
-h is used to specify the hostname of the MQTT server, and -t is the topic name. You’ll see no output after hitting ENTER because mosquitto_sub is waiting for messages to arrive. Switch back to your other terminal and publish a message:
- mosquitto_pub -h localhost -t test -m "hello world"
The options for mosquitto_pub are the same as mosquitto_sub, though this time we use the additional -m option to specify our message. Hit ENTER, and you should see hello world pop up in the other terminal. You’ve sent your first MQTT message!
Enter CTRL+C in the second terminal to exit out of mosquitto_sub, but keep the connection to the server open. We’ll use it again for another test in Step 5.
Next, we’ll secure our installation with SSL using Certbot, the new Let’s Encrypt client.
Step 2 — Installing and Running Certbot for Let’s Encrypt Certificates
Let’s Encrypt is a new service offering free SSL certificates through an automated API. The official Let’s Encrypt client is called Certbot, and it is included in the EPEL repository we installed in the previous step.
Install Certbot with yum.
- sudo yum -y install certbot
Certbot needs to answer a cryptographic challenge issued by the Let’s Encrypt API in order to prove we control our domain. It uses ports 80 (HTTP) and/or 443 (HTTPS) to accomplish this. We’ll only use port 80, so let’s allow incoming traffic on that port now.
Use firewall-cmd to add the HTTP service.
- sudo firewall-cmd --permanent --add-service=http
Reload the firewall so the changes take effect.
- sudo firewall-cmd --reload
We can now run Certbot to get our certificate. We’ll use the --standalone option to tell Certbot to handle the HTTP challenge request on its own, and --standalone-supported-challenges http-01 limits the communication to port 80. -d is used to specify the domain you’d like a certificate for, and certonly tells Certbot to just retrieve the certificate without doing any other configuration steps.
- sudo certbot certonly --standalone --standalone-supported-challenges http-01 -d mqtt.example.com
When running the command, you will be prompted to enter an email address and agree to the terms of service. After doing so, you should see a message telling you the process was successful and where your certificates are stored.
We’ve got our certificates. Now we need to make sure Certbot renews them automatically when they’re about to expire.
Step 3 — Setting up Certbot Automatic Renewals
Let’s Encrypt’s certificates are only valid for ninety days. This is to encourage users to automate their certificate renewal process. We’ll need to set up a regularly run command to check for expiring certificates and renew them automatically.
To run the renewal check daily, we will use cron, a standard system service for running periodic jobs. We tell cron what to do by opening and editing a file called a crontab.
- sudo EDITOR=nano crontab -e
EDITOR=nano will make the crontab file open in the nano editor. Leave it off if you’d prefer the default vi editor.
You should now be presented with the default crontab, a blank file. Paste in the following line, then save and close the file.
15 3 * * * certbot renew --noninteractive --post-hook "systemctl restart mosquitto"
The 15 3 * * * part of this line means “run the following command at 3:15 am, every day”. The renew command for Certbot will check all certificates installed on the system and update any that are set to expire in less than thirty days. --noninteractive tells Certbot not to wait for user input.
--post-hook "systemctl restart mosquitto" will restart Mosquitto to pick up the new certificate, but only if the certificate was renewed.
Now that automatic certificate renewal is all set, we’ll get back to configuring Mosquitto to be more secure.
Step 4 — Configuring MQTT Passwords
Let’s configure Mosquitto to use passwords. Mosquitto includes a utility to generate a special password file called mosquitto_passwd. This command will prompt you to enter a password for the specified username, and place the results in /etc/mosquitto/passwd.
- sudo mosquitto_passwd -c /etc/mosquitto/passwd sammy
Now we’ll replace the default configuration file and tell Mosquitto to use this password file to require logins for all connections. First, delete the existing mosquitto.conf.
- sudo rm /etc/mosquitto/mosquitto.conf
And now open a new, blank config.
- sudo nano /etc/mosquitto/mosquitto.conf
Paste in the following.
allow_anonymous false
password_file /etc/mosquitto/passwd
allow_anonymous false will disable all non-authenticated connections, and the password_file line tells Mosquitto where to look for user and password information. Save and exit the file.
Now we need to restart Mosquitto and test our changes.
- sudo systemctl restart mosquitto
Try to publish a message without a password.
- mosquitto_pub -h localhost -t "test" -m "hello world"
The message should be rejected:
OutputConnection Refused: not authorised.
Error: The connection was refused.
Before we try again with the password, switch to your second terminal window again, and subscribe to the ‘test’ topic, using the username and password this time:
- mosquitto_sub -h localhost -t test -u "sammy" -P "password"
It should connect and sit, waiting for messages. You can leave this terminal open and connected for the rest of the tutorial, as we’ll periodically send it test messages.
Now publish a message with your other terminal, again using the username and password:
- mosquitto_pub -h localhost -t "test" -m "hello world" -u "sammy" -P "password"
The message should go through as in Step 1. We’ve successfully added password protection to Mosquitto. Unfortunately, we’re sending passwords unencrypted over the internet. We’ll fix that next by adding SSL encryption to Mosquitto.
Step 5 — Configuring MQTT SSL
To enable SSL encryption, we need to tell Mosquitto where our Let’s Encrypt certificates are stored. Open up the configuration file we previously started.
- sudo nano /etc/mosquitto/mosquitto.conf
Paste in the following at the end of the file, leaving the two lines we already added:
. . .
listener 1883 localhost

listener 8883
certfile /etc/letsencrypt/live/mqtt.example.com/cert.pem
cafile /etc/letsencrypt/live/mqtt.example.com/chain.pem
keyfile /etc/letsencrypt/live/mqtt.example.com/privkey.pem
We’re adding two separate listener blocks to the config. The first, listener 1883 localhost, updates the default MQTT listener on port 1883, which is what we’ve been connecting to so far. 1883 is the standard unencrypted MQTT port. The localhost portion of the line instructs Mosquitto to only bind this port to the localhost interface, so it’s not accessible externally. External requests would have been blocked by our firewall anyway, but it’s good to be explicit.
listener 8883 sets up an encrypted listener on port 8883. This is the standard port for MQTT + SSL, often referred to as MQTTS. The next three lines, certfile, cafile, and keyfile, all point Mosquitto to the appropriate Let’s Encrypt files to set up the encrypted connections.
Save and exit the file.
Before we restart Mosquitto to load the new config, we need to fix one thing in the default mosquitto service file. This is the file that systemd uses to determine how to run mosquitto. Open it in your favorite editor.
- sudo nano /etc/systemd/system/multi-user.target.wants/mosquitto.service
Look for a line that says User=mosquitto and remove it, then save and exit the file.
Mosquitto will still run as the mosquitto user, but when it first starts up, it will have root privileges, and will be able to load our Let’s Encrypt certificates (which are restricted to root access, for security reasons). After loading the certificates it will drop down to the mosquitto user.
We need to reload systemd itself, so it notices the changes we made to the service file.
- sudo systemctl daemon-reload
And now we can restart Mosquitto to update the settings.
- sudo systemctl restart mosquitto
Update the firewall to allow connections to port 8883.
- sudo firewall-cmd --permanent --add-port=8883/tcp
And reload the firewall.
- sudo firewall-cmd --reload
Now we test again using mosquitto_pub, with a few different options for SSL.
- mosquitto_pub -h mqtt.example.com -t test -m "hello again" -p 8883 --cafile /etc/ssl/certs/ca-bundle.crt -u "sammy" -P "password"
Note that we’re using the full hostname instead of localhost. Because our SSL certificate is issued for mqtt.example.com, if we attempt a secure connection to localhost we’ll get an error saying the hostname does not match the certificate hostname (even though they both point to the same Mosquitto server).
--cafile /etc/ssl/certs/ca-bundle.crt enables SSL for mosquitto_pub, and tells it where to look for root certificates. These are typically installed by your operating system, so the path is different for Mac OS, Windows, etc. mosquitto_pub uses the root certificate to verify that the Mosquitto server’s certificate was properly signed by the Let’s Encrypt certificate authority. It’s important to note that mosquitto_pub and mosquitto_sub will not attempt an SSL connection without this option (or the similar --capath option), even if you’re connecting to the standard secure port of 8883.
If all goes well with the test, we’ll see hello again show up in the other mosquitto_sub terminal. This means your server is fully set up! If you’d like to extend the MQTT protocol to work with websockets, you can follow the final step.
Step 6 — Configuring MQTT Over Websockets (Optional)
In order to speak MQTT using JavaScript from within web browsers, the protocol was adapted to work over standard websockets. If you don’t need this functionality, you may skip this step.
We need to add one more listener block to our Mosquitto config.
- sudo nano /etc/mosquitto/mosquitto.conf
At the end of the file, add the following:
. . .
listener 8083
protocol websockets
certfile /etc/letsencrypt/live/mqtt.example.com/cert.pem
cafile /etc/letsencrypt/live/mqtt.example.com/chain.pem
keyfile /etc/letsencrypt/live/mqtt.example.com/privkey.pem
This is mostly the same as the previous block, except for the port number and the protocol websockets line. There is no official standardized port for MQTT over websockets, but 8083 is the most common.
Save and exit the file, then restart Mosquitto.
- sudo systemctl restart mosquitto
Now, open up port 8083 in the firewall.
- sudo firewall-cmd --permanent --add-port=8083/tcp
And reload the firewall one last time.
- sudo firewall-cmd --reload
To test this functionality, we’ll use a public, browser-based MQTT client. There are a few out there, but mqtt-admin is simple and straightforward. Open mqtt-admin in your browser. You’ll see the following:
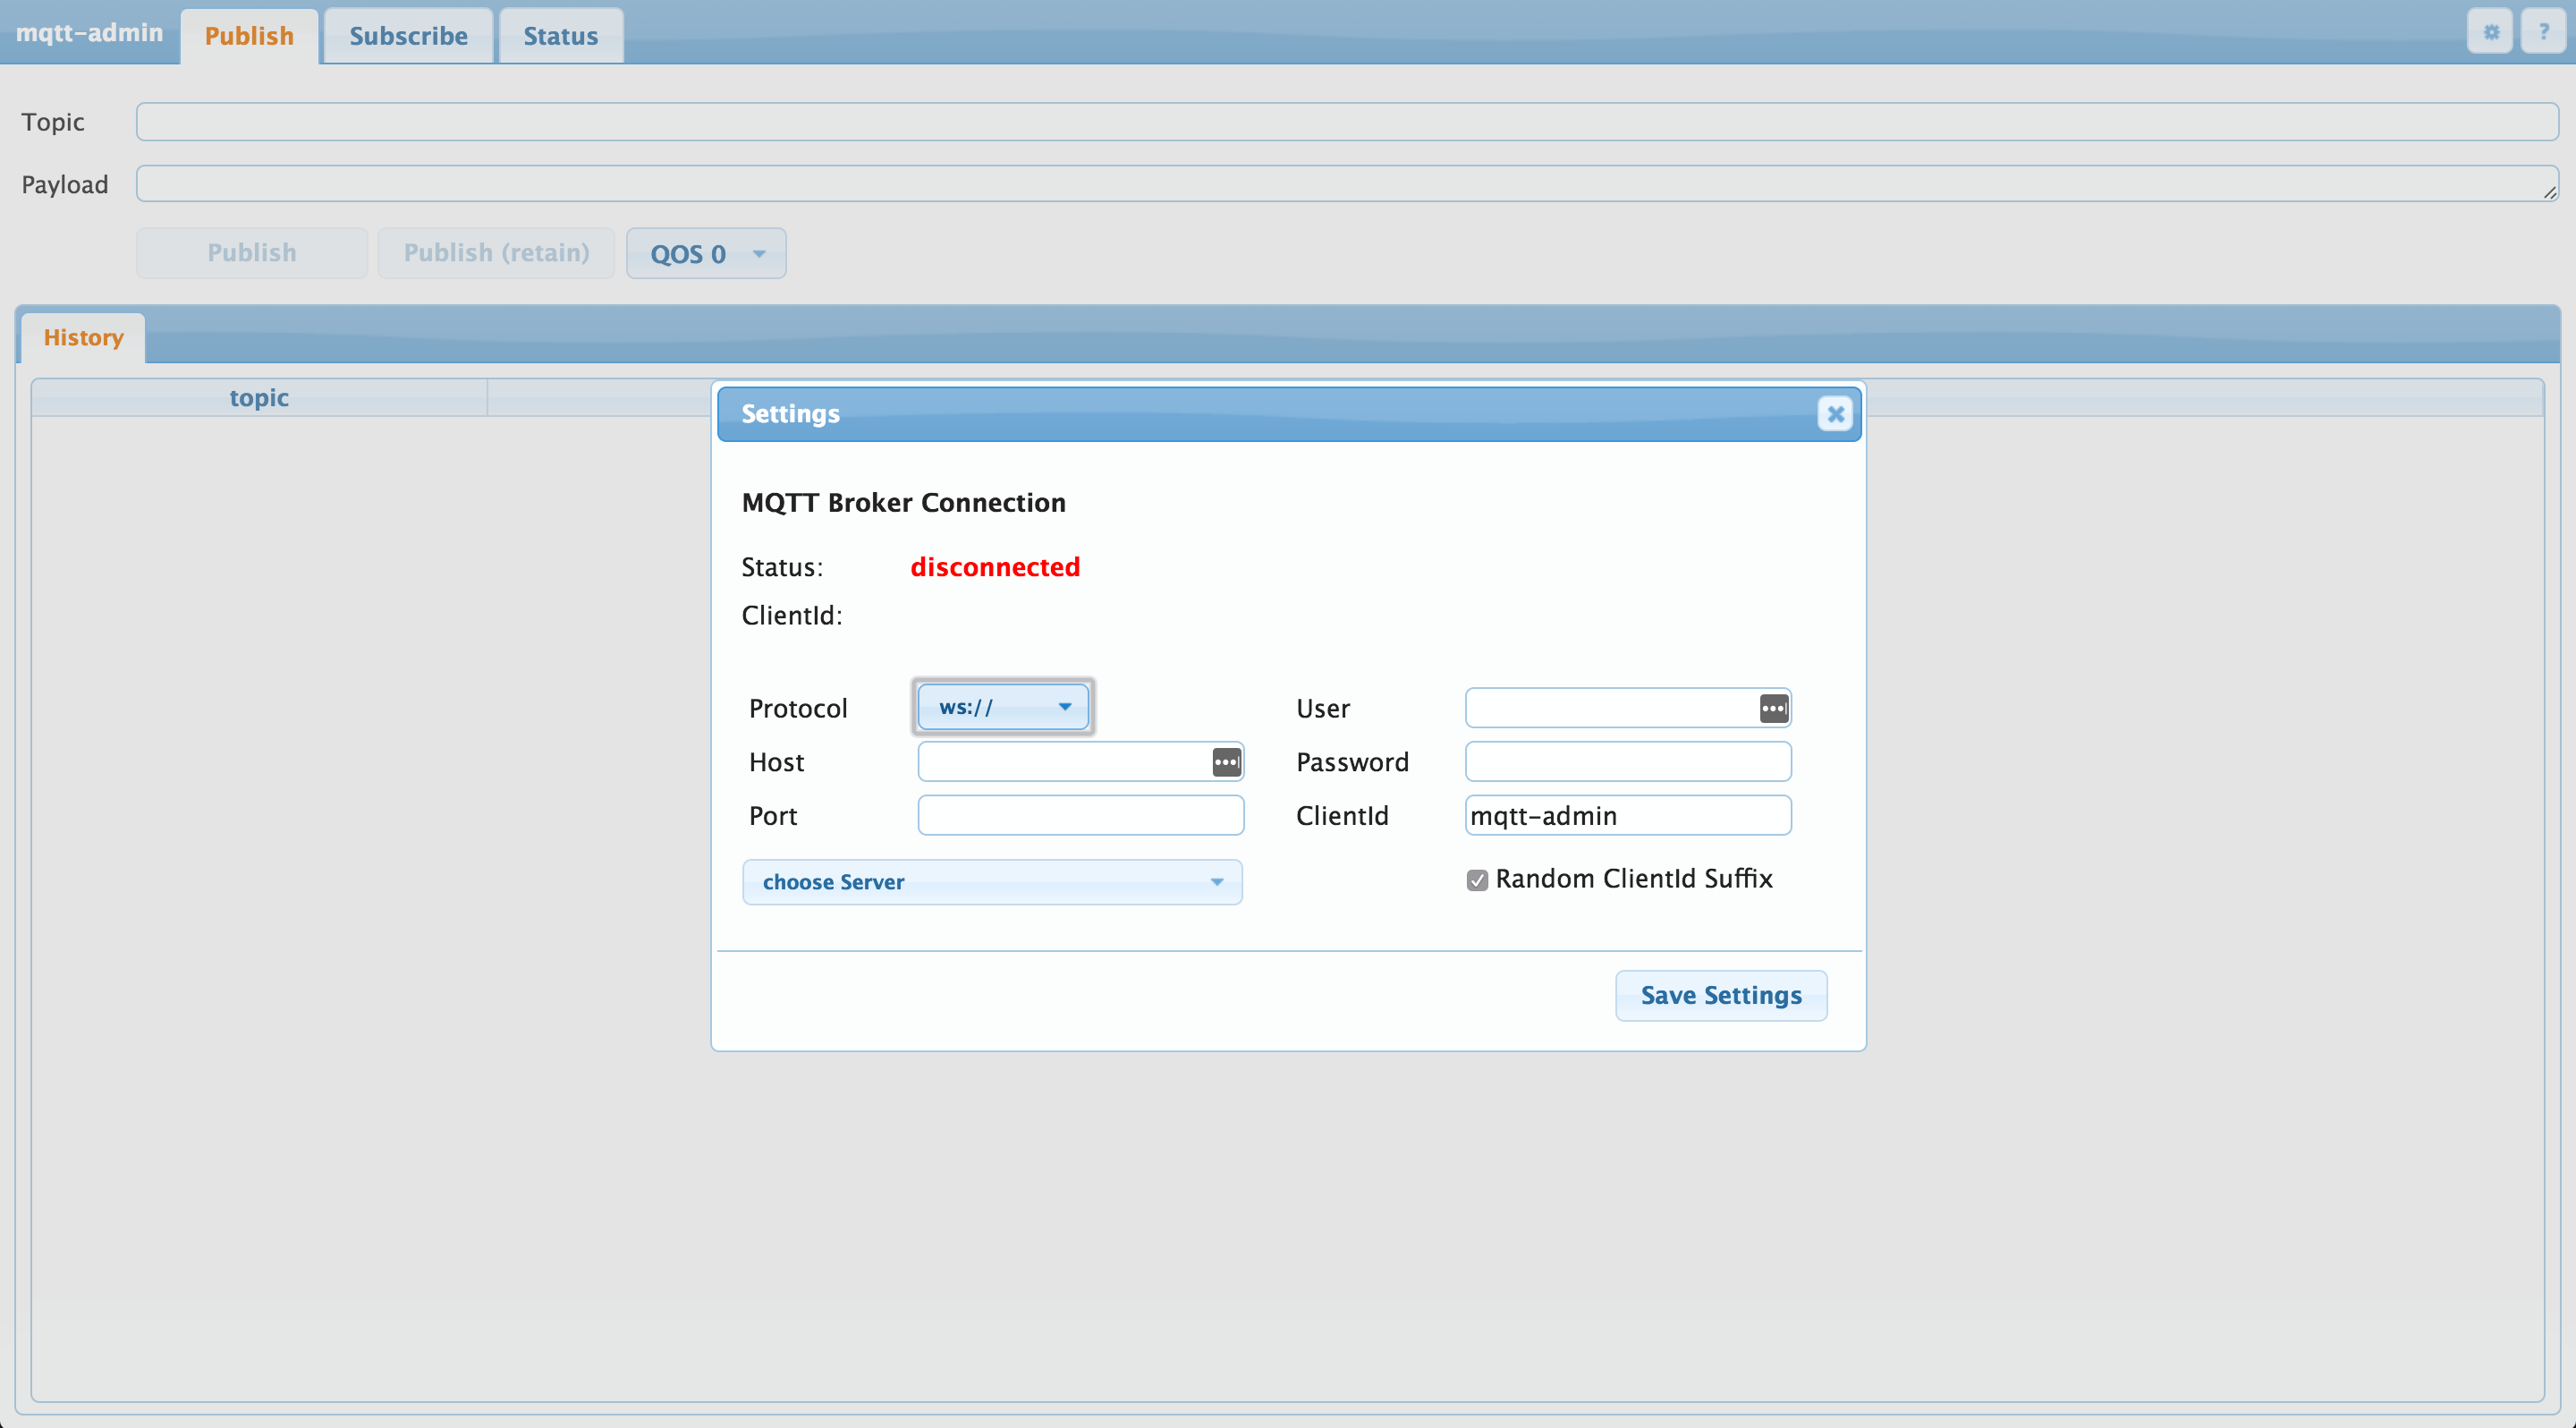
Fill out the connection information as follows:
- Protocol should be wss (which stands for websocket secure).
- Host should be the domain for your Mosquitto server,
mqtt.example.com. - Port should be
8083. - User should be your Mosquitto username; here, we used sammy.
- Password should be the password you chose.
- ClientId can be left to the default value, mqtt-admin.
After pressing Save Settings, mqtt-admin will connect to your Mosquitto server. In the next screen, fill out Topic as test, enter any message for Payload, then press Publish. The message will show up in the mosquitto_sub terminal.
Conclusion
We’ve now set up a secure, password-protected MQTT server, with auto-renewing SSL certificates from the Let’s Encrypt service. This will serve as a robust and secure messaging platform for whatever projects you dream up. Some popular software and hardware that works well with the MQTT protocol includes:
- OwnTracks, an open-source geo-tracking app you can install on your phone. OwnTracks will periodically report position information to your MQTT server, which you could then store and display on a map, or create alerts and activate IoT hardware based on your location.
- Node-RED is a browser-based graphical interface for ‘wiring’ together the Internet of Things. You drag the output of one node to the input of another, and can route information through filters, between various protocols, into databases, and so on. MQTT is very well supported by Node-RED.
- The ESP8266 is an inexpensive wifi microcontroller with MQTT capabilities. You could wire one up to publish temperature data to a topic, or perhaps subscribe to a barometric pressure topic and sound a buzzer when a storm is coming!
These are just a few popular examples from the MQTT ecosystem. There is much more hardware and software out there that speaks the protocol. If you already have a favorite hardware platform, or software language, it probably has MQTT capabilities. Have fun getting your “things” talking to each other!
Thanks for learning with the DigitalOcean Community. Check out our offerings for compute, storage, networking, and managed databases.
About the author(s)
Senior Technical Writer at DigitalOcean
former DO tech editor publishing articles here with the community, then founded the DO product docs team (https://do.co/docs). to all of my authors: you are incredible. working with you was a gift. love is what makes us great.
Still looking for an answer?
This textbox defaults to using Markdown to format your answer.
You can type !ref in this text area to quickly search our full set of tutorials, documentation & marketplace offerings and insert the link!
thank you for this useful article I want to connect to broker using python paho client and I need to provide a .crt certificate in client. how can I generate this file for client after setup server configuration? I could use it with websocket successfully.
Great article! Unfortunetly, I have an error after restarting mosquitto when applying the websocket protocol:
[server ]$ sudo service mosquitto restart
Shutting down Mosquitto MQTT broker                        [FAILED]
Starting Mosquitto MQTT brokerError: Websockets support not available.
Error found at /etc/mosquitto/conf.d/bridge.conf:29.
Error found at /etc/mosquitto/mosquitto.conf:10.
Error: Unable to open configuration file.
I am getting error after executing this command sudo certbot certonly --standalone --standalone-supported-challenges http-01 -d mqtt.example.com
Error: The client lacks sufficient authorization.
I have followed this link with similar problem with no luck.:(:(
 This work is licensed under a Creative Commons Attribution-NonCommercial- ShareAlike 4.0 International License.
Become a contributor for community
Get paid to write technical tutorials and select a tech-focused charity to receive a matching donation.

DigitalOcean Documentation
Full documentation for every DigitalOcean product.

Resources for startups and AI-native businesses
The Wave has everything you need to know about building a business, from raising funding to marketing your product.
The developer cloud
Scale up as you grow — whether you're running one virtual machine or ten thousand.

Start building today
From GPU-powered inference and Kubernetes to managed databases and storage, get everything you need to build, scale, and deploy intelligent applications.
