By O.S Tezer

Introduction
OpenERP is probably the most well-known open-source ERP solution that exists today. With over 3000 modules, its capabilities are vast - and so are possible benefits it brings for businesses and organizations. Thanks to its release under the terms of GNU Affero General Public License (AGPLv3), OpenERP is free to use and share.
In this tutorial, we will show you how easy it is to have a running copy of OpenERP 7.0 (its latest stable release) in less than 15 minutes on a Debian/Ubuntu VPS. A minimal level of technical knowledge is all you need to get started!
Note: It is recommended to start with a freshly instantiated VPS in order to prevent any possible issues, due to the large amount of OpenERP dependencies. Do not forget to update and upgrade your system’s default software packages with the following commands after logging on:
aptitude update
aptitude upgrade
Installing and Setting Up OpenERP
Installation Process (~5 minutes)
We will be using a pre-packaged version of the application to install it on our system. This makes things infinitely easier, as it is going to install all the dependencies and set them up correctly to work with OpenERP, thus producing us a clean copy.
Let’s start with adding the download URL (address) to the aptitude repository sources:
echo "deb http://nightly.openerp.com/7.0/nightly/deb/ ./" >> /etc/apt/sources.list
Afterwards, we need to update the list:
aptitude update
Now we are ready to download and install OpenERP and its dependencies!
Note: The OpenERP package itself is not signed, and a cryptographic key is not provided. Therefore, aptitude will warn you that it can not be authenticated, requesting you to install it without verification.
After entering the command below, you will be asked to confirm:
- The list of packages that are going to be downloaded and installed;
- The amount of disk space that will be used;
- And that the openerp package is authentic.
In order to install, run the following:
aptitude install openerp
Note: You will see that the package names are appended with {a}. This means that aptitude package manager will handle their installation (as well as removal) automatically.
Setting up OpenERP (~10 minutes)
We are now ready to get on with setting up our OpenERP installation.
1) Visiting the set up URL
Enter the following URL to your browser, replacing it with your server’s IP address:
http://your_vps_ip_address:8069
Example: http://162.243.69.108:8069
2): Initiating the application database
A screen asking us to create a new database similar to this will appear:
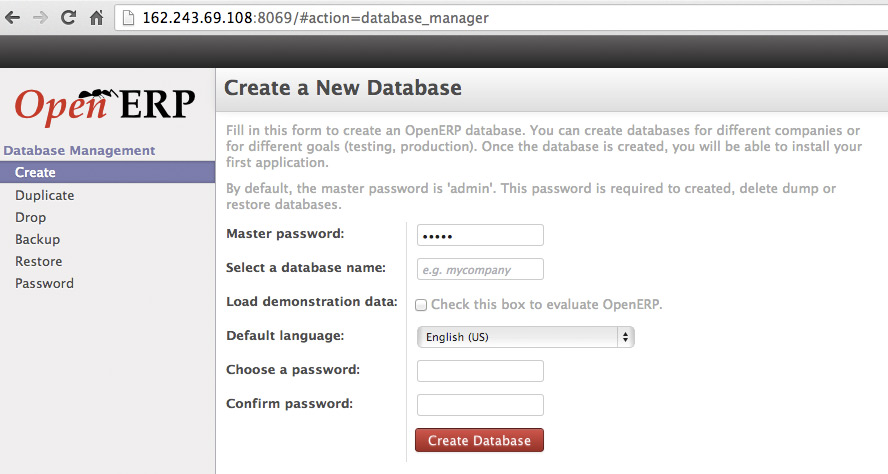
Let’s fill the form as requested (and make sure to note the information entered for future reference).
We can now continue with clicking the red “Create Database” button and go to the next step.
3): Adding modules and getting familiar
You will notice (on the upper right-hand side) that we are logged in as the Administrator. This means that we have full control to perform any operation desired.
On this second step, we will be choosing the applications we want to use with our OpenERP installation.

Click the “Install” button located underneath the name of the application (module) you wish to add. As the Administrator, you can come back to this screen anytime by clicking the “Settings” link, which is normally located on the navigation bar (the dark horizontal bar found atop).
If you need a specific module for your organization, use the search box on the right-hand side by entering your query and following the links that will appear below.
Please note that when you install a module, you will be taken to its management console or setup screen directly after the page finishes loading. You will notice its link appended to the navigation bar as well. Some applications (ex: Point of Sales module) might require you to follow a few steps in order to get started. In that case, just follow the onscreen instructions.
4) Managing users
On the “Settings” panel’s left-hand menu, below the application (module) specific settings, you will find the section to manage your users.
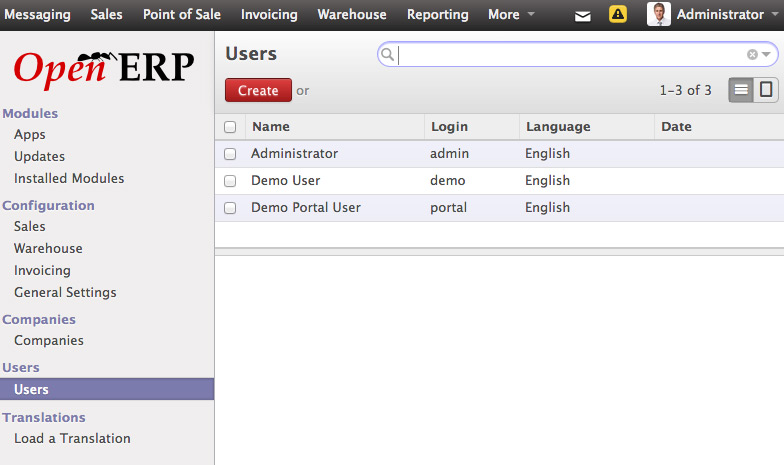
Here you can:
- Add Users: Just click the red “Create” button.
- Edit Users: Click on the user “Name” from the list and use the form appearing below.
- Delete Users: Tick the square box next to user’s name and choose “Delete” from the drop-down menu labeled “More” which will appear next to the “Create” button. You can operate the actions listed under the “More” menu on multiple users at once.
Finally

Our OpenERP installation after:
- Setting up the database;
- Installing the modules we wish to use;
- Switching back to the “Settings” panel from the top menu.
Note the areas marked with red. On the left-hand menu, you will see all the settings of the OpenERP, including the newly added ones of the modules we have installed as explained above.
On top, you will find the menu to switch between applications and the settings panel.
We are fully ready to work with the OpenERP application installed on our VPS.
If you have further questions and would like to learn more, please remember that you can directly refer to the OpenERP Documentation v7.0.
<div class=“author”>Submitted by: <a href=“https://twitter.com/ostezer”>O.S. Tezer</div>
Thanks for learning with the DigitalOcean Community. Check out our offerings for compute, storage, networking, and managed databases.
About the author
Still looking for an answer?
This textbox defaults to using Markdown to format your answer.
You can type !ref in this text area to quickly search our full set of tutorials, documentation & marketplace offerings and insert the link!
OpenERP Server Error Client Traceback (most recent call last): File “/usr/lib/pymodules/python2.7/openerp/addons/web/http.py”, line 204, in dispatch response[“result”] = method(self, **self.params) File “/usr/lib/pymodules/python2.7/openerp/addons/web/controllers/main.py”, line 777, in create params[‘create_admin_pwd’]) File “/usr/lib/pymodules/python2.7/openerp/addons/web/session.py”, line 30, in proxy_method result = self.session.send(self.service_name, method, *args) File “/usr/lib/pymodules/python2.7/openerp/addons/web/session.py”, line 97, in send raise xmlrpclib.Fault(‘AccessDenied’, openerp.tools.ustr(e))
Server Access denied.
There is a small issue. In case of following error: Internal Server Error {“message”: “OpenERP Server Error”, “code”: 200, “data”: {“debug”: "Server Traceback (most recent call last):\n File "/usr/lib/pymodules/python2.7/openerp/addons/web/session.py", line 89, in send\n return openerp.netsvc.dispatch_rpc(service_name, method, args)\n File "/usr/lib/pymodules/python2.7/openerp/netsvc.py", line 292, in dispatch_rpc\n result = ExportService.getService(service_name).dispatch(method, params)\n File "/usr/lib/pymodules/python2.7/openerp/service/web_services.py", line 122, in dispatch\n return fn(*params)\n
Just do the following: The issue is that the user/role openerp is not defined within postgreSQL.
Solution:
On a terminal, type the following:
sudo su - postgres createuser --createdb --username postgres --no-createrole --no-superuser --pwprompt openerp
It will ask you for a password for the role/user openerp, type it twice. When done, quit the user postgres:
exit
You should be able to use openERP now. It has been a while I have installed openERP on a new Ubuntu 12.04.2 server, you might have to add the username and/or password to a specific file. Just let us know if the above was not enough.
one more thing i think it better installing it manually from source rather then the ubuntu repository, Link: http://help.openerp.com/question/2562/how-to-install-openerp-v70-on-ubuntu-1204-from-launchpad-repository/
In case of the following error
Internal Server Error {“message”: “OpenERP Server Error”, “code”: 200, “data”: {“debug”: "Server Traceback (most recent call last):\n File "/usr/lib/pymodules/python2.7/openerp/addons/web/session.py", line 89, in send\n return openerp.netsvc.dispatch_rpc(service_name, method, args)\n File "/usr/lib/pymodules/python2.7/openerp/netsvc.py", line 292, in dispatch_rpc\n result = ExportService.getService(service_name).dispatch(method, params)\n File "/usr/lib/pymodules/python2.7/openerp/service/web_services.py", line 122, in dispatch\n return fn(*params)\n
Solution that worked for me:
Put password admin for the default Master password
can this openerp run on 20 dollar monthly plsn… https://www.digitalocean.com/pricing
 This work is licensed under a Creative Commons Attribution-NonCommercial- ShareAlike 4.0 International License.
Become a contributor for community
Get paid to write technical tutorials and select a tech-focused charity to receive a matching donation.

DigitalOcean Documentation
Full documentation for every DigitalOcean product.

Resources for startups and AI-native businesses
The Wave has everything you need to know about building a business, from raising funding to marketing your product.
The developer cloud
Scale up as you grow — whether you're running one virtual machine or ten thousand.

Start building today
From GPU-powered inference and Kubernetes to managed databases and storage, get everything you need to build, scale, and deploy intelligent applications.
