By Erika Heidi
Developer Advocate
Not using CentOS 8?
Choose a different version or distribution. Stack on CentOS 8")
Introduction
The LEMP software stack is a group of software that can be used to serve dynamic web pages and web applications written in PHP. The name “LEMP” is an acronym that describes a Linux operating system with an Nginx (pronounced like “Engine-X”) web server. The backend data is stored in a MariaDB database and the dynamic processing is handled by PHP.
The database layer in a LEMP stack is typically a MySQL database server, but prior to the release of CentOS 8, MySQL wasn’t available from the default CentOS repositories. Because of this, MariaDB, a community fork of MySQL, became a widely accepted alternative to MySQL as the default database system for LEMP stacks on CentOS machines. MariaDB works as a drop-in replacement for the original MySQL server, which in practice means you can switch to MariaDB without having to make any configuration or code changes in your application.
In this guide, you’ll install a LEMP stack on a CentOS 8 server. Although MySQL is available from the default repositories in CentOS 8, this guide will walk through the process of setting up a LEMP stack with MariaDB as the database management system.
Prerequisites
To follow this guide, you’ll need access to a CentOS 8 server as a non-root user with sudo privileges, and an active firewall installed on your server. To set this up, you can follow our Initial Server Setup Guide for CentOS 8.
Step 1 — Installing the Nginx Web Server
In order to display web pages to our site visitors, we are going to employ Nginx, a high-performance web server. We’ll use the dnf package manager, which is the new default package manager on CentOS 8, to install this software.
Install the nginx package with:
- sudo dnf install nginx
When prompted, enter y to confirm that you want to install nginx.
After the installation is finished, run the following command to enable and start the server:
- sudo systemctl start nginx
In case you have enabled the firewalld firewall as per our initial server setup guide, you will need to allow connections to Nginx. The following command will permanently enable HTTP connections, which run on port 80 by default:
- sudo firewall-cmd --permanent --add-service=http
To verify that the change was applied, you can run:
- sudo firewall-cmd --permanent --list-all
You’ll see output like this:
Outputpublic
  target: default
  icmp-block-inversion: no
  interfaces:
  sources:
  services: cockpit dhcpv6-client http ssh
  ports:
  protocols:
  masquerade: no
  forward-ports:
  source-ports:
  icmp-blocks:
  rich rules:
You’ll need to reload the firewall configuration so the changes take effect:
- sudo firewall-cmd --reload
With the new firewall rule added, you can test if the server is up and running by accessing your server’s public IP address or domain name from your web browser.
Note: In case you are using DigitalOcean as DNS hosting provider, you can check our product docs for detailed instructions on how to set up a new domain name and point it to your server.
If you do not have a domain name pointed at your server and you do not know your server’s public IP address, you can find it by running the following command:
- ip addr show eth0 | grep inet | awk '{ print $2; }' | sed 's/\/.*$//'
This will print out a few IP addresses. You can try each of them in turn in your web browser.
As an alternative, you can check which IP address is accessible, as viewed from other locations on the internet:
- curl -4 icanhazip.com
Type the address that you receive in your web browser and it will take you to Nginx’s default landing page:

If you see this page, then your web server is now correctly installed.
Step 2 — Installing MariaDB
Now that you have a web server up and running, you need to install a database system to be able to store and manage data for your site. We’ll install MariaDB, a community-developed fork of the original MySQL server by Oracle.
To install this software, run:
- sudo dnf install mariadb-server
When the installation is finished, you can enable and start the MariaDB server with:
- sudo systemctl start mariadb
To improve the security of your database server, it’s recommended that you run a security script that comes pre-installed with MariaDB. This script will remove some insecure default settings and lock down access to your database system. Start the interactive script by running:
- sudo mysql_secure_installation
This script will take you through a series of prompts where you can make some changes to your MariaDB setup. The first prompt will ask you to enter the current database root password. This is not to be confused with the system root user. The database root user is an administrative user with full privileges over the database system. Because you just installed MariaDB and haven’t made any configuration changes yet, this password will be blank, so just press ENTER at the prompt.
The next prompt asks you whether you’d like to set up a database root password. Because MariaDB uses a special authentication method for the root user that is typically safer than using a password, you don’t need to set this now. Type N and then press ENTER.
From there, you can press Y and then ENTER to accept the defaults for all the subsequent questions. This will remove anonymous users and the test database, disable remote root login, and load these new rules so that the server immediately respects the changes you have made.
When you’re finished, log in to the MariaDB console by typing:
- sudo mysql
This will connect to the MariaDB server as the administrative database user root, which is inferred by the use of sudo when running this command. You should see output like this:
OutputWelcome to the MariaDB monitor.  Commands end with ; or \g.
Your MariaDB connection id is 9
Server version: 10.3.17-MariaDB MariaDB Server

Copyright (c) 2000, 2018, Oracle, MariaDB Corporation Ab and others.

Type 'help;' or '\h' for help. Type '\c' to clear the current input statement.

MariaDB [(none)]>
Notice that you didn’t need to provide a password to connect as the root user. That works because the default authentication method for the administrative MariaDB user is unix_socket instead of password. Even though this might look like a security concern at first, it makes the database server more secure because the only users allowed to log in as the root MariaDB user are the system users with sudo privileges connecting from the console or through an application running with the same privileges. In practical terms, that means you won’t be able to use the administrative database root user to connect from your PHP application.
For increased security, it’s best to have dedicated user accounts with less expansive privileges set up for every database, especially if you plan on having multiple databases hosted on your server. To demonstrate such a setup, we’ll create a database named example_database and a user named example_user, but you can replace these names with different values.
To create a new database, run the following command from your MariaDB console:
- CREATE DATABASE example_database;
Now you can create a new user and grant them full privileges on the custom database you’ve just created. The following command defines this user’s password as password, but you should replace this value with a secure password of your own choosing:
- GRANT ALL ON example_database.* TO 'example_user'@'localhost' IDENTIFIED BY 'password' WITH GRANT OPTION;
This will give the example_user user full privileges over the example\_database database, while preventing this user from creating or modifying other databases on your server.
Flush the privileges to ensure that they are saved and available in the current session:
- FLUSH PRIVILEGES;
Following this, exit the MariaDB shell:
- exit
You can test if the new user has the proper permissions by logging in to the MariaDB console again, this time using the custom user credentials:
- mysql -u example_user -p
Note the -p flag in this command, which will prompt you for the password you chose when creating the example_user user. After logging in to the MariaDB console, confirm that you have access to the example\_database database:
- SHOW DATABASES;
This will give you the following output:
Output+--------------------+
| Database           |
+--------------------+
| example_database   |
| information_schema |
+--------------------+
2 rows in set (0.000 sec)
To exit the MariaDB shell, type:
- exit
At this point, your database system is set up and you can move on to installing PHP, the final component of the LEMP stack.
Step 3 — Installing PHP-FPM
You have Nginx installed to serve your content and MariaDB installed to store and manage your data. Now you can install PHP to process code and generate dynamic content for the web server.
While Apache embeds the PHP interpreter in each request, Nginx requires an external program to handle PHP processing and act as bridge between the PHP interpreter itself and the web server. This allows for a better overall performance in most PHP-based websites, but it requires additional configuration. You’ll need to install php-fpm, which stands for “PHP fastCGI process manager”, and tell Nginx to pass PHP requests to this software for processing. Additionally, you’ll need php-mysqlnd, a PHP module that allows PHP to communicate with MySQL-based databases. Core PHP packages will automatically be installed as dependencies.
To install the php-fpm and php-mysql packages, run:
- sudo dnf install php-fpm php-mysqlnd
When the installation is finished, you’ll need to edit the /etc/php-fpm.d/www.conf file in order to adjust a couple settings.
The default text editor that comes with CentOS 8 is vi. vi is an extremely powerful text editor, but it can be somewhat obtuse for users who lack experience with it. You might want to install a more user-friendly editor such as nano to facilitate editing configuration files on your CentOS 8 server:
- sudo dnf install nano
Now open the /etc/php-fpm.d/www.conf configuration file using nano or your editor of choice:
- sudo nano /etc/php-fpm.d/www.conf
Now look for the user and group directives. If you are using nano, you can hit CTRL+W to search for these terms inside the open file.
…
; Unix user/group of processes
; Note: The user is mandatory. If the group is not set, the default user's group
;       will be used.
; RPM: apache user chosen to provide access to the same directories as httpd
user = apache
; RPM: Keep a group allowed to write in log dir.
group = apache
…
You’ll notice that both the user and group variables are set to apache. We need to change these to nginx:
…
; RPM: apache user chosen to provide access to the same directories as httpd
user = nginx
; RPM: Keep a group allowed to write in log dir.
group = nginx
…
Save and close the file when you’re done editing. If you are using nano, do so by pressing CTRL + X, then Y and ENTER.
To enable and start the php-fpm service, run:
- sudo systemctl start php-fpm
Finally, restart the Nginx web server so that it loads the configuration files created by the php-fpm installation:
- sudo systemctl restart nginx
Your web server is now fully set up. In the next step, we’ll create a PHP testing script to make sure everything works as expected.
Step 4 — Testing PHP with Nginx
On CentOS 8, the default php-fpm installation automatically creates configuration files that will allow your Nginx web server to handle .php files in the default document root located at /usr/share/nginx/html. You won’t need to make any changes to Nginx’s configuration in order for PHP to work correctly within your web server.
The only adjustment we’ll make is to change the default permission settings on your Nginx document root folder. This way, you’ll be able to create and modify files in that directory with your regular system user, without the need to prefix each command with sudo.
The following command will change the ownership of the default Nginx document root to a user and group called sammy, so be sure to replace the highlighted username and group in this command to reflect your system’s username and group.
- sudo chown -R sammy.sammy /usr/share/nginx/html/
We’ll now create a test PHP page to make sure the web server works as expected.
Create a new PHP file called info.php at the /usr/share/nginx/html directory:
- nano /usr/share/nginx/html/info.php
The following PHP code will display information about the current PHP environment running on the server:
<?php

phpinfo();
When you are finished, save and close the file.
Now we can test whether our web server can correctly display content generated by a PHP script. Go to your browser and access your server hostname or IP address, followed by /info.php:
http://server_host_or_IP/info.php
You’ll see a page similar to this:
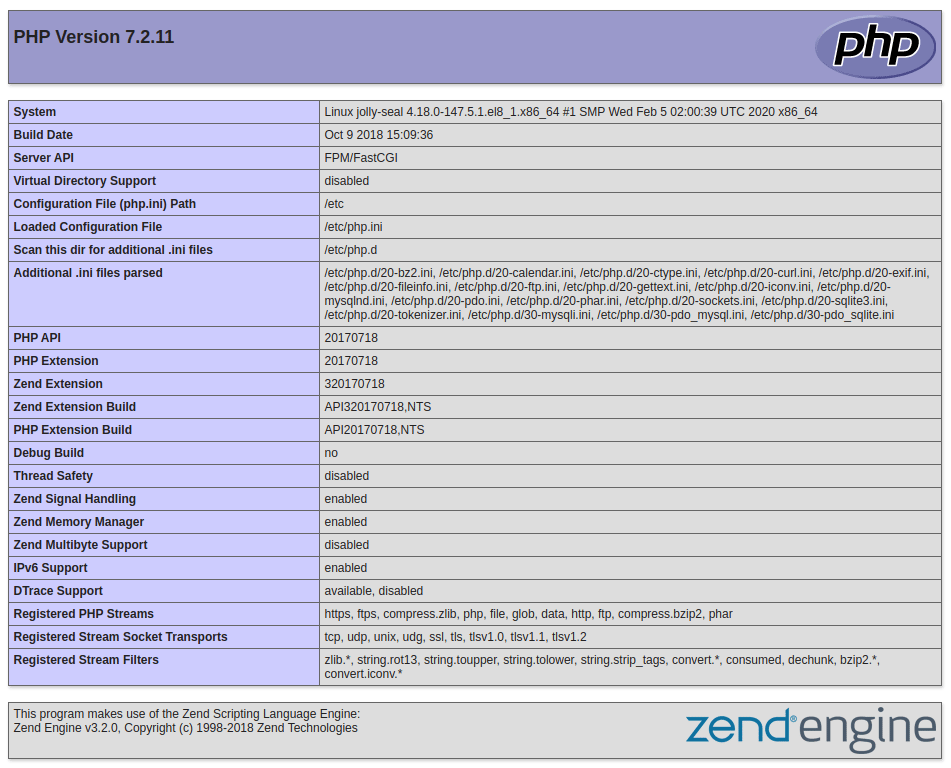
After checking the relevant information about your PHP server through that page, it’s best to remove the file you created as it contains sensitive information about your PHP environment and your CentOS server. You can use rm to remove that file:
- rm /usr/share/nginx/html/info.php
You can always regenerate this file if you need it later. Next, we’ll test the database connection from the PHP side.
Step 5 — Testing Database Connection from PHP (Optional)
If you want to test if PHP is able to connect to MariaDB and execute database queries, you can create a test table with dummy data and query for its contents from a PHP script.
First, connect to the MariaDB console with the database user you created in Step 2 of this guide:
- mysql -u example_user -p
Create a table named todo_list. From the MariaDB console, run the following statement:
CREATE TABLE example_database.todo_list (
	item_id INT AUTO_INCREMENT,
	content VARCHAR(255),
	PRIMARY KEY(item_id)
);
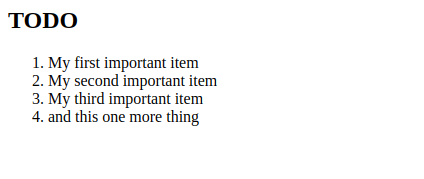
Now, insert a few rows of content in the test table. You might want to repeat the next command a few times, using different values:
- INSERT INTO example_database.todo_list (content) VALUES ("My first important item");
To confirm that the data was successfully saved to your table, run:
- SELECT * FROM example_database.todo_list;
You will see the following output:
Output+---------+--------------------------+
| item_id | content                  |
+---------+--------------------------+
|       1 | My first important item  |
|       2 | My second important item |
|       3 | My third important item  |
|       4 | and this one more thing  |
+---------+--------------------------+
4 rows in set (0.000 sec)
After confirming that you have valid data in your test table, you can exit the MariaDB console:
- exit
Now you can create the PHP script that will connect to MariaDB and query for your content. Create a new PHP file in your custom web root directory using your preferred editor. We’ll use nano for that:
- nano /usr/share/nginx/html/todo_list.php
Add the following content to your PHP script:
<?php
$user = "example_user";
$password = "password";
$database = "example_database";
$table = "todo_list";

try {
  $db = new PDO("mysql:host=localhost;dbname=$database", $user, $password);
  echo "<h2>TODO</h2><ol>";
  foreach($db->query("SELECT content FROM $table") as $row) {
    echo "<li>" . $row['content'] . "</li>";
  }
  echo "</ol>";
} catch (PDOException $e) {
    print "Error!: " . $e->getMessage() . "<br/>";
    die();
}
Save and close the file when you’re done editing.
You can now access this page in your web browser by visiting your server’s host name or public IP address, followed by /todo_list.php:
http://server_host_or_IP/todo_list.php
You should see a page like this, showing the content you’ve inserted in your test table:
That means your PHP environment is ready to connect and interact with your MariaDB server.
Conclusion
In this guide, you’ve built a flexible foundation for serving PHP websites and applications to your visitors, using Nginx as web server. You’ve set up Nginx to handle PHP requests through php-fpm, and you also set up a MariaDB database to store your website’s data.
Thanks for learning with the DigitalOcean Community. Check out our offerings for compute, storage, networking, and managed databases.
About the author
Dev/Ops passionate about open source, PHP, and Linux. Former Senior Technical Writer at DigitalOcean. Areas of expertise include LAMP Stack, Ubuntu, Debian 11, Linux, Ansible, and more.
Still looking for an answer?
This textbox defaults to using Markdown to format your answer.
You can type !ref in this text area to quickly search our full set of tutorials, documentation & marketplace offerings and insert the link!
PHP-FPM install error
After running the following command (sudo dnf install php-fpm php-mysqlnd) I receive the error
Running transaction Preparing : 1/1 Installing : php-fpm-7.4.8-2.el8.remi.x86_64 1/1 Error unpacking rpm package php-fpm-7.4.8-2.el8.remi.x86_64 Verifying : php-fpm-7.4.8-2.el8.remi.x86_64 1/1
Failed: php-fpm-7.4.8-2.el8.remi.x86_64
Error: Transaction failed
Great article. For those who don’t want to use mariadb yet, just pass the installation of php-mysqlnd and mariadb packages.
can you help me install phpmyadmin with centos8 ?. your tutorial is very easy to understand and I have done it.
 This work is licensed under a Creative Commons Attribution-NonCommercial- ShareAlike 4.0 International License.
Become a contributor for community
Get paid to write technical tutorials and select a tech-focused charity to receive a matching donation.

DigitalOcean Documentation
Full documentation for every DigitalOcean product.

Resources for startups and AI-native businesses
The Wave has everything you need to know about building a business, from raising funding to marketing your product.
The developer cloud
Scale up as you grow — whether you're running one virtual machine or ten thousand.

Start building today
From GPU-powered inference and Kubernetes to managed databases and storage, get everything you need to build, scale, and deploy intelligent applications.
