
Status: Deprecated
This article covers a version of CentOS that is no longer supported. If you are currently operating a server running CentOS 6, we highly recommend upgrading or migrating to a supported version of CentOS.
Reason: CentOS 6 reached end of life (EOL) on November 30th, 2020 and no longer receives security patches or updates. For this reason, this guide is no longer maintained.
See Instead:
This guide might still be useful as a reference, but may not work on other CentOS releases. If available, we strongly recommend using a guide written for the version of CentOS you are using.
Step 1 - Install REMI and EPEL Repositories and Packages
rpm -ivh http://dl.fedoraproject.org/pub/epel/6/x86_64/epel-release-6-8.noarch.rpm
rpm -ivh http://rpms.famillecollet.com/enterprise/remi-release-6.rpm
yum -y install php php-mcrypt php-pdo php-mysql pdns pdns-backend-mysql mysql-server httpd
Step 2 - Create a Database and Username
service mysqld start
service httpd start
mysqladmin create powerdns
Make sure to select your own password below:
mysql -Bse "create user 'powerdns'@'localhost' identified by 'password'"
mysql -Bse "grant all privileges on powerdns.* to 'powerdns'@'localhost'"
Step 3 - Create PowerDNS databases and tables:
Start mysql console with "mysql"
mysql> use powerdns;
CREATE TABLE domains (
id INT auto_increment,
name VARCHAR(255) NOT NULL,
master VARCHAR(128) DEFAULT NULL,
last_check INT DEFAULT NULL,
type VARCHAR(6) NOT NULL,
notified_serial INT DEFAULT NULL,
account VARCHAR(40) DEFAULT NULL,
primary key (id)
);

CREATE UNIQUE INDEX name_index ON domains(name);

CREATE TABLE records (
id INT auto_increment,
domain_id INT DEFAULT NULL,
name VARCHAR(255) DEFAULT NULL,
type VARCHAR(6) DEFAULT NULL,
content VARCHAR(255) DEFAULT NULL,
ttl INT DEFAULT NULL,
prio INT DEFAULT NULL,
change_date INT DEFAULT NULL,
primary key(id)
);

CREATE INDEX rec_name_index ON records(name);
CREATE INDEX nametype_index ON records(name,type);
CREATE INDEX domain_id ON records(domain_id);

CREATE TABLE supermasters (
ip VARCHAR(25) NOT NULL,
nameserver VARCHAR(255) NOT NULL,
account VARCHAR(40) DEFAULT NULL
);
Exit mysql console by typing "exit":
mysql> exit
Step 4 - Install PowerAdmin
Login as root and run:
cd /root
wget https://github.com/downloads/poweradmin/poweradmin/poweradmin-2.1.6.tgz
tar xvfz poweradmin-2.1.6.tgz
cd poweradmin-2.1.6/inc
mv config-me.inc.php config.inc.php
Edit config.inc.php and make sure to change password you've specified in Step 2:
nano config.inc.php
Modify db_pass and session_key to your own values:
$db_host                = 'localhost';
$db_port                = '3306';
$db_user                = 'powerdns';
$db_pass                = 'password';
$db_name                = 'powerdns';
$db_type                = 'mysql';
$session_key            = 'session_key';
Move PowerAdmin folder to Apache's DocumentRoot. We can use this droplet's IP address to manage our DNS settings
mv /root/poweradmin-2.1.6/* /var/www/html/
service httpd restart
Edit /etc/pdns/pdns.conf and add the following lines, make sure to modify gmysql-password to MySQL password you've selected in Step 2:
launch=gmysql
gmysql-host=localhost
gmysql-user=powerdns
gmysql-password=password
gmysql-dbname=powerdns
Restart Power DNS daemon:
service pdns restart
Step 5 - Create PowerAdmin Account
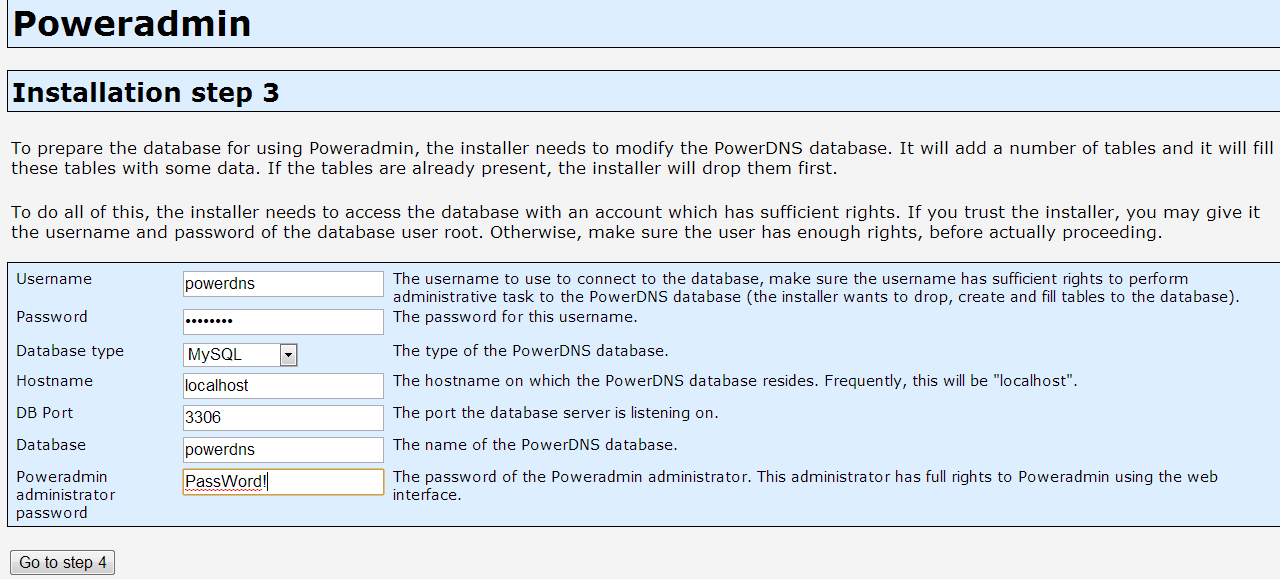
Proceed to installing PowerAdmin from webserver. Navigate over to your droplet's IP /install folder (in our case http://198.211.110.153/install/ ).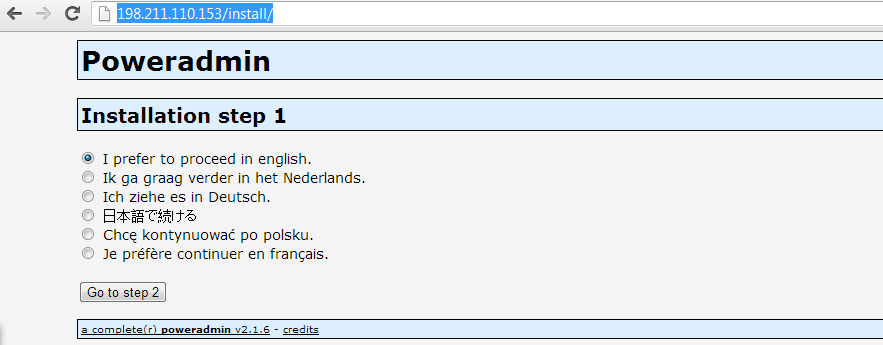
Create a Poweradmin admin account:
Next step is optional:
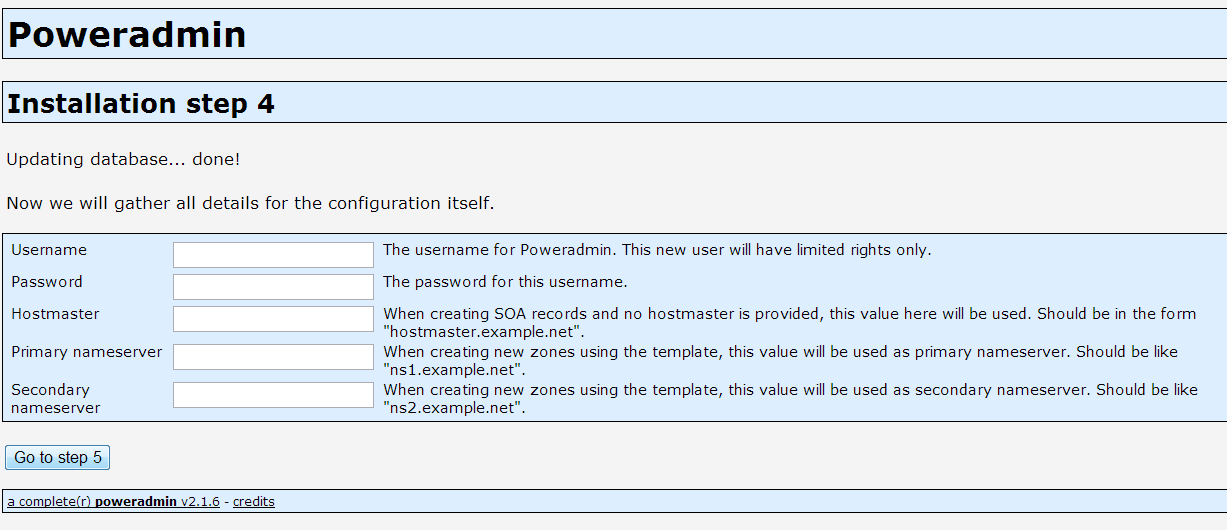
Finish the installation process, and after you get to Step 7, remove /var/www/html/install folder:
rm -rf /var/www/html/install
Now you can navigate to your droplet's IP ( http://198.211.110.153/ in our case), and login as admin with password you've specified in Step 5.
Now you can create your own DNS zone records:
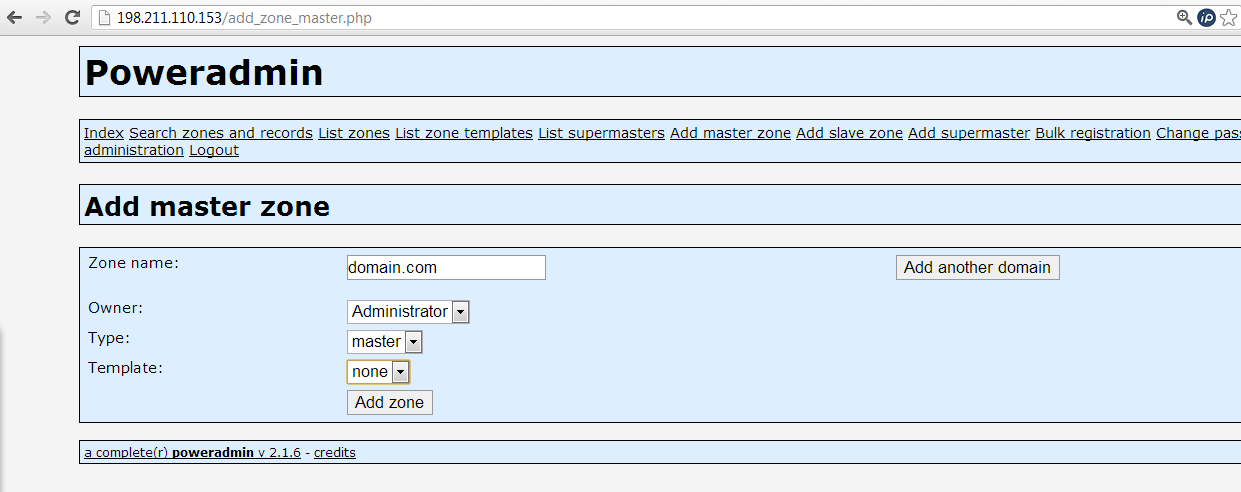
You can verify that your new PowerDNS server is working by running dig against it:
dig @198.211.110.153 domain.com

;; ANSWER SECTION:
domain.com.             86400   IN      A       127.0.0.1
And you are all done!
Thanks for learning with the DigitalOcean Community. Check out our offerings for compute, storage, networking, and managed databases.
About the author
Still looking for an answer?
This textbox defaults to using Markdown to format your answer.
You can type !ref in this text area to quickly search our full set of tutorials, documentation & marketplace offerings and insert the link!
Hi there.
Good tutorial, but I’m getting stuck at “Step 5 - Create PowerAdmin Account”
I get this: Forbidden
You don’t have permission to access /install/ on this server.
Apache/2.2.15 (CentOS) Server at 172.30.3.216 Port 80
Any ideas? Thanks!
im using CentOS 5.5 and for me it was SElinux messing with it, i forgot to check that out. you can temporary disable it by doing as root
echo 0 > /selinux/enforce hope it help someone
This tutorial is good, except for some reason PDNS refuses to listen on port 53… Any ideas?
I’m getting stuck when asked to start mysql, for some reason I’m getting access denied errors. Please see the error below:
[root@ns1 ~]# mysql ERROR 1045 (28000): Access denied for user ‘root’@‘localhost’ (using password: NO) [root@ns1 ~]# mysql -p Enter password: ERROR 1045 (28000): Access denied for user ‘root’@‘localhost’ (using password: YES) [root@ns1 ~]# mysql -u -p ERROR 1045 (28000): Access denied for user ‘-p’@‘localhost’ (using password: NO) [root@ns1 ~]# mysql ERROR 1045 (28000): Access denied for user ‘root’@‘localhost’ (using password: NO)
Any idea how to solve this? I’d love to get this up and running asap.
Hi
I followed your howto but cant get the answer while using “dig”. My installation gone smooth. Here I’m pasting some output. please check and guide me.
#dig @localhost domain.com A
; <<>> DiG 9.7.3-P3-RedHat-9.7.3-8.P3.el6 <<>> @localhost aruhat.com ; (2 servers found) ;; global options: +cmd ;; Got answer: ;; ->>HEADER<<- opcode: QUERY, status: NOERROR, id: 41627 ;; flags: qr aa rd; QUERY: 1, ANSWER: 0, AUTHORITY: 1, ADDITIONAL: 0 ;; WARNING: recursion requested but not available
;; QUESTION SECTION: ;aruhat.com. IN A
;; AUTHORITY SECTION: aruhat.com. 3600 IN SOA 2014051900. 28800. 7200 604800 86400 604800 3600
;; Query time: 0 msec ;; SERVER: 127.0.0.1#53(127.0.0.1) ;; WHEN: Mon May 19 16:30:47 2014 ;; MSG SIZE rcvd: 79
#PDNS monitoring
[root@ldap ~]# /etc/init.d/pdns monitor May 19 16:33:25 Reading random entropy from ‘/dev/urandom’ May 19 16:33:25 This is module gmysqlbackend.so reporting May 19 16:33:25 This is a standalone pdns May 19 16:33:25 UDP server bound to 0.0.0.0:53 May 19 16:33:25 TCP server bound to 0.0.0.0:53 May 19 16:33:25 PowerDNS Authoritative Server 3.3.1 (jenkins@autotest.powerdns.com) © 2001-2013 PowerDNS.COM BV May 19 16:33:25 Using 64-bits mode. Built on 20131217194128 by mockbuild@, gcc 4.4.7 20120313 (Red Hat 4.4.7-4). May 19 16:33:25 PowerDNS comes with ABSOLUTELY NO WARRANTY. This is free software, and you are welcome to redistribute it according to the terms of the GPL version 2. May 19 16:33:25 Set effective group id to 490 May 19 16:33:25 Set effective user id to 495 May 19 16:33:25 Creating backend connection for TCP May 19 16:33:25 Master/slave communicator launching May 19 16:33:25 gmysql Connection successful. Connected to database ‘powerdns’ on ‘localhost’. May 19 16:33:25 gmysql Connection successful. Connected to database ‘powerdns’ on ‘localhost’. % May 19 16:33:25 About to create 3 backend threads for UDP May 19 16:33:25 gmysql Connection successful. Connected to database ‘powerdns’ on ‘localhost’. May 19 16:33:25 gmysql Connection successful. Connected to database ‘powerdns’ on ‘localhost’. May 19 16:33:25 No new unfresh slave domains, 0 queued for AXFR already May 19 16:33:25 No master domains need notifications May 19 16:33:25 gmysql Connection successful. Connected to database ‘powerdns’ on ‘localhost’. May 19 16:33:25 gmysql Connection successful. Connected to database ‘powerdns’ on ‘localhost’. May 19 16:33:25 gmysql Connection successful. Connected to database ‘powerdns’ on ‘localhost’. May 19 16:33:25 gmysql Connection successful. Connected to database ‘powerdns’ on ‘localhost’. May 19 16:33:25 gmysql Connection successful. Connected to database ‘powerdns’ on ‘localhost’. May 19 16:33:25 gmysql Connection successful. Connected to database ‘powerdns’ on ‘localhost’. May 19 16:33:25 Done launching threads, ready to distribute questions
I’m having problem that my pdns won’t resolve any zone… but I could input zone to database.
 This work is licensed under a Creative Commons Attribution-NonCommercial- ShareAlike 4.0 International License.
Become a contributor for community
Get paid to write technical tutorials and select a tech-focused charity to receive a matching donation.

DigitalOcean Documentation
Full documentation for every DigitalOcean product.

Resources for startups and AI-native businesses
The Wave has everything you need to know about building a business, from raising funding to marketing your product.
The developer cloud
Scale up as you grow — whether you're running one virtual machine or ten thousand.

Start building today
From GPU-powered inference and Kubernetes to managed databases and storage, get everything you need to build, scale, and deploy intelligent applications.
