By Theo B and Brian Hogan
Not using Ubuntu 16.04?
Choose a different version or distribution.
###Introduction
Webmin is a modern, web control panel for any Linux machine. It allows you to administer your server through an simple interface. With Webmin, you can change settings for common packages on the fly.
In this tutorial, you’ll install and configure Webmin on your server and secure access to the interface with a valid certificate using Let’s Encrypt. You’ll then use Webmin to add new user accounts, and update all packages on your server from the dashboard.
Prerequisites
To complete this tutorial, you will need:
- One Ubuntu 16.04 server set up by following the Ubuntu 16.04 initial server setup guide, including a sudo non-root user and a firewall.
- Apache installed by following How To Install Linux, Apache, MySQL, PHP (LAMP) stack on Ubuntu 16.04. We’ll use Apache to perform Let’s Encrypt’s domain verification.
- A Fully-Qualified Domain Name (FQDN), with a DNS A record pointing to the IP address of your server. To configure this, follow the tutorial How To Set Up a Host Name with DigitalOcean.
Step 1 — Installing Webmin
First, we need to add the Webmin repository so that we can easily install and update Webmin using our package manager. We do this by adding the repository to the /etc/apt/sources.list file.
Open the file in your editor:
- sudo nano /etc/apt/sources.list
Then add this line to the bottom of the file to add the new repository:
. . .
deb http://download.webmin.com/download/repository sarge contrib
Save the file and exit the editor.
Next, add the Webmin PGP key so that your system will trust the new repository:
wget http://www.webmin.com/jcameron-key.asc
sudo apt-key add jcameron-key.asc
Next, update the list of packages to include the Webmin repository:
- sudo apt-get update
Then install Webmin:
- sudo apt-get install webmin
Once the installation finishes, you be presented with the following output:
OutputWebmin install complete. You can now login to
https://your_server_ip:10000 as root with your
root password, or as any user who can use `sudo`.
Please copy down this information, as you will need it for the next step.
Note: If you installed ufw during the prerequisite step, you will need to run the command sudo ufw allow 10000 in order to allow Webmin through the firewall. For extra security, you may want to configure your firewall to only allow access to this port from certain IP ranges.
Let’s secure access to Webmin by adding a valid certificate.
Step 2 — Adding a Valid Certificate with Let’s Encrypt
Webmin is already configured to use HTTPS, but it uses a self-signed, untrusted certificate. Let’s replace it with a valid certificate from Let’s Encrypt.
Navigate to https://your_domain:10000 in your web browser, replacing your_domain with the domain name you pointed at your server.
Note: When logging in for the first time, you will see an “Invalid SSL” error. This is because the server has generated a self-signed certificate. Allow the exception to continue so you can replace the self-signed certificate with one from Let’s Encrypt.
You’ll be presented with a login screen. Sign in with the non-root user you created while fulfilling the prerequisites for this tutorial.
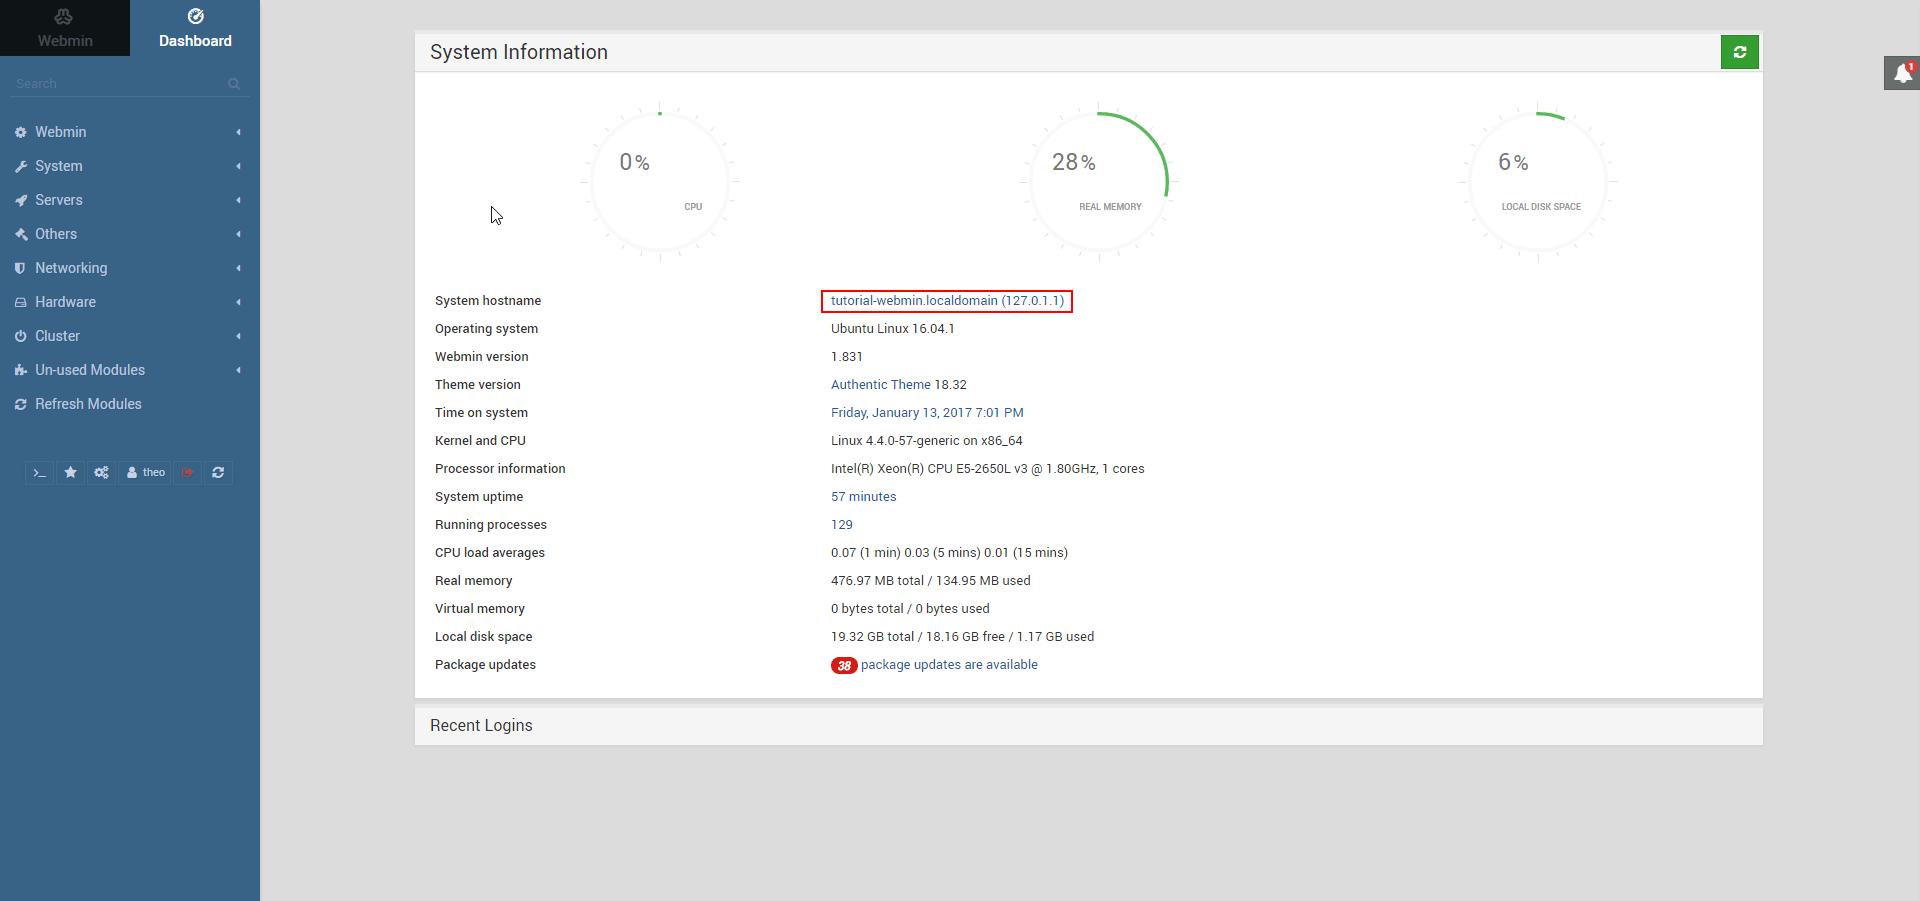
Once you log in, the first screen you will see is the Webmin dashboard. Before you can apply a valid certificate, you have to set the server’s hostname. Look for the System hostname field and lick on the link to the right, as shown in the following figure:
This wil take you to the Hostname and DNS Client page. Locate the Hostname field, and enter your Fully-Qualified Domain Name into the field. Then press the Save button at the bottom of the page to apply the setting.
After you’ve set your hostname, click on Webmin on the left navigation bar, and then click on Webmin Configuration.
Then, select SSL Encryption from the list of icons, and then select the Let’s Encrypt tab. You’ll see a screen like the following figure:

Using this screen, you’ll tell Webmin how to obtain and renew your certificate. Let’s Encrypt certificates expire after 3 months, but we can instruct Webmin to automatically attempt to renew the Let’s Encrypt certificate every month. Let’s Encrypt looks for a verification file on our server, so we’ll configure Webmin to place the verification file inside the folder /var/www/html, which is the folder that the Apache web server you configured in the prerequisites uses. Follow these steps to set up your certificate:
- Fill in Hostnames for certificate with your FQDN.
- For Website root directory for validation file, select the Other Directory button and enter
/var/www/html. - For Months between automatic renewal section, deselect the Only renew manually option by typing
1into the input box, and selecting the radio button to the left of the input box. - Click the Request Certificate button. After a few seconds, you will see a confirmation screen.
To use the new certificate, restart Webmin by clicking the back arrow in your browser, and clicking the Restart Webmin button. Wait around 30 seconds, and then reload the page and log in again. Your browser should now indicate that the certificate is valid.
Step 3 – Using Webmin
You’ve now set up a secured, working instance of Webmin. Let’s look at how to use it.
Webmin has many different modules that can control everything from the BIND DNS Server to something as simple as adding users to the system. Let’s look at how to create a new user, and then explore how to update the operating system using Webmin.
Managing Users and Groups
Let’s explore how to manage the users and groups on your server.
First, click the System tab, and then click the Users and Groups button. Then, from here, you can either add a user, manage a user, or add or manage a group.
Let’s create a new user called deploy which would be used for hosting web applications. To add a user, click Create a new user, which is located at the top of the users table. This displays the Create User screen, where you can supply the username, password, groups and other options. Follow these instructions to create the user:
- Fill in Username with
deploy. - Select Automatic for User ID.
- Fill in Real Name with a descriptive name like
Deployment user. - For Home Directory, select Automatic.
- For Shell, select /bin/bash from the dropdown list.
- For Password, select Normal Password and type in a password of your choice.
- For Primary Group, select New group with same name as user.
- For Secondary Group, select sudo from the All groups list, and press the -> button to add the group to the in groups list.
- Press Create to create this new user.
When creating a user, you can set options for password expiry, the user’s shell, or whether they are allowed a home directory.
Next, let’s look at how to install updates to our system.
Updating Packages
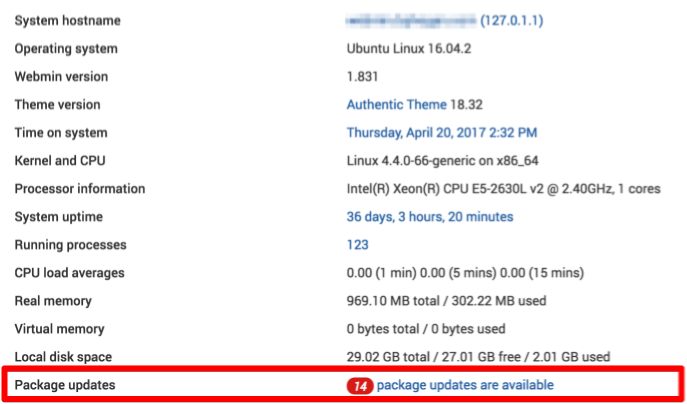
Webmin lets you update all of your packages through its user interface. To update all of your packages, first, go to the Dashboard link, and then locate the Package updates field. If there are updates available, you’ll see a link that states the number of available updates, as shown in the following figure:
Click this link, and then press Update selected packages to start the update. You may be asked to reboot the server, which you can also do through the Webmin interface.
Conclusion
You now have a secured, working instance of Webmin and you’ve used the interface to create a user and update packages. Webmin gives you access to many things you’d normally need to access through the console, and it organizes them in an intuitive way. For example, if you have Apache installed, you would find the configuration tab for it under Servers, and then Apache.
Explore the interface, or read the Official Webmin wiki to learn more about managing your system with Webmin.
Thanks for learning with the DigitalOcean Community. Check out our offerings for compute, storage, networking, and managed databases.
About the author(s)
I like tech.
Managed the Write for DOnations program, wrote and edited community articles, and makes things on the Internet. Expertise in DevOps areas including Linux, Ubuntu, Debian, and more.
Still looking for an answer?
This textbox defaults to using Markdown to format your answer.
You can type !ref in this text area to quickly search our full set of tutorials, documentation & marketplace offerings and insert the link!
I want to install Webmin on DigitalOcean LAMP 16.04, but it showed the following error: Fetched 15.5 MB in 1s (9022 kB/s) perl: warning: Setting locale failed. perl: warning: Please check that your locale settings: LANGUAGE = (unset), LC_ALL = (unset), LC_CTYPE = “UTF-8”, LANG = “en_US.UTF-8” are supported and installed on your system. perl: warning: Falling back to a fallback locale (“en_US.UTF-8”). locale: Cannot set LC_CTYPE to default locale: No such file or directory locale: Cannot set LC_ALL to default locale: No such file or directory Selecting previously unselected package libnet-ssleay-perl. (Reading database … 58336 files and directories currently installed.)
Thank you for this guide.
Is it possible for you to include an nginx version?
Specifically, I am stuck when requesting a new certificate. I suspect there is an issue with the folder I am using to save the cert’s into.
Here is the error (my domain omitted):
Failed authorization procedure. example.com (http-01): urn:acme:error:unauthorized :: The client lacks sufficient authorization :: Invalid response from http://example.com/.well-known/acme-challenge/OZEFGI3e9PyZMiLMUOsqoRCSQzGIfTGke1duuC_fJTA: "<html>
Hello,
Thank you for the tutorial. I recommend checking the article for white space at the end of commands. There are a couple commands with trailing white space at the end.
Thanks. :)
For anyone else this may help, trying to get to the login page of Webmin is just plane terrible at times. You think it is allowed through the ufw but it is really your iptables. Spent just over a day with support troubleshooting, here’s the magic commands to get things working again.
iptables -A INPUT -p tcp -m tcp --dport 10000 -j ACCEPT
http://www.webmin.com/firewall.html
If you are still blocked, make sure it’s open for ufw as well.
ufw allow 10000
https://www.digitalocean.com/community/tutorials/ufw-essentials-common-firewall-rules-and-commands
Thanks.
Hi , I have followed this step and installed the os in wrong way, is there any way to re install in server by using the same installation on going to setting ? This tutorial burned by computer :(
(https://www.envose.com/community/tutorial/how-to-install-ubuntu-server-step-by-step)
Thanks for this tutorial! I don’t have a root password since I use ssh keys to login. So, how can I login to webmin?
SOLVED: I notice the sentence “login to https://your_server_ip:10000 as root with your root password, or as any user who can use sudo” so I created a new user with sudo enabled and login with this user, not root.
So, following this tutorial I got Webmin installed and was able to login, but there’s no options in it after that. The sidebar has a search bar and no links. The “dashboard” just has a list of recent logins, and the message “Warning! In order to have System Information displayed you will need to enable System Status module in user settings.” Googling it doesn’t seem to return anything useful, and all the other install tutorials I’ve seen seem to imply this “just works.”
Does this install the SSL certificate only for port 10000 ? That’s how it works for me after following all these steps. So https://fqdn.com:10000 works but https://fqdn.com does not (the http version does).
A few more tips:
- After installing I get the message Webmin install complete. You can now login to https://blackstar:10000/ with blackstar being the name I gave the Droplet. Obviously this didn’t work. Using the droplet IP does work.
- Another issue was that when requesting the Let’sEncrypt certificate there was a failure due to some agreement.pdf file having changed. Webmin reports this error, referring to 2x different pdfs.
- To fix this you have to edit the acme_tiny.py file. Find the file with “find / -name acme_tiny.py” and then edit it to contain the proper PDF filename. (EDIT the file to edit is acme _ tiny.py without spaces. This editor turns the string in to italics)
I tried to use Webmin’s Let’s Encrypt module and kept getting this error:
request failed : Failed to request certificate : my.domain challenge did not pass: Invalid response from http://my.domain/.well-known/acme-challenge/CCZqnto74VD0TQAekghFEbDzdr5t… 404 Not Found Not Found <p
After spending way too long trying to search Webmin’s documentation and even trying to review the prereqs for this tutorial, I ended up just following this very simple and fast guide from certbot via lets encrypt: [https://certbot.eff.org/lets-encrypt/ubuntuxenial-apache]
If you have ssh access for your droplet, I highly recommend this option over doing it through Webmin. However, webmin’s other features are super useful - that’s why I installed it.
In addition, in order for the SSL to be available on Webmin’s port (10000), I needed to change the SSL configurations. In Webmin > Webmin Configurations > SSL Encryption, in SSL Settings, change the private key and certification file paths accordingly:
/etc/letsencrypt/live/yourdomain.com/privkey.pem /etc/letsencrypt/live/yourdomain.com/cert.pem
I also selected yes to redirect non-SSL to SSL.
However, I’m still not able to use the SSL on the IP address. If anyone can point me in the direction of resolving this for me, that would be super helpful.
Thanks!
i have 4 vhosts and I used numbers for this tutorials like 206.189.143.29 . I already had all 4 vhost domains got ssl from let’s encrypt. I am accessing the webmin from https://206.189.143.10000 and it shows non-secured connection. I had to add an exception to get to the home page. Any way we can get cert for this droplet ?
 This work is licensed under a Creative Commons Attribution-NonCommercial- ShareAlike 4.0 International License.
Become a contributor for community
Get paid to write technical tutorials and select a tech-focused charity to receive a matching donation.

DigitalOcean Documentation
Full documentation for every DigitalOcean product.

Resources for startups and AI-native businesses
The Wave has everything you need to know about building a business, from raising funding to marketing your product.
The developer cloud
Scale up as you grow — whether you're running one virtual machine or ten thousand.

Start building today
From GPU-powered inference and Kubernetes to managed databases and storage, get everything you need to build, scale, and deploy intelligent applications.
