By Donald Le and Caitlin Postal

The author selected Open Sourcing Mental Illness to receive a donation as part of the Write for DOnations program.
Introduction
Playwright is a great tool for end-to-end testing across browsers, including Chromium, Firefox, and Webkit. Since Webkit is the core of the Safari browser, Playwright’s cross-browser functionality makes it a good option for testing web apps. Playwright has features like auto-support interaction with browsers, so you don’t have to install the web drivers manually, and it supports multiple programming languages, such as Java, Python, and NodeJS. Playwright’s flexibility means it can be used as a web scraping tool or for end-to-end testing to ensure software meets its requirements.
To run Playwright, you need an appropriate environment, such as NodeJS runtime, Playwright core framework, or Playwright test runner. Your operating system might need dependencies to support Playwright. Docker, an open-source containerization platform, can serve your Playwright environment so that you don’t need to create multiple environments for different operating systems.
In this tutorial, you will set up an environment to use Playwright with Typescript for end-to-end testing, write and execute the tests, export the test report in multiple forms, and deploy the test using Docker. By the end of the tutorial, you will be able to use Playwright for your automation testing and to integrate your tests into an existing CI/CD pipeline with Docker wrapping the test environment.
Prerequisites
To follow along with this tutorial, you will need:
- One Ubuntu 20.04 server with a sudo-enabled account set up by following the Ubuntu 20.04 initial server setup guide. You need a sudo-enabled account to install NodeJS and Docker on your server.
- Node.js set up on your server. If you are on Ubuntu 22.04, install the latest version of Node.js in How To Install Node.js on Ubuntu 20.04. For other operating systems, see the How to Install Node.js and Create a Local Development Environment series.
- Docker installed on your server, which you can set up by following Steps 1-4 in How To Install and Use Docker on Ubuntu 20.04. In Step 4, you will run
docker run hello-worldto ensure that Docker is properly installed and ready to use. - Familiarity with end-to-end testing for web applications.
- Familiarity with Typescript for writing the test. If you would like to learn more about TypeScript, you can review the How To Code in TypeScript tutorial series.
- (Optional) Visual Studio Code, which has robust features support such as code navigation and compiler error warning when working in Typescript. This tutorial uses
nanothroughout.
Step 1 — Preparing the Environment
Before implementing the end-to-end tests, you must prepare the Playwright project environment.
First, create a folder for this project:
- mkdir playwright-with-docker
Move to the new folder:
- cd playwright-with-docker
Then initialize a new Node environment:
- npm init
You will be prompted to provide information for the new project, such as the project name, version, the entry of the application, and the test command.
You will be prompted to input answers for the following prompts related to the new project:
Outputpackage name: (playwright-docker)
version: (1.0.0)
description:
entry point: (index.js)
test command:
git repository:
keywords:
author:
license: (ISC)
You will see results like this:
OutputThis utility will walk you through creating a package.json file.
It only covers the most common items, and tries to guess sensible defaults.

See `npm help init` for definitive documentation on these fields
and exactly what they do.

Use `npm install <pkg>` afterward to install a package and
save it as a dependency in the package.json file.

Press ^C at any time to quit.
package name: (test) playwright-docker
version: (1.0.0)
description: A project for using playwright for end-to-end testing purpose with docker for deployment
entry point: (index.js)
test command:
git repository:
keywords:
author:
license: (ISC)
About to write to /your-path/test/package.json:

{
  "name": "playwright-docker",
  "version": "1.0.0",
  "description": "A project for using playwright for end-to-end testing purpose with docker for deployment",
  "main": "index.js",
  "scripts": {
  "test": "echo \"Error: no test specified\" && exit 1"
  },
  "author":
  "license": "ISC"
}


Is this OK? (yes) yes
After adding the requisite information, type yes or press enter to confirm the setup for the package.json file.
Next, install the needed dependencies for the project:
- npm install --save-dev playwright
- npm install --save-dev typescript
These commands install Playwright and TypeScript within the sample project. The flag --save-dev is used to install dependencies that are not mandatory for the application to run.
Next, install type definitions for Node.JS:
- npm install --save-dev @types/node
Next, install a library to work with the TOML file for configuration:
- npm install --save-dev toml
TOML is one of the file types used for application configuration. A .toml file is human readable and allows the application to update its content without reading it first.
Next, install the Playwright dependencies for the host system:
- npx playwright install-deps
When prompted, enter your sudo password.
Note: If you receive a message that you need to upgrade your Node version to a higher version like this:
OutputYou are running Node.js 10.19.0.
Playwright requires Node.js 12 or higher.
Please update your version of Node.js.
You can upgrade using these commands:
- sudo npm cache clean -f
- sudo npm install -g n
- sudo n stable
npm cache clean -f will forcibly clean all the caches while
npm install -g n and n stable will install Node.js stable version globally in your server. After running these commands, restart your server.
Then, install the Playwright test runner, which you will use in later steps of this tutorial:
- npm install --save-dev @playwright/test
Finally, install the supported browsers for Playwright:
- npx playwright install
With this command, you can run your tests with multiple browsers.
To prepare the TypeScript config file, open tsconfig.json with nano or your preferred text editor:
- sudo nano tsconfig.json
The current file is empty. To update it for this project, add the following code:
{
  "compilerOptions": {
    "strict": true,
    "module": "commonjs"
  },
  "include": ["tests"]
}
A tsconfig.json file tells NodeJS runtime that the current directory is a Typescript project. The compilerOptions lists the conditions NodeJS needs to compile the project. The module tells the compiler what module syntax to use when the files are compiled to Javascript. The strict fields set to true will enable type checking for Typescript code, which guarantees the types will match the data value of variables or methods. include will show a list of file names or patterns that are included in the application. In this case, the application should include all the files in the tests directory.
Save and close the file when finished.
With your environment set up, you can now begin building your tests.
Step 2 — Writing the Tests
With the Playwright testing environment that you prepared in the first step, you will now write three example tests connected to the DigitalOcean Droplets Page.
The TypeScript tests that you will build will verify the following three items:
- Verify three options for signing up for new DigitalOcean accounts:
Sign up with Email,Sign up with Google,Sign up with Github. - Verify that DigitalOcean supports two types of packages: Basic and Premium.
- Verify that there are four basic virtual machine costs: 1 CPU, 2 CPUs, 4 CPUs, 8 CPUs.
While you can have all three tests in the same test file, this tutorial will use three separate files because each test serves a different purpose.
Create a new directory named tests to hold all the test files:
mkdir tests
Then navigate to the tests directory:
cd tests
Because you will run three tests with different purposes, you will create three separate test files later in this step that are all located within the tests directory in the project:
signUpMethods.spec.tswill implement the test for verifying the number of supported methods for users to sign up.multiplePackages.spec.tswill implement the test to verify the number of packages customers can choose.pricingComparison.spec.tswill verify the number of basic virtual machine costs.
Note: The default format of the test files will be *.spec.ts (for TypeScript projects) or *.spec.js (for JavaScript projects).
The configuration file for the tests will be named configTypes.ts and is also put in the tests directory. In this file, you will define global variables for interacting with multiple browsers and their pages. You will also define some configuration values used in the test, such as the URL of the application being tested. This tutorial will use DIGITAL_OCEAN_URL for the URL being tested.
Create configTypes.ts:
- nano configTypes.ts
Add the following code to the currently empty configTypes.ts file:
import { Browser, Page } from "playwright";

import fs from 'fs';
import toml from 'toml';
const config = toml.parse(fs.readFileSync('./config.toml', 'utf-8'));

declare global {
  const page: Page;
  const browser: Browser;
  const browserName: string;
}

export default {
  DIGITAL_OCEAN_URL: config.digital_ocean_url ?? '',
  };
First, the import functions read the configuration content from ./config.toml at the project’s home directory.
You declare global variables for page, browser, browserName, which will be used for initializing page and browser instances in the end-to-end tests.
Finally, you export DIGITAL_OCEAN_URL with the value read from ./config.toml by digital_ocean_url key, so that you can use this URL in your tests later.
Save and close the file when finished.
For the first test, create and open the signUpMethods.spec.ts file using nano or your preferred text editor:
- nano signUpMethods.spec.ts
Add the following code to the empty file:
import endpoint from "./configTypes"
import { test, expect } from '@playwright/test'

test("Expect to have 3 options for signing up", async ({ page }) => {

  // Go to the Droplets product page of DigitalOcean web page
  await page.goto(endpoint.DIGITAL_OCEAN_URL);

  // Wait for the page to load
  await page.waitForLoadState('networkidle');

  // Get the number of signUp options
  const number_subscriptions_allowed = await page.locator('.SignupButtonsStyles__ButtonContainer-sc-yg5bly-0 > a').count()

  // Verify that number equals 3
  expect(number_subscriptions_allowed).toBe(3)
});
The signUpMethods.spec.ts file contains the code for the test that assesses whether the Droplets Page has three options for sign up. You import the test and expect methods in the first two lines.
Tests can be written asynchronously or synchronously. Writing a test in an asynchronous manner helps optimize the speed of the test since you do not have to wait for each step in the test to finish in order to execute the next step. You use the await keyword when you need to wait for the step to finish before moving to the following action. Since the steps here are related to web interactions, you need to ensure that each element in the user interface is displayed before executing the action, which is why you include the await method before every action is called.
The test is defined in the test block with four actions. The first await keyword uses the page.goto() function to tell the test to go to the DIGITAL_OCEAN_URL that has been defined in the configTypes.ts file. You put the global variable page in the async declaration so you can use page instances throughout the test without needing to initialize it.
The second await keyword tells the test to wait for the page to load using the page.waitForLoadState() function. If there are API calls that have not finished, there may be elements on the page that are not available, and, as a result, the test could fail because it can’t find that element.
You define the number_subscriptions_allowed to use the the page.locator() function to look for the number of sign-up options. You find the signUp options components by CSS selectors (in this case, the sign-up buttons), which allows you to get the number of child elements it contains.
Finally, an expect method will validate the number of options found by page.locator() with the expected output of 3.
Save and close the file.
Next, you will write the second test. Create and open the multiplePackages.spec.ts file:
- nano multiplePackages.spec.ts
In the empty file, add the following code:
import endpoint from "./configTypes"
import { test, expect } from '@playwright/test'

test("Expect to have 3 packages for subscription", async ({ page }) => {

  // Go to the Droplets product page of DigitalOcean web page
  await page.goto(endpoint.DIGITAL_OCEAN_URL);

  // Wait for the page to load
  await page.waitForLoadState('networkidle');

  // Get the number of packages to be 2 (Basic and Premium)
  const number_subscriptions_allowed = await page.locator('.CPUInfoStyles__StyledLeftCpuInfo-sc-ooo7a2-4 > div').count()

  // Verify that number equals 2
  expect(number_subscriptions_allowed).toBe(2)
});
Similar to the signUpMethods.spec.ts file, you will import the test configuration and test functions from Playwright dependencies.
In this test, you go to the DIGITAL_OCEAN_URL first by using page.goto(). Then you wait for the page to complete all the network calls with page.waitForLoadState().
You find the child elements of the subscription component in the web UI and store that information in the number_subscriptions_allowed variable.
Finally, you compare the value of number_subscriptions_allowed with the expected output of 2.
Save and close the file when finished.
Then, create and open the pricingComparison.spec.ts file to define the third test:
- nano pricingComparison.spec.ts
Add the following code to the empty file:
import endpoint from "./configTypes"
import { test, expect } from '@playwright/test'

test("Expect to have 3 packages for subscription", async ({ page }) => {

  // Go to the Droplets product page of DigitalOcean web page
  await page.goto(endpoint.DIGITAL_OCEAN_URL);

  // Wait for the page to load
  await page.waitForLoadState('networkidle');

  // Get the number of basic virtual machine costs (1 CPU, 2 CPU, 4 CPU, 8 CPU)
  const number_subscriptions_allowed = await page.locator('.PricingComparisonToolStyles__StyledCpuSelector-sc-1k0sndv-7 > button').count()

  // Verify that number equals 4
  expect(number_subscriptions_allowed).toBe(4)
});
The async function in this test uses the same page.goto() URL and page.waitForLoadState() directions as in the previous tests. Because this test is connected to the subscription packages available on the Droplets page, the second half of the code block sets up that test.
For this test, you get the number of child elements for the pricing options component and store that value in the number_subscriptions_allowed variable. You validate that the value of number_subscriptions_allowed must equal 4 (the number of subscriptions currently supported).
Save and close the file.
In your tests, you use DIGITAL_OCEAN_URL from the configTypes.ts, and configTypes.ts reads digital_ocean_url value from the ./config.toml file.
You will now create the config.toml file in the project’s home directory. Navigate to the home directory:
- cd ..
Then create the config.toml file:
- nano config.toml
Copy the following content into the config.tomlfile:
digital_ocean_url="https://www.digitalocean.com/products/droplets"
Save and close the file.
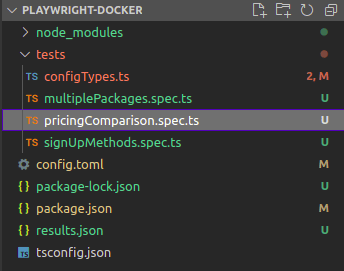
The directory tree of the project now will look like this:
In this step, you wrote the three tests that you will use. You also defined the config.toml file that the tests rely on. You will execute the tests in the next step.
Step 3 — Executing the Tests
There are many options for using the Playwright test runner in the CLI, such as running all tests with all browsers, disabling parallelization, running a set of test files, and running in debug mode, among others. In this step, you will run the tests with all browsers.
First, run this command:
- npx playwright test --browser=all
You should be able to see the test results like so:
OutputRunning 9 tests using 1 worker

  ✓  [chromium] › tests/multiplePackages.spec.ts:4:1 › Expect to have 3 packages for subscription (6s)
  ✓  [chromium] › tests/pricingComparison.spec.ts:4:1 › Expect to have 3 packages for subscription (4s)
  ✓  [chromium] › tests/signUpMethods.spec.ts:4:1 › Expect to have 3 options for signing up (3s)
  ✓  [firefox] › tests/multiplePackages.spec.ts:4:1 › Expect to have 3 packages for subscription (9s)
  ✓  [firefox] › tests/pricingComparison.spec.ts:4:1 › Expect to have 3 packages for subscription (5s)
  ✓  [firefox] › tests/signUpMethods.spec.ts:4:1 › Expect to have 3 options for signing up (7s)
  ✓  [webkit] › tests/multiplePackages.spec.ts:4:1 › Expect to have 3 packages for subscription (7s)
  ✓  [webkit] › tests/pricingComparison.spec.ts:4:1 › Expect to have 3 packages for subscription (6s)
  ✓  [webkit] › tests/signUpMethods.spec.ts:4:1 › Expect to have 3 options for signing up (6s)


  9 passed (1m)
The checkmark indicates that all tests have passed in the three browsers (Chromium, Firefox, and Webkit).
The number of workers will depend on the number of cores that the current server is using and the current configuration for the test. You can limit the number of workers by setting the workers value in the playwright.config.ts file. For more information on test configuration, you can read the Playwright product docs.
The Playwright test runner provides several options for the test report that can be integrated into CI tools such as Jenkins or CircleCI. For more information on test reports, see the Playwright test reporters documentation page.
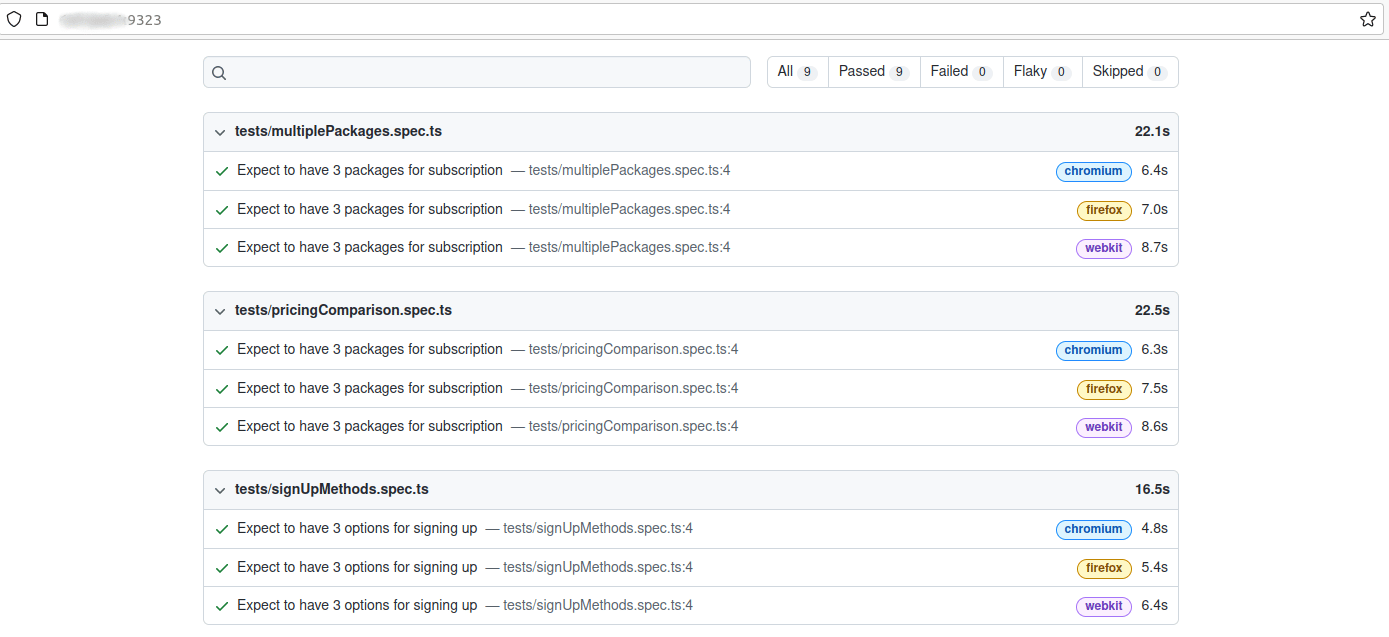
For this tutorial, you will run the test with the HTML report file, which provides easier readability than viewing tests in the CLI.
Run this command for the HTML test report:
- npx playwright test --browser=all --reporter=html
You will see a result like this:
OutputRunning 9 tests using 2 workers

  9 passed (40s)

To open last HTML report run:

  npx playwright show-report
To view the HTML report, run:
- npx playwright show-report
You will see an output like this:
OutputServing HTML report at http://your_ip_address:9323. Press Ctrl+C to quit.
You should now be able to access your report via port 9323.
Note: If you are accessing the server remotely, you will need to expose your remote server to the current local machine to view the test report in your local browser. In a new terminal session on your local machine, run the following command:
- ssh -L 9323:localhost:9323 your_non_root_user@your_server_ip
SSH port forwarding will forward the server port to the local port. The -L 9323:localhost:9323 section identifies that port 9323 on the local machine will be forwarded to the same port on the remote server.
You should now be able to view the test report by navigating to http://localhost:9323 in a browser on your local machine.
When your report loads in the browser, you will observe that each test has been run on three browsers: Chromium, Firefox, and Webkit. You will know how long each test on each browser took to run, as well as how long the entire test took.
Click the report name to see the details.
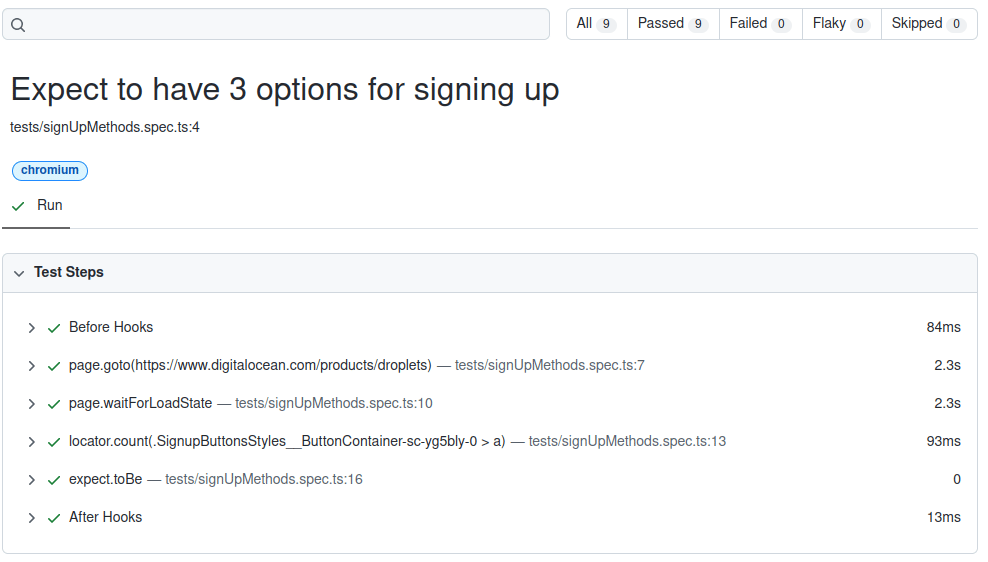
In the details section, the test execution steps will feature Before Hooks and After Hooks steps by default. The Before Hooks section is often used for initial setup, such as logging into the console or reading test data. After the test execution, the After Hooks section will often clean test data in the test environment. There are details for each step in the test, including visiting the URL with page.goto(), waiting for the page to load with page.waitForLoadState(), counting the sign-up methods with locator.count(), and verifying the values match with expect.toBe.
In this step, you ran all three tests, reviewed their pass state, and viewed the test results in both CLI and HTML formats. Next, you will automate the tests with Docker.
Step 4 — Deploying the Tests with Docker
When implementing test automation, you may face environmental issues. Some tests will run as expected in the local machine of a test engineer but then fail when integrated into CI/CD pipeline due to environment compatibility problems. To avoid this issue, you can use Docker containers to run automation testing, which you will set up in this step. If the testing runs as expected in the local environment with Docker, there is a high probability you can avoid compatibility issues in the CI/CD pipeline.
First, you will update the package.json file to add the necessary test scripts that will run later in Docker. Open the file:
- nano package.json
Add the highlighted lines to the scripts section in the package.json file:
...
 "scripts": {
  "test": "playwright test --browser=all",
  "test-html-report": "playwright test --browser=all --reporter=html",
  "test-json-report": "PLAYWRIGHT_JSON_OUTPUT_NAME=results.json playwright test --browser=chromium --reporter=json"
  },
These scripts will run the custom tests instead of typing out the full command. When you need to run the test with the reporter display in HTML, you will now be able to run this command:
- npm run test-html-report
In place of the full command:
- npx playwright test --browser=all --reporter=html
Your current package.json will look like this:
{
  "name": "playwright-docker",
  "version": "1.0.0",
  "description": "A project for using playwright for end-to-end testing purpose with docker for deployment",
  "main": "index.js",
  "scripts": {
  "test": "playwright test --browser=all",
  "test-html-report": "playwright test --browser=all --reporter=html",
  "test-json-report": "PLAYWRIGHT_JSON_OUTPUT_NAME=results.json playwright test --browser=chromium --reporter=json"
  },
  "author": "",
  "license": "ISC",
  "devDependencies": {
  "@playwright/test": "^1.22.2",
  "@types/node": "^17.0.35",
  "playwright": "^1.22.1",
  "toml": "^3.0.0",
  "typescript": "^4.6.4"
  }
}
Save and close the file.
Next, create and open a Dockerfile in the current directory:
- nano Dockerfile
Then add the following content to it:
# Get the base image of Node version 16
FROM node:16

# Get the latest version of Playwright
FROM mcr.microsoft.com/playwright:focal

# Set the work directory for the application
WORKDIR /app

# Set the environment path to node_modules/.bin
ENV PATH /app/node_modules/.bin:$PATH

# COPY the needed files to the app folder in Docker image
COPY package.json /app/
COPY tests/ /app/tests/
COPY tsconfig.json /app/
COPY config.toml /app/

# Get the needed libraries to run Playwright
RUN apt-get update && apt-get -y install libnss3 libatk-bridge2.0-0 libdrm-dev libxkbcommon-dev libgbm-dev libasound-dev libatspi2.0-0 libxshmfence-dev

# Install the dependencies in Node environment
RUN npm install
First, you get the base image of Node version 16 and Playwright version focal to put in your Docker image. The tests require Node and Playwright to run.
Then, you set the project directory name in the container. In this case, it is WORKDIR. Setting WORKDIR /app will put all your files inside the /app directory inside the container.
You set the environment path for the Docker container with ENV PATH. In this case, you set it to the node_modules directory.
Then, you copy all the necessary files to the /app directory in the Docker image.
Because Playwright requires some dependencies to run, you will also install those dependencies in the Docker image.
Save and close the file.
Next, you will build the image for your automation project:
- docker build -t playwright-docker .
Docker will find Dockerfile in the current directory and build the image by following the instructions inside Dockerfile. The -t flag tags the Docker image by naming it playwright-docker. The . tells Docker to look for Dockerfile in this current directory. You can review the Docker product docs for more about building Docker images.
The build output (shortened for brevity) will look similar to this:
OutputSending build context to Docker daemon  76.61MB
...
added 6 packages, and audited 7 packages in 6s

found 0 vulnerabilities
Removing intermediate container 87520d179fd1
 ---> 433ae116d06a
Successfully built 433ae116d06a
Successfully tagged playwright-docker:latest
The tests might not run correctly on Windows or MacOS due to conflict dependencies or missing dependencies during initial setup, but using Docker to run the tests should prevent these environment configuration problems. With Docker, your base image contains all required dependencies. The tests can be run on different operating systems as long as Docker is installed.
Check if the Docker image was created successfully:
- docker image ls
The result should be similar to this:
OutputREPOSITORY                  TAG     IMAGE ID    CREATED       SIZE
playwright-docker           latest  433ae116d06a   5 minutes ago   1.92GB
mcr.microsoft.com/playwright   focal  bb9872cfd272   2 days ago   1.76GB
node                        16      c6b745e900c7   6 days ago   907MB
You will have playwright-docker (the test image), microsoft playwright, and node images. You may also have images for ubuntu and hello-world from the Docker installation prerequisite.
Now run the test command in your Docker container using docker run:
- docker run -it playwright-docker:latest npm run test
docker run will run the specified Docker image with the command. In this example, the image is playwright-docker:latest and the command is npm run test. docker run will first bring up the Docker container, then run the needed command. You can check out more in the Docker product docs.
The result will look like this:
Output> playwright-docker@1.0.0 test
> playwright test --browser=all


Running 9 tests using 2 workers

  ✓  [chromium] › tests/pricingComparison.spec.ts:4:1 › Expect to have 4 pricing options (7s)
  ✓  [chromium] › tests/multiplePackages.spec.ts:4:1 › Expect to have 2 packages for subscription (8s)
  ✓  [chromium] › tests/signUpMethods.spec.ts:4:1 › Expect to have 3 options for signing up (8s)
  ✓  [firefox] › tests/multiplePackages.spec.ts:4:1 › Expect to have 2 packages for subscription (9s)
  ✓  [firefox] › tests/pricingComparison.spec.ts:4:1 › Expect to have 4 pricing options (8s)
  ✓  [firefox] › tests/signUpMethods.spec.ts:4:1 › Expect to have 3 options for signing up (5s)
  ✓  [webkit] › tests/multiplePackages.spec.ts:4:1 › Expect to have 2 packages for subscription (8s)
  ✓  [webkit] › tests/pricingComparison.spec.ts:4:1 › Expect to have 4 pricing options (10s)
  ✓  [webkit] › tests/signUpMethods.spec.ts:4:1 › Expect to have 3 options for signing up (7s)


  9 passed (41s)
The tests have now successfully run in the Docker environment. You can safely update the code to the remote repository, and system administrators can integrate the automation test into the CI/CD pipeline.
You can also review the files created in this article in this repository.
Conclusion
You have now used Playwright for end-to-end testing and deployed the tests with Docker. For more about Playwright, visit the Playwright documentation.
You can read about the Docker ecosystem to learn more about Docker. Docker product documentation also has some best practices for writing Dockerfiles and a Dockerfile reference guide. To continue your work with Docker, you can try out other Docker tutorials.
Thanks for learning with the DigitalOcean Community. Check out our offerings for compute, storage, networking, and managed databases.
About the author(s)
A man on a thousand mile walk has to forget his goal and say to himself every morning : Today I'm going to cover twenty-five miles then rest up sleep.
Still looking for an answer?
This textbox defaults to using Markdown to format your answer.
You can type !ref in this text area to quickly search our full set of tutorials, documentation & marketplace offerings and insert the link!
The Dockerfile here https://www.digitalocean.com/community/tutorials/how-to-run-end-to-end-tests-using-playwright-and-docker#:~:text=Then add the following content to it
Is incorrect, that’s not the way multi-stage builds work. When the second FROM statement starts, nothing from the first Node 16 image is used in the final image. This only appears to work because the playwright image has node in it.
 This work is licensed under a Creative Commons Attribution-NonCommercial- ShareAlike 4.0 International License.
Become a contributor for community
Get paid to write technical tutorials and select a tech-focused charity to receive a matching donation.

DigitalOcean Documentation
Full documentation for every DigitalOcean product.

Resources for startups and AI-native businesses
The Wave has everything you need to know about building a business, from raising funding to marketing your product.
The developer cloud
Scale up as you grow — whether you're running one virtual machine or ten thousand.

Start building today
From GPU-powered inference and Kubernetes to managed databases and storage, get everything you need to build, scale, and deploy intelligent applications.
