
Nginx is a very secure and reliable web server even with a default setup. However, there are many ways to secure Nginx further.
In this article, we will use open source software exclusively while trying to follow some popular web server hardening approaches and security standards. Namely, we’ll be talking about preventing information disclosure, enforcing encryption, performing audits, and limiting access.
Prerequisites
Before following this tutorial, please make sure you complete the following prerequisites:
-
Ubuntu 14.04 Droplet (see (Initial Server Setup with Ubuntu 14.04 for details)
-
Nginx web server installed and configured as explained in How To Install Nginx on Ubuntu 14.04 LTS
-
A registered domain or subdomain pointed to the Droplet’s IP. You will need this to test the SSL settings. For more information read this article on How to Point to DigitalOcean Nameservers From Common Domain Registrars.
-
Non-root sudo user (check out Initial Server Setup with Ubuntu 14.04 for details)
Except otherwise noted, all of the commands that require root privileges in this tutorial should be run as a non-root user with sudo privileges.
Step 1 — Updating All Software
Updating your software to the latest version is a great first step in securing your entire system, not just Nginx.
Warning: before updating all the packages on your system, be sure to determine whether or not this will cause issues with anything running on your system other than Nginx. It is a good idea to make a backup of the entire system before performing an operation that affect so many packages at once. You can revert to the backup if issues arise after updating all packages. To update the repository package list and then all the currently installed packages managed with apt-get on your Ubuntu server, run the commands:
- sudo apt-get update && sudo apt-get upgrade
Alternatively, you can just upgrade Nginx to the latest version in the Ubuntu repository. This will upgrade the Nginx package and any necessary dependencies:
- sudo apt-get upgrade nginx
Step 2 — Preventing Information Disclosure
To begin hardening your Nginx web server, let’s begin with limiting the information it discloses. Valuable information is leaked on every level from the HTTP server headers to the application error reporting.
So let’s start with the HTTP headers. By default, Nginx shows its name and version in the HTTP headers. You can check this information with curl like this:
- curl -I http://localhost
The output should look like:
Output of curl -I http://localhostHTTP/1.1 200 OK
Server: nginx/1.4.6 (Ubuntu)
...
As you can see, the version of Nginx and the name of the operating system can be seen in the above output. This is not necessarily a serious problem but rather a part of the puzzle that an attacker will try to solve to compromise your Nginx server. That’s why we’ll hide this information by opening Nginx’s main configuration file /etc/nginx/nginx.conf with nano like this:
- sudo nano /etc/nginx/nginx.conf
Then, inside the http configuration part add the line server_tokens off; like this:
http {

        ##
        # Basic Settings
        ##
        server_tokens off;
...
After that, save and exit the file, and reload Nginx for the change to take effect:
- sudo service nginx reload
Now, if you try again the same curl command:
- curl -I http://localhost
You will see less information:
Output of curl -I http://localhostHTTP/1.1 200 OK
Server: nginx
...
The above output discloses only the fact that this is an Nginx server. You may wonder if you can remove this too. Unfortunately, this is not easily accomplished because there is no configuration option for it. Instead, you will have to recompile Nginx from source which is not worth the efforts.
Besides the Server header, there is another header with sensitive information — X-Powered-By. This header usually shows the version of PHP, Tomcat or any server-side engine behind Nginx. If you run Nginx with PHP the output of curl will look like this:
Output of curl -I http://localhost on nginx with phpHTTP/1.1 200 OK
Server: nginx
...
X-Powered-By: PHP/5.5.9-1ubuntu4.14
...
The above X-Powered-By header shows that the server is Ubuntu 14 running PHP version 5.5.9. It’s very important to hide this information from the X-Powered-By header. You can’t do this in Nginx, but instead you should find the corresponding option in the backend engine. For example, with the case of PHP, you have to set the option expose_php = Off in the main php.ini configuration file. By default, this option is set to On.
The next thing to do is to change the 4xx (client-side) error pages, the information from which could be used by an attacker. Commonly, these are Unauthorized 401 and Forbidden 403 error pages. Unless you are debugging a problem, usually there is no need to show these errors to regular visitors. If you need to know about these errors, you will be still able to find them in the Nginx error log (/var/log/nginx/error.log).
To change these two error pages open the configuration file for your server block, for example the default one:
- sudo nano /etc/nginx/sites-enabled/default
Inside the main server server configuration part specify:
server {
...
        error_page 401 403 404 /404.html;
...
After saving the changes to the file, make sure to reload Nginx so that it takes effect with the command:
- sudo service nginx reload
The above hints give you the idea of preventing information disclosure — show as little as possible non-essential web content. You should hide service and debugging information not only in Nginx but also in the backend engines (PHP, Tomcat, etc.) and, of course, in the web applications.
Step 2 — Configuring SSL
Running the secure HTTPS protocol with SSL on Nginx is a must for any site which handles sensitive information such as users’ credentials, private data, etc. SSL is the only means to make sure that no matter where your site users are and what Internet connection they use, the information they receive and send will be protected.
The article How To Create an SSL Certificate on Nginx for Ubuntu 14.04 explains how to easily setup a free-of-charge SSL with default HTTPS configuration. While this article is a good beginning, it will not efficiently protect your data. Nowadays the default SSL settings and algorithms are not strong enough to prevent an attacker from decrypting your traffic.
That’s why we will configure an SSL certificate for Nginx with stronger encryption algorithms and settings. This will ensure a higher level of protection for your data and your HTTPS service will be compliant with the highest security standards and practices.
Let’s start with creating a directory for our SSL certificates with the command:
- sudo mkdir /etc/nginx/ssl/
For our SSL we’ll need a certificate with a strong signature algorithm, SHA256. For testing purposes or non-production environments you can use a self-signed certificate and ignore the SSL warnings. Let’s create one with the command:
- sudo openssl req -x509 -nodes -sha256 -days 365 -newkey rsa:2048 -keyout /etc/nginx/ssl/nginx.key -out /etc/nginx/ssl/nginx.crt
This command will ask you a few simple questions about the details of your site and business. After that it will create a 2048 bit RSA encrypted key in the file /etc/nginx/ssl/nginx.key and a SHA256 certificate in the file /etc/nginx/ssl/nginx.crt.
Next, you will have to generate stronger, 4096 bit long DH parameters. Prepare yourself to wait some time, depending on your Droplet, it may take up to 30 minutes. Run the command:
- sudo openssl dhparam -out /etc/nginx/ssl/dhparam.pem 4096
Now you can configure the SSL part of your server block. As an example, let’s configure the default server block. Open its configuration file for editing with nano:
sudo nano /etc/nginx/sites-enabled/default
In this file, edit the server configuration part adding the SSL part after the server_name directive like this:
server {
...
       server_name localhost;

        ### SSL Part
        listen 443 ssl;
        ssl_protocols TLSv1 TLSv1.1 TLSv1.2;
        ssl_ciphers 'EECDH+AESGCM:EDH+AESGCM:AES256+EECDH:AES256+EDH';
        ssl_prefer_server_ciphers on;
        ssl_dhparam /etc/nginx/ssl/dhparam.pem;
        ssl_certificate /etc/nginx/ssl/nginx.crt;
        ssl_certificate_key /etc/nginx/ssl/nginx.key;

...
Here is what instructions we have specified with the above directives:
listen— enable the SSL listener on port 443, i.e. the HTTPS port.ssl_protocols— enable only these three, considered currently secure protocols -TLSv1 TLSv1.1 TLSv1.2.ssl_ciphers— enable only these secure SSL ciphers:EECDH+AESGCM:EDH+AESGCM:AES256+EECDH:AES256+EDHssl_prefer_server_ciphers— make sure that the client respects the server’s ciphers preferences.ssl_dhparam— use the custom, strong DH parameters which we have generated earlier.ssl_certificate— use our self-signed SSL certificate. Make sure to change it if you are using another certificate.ssl_certificate_key— use our SSL private key, which we have previously generated.
For the above settings to take effect, you will have to reload again nginx with the command:
- sudo service nginx reload
To test your new SSL configuration it’s best to use an external tool such as the one provided by SSL Labs. There you should disregard the warning that the SSL is not trusted. This is natural because it is a self-signed certificate. Note that this site will only test sites with a registered domain name. You can not test the SSL connection with just your Droplet’s IP address.
The overall result should be “T” like for “Testing” but essentially it’s an A (the highest possible) and it should say "If trust issues are ignored: A" like this:
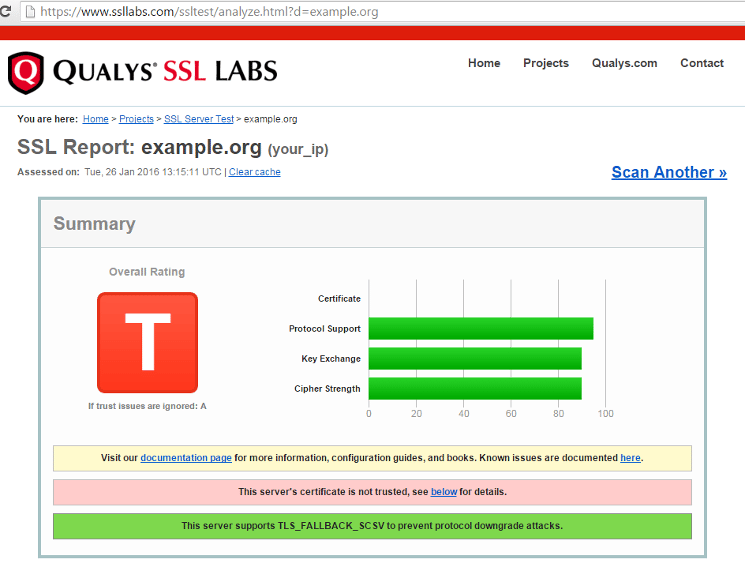
Later on, you would probably wish to remove the SSL warning and make the SSL test a clean “A”. One option is to use Let’s Encrypt as described in the article How To Secure Nginx with Let’s Encrypt on Ubuntu 14.04. It is free, allows you to specify an RSA key size up to 4096, and doesn’t give a warning about being self-signed. Otherwise, you can choose any of commercial SSL providers out there. When you choose one just make sure that you opt for a SHA256 certificate.
Step 3 — Restricting Access by IP
Password authentication is not always enough to ensure the security of sensitive areas of your site such as site control panels, phpmyadmin, etc. Sometimes attackers exploit weak passwords or software vulnerabilities in such areas to gain unauthorized access. That’s why it’s highly recommended to add additional IP restriction provided you can determine the IPs of legitimate user(s).
For example, if you have a WordPress site and its admin area is at /wp-admin/, you should limit the access to it only to your IP or to the IPs of all the administrators. For this purpose, open the corresponding server block — the default server block for Nginx is /etc/nginx/sites-enabled/default:
sudo nano /etc/nginx/sites-enabled/default
Inside the server configuration part add:
server {
...
	location /wp-admin/ {
    	allow 192.168.1.1/24;
     allow 10.0.0.1/24;
    	deny  all;
}
...
...
In the above please make sure to replace 192.168.1.1 and 10.0.0.1 with your IPs. Similarly, you can allow access for other IPs or even networks by changing the network mask (/24).
For such settings to take effect you will have to reload Nginx again with the command:
- sudo service nginx reload
Now if you try to access the /wp-admin/ part of your site with a browser outside of the allowed IP address ranges, you will get an error. This error will be 403 Forbidden (unless you have changed this error to 404 Not found as previously explained). At the same time you will see the true error code in the error log with the command:
- sudo tail /var/log/nginx/error.log
The access forbidden error will show like this:
Output of sudo tail -f /var/log/nginx/error.log...
2016/01/02 04:16:12 [error] 4767#0: *13 access forbidden by rule, client: X.X.X.X, server: localhost, request: "GET /wp-admin/ HTTP/1.1", host: "Y.Y.Y.Y"
...
The combination of applying more than one approach to security, such as changing the error page and restricting access by IP, shows the cumulative effect of hardening Nginx. As per the example, instead of the usual WordPress admin page, attackers and the automated tools they use will see a 404 not found page. This is confusing and may discourage them from trying other approaches to compromising your WordPress.
Step 4 — Performing a Security Audit
It’s always a good idea to have a security check independent from your own opinion. For this purpose you can use a security auditing tool which scans for web vulnerabilities. There are many such tools, including commercial ones, and for a start you can use wapiti which is free and open source. Wapiti may lack some of the features of the more advanced tools, but it will give you the idea of what security auditing is.
You can install wapiti on Ubuntu via apt:
- sudo apt-get install wapiti
Then start scanning your site with wapiti with the command:
wapiti http://example.org -n 10 -b folder
Make sure to replace example.org with the name of your site. We have given two additional arguments to the command. The first -n 10 limits the number of URLs with the same pattern to 10 so that endless loops are prevented. The second argument -b folder sets the scope of the scan only to the given domain.
After the scan completes you will have the results inside a directory called generated_report inside the directory from which you have run the scan. For best viewing, download this directory to your local computer and open the index.html file with a web browser.
Inside the report you will see the vulnerabilities sorted in 10 different categories: SQL Injection, Blind SQL Injection, File Handling, Cross Site Scripting, CRLF, Commands execution, Resource consumption, Htaccess Bypass, Backup file, and Potentially dangerous file.
Ideally, your report should look like this with no vulnerabilities found:

If there are vulnerabilities, you can expand the corresponding part of the scan for more information.
Make sure to run such scans frequently and with different tools to ensure to the most complete and thorough auditing of your Nginx and websites.
Step 5 — Taking Additional Security Measures
Some topics regarding Nginx security are not covered in this article because there are already excellent article about them. Please get acquainted with the following ones:
Naxsi is a web application firewall for Nginx. It protects you both from known and unknown web vulnerabilities by using a compilation of malicious signatures.
You should know that Naxsi is a complex piece of software and its tweaking takes some time and efforts. Luckily, there are readily available configurations for most popular web applications which you can customize further if needed.
Fail2ban is a great tool to take web security to the next level and proactively protect your nginx server. So far, we have restricted users from finding certain information and accessing parts of our site. With fail2ban you can further block attackers for certain periods of time when you detect that they are performing malicious activity.
Monitoring is essential to security, and Monit is a great tool for this purpose with good support for Nginx. Not only do web logs show traces of malicious activities, but they also show spikes in CPU load and memory usage.
In this article pay special attention to Step 5 — Monitor Logs for Errors and Keywords. There you can configure custom alerts to be sent upon security events such as when someone accesses or tries to access sensitive parts of your site(s).
Having a firewall is very important for the security of your nginx and your droplet as a whole. Make sure that you add the https (tcp 443) port to the allowed incoming connections besides the standard http (tcp 80) port.
A file and directory integrity checker, such as AIDE, alerts for changes in files and directories. This is especially handy for web files because you should be aware when parts of your site changes and new files/directories are added. To learn more about AIDE you can start with the article.
The above article is a bit outdated and not specifically written for Ubuntu. However, you should be able to easily adapt it and apply it for Ubuntu 14.04 as well. When you configure AIDE, or another similar tool, make sure to exclude your web logs and temporary files such as web cache from being monitored.
Conclusion
After reading this article you should feel more confident about Nginx security. Just make sure to look for the balance between functionality and security so that you have peace of mind that your web environment operates as designed yet secure. Also, keep in mind that securing Nginx is an ongoing task which requires regular updating, reconfiguration, scanning, etc.
Thanks for learning with the DigitalOcean Community. Check out our offerings for compute, storage, networking, and managed databases.
About the author(s)
IT pro with interests in various Open Source projects.
Technical Editor, DigitalOcean
Still looking for an answer?
This textbox defaults to using Markdown to format your answer.
You can type !ref in this text area to quickly search our full set of tutorials, documentation & marketplace offerings and insert the link!
This comment has been deleted
Its nice article, but i need a help, how can i protect VPS information from whois like sites ? Actually when i tried to search DO hosted mysite on google, i found several links which contain the VPS IP and other information like nginx versions.
Good article, but your information regarding “expose_php” is incredibly limited.
I am running PHP5-FPM and there is a php.ini file located at /etc/php5/fpm/php.ini, but adding “expose_php = Off” and restarting the service does nothing.
What is the correct way to hid X-Powered-By on an Nginx server running PHP5-FPM? An example of code would be great.
When i try to secure the /wp-admin/ directory by
server {
...
    location /wp-admin/ {
        allow 192.168.1.1/24;
     allow 10.0.0.1/24;
        deny  all;
}
The server blocks me too, though i put my IP on allow. On checking the nginx logs, i find this -
[error] 32638#0: *1 access forbidden by rule, client: ip.xx.xx.xx, server: testdomain.com, request: "GET /wp-admin/ HTTP/1.1", host: "testdomain.com"
Any ideas? Thanks. (P.S - I don’t know if it matters but, I use Cloudflare, whose IPs i’ve already whitelisted)
I installed Wapiti-2.2.1 and ran wapiti https://mywebsite.com -n 10 -b folder however, I keep getting the below error and it never generates a report for me. Any suggestions?
File “/usr/bin/wapiti”, line 444, in <module> wap.browse(crawlerFile) File “/usr/bin/wapiti”, line 238, in browse self.urls, self.forms = self.HTTP.browse(crawlerFile) File “/usr/share/wapiti/net/HTTP.py”, line 74, in browse self.myls.go(crawlerFile) File “/usr/share/wapiti/net/lswww.py”, line 499, in go headers = self.browse(lien) File “/usr/share/wapiti/net/lswww.py”, line 205, in browse info, data = self.h.request(url, headers = self.cookiejar.headers_url(url)) File “/usr/lib/python2.7/dist-packages/httplib2/init.py”, line 1569, in request (response, content) = self._request(conn, authority, uri, request_uri, method, body, headers, redirections, cachekey) File “/usr/lib/python2.7/dist-packages/httplib2/init.py”, line 1316, in _request (response, content) = self._conn_request(conn, request_uri, method, body, headers) File “/usr/lib/python2.7/dist-packages/httplib2/init.py”, line 1285, in _conn_request response = conn.getresponse() File “/usr/lib/python2.7/httplib.py”, line 1051, in getresponse response.begin() File “/usr/lib/python2.7/httplib.py”, line 415, in begin version, status, reason = self._read_status() File “/usr/lib/python2.7/httplib.py”, line 371, in _read_status line = self.fp.readline(_MAXLINE + 1) File “/usr/lib/python2.7/socket.py”, line 476, in readline data = self._sock.recv(self._rbufsize) File “/usr/lib/python2.7/ssl.py”, line 341, in recv return self.read(buflen) File “/usr/lib/python2.7/ssl.py”, line 260, in read return self._sslobj.read(len) ssl.SSLError: The read operation timed out
The addition step to take is to add WAF layer to NGINX instances. There are mod_security and naxsi which are open-source. But if you’re looking for something Enterprise-ready I would recommend Wallarm: WAF for NGINX as uses machine learning to craft the blocking rules specifically for every API and application you have. Moreover, it checks if detected attack is really targeting vulnerabilities and therefore dangerous (don’t know if any other WAF has vulnerability scanner built-in to do so).
In any case, WAF for NGINX rocks! Recommend to do it ASAP.
Hi Dojam,
I already have the .crt and .key files. How can I upload these to the etc/nginx/ssl folder manually?
Thanks for a great article.
 This work is licensed under a Creative Commons Attribution-NonCommercial- ShareAlike 4.0 International License.
Become a contributor for community
Get paid to write technical tutorials and select a tech-focused charity to receive a matching donation.

DigitalOcean Documentation
Full documentation for every DigitalOcean product.

Resources for startups and AI-native businesses
The Wave has everything you need to know about building a business, from raising funding to marketing your product.
The developer cloud
Scale up as you grow — whether you're running one virtual machine or ten thousand.

Start building today
From GPU-powered inference and Kubernetes to managed databases and storage, get everything you need to build, scale, and deploy intelligent applications.
