By Ayooluwa Isaiah and Kathryn Hancox

The author selected the Free Software Foundation to receive a donation as part of the Write for DOnations program.
Introduction
When the browser loads a page, it executes a lot of code to render the content. The code could be from the same origin as the root document, or a different origin. By default, the browser does not distinguish between the two and executes any code requested by a page regardless of the source. Attackers use this exploit to maliciously inject scripts to the page, which are then executed because the browser has no way of determining if the content is harmful. These situations are where a Content Security Policy (CSP) can provide protection.
A CSP is an HTTP header that provides an extra layer of security against code-injection attacks, such as cross-site scripting (XSS), clickjacking, and other similar exploits. It facilitates the creation of an “allowlist” of trusted content and blocks the execution of code from sources not present in the allowlist. It also reports any policy violations to a URL of your choice, so that you can keep abreast of potential security attacks.
With the CSP header, you can specify approved sources for content on your site that the browser can load. Any code that is not from the approved sources, will be blocked from executing, which makes it considerably more difficult for an attacker to inject content and siphon data.
In this tutorial, you’ll review the different protections the CSP header offers by implementing one in an example Node.js application. You’ll also collect JSON reports of CSP violations to catch problems and fix exploits quickly.
Prerequisites
To follow this tutorial, you will need the following:
- A recent version of Node.js installed on your machine. Follow the steps in the relevant How To Install Node.js tutorial for your operating system to set up a Node.js development environment.
You should also use a recent browser version, preferably Chrome, as it has the best support for CSP level 3 directives at the time of writing this article (November 2020). Also, make sure to disable any third-party extensions while testing the CSP implementation so that they don’t interfere with the violation reports rendered in the console.
Step 1 — Setting Up the Demo Project
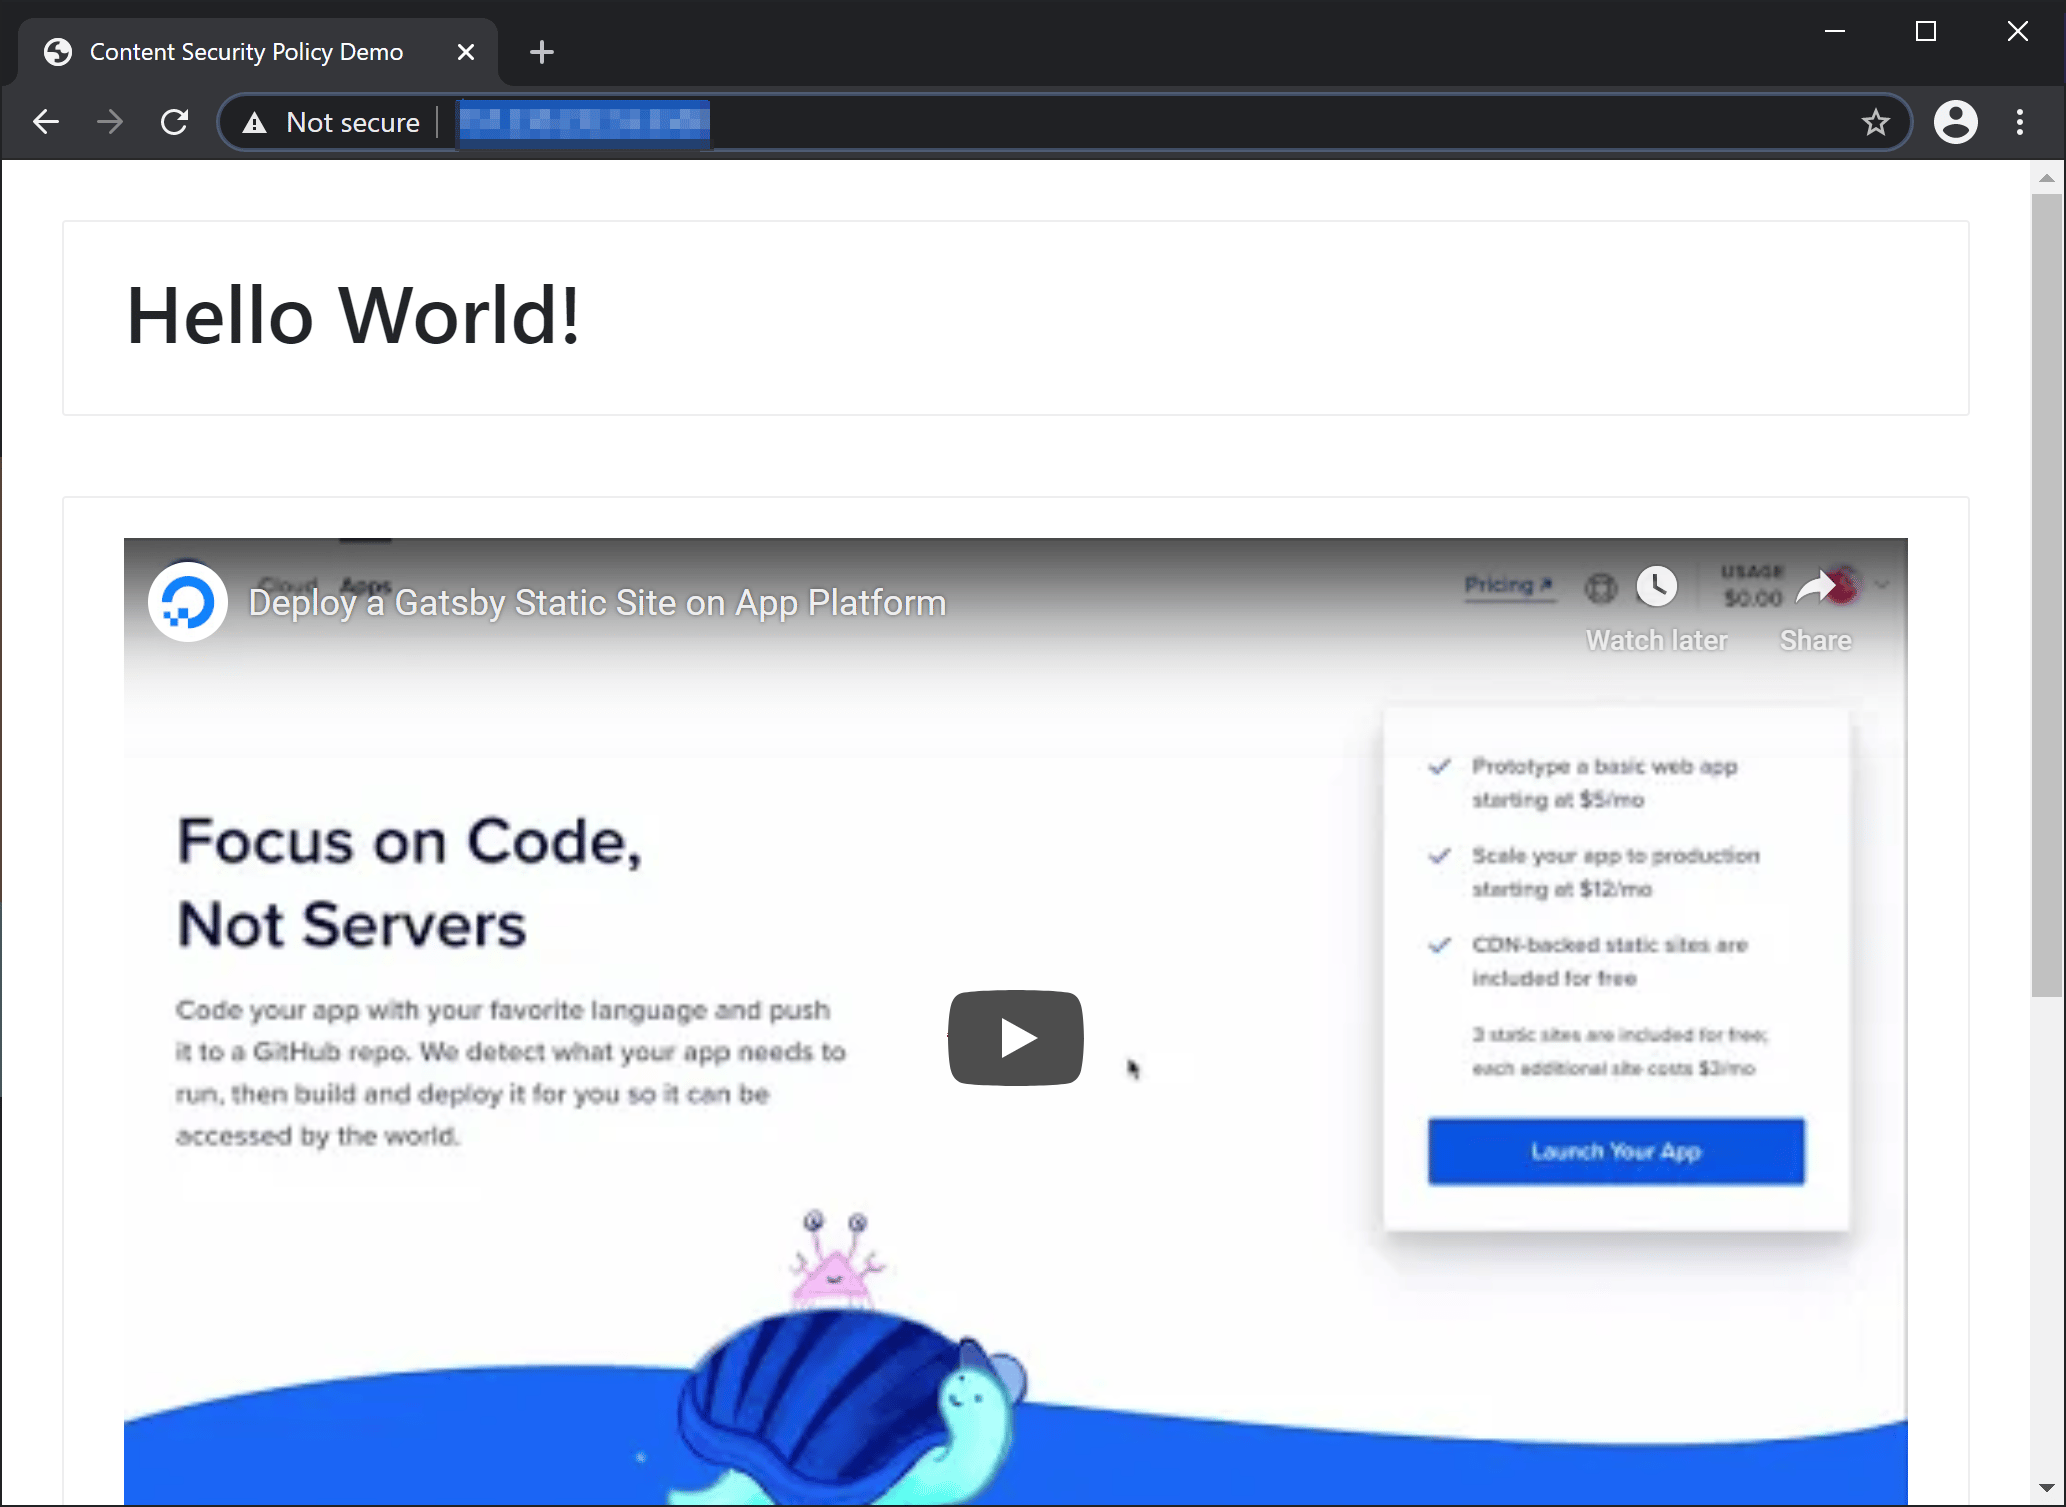
To demonstrate the process of creating a Content Security Policy, we’ll work through the entire process of implementing one for this demo project. It’s a one-page website with a variety of content that approximates a typical website or application. It includes a small Vue.js application, YouTube embeds, and some images sourced from Unsplash. It also uses Google fonts and the Bootstrap framework, which is loaded over a content delivery network (CDN).
In this step, you’ll set up the demo project on your test server or local machine and view it in your browser.
First, clone the project to your filesystem using the following command:
- git clone https://github.com/do-community/csp-demo
Once your project directory is set up, change into it with the following command:
- cd csp-demo
Next, install the dependencies specified in the package.json file with the next command. You use the express package to set up the web server, while nodemon helps to automatically restart the node application when it detects file changes in the directory:
- npm install
Once the dependencies you’ve installed the dependencies, enter the following command to start the web server on port 5500:
- npm start
You can now visit your_server_ip:5500 or localhost:5500 in your browser to view the demo page. You will find the text Hello World!, a YouTube embed, and some images on the page.
In the next section, we’ll implement a CSP policy that covers only the most basic protections. We’ll then build on that in the subsequent sections as we uncover all the legitimate resources that we need to allow on the page.
Step 2 — Implementing a Basic CSP
Let’s go ahead and write a CSP policy that restricts fonts, images, scripts, styles, and embeds to those originating from the current host only. The following is the response header that achieves this:
Content-Security-Policy: default-src 'self'; font-src 'self'; img-src 'self'; script-src 'self'; style-src 'self'; frame-src 'self';
Here’s an explanation of the policy directives in this header:
font-srcdefines the sources from where fonts can be loaded from.img-srcdefines the sources from which image loading is permitted.script-srccontrols any script-loading privileges on a web page.style-srcis the directive for allowing stylesheet sources.frame-srcdefines allowed sources for frame embeds. (It was deprecated in CSP level 2, but reinstated in level 3.)default-srcdefines a fallback policy for certain directives if they are not explicitly specified in the header. Here is a complete list of the directives that fall back todefault-src.
In this example, all the specified directives are assigned the 'self' keyword in their source list. This indicates that only resources from the current host (including the URL scheme and port number) should be allowed to execute. For example, script-src 'self' allows the execution of scripts from the current host, but it blocks all other script sources.
Let’s go ahead and add the header to our Node.js project.
Leave your app running and open a new terminal window to work with your server.js file:
- nano server.js
Next, add the CSP header from the example in an Express middleware layer. This ensures that you’re including the header in every response from the server:
const express = require('express');
const bodyParser = require('body-parser');
const path = require('path');
const app = express();

app.use(function (req, res, next) {
  res.setHeader(
    'Content-Security-Policy',
    "default-src 'self'; font-src 'self'; img-src 'self'; script-src 'self'; style-src 'self'; frame-src 'self'"
  );
  next();
});

app.use(bodyParser.json());
app.use(express.static(path.join(__dirname)));

app.get('/', (req, res) => {
  res.sendFile(path.join(__dirname + '/index.html'));
});

const server = app.listen(process.env.PORT || 5500, () => {
  const { port } = server.address();
  console.log(`Server running on PORT ${port}`);
});
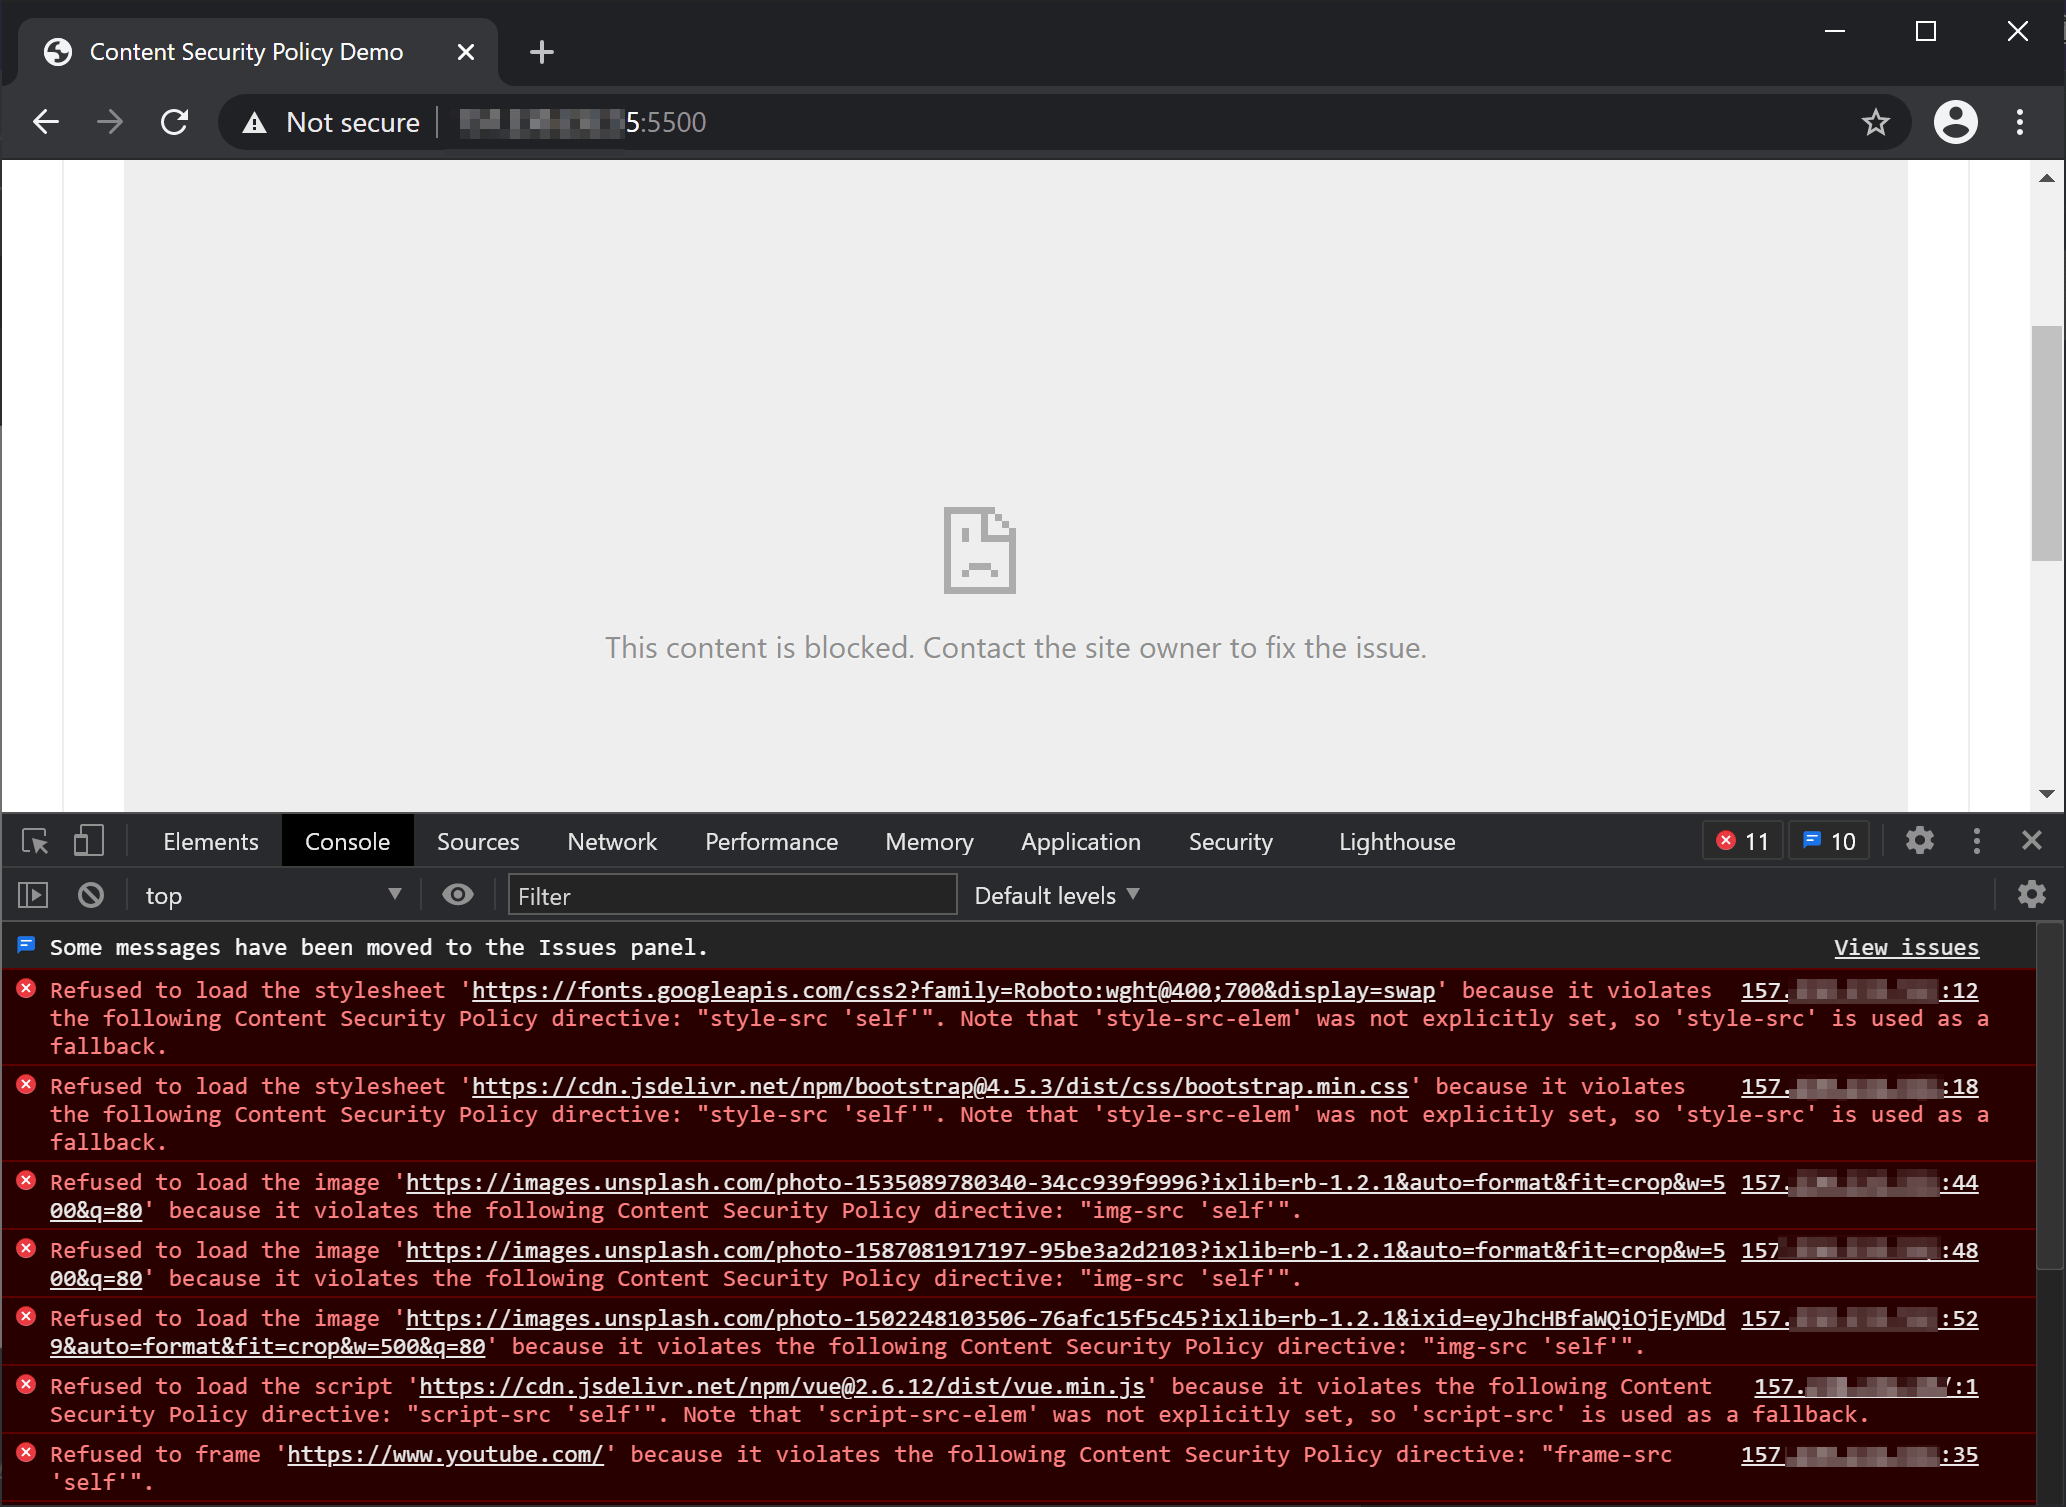
Save the file and reload the project in your browser. You’ll notice that the page is completely broken.
Our CSP header is working as expected and all the external sources that we included on the page have been blocked from loading because they violate the defined policy. However, this is not an ideal way to test a brand-new policy since it can break a website when violations occur.
This is why the Content-Security-Policy-Report-Only header exists. You can use it instead of Content-Security-Policy to prevent the browser from enforcing the policy, while still reporting the violations that occur—this means that you can refine the policy without putting your site at risk. Once you’re happy with your policy, you can switch back to the enforcing header so that the protections are activated.
Go ahead and replace the Content-Security-Policy header with Content-Security-Policy-Report-Only in your server.js file:
- nano server.js
Add the following highlighted code:
. . .
app.use(function (req, res, next) {
  res.setHeader(
    'Content-Security-Policy-Report-Only',
    "default-src 'self'; font-src 'self'; img-src 'self'; script-src 'self'; style-src 'self'; frame-src 'self'"
  );
  next();
});
. . .
Save the file and reload the page in your browser. The page returns to a working state, but the browser console still reports the CSP violations. Each violation is prefixed with [Report Only] to indicate that the policy is not enforced.

In this section, we created the initial implementation of our CSP and set it to report-only mode so that we can refine it without causing the site to break. In the next section, we’ll fix the violations triggered through our initial CSP.
Step 3 — Fixing Policy Violations
The policy we implemented in the previous section triggered several violations because we restricted all resources to the origin only—however, we have several third-party assets on the page.
The two ways to fix CSP violations are: approving the sources in the policy, or removing the code that triggers the violations. Since legitimate resources are triggering all the violations, we’ll concentrate mainly on the former option in this section.
Open up your browser console. It will display all the current violations of the CSP. Let’s fix each of these issues.
Allowing the Stylesheets
The first two violations in the console are from the Google fonts and Bootstrap stylesheets, which you’re loading from https://fonts.googleapis.com and https://cdn.jsdelivr.net respectively. You can allow them both on the page through the style-src directive:
style-src 'self' https://fonts.googleapis.com https://cdn.jsdelivr.net;
This specifies that CSS files from the origin host, https://fonts.googleapis.com, and https://cdn.jsdelivr.net, should be executed on the page. This policy is quite broad, because it allows any stylesheet from the allowlist domains (not just the ones you’re currently using).
We can be more specific by using the exact file or directory we’d like to allow instead:
style-src 'self' https://fonts.googleapis.com https://cdn.jsdelivr.net/npm/bootstrap@4.5.3/dist/css/bootstrap.min.css;
Now, it will only allow the exact, specified stylesheet to execute. It will block all other stylesheets—even if they originate from https://cdn.jsdelivr.net.
You can update the CSP header like the following with the updated style-src directive. By the time you reload the page, both violations will be resolved:
. . .
app.use(function (req, res, next) {
  res.setHeader(
    'Content-Security-Policy-Report-Only',
    "default-src 'self'; font-src 'self'; img-src 'self'; script-src 'self'; style-src 'self' https://fonts.googleapis.com https://cdn.jsdelivr.net/npm/bootstrap@4.5.3/dist/css/bootstrap.min.css; frame-src 'self';"
  );
  next();
});
. . .
Allowing the Image Sources
The images you’re using on the page are from a single source: https://images.unsplash.com. Let’s allow it through the img-src directive like the following:
. . .
app.use(function (req, res, next) {
  res.setHeader(
    'Content-Security-Policy-Report-Only',
    "default-src 'self'; font-src 'self'; img-src 'self' https://images.unsplash.com; script-src 'self'; style-src 'self' https://fonts.googleapis.com https://cdn.jsdelivr.net/npm/bootstrap@4.5.3/dist/css/bootstrap.min.css; frame-src 'self'"
  );
  next();
});
. . .
Allowing the Youtube Embed
You can allow valid sources for nested browsing contexts, which use elements such as <iframe>, through the frame-src directive. If this directive is absent, the browser will look for the child-src directive, which subsequently falls back to the default-src directive.
Our current policy limits frame embeds to the origin host. Let’s add https://www.youtube.com to the allowlist so that the CSP doesn’t block Youtube embeds from loading once we enforce the policy:
frame-src 'self' https://www.youtube.com;
Note that the www subdomain is significant here. If you have an embed from https://youtube.com, it will be blocked according to this policy unless you also add https://youtube.com to the allowlist:
frame-src 'self' https://www.youtube.com https://youtube.com;
Here’s the updated CSP header. Change the frame-src directive as following:
. . .
app.use(function (req, res, next) {
  res.setHeader(
    'Content-Security-Policy-Report-Only',
    "default-src 'self'; font-src 'self'; img-src 'self' https://images.unsplash.com; script-src 'self'; style-src 'self' https://fonts.googleapis.com https://cdn.jsdelivr.net/npm/bootstrap@4.5.3/dist/css/bootstrap.min.css; frame-src 'self' https://www.youtube.com https://youtube.com;"
  );
  next();
});
. . .
Allowing the Font Files
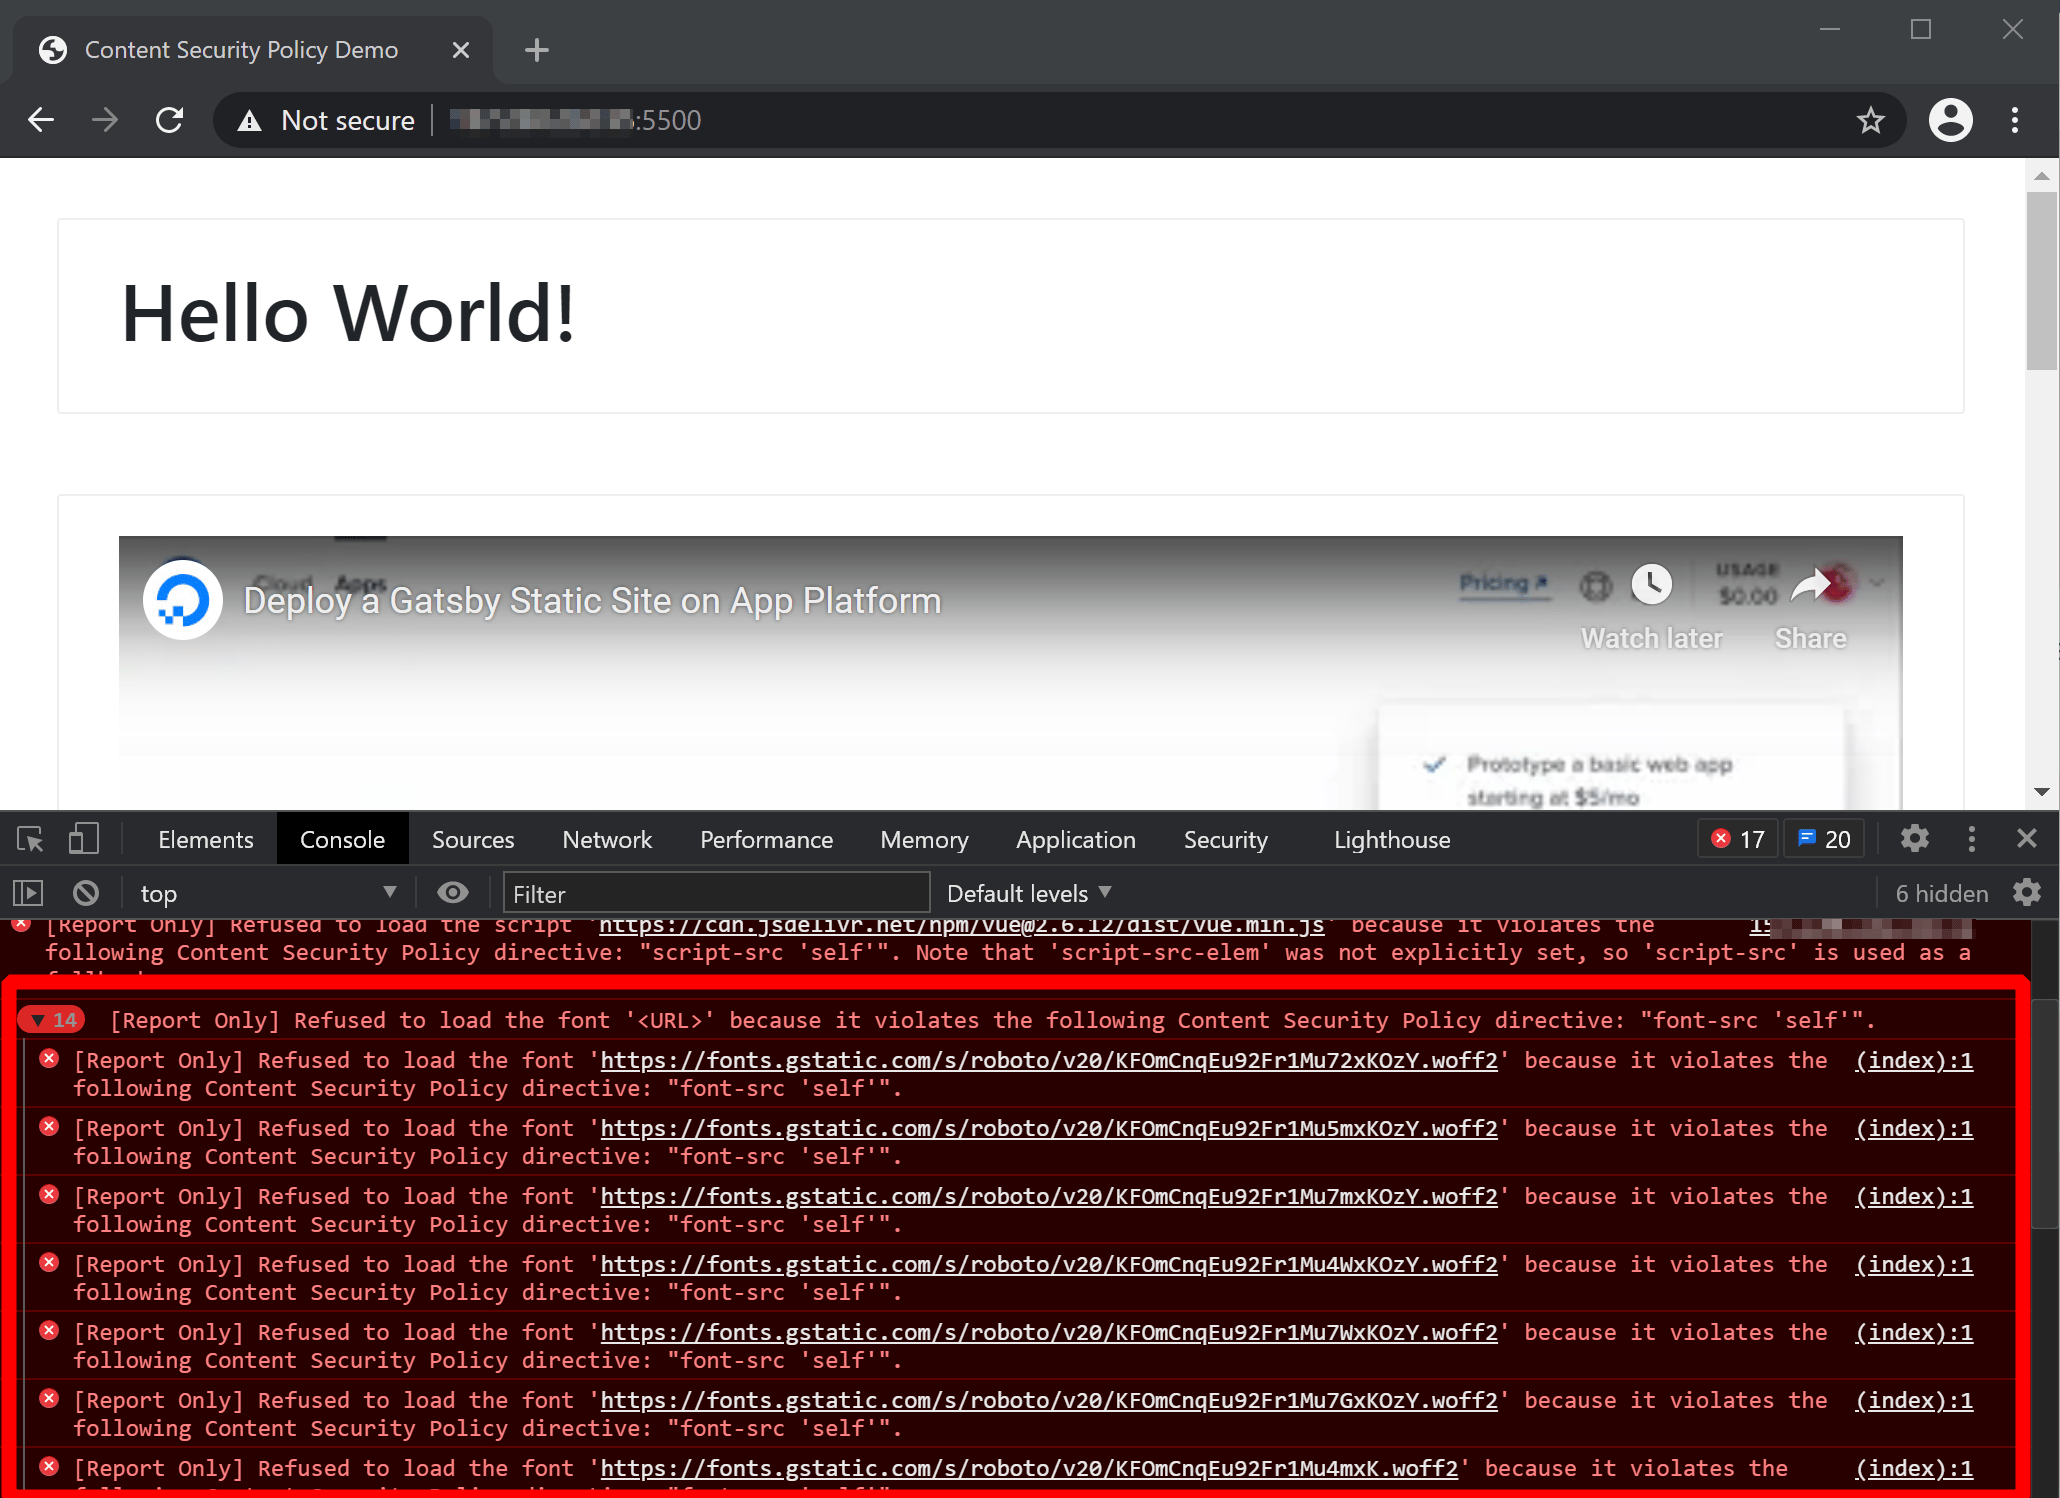
The Google fonts stylesheet contain references to several font files from https://fonts.gstatic.com. You will find that these files currently violate the defined font-src policy (currently 'self'), so you need to account for them in your revised policy:
font-src 'self' https://fonts.gstatic.com;
Update the font-src directive in the CSP header as following:
. . .
app.use(function (req, res, next) {
  res.setHeader(
    'Content-Security-Policy-Report-Only',
    "default-src 'self'; font-src 'self' https://fonts.gstatic.com; img-src 'self' https://images.unsplash.com; script-src 'self'; style-src 'self' https://fonts.googleapis.com https://cdn.jsdelivr.net/npm/bootstrap@4.5.3/dist/css/bootstrap.min.css; frame-src 'self' https://www.youtube.com https://youtube.com;"
  );
  next();
});
. . .
Once you reload the page, the console will no longer report violations for the Google fonts files.
Allowing the Vue.js Script
A Vue.js script loaded over a CDN is rendering the Hello world! text at the top of the page. We’ll allow its execution on the page through the script-src directive. As mentioned earlier, it’s important to be specific when allowing CDN sources so we don’t open up our site to other possible malicious scripts that are hosted on that domain.
script-src 'self' https://cdn.jsdelivr.net/npm/vue@2.6.12/dist/vue.min.js;
In this example, you’re only allowing the exact script at that URL to execute on the page. If you want to switch between development and production builds, you’ll need to add the other script URL to the allowlist as well, or you can allow all the resources present in the /dist location, to cover both cases at once:
script-src 'self' https://cdn.jsdelivr.net/npm/vue@2.6.12/dist/;
Here’s the updated CSP header with the relevant changes:
. . .
app.use(function (req, res, next) {
  res.setHeader(
    'Content-Security-Policy-Report-Only',
    "default-src 'self'; font-src 'self' https://fonts.gstatic.com; img-src 'self' https://images.unsplash.com; script-src 'self' https://cdn.jsdelivr.net/npm/vue@2.6.12/dist/; style-src 'self' https://fonts.googleapis.com https://cdn.jsdelivr.net/npm/bootstrap@4.5.3/dist/css/bootstrap.min.css; frame-src 'self' https://www.youtube.com https://youtube.com;"
  );
  next();
});
. . .
At this point, we’ve successfully allowed all the external files and scripts that our page relies on. But we still have one more CSP violation to resolve due to the presence of an inline script on the page. We’ll explore a few solutions to this problem in the next section.
Step 4 — Handling Inline Sources
Although you can approve inline code (such as JavaScript code in a <script> tag) within a CSP using the 'unsafe-inline' keyword, it is not recommended because it greatly increases the risk of a code-injection attack.
This example policy allows the execution of any inline script on the page, but this is not safe for the aforementioned reasons.
script-src 'self' 'unsafe-inline' https://unpkg.com/vue@3.0.2/dist/;
The best way to avoid using unsafe-inline is to move the inline code to an external file and reference it that way. This is a better approach for caching, minification, and maintainability, and it also makes the CSP easier to modify in the future.
However, if you absolutely must use inline code, there are two major ways to add them to your allowlist safely.
Option 1 — Using a Hash
This method requires that you calculate a SHA hash that is based on the script itself and then add it to the script-src directive. In recent versions of Chrome, you don’t even need to generate the hash yourself as it’s already included in the CSP violation error in the console:
[Report Only] Refused to execute inline script because it violates the following Content Security Policy directive: "script-src 'self' https://unpkg.com/vue@3.0.2/dist/". Either the 'unsafe-inline' keyword, a hash ('sha256-INJfZVfoUd61ITRFLf63g+S/NJAfswGDl15oK0iXgYM='), or a nonce ('nonce-...') is required to enable inline execution.
The highlighted section here is the exact SHA256 hash that you would need to add to the script-src directive to allow the execution of the specific inline script that triggered the violation.
Copy the hash and add it to your CSP as follows:
script-src 'self' https://unpkg.com/vue@3.0.2/dist/ 'sha256-INJfZVfoUd61ITRFLf63g+S/NJAfswGDl15oK0iXgYM=';
The disadvantage to this approach is that if the contents of the script changes, the generated hash will be different, which will trigger a violation.
Option 2 — Using a Nonce
The second way to allow the execution of inline code is by using a nonce. These are random strings that you can use to allow a complete block of code regardless of its content.
Here’s an example of a nonce value in use:
script-src 'self' https://unpkg.com/vue@3.0.2/dist/ 'nonce-EDNnf03nceIOfn39fn3e9h3sdfa'
The value of the nonce in the CSP must match the nonce attribute on the script:
<script nonce="EDNnf03nceIOfn39fn3e9h3sdfa">
  // Some inline code
</script>
Nonces must be unguessable and dynamically generated each time the page is loaded so that an attacker is unable to use them for the execution of a malicious script. If you decide to implement this option, you can use the crypto package to generate a nonce as following:
const crypto = require('crypto');
let nonce = crypto.randomBytes(16).toString('base64');
We will opt for the hash method in this tutorial since it’s more practical for our use case.
Update the script-src directive in your CSP header to include the SHA256 hash of the sole inline script as shown following:
. . .
app.use(function (req, res, next) {
  res.setHeader(
    'Content-Security-Policy-Report-Only',
    "default-src 'self'; font-src 'self' https://fonts.gstatic.com; img-src 'self' https://images.unsplash.com; script-src 'self' https://unpkg.com/vue@3.0.2/dist/ 'sha256-INJfZVfoUd61ITRFLf63g+S/NJAfswGDl15oK0iXgYM='; style-src 'self' https://fonts.googleapis.com https://cdn.jsdelivr.net/npm/bootstrap@4.5.3/dist/css/bootstrap.min.css; frame-src 'self' https://www.youtube.com https://youtube.com;"
  );
  next();
});
. . .
This removes the final CSP violation error that the inline script triggers from the console.
In the next section, we will monitor the effects of our CSP in a production environment.
Step 5 — Monitoring Violations
Once you have your CSP in place, it’s necessary to keep an eye on its effect once in use. For example, if you forget to allow a legitimate source in production or when an attacker is trying to exploit an XSS attack vector (which you need to identify and stop immediately).
Without some form of active reporting in place, there’s no way to know of these events. This is why the report-to directive exists. It specifies a location that the browser should POST a JSON-formatted violation report to, in the event it has to take action based on the CSP.
To use this directive, you need to add an additional header to specify an endpoint for the Reporting API:
Report-To: {"group":"csp-endpoint","max_age":10886400,"endpoints":[{"url":"http://your_server_ip:5500/__cspreport__"}],"include_subdomains":true}
Once that is set, specify the group name in the report-to directive as following:
report-to csp-endpoint;
Here’s the updated portion of the server.js file with the changes. Be sure to replace the <your_server_ip> placeholder in the Report-To header with your actual server IP address:
. . .
app.use(function (req, res, next) {
  res.setHeader(
    'Report-To',
    '{"group":"csp-endpoint","max_age":10886400,"endpoints":[{"url":"https://<your_server_ip>:5500/__cspreport__"}],"include_subdomains":true}'
  );
  res.setHeader(
    'Content-Security-Policy-Report-Only',
    "default-src 'self'; font-src 'self' https://fonts.gstatic.com; img-src 'self' https://images.unsplash.com; script-src 'self' https://cdn.jsdelivr.net/npm/vue@2.6.12/dist/ 'sha256-INJfZVfoUd61ITRFLf63g+S/NJAfswGDl15oK0iXgYM='; style-src 'self' https://fonts.googleapis.com https://cdn.jsdelivr.net/npm/bootstrap@4.5.3/dist/css/bootstrap.min.css; frame-src 'self' https://www.youtube.com https://youtube.com; report-to csp-endpoint;"
  );
  next();
});
. . .
The report-to directive is intended to replace the now deprecated report-uri directive, but most browsers don’t support it yet (as of November 2020). So, for compatibility with current browsers while also ensuring compatibility with future browser releases support, you should specify both report-uri and report-to in your CSP. If the latter is supported, it will ignore the former:
. . .
app.use(function (req, res, next) {
  res.setHeader(
    'Report-To',
    '{"group":"csp-endpoint","max_age":10886400,"endpoints":[{"url":"https://your_server_ip:5500/__cspreport__"}],"include_subdomains":true}'
  );
  res.setHeader(
    'Content-Security-Policy-Report-Only',
    "default-src 'self'; font-src 'self' https://fonts.gstatic.com; img-src 'self' https://images.unsplash.com; script-src 'self' https://cdn.jsdelivr.net/npm/vue@2.6.12/dist/ 'sha256-INJfZVfoUd61ITRFLf63g+S/NJAfswGDl15oK0iXgYM='; style-src 'self' https://fonts.googleapis.com https://cdn.jsdelivr.net/npm/bootstrap@4.5.3/dist/css/bootstrap.min.css; frame-src 'self' https://www.youtube.com https://youtube.com; report-to csp-endpoint; report-uri /__cspreport__;"
  );
  next();
});
. . .
The /__cspreport__ route needs to exist on the server as well; add this to your file like the following:
. . .
app.get('/', (req, res) => {
  res.sendFile(path.join(__dirname + '/index.html'));
});

app.post('/__cspreport__', (req, res) => {
  console.log(req.body);
});
. . .
Some browsers send the Content-Type of the report payload as application/csp-report, while others use application/json. If the report-to directive is supported, the Content-Type should be application/reports+json.
To account for all the possible Content-Type values, you have to set up some configurations on your express server:
. . .
app.use(
  bodyParser.json({
    type: ['application/json', 'application/csp-report', 'application/reports+json'],
  })
);
. . .
At this point, any CSP violations will be sent to the /__cspreport__ route and subsequently logged to the terminal.
You can try it out by adding a resource from a source that is not compliant with the current CSP, or modifying the inline script in the index.html file as shown following:
. . .
<script>
  new Vue({
    el: '#vue',
    render(createElement) {
      return createElement('h1', 'Hello World!');
    },
  });
  console.log("Hello")
</script>
. . .
This will trigger a violation because the hash of the script is now different from what you included in the CSP header.
Here’s a typical violation report from a browser using the report-uri:
{
  'csp-report': {
    'document-uri': 'http://localhost:5500/',
    referrer: '',
    'violated-directive': 'script-src-elem',
    'effective-directive': 'script-src-elem',
    'original-policy': "default-src 'self'; font-src 'self' https://fonts.gstatic.com; img-src 'self' https://images.unsplash.com; script-src 'self' https://cdn.jsdelivr.net/npm/vue@2.6.12/dist/ 'sha256-INJfZVfoUd61ITRFLf63g+S/NJAfswGDl15oK0iXgYM='; style-src 'self' https://fonts.googleapis.com https://cdn.jsdelivr.net/npm/bootstrap@4.5.3/dist/css/bootstrap.min.css; frame-src 'self' https://www.youtube.com https://youtube.com; report-uri /__cspreport__;",
    disposition: 'report',
    'blocked-uri': 'inline',
    'line-number': 58,
    'source-file': 'http://localhost:5500/',
    'status-code': 200,
    'script-sample': ''
  }
}
The parts to this report are:
document-uri: The page the violation occurred on.referrer: The page’s referrer.blocked-uri: The resource that violated the page’s policy (aninlinescript in this case).line-number: The line number where the inline code begins.violated-directive: The specific directive that was violated. (script-src-elemin this case, which falls back toscript-src.)original-policy: The complete policy of the page.
If the browser supports the report-to directive, the payload should have a similar structure to what is following. Notice how it’s different from the report-uri payload while still carrying the same information:
[{
	"age": 16796,
	"body": {
		"blocked-uri": "https://vimeo.com",
		"disposition": "enforce",
		"document-uri": "https://localhost:5500/",
		"effective-directive": "frame-src",
		"line-number": 58,
    'original-policy': "default-src 'self'; font-src 'self' https://fonts.gstatic.com; img-src 'self' https://images.unsplash.com; script-src 'self' https://cdn.jsdelivr.net/npm/vue@2.6.12/dist/ 'sha256-INJfZVfoUd61ITRFLf63g+S/NJAfswGDl15oK0iXgYM='; style-src 'self' https://fonts.googleapis.com https://cdn.jsdelivr.net/npm/bootstrap@4.5.3/dist/css/bootstrap.min.css; frame-src 'self' https://www.youtube.com https://youtube.com; report-uri /__cspreport__;",
		"referrer": "",
		"script-sample": "",
		"sourceFile": "https://localhost:5500/",
		"violated-directive": "frame-src"
	},
	"type": "csp",
	"url": "https://localhost:5500/",
	"user_agent": "Mozilla/5.0 (Macintosh; Intel Mac OS X 10_14_2) AppleWebKit/537.36 (KHTML, like Gecko) Chrome/73.0.3683.86 Safari/537.36"
}]
Note: The report-to directive is supported only in secure contexts, which means that you need to set up your Express server with a valid HTTPS certificate, otherwise you won’t be able to test or use it.
In this section, we successfully set up CSP monitoring on our server so that we can detect and fix problems quickly. Let’s go ahead and finish this tutorial by enforcing the final policy in the next step.
Step 6 — Publishing the Final Policy
Once you’re confident your CSP is set up correctly (ideally after leaving it in production for a few days or weeks in report-only mode), you can enforce it by changing the CSP header from Content-Security-Policy-Report-Only to Content-Security-Policy.
In addition to reporting the violations, this will stop unauthorized resources from being executed on the page, leading to a safer experience for your visitors.
Here is the final version of the server.js file:
const express = require('express');
const bodyParser = require('body-parser');
const path = require('path');
const app = express();

app.use(function (req, res, next) {
  res.setHeader(
    'Report-To',
    '{"group":"csp-endpoint","max_age":10886400,"endpoints":[{"url":"http://your_server_ip:5500/__cspreport__"}],"include_subdomains":true}'
  );
  res.setHeader(
    'Content-Security-Policy',
    "default-src 'self'; font-src 'self' https://fonts.gstatic.com; img-src 'self' https://images.unsplash.com; script-src 'self' https://cdn.jsdelivr.net/npm/vue@2.6.12/dist/ 'sha256-INJfZVfoUd61ITRFLf63g+S/NJAfswGDl15oK0iXgYM='; style-src 'self' https://fonts.googleapis.com https://cdn.jsdelivr.net/npm/bootstrap@4.5.3/dist/css/bootstrap.min.css; frame-src 'self' https://www.youtube.com https://youtube.com; report-to csp-endpoint; report-uri /__cspreport__;"
  );
  next();
});

app.use(
  bodyParser.json({
    type: [
      'application/json',
      'application/csp-report',
      'application/reports+json',
    ],
  })
);
app.use(express.static(path.join(__dirname)));

app.get('/', (req, res) => {
  res.sendFile(path.join(__dirname + '/index.html'));
});

app.post('/__cspreport__', (req, res) => {
  console.log(req.body);
});

const server = app.listen(process.env.PORT || 5500, () => {
  const { port } = server.address();
  console.log(`Server running on PORT ${port}`);
});
Browser support
The CSP header is supported in all browsers with the exception of Internet Explorer, which uses the non-standard X-Content-Security-Policy header instead. If you need to support IE, you have to issue the CSP twice in the response headers.
The latest version of the CSP spec (level 3) also introduced some newer directives that are not well supported at the moment. Examples include the script-src-elem and prefetch-src directives. Make sure to use the appropriate fallbacks when setting up those directives to ensure the protections remain active in browsers that have not caught up yet.
Conclusion
In this article, you’ve set up an effective Content Security Policy for a Node.js application and monitored the violations. If you have an older or more complex website, it will require a wider policy setup that covers all the bases. However, setting up a thorough policy is worth the effort as it makes it a lot harder for an attacker to exploit your website to steal user data.
You can find the final code from this tutorial in this GitHub repository.
For more security-related articles, check out our Security topic page. If you would like to learn more about working with Node.js, you can read our How To Code in Node.js series.
Thanks for learning with the DigitalOcean Community. Check out our offerings for compute, storage, networking, and managed databases.
About the author(s)
Former Senior Technical Editor at DigitalOcean, with a strong focus on DevOps and System Administration content. Areas of expertise include Terraform, PyTorch, Python, and Django.
Still looking for an answer?
This textbox defaults to using Markdown to format your answer.
You can type !ref in this text area to quickly search our full set of tutorials, documentation & marketplace offerings and insert the link!
The page is not updating unless clearing the cookies and data
all the specified directives are assigned the ‘self’ keyword in their source list. This indicates that only resources from the current host (including the URL scheme and port number) should be allowed to execute
It’s not true. On the HTTP-pages, ‘self’ covers the http:, ws:, https: and wss: schemes. On the HTTPS:-pages it covers the https: and wss:.
default-src defines a fallback policy for certain directives if they are not explicitly specified in the header.
It’s common misconception. The worker-src directive is not explicitly specified in the CSP been example, but it will not fallback to default-src, you can check it.
Report-To: {“group”:“csp-endpoint”,“max_age”:10886400,“endpoints”:[{“url”:“http://your_server_ip:5500/__ cspreport __”}],“include_subdomains”:true} Be sure to replace the <your_server_ip> placeholder in the Report-To header with your actual server IP address:
URL http://your_server_ip:5500/__cspreport__ is wrong, because Report-To works in secure context only.
In http://your_server_ip construсt the only 127.0.0.1 (or localhost) have a secure context with insecure http:, other IPs can not be used since SSL-certs are not assigned to IPs.
And Report-To fails to work if site is proxied via Cloudflare (CF is screw up the HTTP header).
app.post(‘/__ cspreport __’, (req, res) => { console.log(req.body); });
This is an example of incorrect handling of violation reports. This code doesn’t return the correct status code and after submitting the violation report the browser keeps hanging awaiting a response.
It need to finalize code with res.status(204).end().
If the browser supports the report-to directive, the payload should have a similar structure to what is following. Notice how it’s different from the report-uri payload while still carrying the same information:
Incorrect example is shown, other field names do send.
The highlighted section here is the exact SHA256 hash that you would need to add to the script-src directive to allow the execution of the specific inline script that triggered the violation.
It doesn’t always work, there is a lot of topics on SO like CSP header fails with “Refused to apply inline style…” but I have already added the hash
It is 2015 level article, nothing about tokens: 'report-sample', 'strict-dynamic', 'unsafe-hashes', 'none', 'unsafe-allow-redirects’, 'unsafe-eval' and * special character. Nothing about usage of non-network scheme-sources like data:, blob:, filesystem:.
Life has gone far ahead, a new concept of XSS protection via Trusted Types API is now implemented in CSP, but you still create tutorials how to work the CSP1 with using the one of most problematic and badly supported CSP3 directive.
 This work is licensed under a Creative Commons Attribution-NonCommercial- ShareAlike 4.0 International License.
Become a contributor for community
Get paid to write technical tutorials and select a tech-focused charity to receive a matching donation.

DigitalOcean Documentation
Full documentation for every DigitalOcean product.

Resources for startups and AI-native businesses
The Wave has everything you need to know about building a business, from raising funding to marketing your product.
The developer cloud
Scale up as you grow — whether you're running one virtual machine or ten thousand.

Start building today
From GPU-powered inference and Kubernetes to managed databases and storage, get everything you need to build, scale, and deploy intelligent applications.
