By finid, Brian Mutende and Timothy Nolan
Not using Ubuntu 18.04?
Choose a different version or distribution.
The author selected the Open Internet/Free Speech Fund to receive a donation as part of the Write for DOnations program.
Introduction
From cloud-based backup solutions to high-availability content delivery networks (CDNs), the ability to store unstructured blobs of object data and make them accessible through HTTP APIs, known as object storage, has become an integral part of the modern technology landscape.
Minio is a popular open-source object storage server compatible with the Amazon S3 cloud storage service. Applications that have been configured to talk to Amazon S3 can also be configured to talk to Minio, allowing Minio to be a viable alternative to S3 if you want more control over your object storage server. The service stores unstructured data such as photos, videos, log files, backups, and container/VM images, and can even provide a single object storage server that pools multiple drives spread across many servers.
Minio is written in Go, comes with a command line client plus a browser interface, and supports simple queuing service for Advanced Message Queuing Protocol (AMQP), Elasticsearch, Redis, NATS, and PostgreSQL targets. For all of these reasons, learning to set up a Minio object storage server can add a wide range of flexibility and utility to your project.
In this tutorial, you will:
-
Install the Minio server on your Ubuntu 18.04 server and configure it as a
systemdservice. -
Set up an SSL/TLS certificate using Let’s Encrypt to secure communication between the server and the client.
-
Access Minio’s browser interface via HTTPS to use and administrate the server.
Prerequisites
To complete this tutorial, you will need:
-
One Ubuntu 18.04 server set up by following our Ubuntu 18.04 initial server setup tutorial, including a sudo non-root user and a firewall.
-
A fully registered domain name. You can purchase one on Namecheap or get one for free on Freenom. In this tutorial, your domain will be represented as
your_domain. -
The following DNS records set up for your Minio server. You can follow our DNS records documentation for details on how to add them for a DigitalOcean Droplet.
-
An A record with your server name (e.g.
minio-server.your_domain) pointing to your object server’s IPv4 address. -
(Optional) If you want your server reachable via IPv6, you’ll need an AAAA record with your server name pointing to your object server’s IPv6 address.
-
Step 1 — Installing and Configuring the Minio Server
You can install the Minio server by compiling the source code or via a binary file. To install it from the source, you need to have at least Go 1.12 installed on your system.
In this step, you will install the server through the precompiled binary and then configure the Minio server afterward.
First, log in to your server, replacing sammy with your username and your_server_ip with your Ubuntu 18.04 server’s IP address:
- ssh sammy@your_server_ip
If you haven’t updated the package database recently, update it now:
- sudo apt update
Next, download the Minio server’s binary file from the official website:
- wget https://dl.min.io/server/minio/release/linux-amd64/minio
You will receive output similar to the following:
Output--2019-08-27 15:08:49--  https://dl.min.io/server/minio/release/linux-amd64/minio
Resolving dl.min.io (dl.min.io)... 178.128.69.202
Connecting to dl.min.io (dl.min.io)|178.128.69.202|:443... connected.
HTTP request sent, awaiting response... 200 OK
Length: 44511616 (42M) [application/octet-stream]
Saving to: ‘minio’

minio               100%[===================>]  42.45M  21.9MB/s    in 1.9s

2019-08-27 15:08:51 (21.9 MB/s) - ‘minio’ saved [44511616/44511616]
Once the download is finished, a file named minio will be in your working directory. Use the following command to make it executable:
- sudo chmod +x minio
Now, move the file into the /usr/local/bin directory where Minio’s systemd startup script expects to find it:
- sudo mv minio /usr/local/bin
This will allow us to write a service unit file later in this tutorial to automatically run Minio on startup.
For security reasons, it is best to avoid running the Minio server as root. This will limit the damage that can be done to your system if compromised. Since the systemd script you’ll use in Step 2 looks for a user account and group called minio-user, make a new user with this name:
- sudo useradd -r minio-user -s /sbin/nologin
In this command, you used the -s flag to set /sbin/nologin as the shell for minio-user. This is a shell that does not allow user login, which is not needed for minio-user.
Next, change ownership of the Minio binary to minio-user:
- sudo chown minio-user:minio-user /usr/local/bin/minio
Next, you will create a directory where Minio will store files. This will be the storage location for the buckets that you will use later to organize the objects you store on your Minio server. This tutorial will name the directory minio:
- sudo mkdir /usr/local/share/minio
Give ownership of that directory to minio-user:
- sudo chown minio-user:minio-user /usr/local/share/minio
Most server configuration files are stored in the /etc directory, so create your Minio configuration file there:
- sudo mkdir /etc/minio
Give ownership of that directory to minio-user, too:
- sudo chown minio-user:minio-user /etc/minio
Use Nano or your favorite text editor to create the environment file needed to modify the default configuration:
- sudo nano /etc/default/minio
Once the file is open, add in the following lines to set some important environment variables in your environment file:
MINIO_ACCESS_KEY="minio"
MINIO_VOLUMES="/usr/local/share/minio/"
MINIO_OPTS="-C /etc/minio --address your_server_ip:9000"
MINIO_SECRET_KEY="miniostorage"
Let’s take a look at these variables and the values you set:
MINIO_ACCESS_KEY: This sets the access key you will use to access the Minio browser user interface.MINIO_SECRET_KEY: This sets the private key you will use to complete your login credentials into the Minio interface. This tutorial has set the value tominiostorage, but we advise choosing a different, more complicated password to secure your server.MINIO_VOLUMES: This identifies the storage directory that you created for your buckets.MINIO_OPTS: This changes where and how the server serves data. The-Cflag points Minio to the configuration directory it should use, while the--addressflag tells Minio the IP address and port to bind to. If the IP address is not specified, Minio will bind to every address configured on the server, includinglocalhostand any Docker-related IP addresses, so directly specifying the IP address here is recommended. The default port9000can be changed if you would like.
Finally, save and close the environment file when you’re finished making changes.
You’ve now installed Minio and set some important environment variables. Next, you’ll configure the server to run as a system service.
Step 2 — Installing the Minio Systemd Startup Script
In this step, you’ll configure the Minio server to be managed as a systemd service.
First, download the official Minio service descriptor file using the following command:
- curl -O https://raw.githubusercontent.com/minio/minio-service/master/linux-systemd/minio.service
You will receive output similar to the following:
Output
  % Total    % Received % Xferd  Average Speed   Time    Time     Time  Current
                                 Dload  Upload   Total   Spent    Left  Speed
100   835  100   835    0     0   6139      0 --:--:-- --:--:-- --:--:--  6139
After the download has finished, a file named minio.service will be in your working directory.
To audit the contents of minio.service before applying it, open it in a text editor to view its contents:
- nano minio.service
This will show the following:
[Unit]
Description=MinIO
Documentation=https://docs.min.io
Wants=network-online.target
After=network-online.target
AssertFileIsExecutable=/usr/local/bin/minio

[Service]
WorkingDirectory=/usr/local/

User=minio-user
Group=minio-user

EnvironmentFile=/etc/default/minio
ExecStartPre=/bin/bash -c "if [ -z \"${MINIO_VOLUMES}\" ]; then echo \"Variable MINIO_VOLUMES not set in /etc/default/minio\"; exit 1; fi"

ExecStart=/usr/local/bin/minio server $MINIO_OPTS $MINIO_VOLUMES

# Let systemd restart this service always
Restart=always

# Specifies the maximum file descriptor number that can be opened by this process
LimitNOFILE=65536

# Disable timeout logic and wait until process is stopped
TimeoutStopSec=infinity
SendSIGKILL=no

[Install]
WantedBy=multi-user.target

# Built for ${project.name}-${project.version} (${project.name})
This service unit file starts the Minio server using the minio-user user that you created earlier. It also implements the environment variables you set in the last step, and makes the server run automatically on startup. For more information on systemd unit files, see our guide Understanding Systemd Units and Unit Files.
Once you’ve looked over the script’s contents, close your text editor.
Systemd requires that unit files be stored in the systemd configuration directory, so move minio.service there:
- sudo mv minio.service /etc/systemd/system
Then, run the following command to reload all systemd units:
- sudo systemctl daemon-reload
Finally, enable Minio to start on boot:
- sudo systemctl enable minio
This will give the following output:
OutputCreated symlink from /etc/systemd/system/multi-user.target.wants/minio.service to /etc/systemd/system/minio.service.
Now that the systemd script is installed and configured, it’s time to start the server.
Step 3 — Starting the Minio Server
In this step, you’ll start the server and modify the firewall to allow access through the browser interface.
First, start the Minio server:
- sudo systemctl start minio
Next, verify Minio’s status, the IP address it’s bound to, its memory usage, and more by running this command:
- sudo systemctl status minio
You will get the following output:
Output● minio.service - MinIO
   Loaded: loaded (/etc/systemd/system/minio.service; enabled; vendor preset: enabled)
   Active: active (running) since Mon 2019-12-09 21:54:02 UTC; 46s ago
     Docs: https://docs.min.io
  Process: 3405 ExecStartPre=/bin/bash -c if [ -z "${MINIO_VOLUMES}" ]; then echo "Variable MINIO_VOLUMES not set in /etc/default/minio"; exit 1; fi (code=exited, status=0/SUCCES
 Main PID: 3407 (minio)
    Tasks: 7 (limit: 1152)
   CGroup: /system.slice/minio.service
           └─3407 /usr/local/bin/minio server -C /etc/minio --address your_server_IP:9000 /usr/local/share/minio/

Dec 09 21:54:02 cart-Minion-Object-1804-1 systemd[1]: Started MinIO.
Dec 09 21:54:03 cart-Minion-Object-1804-1 minio[3407]: Endpoint:  http://your_server_IP:9000
Dec 09 21:54:03 cart-Minion-Object-1804-1 minio[3407]: Browser Access:
Dec 09 21:54:03 cart-Minion-Object-1804-1 minio[3407]:    http://your_server_IP:9000
...
Next, enable access through the firewall to the Minio server on the configured port. In this tutorial, that’s port 9000.
First add the rule:
- sudo ufw allow 9000
Then, enable the firewall:
- sudo ufw enable
You will get the following prompt:
OutputCommand may disrupt existing ssh connections. Proceed with operation (y|n)?
Press y and ENTER to confirm this. You will then get the following output:
OutputFirewall is active and enabled on system startup
Minio is now ready to accept traffic, but before connecting to the server, you will secure communication by installing an SSL/TLS certificate.
Step 4 — Securing Access to Your Minio Server With a TLS Certificate
In this step, you will secure access to your Minio server using a private key and public certificate that has been obtained from a certificate authority (CA), in this case Let’s Encrypt. To get a free SSL certificate, you will use Certbot.
First, allow HTTP and HTTPS access through your firewall. To do this, open port 80, which is the port for HTTP:
- sudo ufw allow 80
Next, open up port 443 for HTTPS:
- sudo ufw allow 443
Once you’ve added these rules, check on your firewall’s status with the following command:
- sudo ufw status verbose
You will receive output similar to the following:
OutputStatus: active
Logging: on (low)
Default: deny (incoming), allow (outgoing), disabled (routed)
New profiles: skip

To                         Action      From
--                         ------      ----
22/tcp (OpenSSH)           ALLOW IN    Anywhere
9000                       ALLOW IN    Anywhere
443                        ALLOW IN    Anywhere
80                         ALLOW IN    Anywhere
22/tcp (OpenSSH (v6))      ALLOW IN    Anywhere (v6)
9000 (v6)                  ALLOW IN    Anywhere (v6)
443 (v6)                   ALLOW IN    Anywhere (v6)
80 (v6)                    ALLOW IN    Anywhere (v6)
This confirms that ports 80 and 443 are open, ensuring that your server accepts requests from the internet.
Next, you will install Certbot. Since Certbot maintains a separate PPA repository, you will first have to add it to your list of repositories before installing Certbot as shown:
To prepare to add the PPA repository, first install software-properties-common, a package for managing PPAs:
- sudo apt install software-properties-common
This package provides some useful scripts for adding and removing PPAs instead of doing it manually.
Now add the Universe repository:
- sudo add-apt-repository universe
This repository contains free and open source software maintained by the Ubuntu community, but is not officially maintained by Canonical, the developers of Ubuntu. This is where we will find the repository for Certbot.
Next, add the Certbot repository:
- sudo add-apt-repository ppa:certbot/certbot
You will receive the following output:
OutputThis is the PPA for packages prepared by Debian Let's Encrypt Team and backported for Ubuntu(s).
More info: https://launchpad.net/~certbot/+archive/ubuntu/certbot
Press [ENTER] to continue or ctrl-c to cancel adding it
Press ENTER to accept.
Then update the package list:
- sudo apt update
Finally, install certbot:
- sudo apt install certbot
Next, you will use certbot to generate a new SSL certificate.
Since Ubuntu 18.04 doesn’t yet support automatic installation, you will use the certonly command and --standalone to obtain the certificate:
- sudo certbot certonly --standalone -d minio-server.your_domain
--standalone means that this certificate is for a built-in standalone web server. For more information on this, see our How To Use Certbot Standalone Mode to Retrieve Let’s Encrypt SSL Certificates on Ubuntu 18.04 tutorial.
You will receive the following output:
OutputSaving debug log to /var/log/letsencrypt/letsencrypt.log
Plugins selected: Authenticator standalone, Installer None
Enter email address (used for urgent renewal and security notices) (Enter 'c' to
cancel):
Add your email and press ENTER.
Certbot will then ask you to register with Let’s Encrypt:
Output- - - - - - - - - - - - - - - - - - - - - - - - - - - - - - - - - - - - - - - -
Please read the Terms of Service at
https://letsencrypt.org/documents/LE-SA-v1.2-November-15-2017.pdf. You must
agree in order to register with the ACME server at
https://acme-v02.api.letsencrypt.org/directory
- - - - - - - - - - - - - - - - - - - - - - - - - - - - - - - - - - - - - - - -
(A)gree/(C)ancel:
Type A and press ENTER to agree.
Next, you will be asked if you are willing to share your email with the Electronic Frontier Foundation:
Output- - - - - - - - - - - - - - - - - - - - - - - - - - - - - - - - - - - - - - - -
Would you be willing to share your email address with the Electronic Frontier
Foundation, a founding partner of the Let's Encrypt project and the non-profit
organization that develops Certbot? We'd like to send you email about our work
encrypting the web, EFF news, campaigns, and ways to support digital freedom.
- - - - - - - - - - - - - - - - - - - - - - - - - - - - - - - - - - - - - - - -
(Y)es/(N)o:
Once you answer Y or N, your public and private keys will be generated and saved in the /etc/letsencrypt/live/minio-server.your_domain_name directory.
Next, copy these two files (privkey.pem and fullchain.pem) into the certs directory under Minio’s server configuration folder, which is /etc/minio for this tutorial. Use the following to copy privkey.pem and rename the file private.key:
- sudo cp /etc/letsencrypt/live/minio-server.your_domain_name/privkey.pem /etc/minio/certs/private.key
Then do the same for fullchain.pem, naming the result public.crt:
- sudo cp /etc/letsencrypt/live/minio-server.your_domain_name/fullchain.pem /etc/minio/certs/public.crt
Now, change the ownership of the files to minio-user. First, do this for private.key:
- sudo chown minio-user:minio-user /etc/minio/certs/private.key
Then public.crt:
- sudo chown minio-user:minio-user /etc/minio/certs/public.crt
Restart the Minio server, so that it becomes aware of the certificate and starts using HTTPS:
- sudo systemctl restart minio
Let’s Encrypt certificates are only valid for ninety days. This is to encourage users to automate their certificate renewal process. The Certbot package you installed automatically adds a renew script to /etc/cron.d. This script runs twice a day and will automatically renew any certificate that’s within thirty days of expiration.
With that, Minio’s connection is now secure, and the SSL/TLS certificate will automatically renew for you. In the next step, you’ll connect to Minio through the browser to use the server.
Step 5 — Securely Connecting to Minio’s Web Interface Using HTTPS
In this step, you’ll securely connect to the Minio web interface via HTTPS, and then you’ll create buckets and upload objects into them.
Access the web interface by pointing your browser to https://minio-server.your_domain:9000.
You will see the Minio server login screen:
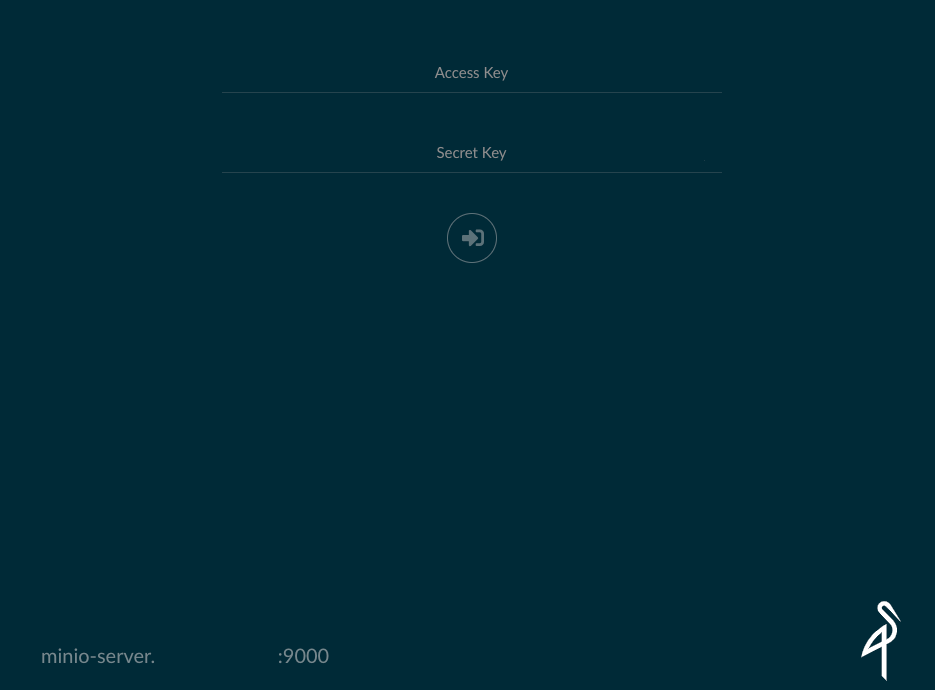
Now, log in to the main interface by entering your credentials. For Access Key, enter the MINIO_ACCESS_KEY you set in the /etc/default/minio environment file in Step 1. For Secret Key, type the MINIO_SECRET_KEY you set in the same file. Once you’ve entered the credentials, click the round button with the arrow directly below the input fields.
You will then be presented with the Minio user interface. To create a new bucket in which you can store objects, click the light-red + button on the bottom right of the main interface to bring up two additional yellow buttons.
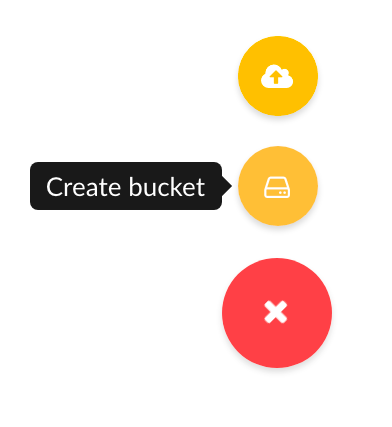
Click the middle yellow button and enter a name for your new bucket in the prompt, pressing the ENTER key to save your response. Your new bucket is now ready to be used for storage.
Note: When naming your Minio bucket, make sure that your name only contains lowercase letters, numbers, or hyphens. Minio limits bucket naming conventions in order to be compatible with AWS S3 standards.
When you want to add objects into your bucket, click the same light-red button as before and then click the top yellow button to open a file-upload prompt.
At this point, you’ve worked through the entire basic web interface of creating buckets and uploading objects.
Conclusion
You now have your own Minio object storage server that you can connect to securely from the web interface using a Let’s Encrypt SSL/TLS certificate. Optionally, you may want to look at the Minio desktop clients for FreeBSD, Linux, Mac, and Windows as an alternative way to use and administrate your object storage server.
Additionally, if you’d like to increase your Minio installation’s storage capacity beyond your server’s disk size, you can use DigitalOcean’s block storage service to attach a volume to your server, extending storage capacity by as much as 80 TB.
More information about Minio is available at the project’s documentation website. If you’d like to learn more about object storage, browse our Object Storage tutorials.
Thanks for learning with the DigitalOcean Community. Check out our offerings for compute, storage, networking, and managed databases.
About the author(s)
Jack of all trades, master of a few
In love with coding
Former Senior Technical Editor at DigitalOcean, fiction writer and podcaster elsewhere, always searching for the next good nautical pun! Areas of expertise include Node.js, PostgreSQL, CSS, JavaScript.
Still looking for an answer?
This textbox defaults to using Markdown to format your answer.
You can type !ref in this text area to quickly search our full set of tutorials, documentation & marketplace offerings and insert the link!
Great guide! I wonder what happens when certbot renews the certificates. Do you have to copy them to “/etc/minio/certs” again or is this handled automatically? Thanks in advance!
This was a great tutorial. Any way to show how to set up Minio to enable virtual-host-style requests?
Thanks
I was looking for quick start steps and this helped me a lot. Thanks a lot for such a great guide.
Thanks for the nice tutorial. I am facing one problem. After once setting up minio, if I try to modify ‘/etc/default/minio’ file by changing secret_key or access_key, minio server does not start. What did I do wrong?
I changed the SECRET KEY from ‘miniostorage’ to something else, as suggested. After the change minio doesn’t startup. If I set the the value back to ‘miniostorage’ - it works fine…
Is there any place, where the SECRET KEY is getting validated?
Need help. Thx
Just to let you know:
WARNING: MINIO_ACCESS_KEY and MINIO_SECRET_KEY are deprecated. Please use MINIO_ROOT_USER and MINIO_ROOT_PASSWORD
Document is very useful. I am getting an error “volume not found” while checking the status of minio service. Also in console getting this error: “an error occurred please try again the specified bucket does not exist”. Plase someone assist on this.
Hello, I followed this tutorial but I have always the same problem and the service is not starting. It seem’s to be a classique configuration problem, the service never met minio.
I’d restart all the tutorial on a new bucket, step by step without changing anything, but when I try to change ‘chmond’ on ‘/usr/local/bin/minio’ the error response is always the same: “‘/usr/local/bin/minio’ is not a directory”.
Could you give me some help? Regards, Ju.
 This work is licensed under a Creative Commons Attribution-NonCommercial- ShareAlike 4.0 International License.
Become a contributor for community
Get paid to write technical tutorials and select a tech-focused charity to receive a matching donation.

DigitalOcean Documentation
Full documentation for every DigitalOcean product.

Resources for startups and AI-native businesses
The Wave has everything you need to know about building a business, from raising funding to marketing your product.
The developer cloud
Scale up as you grow — whether you're running one virtual machine or ten thousand.

Start building today
From GPU-powered inference and Kubernetes to managed databases and storage, get everything you need to build, scale, and deploy intelligent applications.
