By Jesin A

About DNSSEC
We all know that DNS is a protocol which resolves domain names to IP addresses, but how do we know the authenticity of the returned IP address? It is possible for an attacker to tamper a DNS response or poison the DNS cache and take users to a malicious site with the legitimate domain name in the address bar. DNS Security Extensions (DNSSEC) is a specification which aims at maintaining the data integrity of DNS responses. DNSSEC signs all the DNS resource records (A, MX, CNAME etc.) of a zone using PKI (Public Key Infrastructure). Now DNSSEC enabled DNS resolvers (like Google Public DNS) can verify the authenticity of a DNS reply (containing an IP address) using the public DNSKEY record.
DNSSEC Resource Records
A Resource Record (RR) contains a specific information about the domain. Some common ones are A record which contains the IP address of the domain, AAAA record which holds the IPv6 information, and MX record which has mail servers of a domain. A complete list of DNS RRs can be found here.
Likewise DNSSEC too requires several RRs.
- DNSKEY Holds the public key which resolvers use to verify.
- RRSIG Exists for each RR and contains the digital signature of a record.
- DS - Delegation Signer – this record exists in the TLD’s nameservers. So if example.com was your domain name, the TLD is “com” and its nameservers are
a.gtld-servers.net.,b.gtld-servers.net.up tom.gtld-servers.net.. The purpose of this record is to verify the authenticity of the DNSKEY itself.
Setup Environment
Domain Name: example.com
I used a real .COM domain to do this, but have replaced it with example.com for this article.
Master Nameserver: IP Address: 1.1.1.1 Hostname: master.example.com OS: Debian 7
Slave Nameserver: IP Address: 2.2.2.2 Hostname: slave.example.com OS: CentOS
File locations and names
The names and locations of configuration and zone files of BIND different according to the Linux distribution used.
Debian/Ubuntu
Service name:
bind9
Main configuration file:
/etc/bind/named.conf.options
Zone names file:
/etc/bind/named.conf.local
Default zone file location:
/var/cache/bind/
CentOS/Fedora
Service name:
named
Main configuration and zone names file:
/etc/named.conf
Default zone file location:
/var/named/
These may change if you’re using bind-chroot. For this tutorial, I’ve used Debian for the Master NS and CentOS for the Slave NS, so change it according to your distribution.
DNSSEC Master Configuration
Enable DNSSEC by adding the following configuration directives inside options{ }
nano /etc/bind/named.conf.options
dnssec-enable yes;
dnssec-validation yes;
dnssec-lookaside auto;
It is possible that these are already added in some distributions. Navigate to the location of your zone files.
cd /var/cache/bind
Create a Zone Signing Key(ZSK) with the following command.
dnssec-keygen -a NSEC3RSASHA1 -b 2048 -n ZONE example.com
If you have installed haveged, it’ll take only a few seconds for this key to be generated; otherwise it’ll take a very long time. Sample output.
root@master:/var/cache/bind# dnssec-keygen -a NSEC3RSASHA1 -b 2048 -n ZONE example.com
Generating key pair..................+++ .............+++
Kexample.com.+007+40400
Create a Key Signing Key(KSK) with the following command.
dnssec-keygen -f KSK -a NSEC3RSASHA1 -b 4096 -n ZONE example.com
Sample output.
root@master:/var/cache/bind# dnssec-keygen -f KSK -a NSEC3RSASHA1 -b 4096 -n ZONE example.com
Generating key pair......................++ .............................................................................................................................................................................................................++
Kexample.com.+007+62910
The directory will now have 4 keys - private/public pairs of ZSK and KSK. We have to add the public keys which contain the DNSKEY record to the zone file. The following for loop will do this.
for key in `ls Kexample.com*.key`
do
echo "\$INCLUDE $key">> example.com.zone
done
Sign the zone with the dnssec-signzone command.
dnssec-signzone -3 <salt> -A -N INCREMENT -o <zonename> -t <zonefilename>
Replace salt with something random. Here is an example with the output.
root@master:/var/cache/bind# dnssec-signzone -A -3 $(head -c 1000 /dev/random | sha1sum | cut -b 1-16) -N INCREMENT -o example.com -t example.com.zone
Verifying the zone using the following algorithms: NSEC3RSASHA1.
Zone signing complete:
Algorithm: NSEC3RSASHA1: KSKs: 1 active, 0 stand-by, 0 revoked
                        ZSKs: 1 active, 0 stand-by, 0 revoked
example.com.zone.signed
Signatures generated:                       14
Signatures retained:                         0
Signatures dropped:                          0
Signatures successfully verified:            0
Signatures unsuccessfully verified:          0
Signing time in seconds:                 0.046
Signatures per second:                 298.310
Runtime in seconds:                      0.056
A 16 character string must be entered as the “salt”. The following command
head -c 1000 /dev/random | sha1sum | cut -b 1-16
outputs a random string of 16 characters which will be used as the salt.
This creates a new file named example.com.zone.signed which contains RRSIG records for each DNS record. We have to tell BIND to load this “signed” zone.
nano /etc/bind/named.conf.local
Change the file option inside the zone { } section.
zone "example.com" IN {
    type master;
    file "example.com.zone.signed";
    allow-transfer { 2.2.2.2; };
    allow-update { none; };
};
Save this file and reload bind
service bind9 reload
Check if for the DNSKEY record using dig on the same server.
dig DNSKEY example.com. @localhost +multiline
Sample output
root@master:/var/cache/bind# dig DNSKEY example.com. @localhost +multiline
;; Truncated, retrying in TCP mode.

; <<>> DiG 9.8.4-rpz2+rl005.12-P1 <<>> DNSKEY example.com. @localhost +multiline
;; global options: +cmd
;; Got answer:
;; ->>HEADER<<- opcode: QUERY, status: NOERROR, id: 43986
;; flags: qr aa rd; QUERY: 1, ANSWER: 2, AUTHORITY: 0, ADDITIONAL: 0
;; WARNING: recursion requested but not available

;; QUESTION SECTION:
;example.com.       IN DNSKEY

;; ANSWER SECTION:
example.com.        86400 IN DNSKEY   256 3 7 (
                AwEAActPMYurNEyhUgHjPctbLCI1VuSj3xcjI8QFTpdM
                8k3cYrfwB/WlNKjnnjt98nPmHv6frnuvs2LKIvvGzz++
                kVwVc8uMLVyLOxVeKhygDurFQpLNNdPumuc2MMRvV9me
                fPrdKWtEEtOxq6Pce3DW2qRLjyE1n1oEq44gixn6hjgo
                sG2FzV4fTQdxdYCzlYjsaZwy0Kww4HpIaozGNjoDQVI/
                f3JtLpE1MYEb9DiUVMjkwVR5yH2UhJwZH6VVvDOZg6u6
                YPOSUDVvyofCGcICLqUOG+qITYVucyIWgZtHZUb49dpG
                aJTAdVKlOTbYV9sbmHNuMuGt+1/rc+StsjTPTHU=
                ) ; key id = 40400
example.com.        86400 IN DNSKEY   257 3 7 (
                AwEAAa2BE0dAvMs0pe2f+D6HaCyiFSHw47BA82YGs7Sj
                qSqH3MprNra9/4S0aV6SSqHM3iYZt5NRQNTNTRzkE18e
                3j9AGV8JA+xbEow74n0eu33phoxq7rOpd/N1GpCrxUsG
                kK4PDkm+R0hhfufe1ZOSoiZUV7y8OVGFB+cmaVb7sYqB
                RxeWPi1Z6Fj1/5oKwB6Zqbs7s7pmxl/GcjTvdQkMFtOQ
                AFGqaaSxVrisjq7H3nUj4hJIJ+SStZ59qfW3rO7+Eqgo
                1aDYaz+jFHZ+nTc/os4Z51eMWsZPYRnPRJG2EjJmkBrJ
                huZ9x0qnjEjUPAcUgMVqTo3hkRv0D24I10LAVQLETuw/
                QOuWMG1VjybzLbXi5YScwcBDAgtEpsQA9o7u6VC00DGh
                +2+4RmgrQ7mQ5A9MwhglVPaNXKuI6sEGlWripgTwm425
                JFv2tGHROS55Hxx06A416MtxBpSEaPMYUs6jSIyf9cjB
                BMV24OjkCxdz29zi+OyUyHwirW51BFSaOQuzaRiOsovM
                NSEgKWLwzwsQ5cVJBEMw89c2V0sHa4yuI5rr79msRgZT
                KCD7wa1Hyp7s/r+ylHhjpqrZwViOPU7tAGZ3IkkJ2SMI
                e/h+FGiwXXhr769EHbVE/PqvdbpcsgsDqFu0K2oqY70u
                SxnsLB8uVKYlzjG+UIoQzefBluQl
                ) ; key id = 62910

;; Query time: 0 msec
;; SERVER: 127.0.0.1#53(127.0.0.1)
;; WHEN: Wed Nov 27 18:18:30 2013
;; MSG SIZE  rcvd: 839
Check for the presence of RRSIG records.
dig A example.com. @localhost +noadditional +dnssec +multiline
; <<>> DiG 9.8.4-rpz2+rl005.12-P1 <<>> A example.com. @localhost +noadditional +dnssec +multiline
;; global options: +cmd
;; Got answer:
;; ->>HEADER<<- opcode: QUERY, status: NOERROR, id: 32902
;; flags: qr aa rd; QUERY: 1, ANSWER: 2, AUTHORITY: 3, ADDITIONAL: 5
;; WARNING: recursion requested but not available

;; OPT PSEUDOSECTION:
; EDNS: version: 0, flags: do; udp: 4096
;; QUESTION SECTION:
;example.com.         IN A

;; ANSWER SECTION:
example.com.          86400 IN A 93.184.216.119
example.com.          86400 IN RRSIG A 7 2 86400 20131227171405 (
                            20131127171405 40400 example.com.
                            JCoL8L7As1a8CXnx1W62O94eQl6zvVQ3prtNK7BWIW9O
                            lir/4V+a6c+0tbt4z4lhgmb0sb+qdvqRnlI7CydaSZDb
                            hlrJA93fHqFqNXw084YD1gWC+M8m3ewbobiZgBUh5W66
                            1hsVjWZGvvQL+HmobuSvsF8WBMAFgJgYLg0YzBAvwHIk
                            886be6vbNeAltvPl9I+tjllXkMK5dReMH40ulgKo+Cwb
                            xNQ+RfHhCQIwKgyvL1JGuHB125rdEQEVnMy26bDcC9R+
                            qJNYj751CEUZxEEGI9cZkD44oHwDvPgF16hpNZGUdo8P
                            GtuH4JwP3hDIpNtGTsQrFWYWL5pUuuQRwA== )

;; AUTHORITY SECTION:
example.com.          86400 IN NS master.example.com.
example.com.          86400 IN NS slave.example.com.
example.com.          86400 IN RRSIG NS 7 2 86400 20131227171405 (
                            20131127171405 40400 example.com.
                            hEGzNvKnc3sXkiQKo9/+ylU5WSFWudbUc3PAZvFMjyRA
                            j7dzcVwM5oArK5eXJ8/77CxL3rfwGvi4LJzPQjw2xvDI
                            oVKei2GJNYekU38XUwzSMrA9hnkremX/KoT4Wd0K1NPy
                            giaBgyyGR+PT3jIP95Ud6J0YS3+zg60Zmr9iQPBifH3p
                            QrvvY3OjXWYL1FKBK9+rJcwzlsSslbmj8ndL1OBKPEX3
                            psSwneMAE4PqSgbcWtGlzySdmJLKqbI1oB+d3I3bVWRJ
                            4F6CpIRRCb53pqLvxWQw/NXyVefNTX8CwOb/uanCCMH8
                            wTYkCS3APl/hu20Y4R5f6xyt8JZx3zkZEQ== )

;; Query time: 0 msec
;; SERVER: 127.0.0.1#53(127.0.0.1)
;; WHEN: Thu Nov 28 00:01:06 2013
;; MSG SIZE  rcvd: 1335
The configuration of the master server is complete.
DNSSEC Slave Configuration
The slave servers only require DNSSEC to be enabled and the zone file location to be changed. Edit the main configuration file of BIND.
nano /etc/named.conf
Place these lines inside the options { } section if they don’t exist.
dnssec-enable yes;
dnssec-validation yes;
dnssec-lookaside auto;
Edit the file option inside the zone { } section.
zone "example.com" IN {
    type slave;
    file "example.com.zone.signed";
    masters { 1.1.1.1; };
    allow-notify { 1.1.1.1; };
};
Reload the BIND service.
service named reload
Check if there is a new .signed zone file.
[root@slave ~]# ls -l /var/named/slaves/
total 16
-rw-r--r-- 1 named named  472 Nov 27 17:25 example.com.zone
-rw-r--r-- 1 named named 9180 Nov 27 18:29 example.com.zone.signed
Voila! That’s it. Just to make sure things are working as they should ,query the DNSKEY using dig as mentioned in the previous section.
Configure DS records with the registrar
When we ran the dnssec-signzone command apart from the .signed zone file, a file named dsset-example.com was also created, this contains the DS records.
root@master:/var/cache/bind# cat dsset-example.com.
example.com.        IN DS 62910 7 1 1D6AC75083F3CEC31861993E325E0EEC7E97D1DD
example.com.        IN DS 62910 7 2 198303E265A856DE8FE6330EDB5AA76F3537C10783151AEF3577859F FFC3F59D
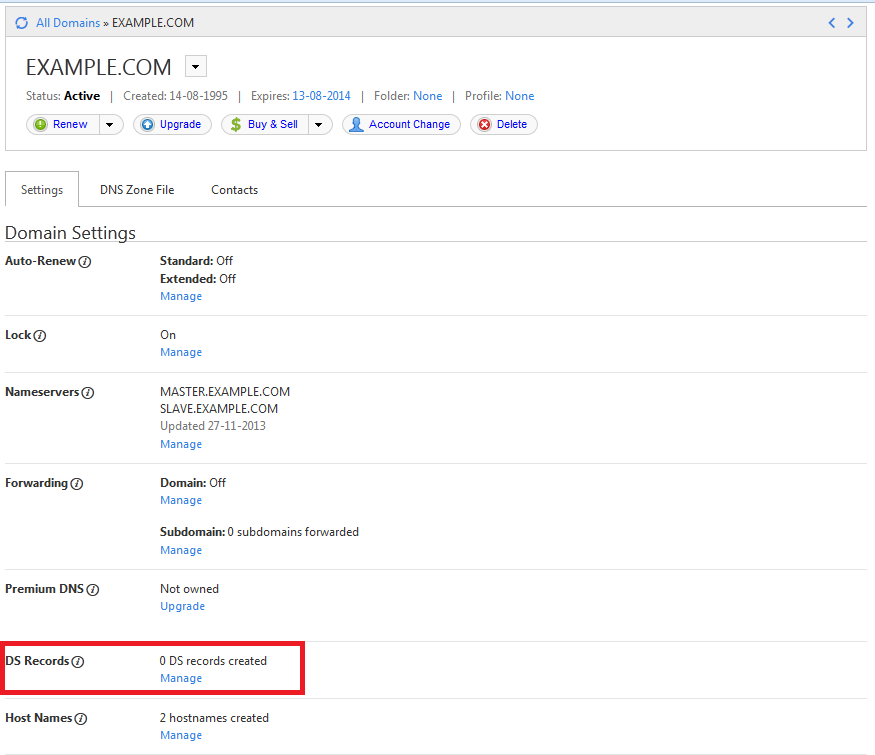
These have to be entered in your domain registrar’s control panel. The screenshots below will illustrate the steps on GoDaddy.
Login to your domain registrar’s control panel, choose your domain, and select the option to manage DS records. GoDaddy’s control panel looks like this.
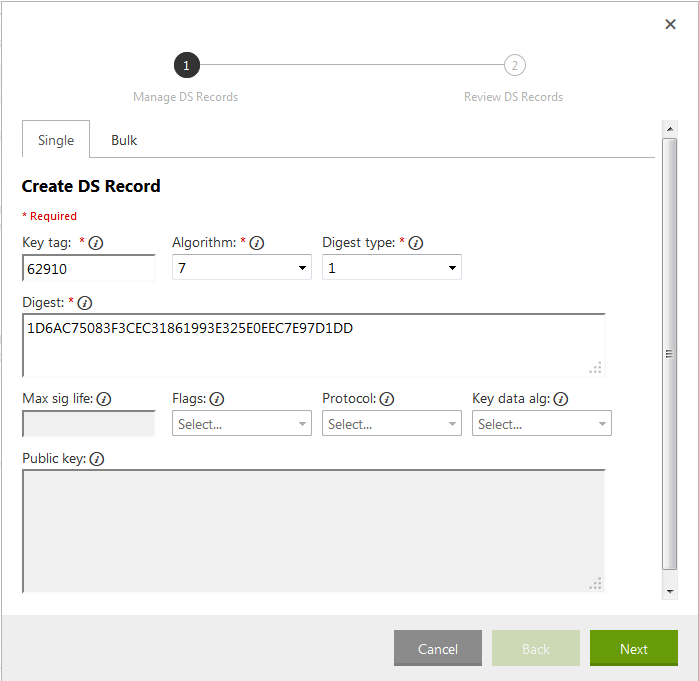
Here is a breakup of the data in the dsset-example.com. file.
DS record 1:
Key tag: 62910 Algorithm: 7 Digest Type: 1 Digest: 1D6AC75083F3CEC31861993E325E0EEC7E97D1DD
DS record 2:
Key tag: 62910 Algorithm: 7 Digest Type: 2 Digest: 198303E265A856DE8FE6330EDB5AA76F3537C10783151AEF3577859FFFC3F59D
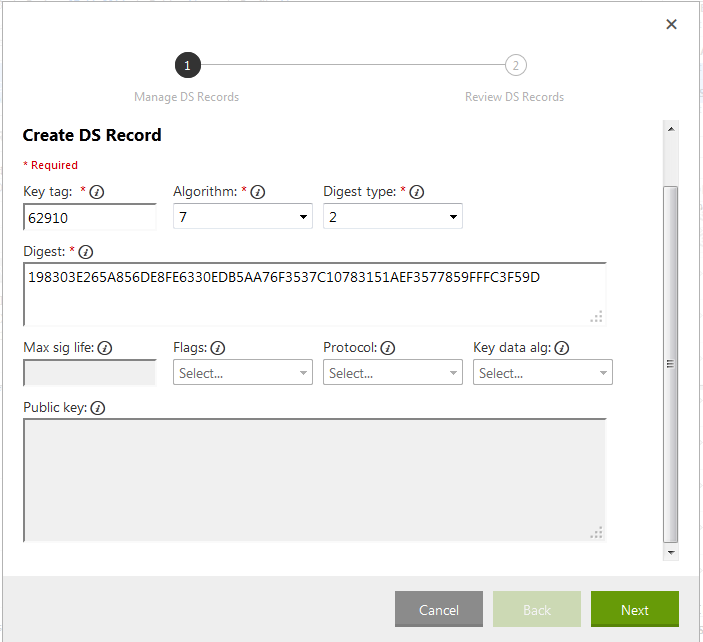
The second DS record in the dsset-example.com. file had a space in the digest, but when entering it in the form you should omit it. Click Next, click Finish and Save the records.
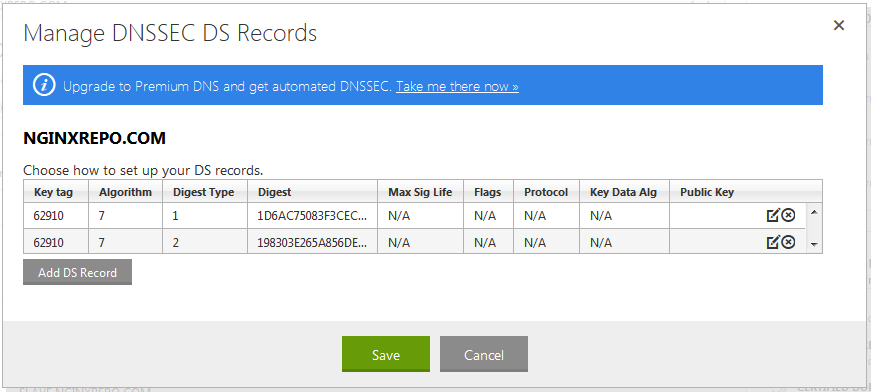
It’ll take a few minutes for these changes to be saved. To check if the DS records have been created query the nameservers of your TLD. Instead of finding the TLD’s nameservers we can do a dig +trace which is much simpler.
root@master:~# dig +trace +noadditional DS example.com. @8.8.8.8 | grep DS
; <<>> DiG 9.8.2rc1-RedHat-9.8.2-0.17.rc1.el6_4.6 <<>> +trace +noadditional DS example.com. @8.8.8.8
example.com.          86400   IN      DS      62910 7 2 198303E265A856DE8FE6330EDB5AA76F3537C10783151AEF3577859F FFC3F59D
example.com.          86400   IN      DS      62910 7 1 1D6AC75083F3CEC31861993E325E0EEC7E97D1DD
Once this is confirmed, we can check if DNSSEC is working fine using any of the following online services.
The first tool is a simple one, while the second gives you a visual representation of things. Here is a screenshot from the first tool.
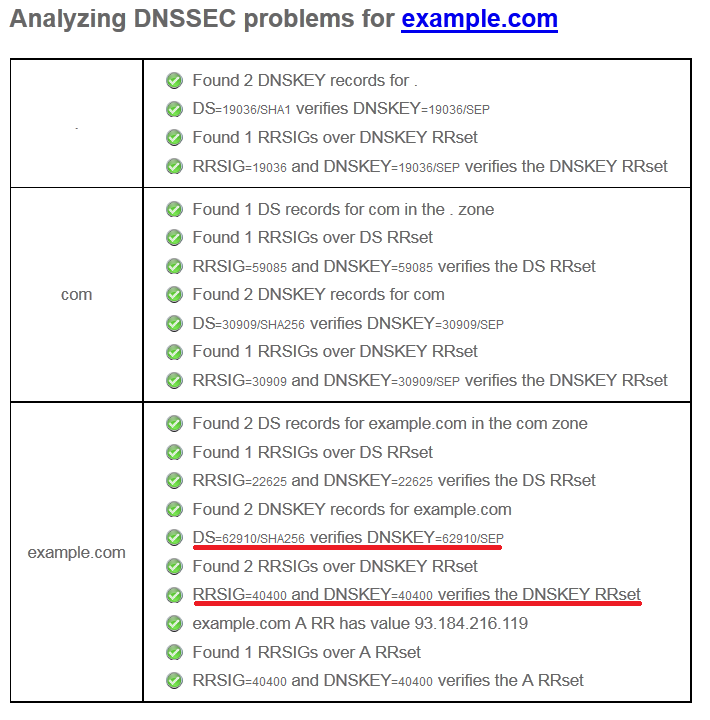
Notice the lines I’ve marked. The first one mentions the Key tag value (62910) of the DS record while the second one key id (40400) of the DNSKEY record which holds the ZSK (Zone Signing Key).
Modifying Zone Records
Each time you edit the zone by adding or removing records, it has to be signed to make it work. So we will create a script for this so that we don’t have to type long commands every time.
root@master# nano /usr/sbin/zonesigner.sh

#!/bin/sh
PDIR=`pwd`
ZONEDIR="/var/cache/bind" #location of your zone files
ZONE=$1
ZONEFILE=$2
DNSSERVICE="bind9" #On CentOS/Fedora replace this with "named"
cd $ZONEDIR
SERIAL=`/usr/sbin/named-checkzone $ZONE $ZONEFILE | egrep -ho '[0-9]{10}'`
sed -i 's/'$SERIAL'/'$(($SERIAL+1))'/' $ZONEFILE
/usr/sbin/dnssec-signzone -A -3 $(head -c 1000 /dev/random | sha1sum | cut -b 1-16) -N increment -o $1 -t $2
service $DNSSERVICE reload
cd $PDIR
Save the file and make it executable.
root@master# chmod +x /usr/sbin/zonesigner.sh
Whenever you want to add or remove records, edit the example.com.zone and NOT the .signed file. This file also takes care of incrementing the serial value, so you needn’t do it each time you edit the file. After editing it run the script by passing the domain name and zone filename as parameters.
root@master# zonesigner.sh example.com example.com.zone
You do not have to do anything on the slave nameserver as the incremented serial will ensure the zone if transferred and updated.
Securing the DNSSEC setup from Zone Walking
Zone Walking is a technique used to find all the Resource Records of a zone by querying the NSEC (Next-Secure) record. NSEC3 was released which “hashed” this information using a salt. Recall the dnssec-signzone command in which we specified a -3 option followed by another elaborate command to generate a random string. This is the salt which can be found using the following dig query.
# dig NSEC3PARAM example.com. @master.example.com. +short
1 0 10 7CBAA916230368F2
All this makes zone walking difficult but not impossible. A determined hacker using rainbow tables can break the hash, though it’ll take a long time. To prevent this we can recompute this salt at regular intervals, which makes a hacker’s attempt futile as there is a new salt before he/she can find the hash with the old salt. Create a cron job to do this for you using the zonesigner.sh script we created previously. If you run the cronjob as root you don’t have to worry about file ownership. Or else make sure the user under whom you’re placing the cron has write permission on the zone directory and read permission on the private keys (Kexample.com.*.private).
root@master:~# crontab -e

0       0       */3     *       *       /usr/sbin/zonesigner.sh example.com example.com.zone
This will sign the zone every 3 days and as a result a new salt will be generated. You’ll also receive an email containing the output of the dnssec-signzone command.
<div class=“author”>Submitted by: <a rel=“author” href=“http://jesin.tk/”>Jesin A</a></div>
Thanks for learning with the DigitalOcean Community. Check out our offerings for compute, storage, networking, and managed databases.
About the author
Independent Technical writer, WordPress developer and Linux administrator.
Still looking for an answer?
This textbox defaults to using Markdown to format your answer.
You can type !ref in this text area to quickly search our full set of tutorials, documentation & marketplace offerings and insert the link!
Great tutorial and works as it should on Ubuntu 12.04 LTS, but I have one little problem. When I go to godaddy Im not able to add ds records. WHen I click on Add DS records nothing happens. Godaddy is a strange registrar :(
Nice article. Just wanted to point out that there is a little typo in your DNS Poisoning link to Wikipedia. Should be http://en.wikipedia.org/wiki/DNS_cache_poisoning.
Nice write up! Only one concern from my perspective. Would it not be better to generate dnskey with RSASHA256 algorithm to be compatible with the ICANN root implementation of DNSSEC?
This comment has been deleted
Great tutorial! However for the step of creating the salt and everything instead of doing:
dnssec-signzone -A -3 $(head -c 1000 /dev/random | sha1sum | cut -b 1-16) -N INCREMENT -o example.com -t example.com.zone
Doing this I was getting an invalid variable error, so I changed it up a little and did this instead:
dnssec-signzone -A -3 `head -c 1000 /dev/urandom | sha1sum | cut -b 1-16` -N INCREMENT -o example.com -t example.com.zone
try this for simple signzone
dnssec-signzone -t -g -o example.com example.com.zone /etc/keys/Kexample.com*.private
Thank you for this great tutorial. I’ve used it on my Debian server for a .net and a .eu domain.
When entering DS-records for a .eu domain (also GoDaddy) one need to enter “flags”, “protocol”, “key data alg” and “public key”. This differs from your example were one is entering “key tag”, “algoritm”, “digest type” and “digest”.
I did find out the hard way that there is a need for resigning of the zones in order to prevent expired records after 30 days.
Also “dnsviz.net” finds problems that “dnssec-debugger.verisignlabs.com” don’t see.
The use of “-N increment” at the “dnssec-signzone” command line in zonesigner.sh seems superfluous, since you increment the serial within the zonefile with sed.
It is a good one for beginners!
I tried to run “/usr/sbin/zonesigner.sh example.com example.com.zone” in crontab, but it was not successful.
I could get salt changed by running the same command manually. In crontab, I asked the command to write stdout to a log file which has only part of the whole output I expect.
For example, if I run the following command manually, I get the first half of the output in cronrun log file. In such case, salt is successfully changed. /usr/sbin/zonesigner.sh home db.home >>/var/log/cronrun sed: -e expression #1, char 0: no previous regular expression Verifying the zone using the following algorithms: NSEC3RSASHA1. Zone fully signed: Algorithm: NSEC3RSASHA1: KSKs: 1 active, 0 stand-by, 0 revoked ZSKs: 1 active, 0 stand-by, 0 revoked
When crontab runs the same command, I only see the second half of the output in cronrun log, and the salt is not changed in such case. db.home.signed Signatures generated: 43 Signatures retained: 0 Signatures dropped: 0 Signatures successfully verified: 0 Signatures unsuccessfully verified: 0 Signing time in seconds: 3.673 Signatures per second: 11.706 Runtime in seconds: 3.916
If I just run the command without redirecting output to a log file, I get both the above outputs once. And salt is updated correctly.
Not sure why is that… Thank you!
Thank you for this tutorial i need help, i am stuck at the “dnssec-signzone” command, i am getting a ttl problem :
dnssec-signzone -A -3 $(head -c 1000 /dev/random | sha1sum | cut -b 1-16) -N INCREMENT -o example.com -t example.com.zone
dnssec-signzone: warning: Kexample.com.+008+48907.key:5: no TTL specified; zone rejected dnssec-signzone: fatal: failed loading zone from ‘example.com.zone’: no ttl
is there any hint ? thanks a lot
 This work is licensed under a Creative Commons Attribution-NonCommercial- ShareAlike 4.0 International License.
Become a contributor for community
Get paid to write technical tutorials and select a tech-focused charity to receive a matching donation.

DigitalOcean Documentation
Full documentation for every DigitalOcean product.

Resources for startups and AI-native businesses
The Wave has everything you need to know about building a business, from raising funding to marketing your product.
The developer cloud
Scale up as you grow — whether you're running one virtual machine or ten thousand.

Start building today
From GPU-powered inference and Kubernetes to managed databases and storage, get everything you need to build, scale, and deploy intelligent applications.
